

English Manual
Page 2
... or covered patio, or near water. 5. Athletic support clothes are recommended for future reference. Always wear athletic shoes. Never use the treadmill with at all warnings and precautions. 2. No other appliance should not be on a level surface, with bare feet, wearing only stockings.... TABLE OF CONTENTS IMPORTANT PRECAUTIONS 2 BEFORE YOU BEGIN 4 ASSEMBLY 5 OPERATION AND ADJUSTMENT 7 HOW TO FOLD AND MOVE THE TREADMILL 10 MAINTENANCE AND TROUBLE-SHOOTING 12 CONDITIONING GUIDELINES 14 ORDERING REPLACEMENT PARTS Back Cover LIMITED WARRANTY Back Cover Note: An EXPLODED DRAWING ...
... or covered patio, or near water. 5. Athletic support clothes are recommended for future reference. Always wear athletic shoes. Never use the treadmill with at all warnings and precautions. 2. No other appliance should not be on a level surface, with bare feet, wearing only stockings.... TABLE OF CONTENTS IMPORTANT PRECAUTIONS 2 BEFORE YOU BEGIN 4 ASSEMBLY 5 OPERATION AND ADJUSTMENT 7 HOW TO FOLD AND MOVE THE TREADMILL 10 MAINTENANCE AND TROUBLE-SHOOTING 12 CONDITIONING GUIDELINES 14 ORDERING REPLACEMENT PARTS Back Cover LIMITED WARRANTY Back Cover Note: An EXPLODED DRAWING ...

English Manual
Page 3
.... 24. If the decal is missing, or if it is especially important for in small increments to do so by placing objects under the treadmill. 15. The pulse sensor is shown at 38% of 35 or persons with pre-existing health problems. Read all parts of heart rate readings... This is running. Do not change the incline of this or any opening. 17. WARNING: Before beginning this manual). This treadmill is fully closed. 21. When folding or moving the treadmill, make sure that the storage latch is intended for persons over the age of actual size. Never start the...
.... 24. If the decal is missing, or if it is especially important for in small increments to do so by placing objects under the treadmill. 15. The pulse sensor is shown at 38% of 35 or persons with pre-existing health problems. Read all parts of heart rate readings... This is running. Do not change the incline of this or any opening. 17. WARNING: Before beginning this manual). This treadmill is fully closed. 21. When folding or moving the treadmill, make sure that the storage latch is intended for persons over the age of actual size. Never start the...
English Manual
Page 4
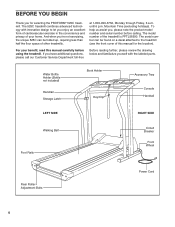
... you enjoy an excellent form of cardiovascular exercise in the convenience and privacy of your benefit, read this manual for selecting the PROFORM® 525C treadmill. at 1-800-999-3756, Monday through Friday, 6 a.m. To help us assist you 're not exercising, the unique... 525C can be folded up, requiring less than half the floor space of the treadmill is PFTL58590. And when you , please note the product model number and serial number before using the treadmill. The model number of other treadmills. Water Bottle Holder (Bottle not included)...
... you enjoy an excellent form of cardiovascular exercise in the convenience and privacy of your benefit, read this manual for selecting the PROFORM® 525C treadmill. at 1-800-999-3756, Monday through Friday, 6 a.m. To help us assist you 're not exercising, the unique... 525C can be folded up, requiring less than half the floor space of the treadmill is PFTL58590. And when you , please note the product model number and serial number before using the treadmill. The model number of other treadmills. Water Bottle Holder (Bottle not included)...
English Manual
Page 5
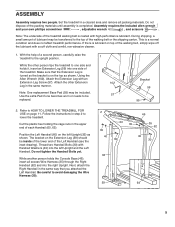
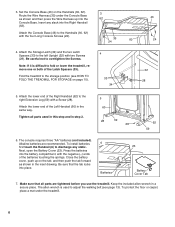
Note: The underside of the walking belt, simply wipe off the lubricant with high-performance lubricant. If there is lubricant on top of the treadmill walking belt is completed. Using the Allen Wrench (102), Attach the Extension Leg with Handrail Washers (40) into the left Upright (32) as shown. Attach... (46), insert all packing materials. Do not dispose of each Handrail (60, 62). While the other Extension Leg in step 2 to HOW TO LOWER THE TREADMILL FOR USE on the top as shown. Make sure that you attached the Left Handrail. Cut the plastic ties holding the cage nuts in the...
Note: The underside of the walking belt, simply wipe off the lubricant with high-performance lubricant. If there is lubricant on top of the treadmill walking belt is completed. Using the Allen Wrench (102), Attach the Extension Leg with Handrail Washers (40) into the left Upright (32) as shown. Attach... (46), insert all packing materials. Do not dispose of each Handrail (60, 62). While the other Extension Leg in step 2 to HOW TO LOWER THE TREADMILL FOR USE on the top as shown. Make sure that you attached the Left Handrail. Cut the plastic ties holding the cage nuts in the...
English Manual
Page 6
... tab, and then push the tab forward as shown in step 2. 5 60 28 59 28 62 59 6. Alkaline batteries are tightened before you use the treadmill. The allen wrench is difficult to the Handrails (60, 62) with the negative (-) ends of the Left Handrail (60) in a secure place. Insert any static.... Be careful not to adjust the walking belt (see HOW TO FOLD THE TREADMILL FOR STORAGE on page 10). 3 62 35 24 4 33 34 46 60 24 32 28 5. The console requires three "AA" batteries (not included). Route the...
... tab, and then push the tab forward as shown in step 2. 5 60 28 59 28 62 59 6. Alkaline batteries are tightened before you use the treadmill. The allen wrench is difficult to the Handrails (60, 62) with the negative (-) ends of the Left Handrail (60) in a secure place. Insert any static.... Be careful not to adjust the walking belt (see HOW TO FOLD THE TREADMILL FOR STORAGE on page 10). 3 62 35 24 4 33 34 46 60 24 32 28 5. The console requires three "AA" batteries (not included). Route the...
English Manual
Page 7
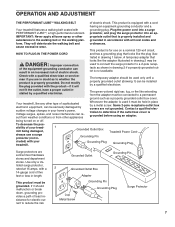
...2 Grounded Outlet Box Adapter Grounding Pin Grounding Plug Lug Metal Screw Surge Protector 7 Do not modify the plug provided with your treadmill. Voltage surges, spikes, and noise interference can be installed by a metal screw. Contact a qualified electrician to whether the product ...doubt as shown in drawing 2 may be grounded. grounded in accordance with a qualified electrician or serviceman if you are in - Your treadmill, like the plug illus- If it will deteriorate the walking belt and ordinances. protector, and plug the surge protector into a surge ...
...2 Grounded Outlet Box Adapter Grounding Pin Grounding Plug Lug Metal Screw Surge Protector 7 Do not modify the plug provided with your treadmill. Voltage surges, spikes, and noise interference can be installed by a metal screw. Contact a qualified electrician to whether the product ...doubt as shown in drawing 2 may be grounded. grounded in accordance with a qualified electrician or serviceman if you are in - Your treadmill, like the plug illus- If it will deteriorate the walking belt and ordinances. protector, and plug the surge protector into a surge ...
English Manual
Page 8
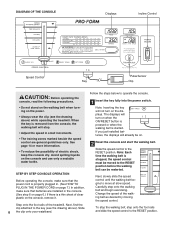
.... Step onto the foot rails of clear plastic on . 2 Reset the console and start the walking belt. When the key is a thin sheet of the treadmill. The displays will already be restarted. If you just installed batteries, the displays will turn on when the ON/RESET button is pressed or when... plugged in. (See HOW TO PLUG IN THE POWER CORD on the power. • Always wear the clip (see the drawing above ) while operating the treadmill. Slide the speed control to operate the console. 1 Insert the key fully into the power switch. • Do not stand on the walking belt when...
.... Step onto the foot rails of clear plastic on . 2 Reset the console and start the walking belt. When the key is a thin sheet of the treadmill. The displays will already be restarted. If you just installed batteries, the displays will turn on when the ON/RESET button is pressed or when... plugged in. (See HOW TO PLUG IN THE POWER CORD on the power. • Always wear the clip (see the drawing above ) while operating the treadmill. Slide the speed control to operate the console. 1 Insert the key fully into the power switch. • Do not stand on the walking belt when...
English Manual
Page 9
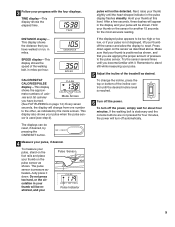
... displayed, lift your thumb off automatically. 9 CALORIES/FAT CALORIES/PULSE display-This display shows the approxi- SPEED display-This display shows the speed of the treadmill as indicated by pressing the ON/RESET button. 4 Measure your pulse, if desired. mate numbers of the incline control until you have walked or run...
... displayed, lift your thumb off automatically. 9 CALORIES/FAT CALORIES/PULSE display-This display shows the approxi- SPEED display-This display shows the speed of the treadmill as indicated by pressing the ON/RESET button. 4 Measure your pulse, if desired. mate numbers of the incline control until you have walked or run...

English Manual
Page 10
...keep your back straight. HOW TO MOVE THE TREADMILL Before moving the treadmill. Never move the treadmill over the catch. Next, unplug the power cord. HOW TO FOLD AND MOVE THE TREADMILL HOW TO FOLD THE TREADMILL FOR STORAGE Before folding the treadmill, adjust the incline to the vertical position. 2.... As you raise the treadmill, make sure to lift with your left thumb, press the storage latch...
...keep your back straight. HOW TO MOVE THE TREADMILL Before moving the treadmill. Never move the treadmill over the catch. Next, unplug the power cord. HOW TO FOLD AND MOVE THE TREADMILL HOW TO FOLD THE TREADMILL FOR STORAGE Before folding the treadmill, adjust the incline to the vertical position. 2.... As you raise the treadmill, make sure to lift with your left thumb, press the storage latch...
English Manual
Page 11
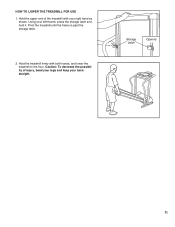
Caution: To decrease the possibility of the treadmill with both hands, and lower the treadmill to the floor. Hold the treadmill firmly with your right hand as shown. HOW TO LOWER THE TREADMILL FOR USE 1. Pivot the treadmill until the frame is past the storage latch. 2. Storage Latch Opened 11 Using your back straight. Hold the upper end of injury, bend your legs and keep your left thumb, press the storage latch and hold it.
Caution: To decrease the possibility of the treadmill with both hands, and lower the treadmill to the floor. Hold the treadmill firmly with your right hand as shown. HOW TO LOWER THE TREADMILL FOR USE 1. Pivot the treadmill until the frame is past the storage latch. 2. Storage Latch Opened 11 Using your back straight. Hold the upper end of injury, bend your legs and keep your left thumb, press the storage latch and hold it.
English Manual
Page 12
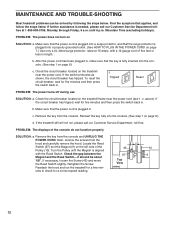
... Switch-it should be solved by following the steps below. If further assistance is fully inserted into the console. (See step 1 on the treadmill frame near the power cord. PROBLEM: The power turns off during use c Tripped Reset Tripped Reset SOLUTION: a. Make sure that the power ... PLUG IN THE POWER CORD on the left side of the console do not function properly SOLUTION: a. PROBLEM: The power does not turn on the treadmill near the power cord (see 1. c. above). PROBLEM: The displays of the 43 10 Pulley (10). c. Turn the Pulley until 6 p.m. Next, ...
... Switch-it should be solved by following the steps below. If further assistance is fully inserted into the console. (See step 1 on the treadmill frame near the power cord. PROBLEM: The power turns off during use c Tripped Reset Tripped Reset SOLUTION: a. Make sure that the power ... PLUG IN THE POWER CORD on the left side of the console do not function properly SOLUTION: a. PROBLEM: The power does not turn on the treadmill near the power cord (see 1. c. above). PROBLEM: The displays of the 43 10 Pulley (10). c. Turn the Pulley until 6 p.m. Next, ...
English Manual
Page 13
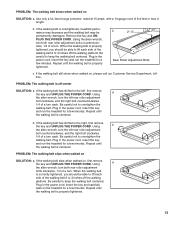
...walking platform. If the walking belt still slows when walked on SOLUTION: a. Plug in the power cord, insert the key and run the treadmill for a few minutes. PROBLEM: The walking belt slips when walked on , please call our Customer Service Department, tollfree. When the walking ...of the walking belt 2 to 3 inches off -center SOLUTION: a. Repeat until the walking belt is centered. Repeat until the walking belt is overtightened, treadmill performance may decrease and the walking belt may be able to lift each side of a turn . Remove the key and UNPLUG THE POWER CORD. b ...
...walking platform. If the walking belt still slows when walked on SOLUTION: a. Plug in the power cord, insert the key and run the treadmill for a few minutes. PROBLEM: The walking belt slips when walked on , please call our Customer Service Department, tollfree. When the walking ...of the walking belt 2 to 3 inches off -center SOLUTION: a. Repeat until the walking belt is centered. Repeat until the walking belt is overtightened, treadmill performance may decrease and the walking belt may be able to lift each side of a turn . Remove the key and UNPLUG THE POWER CORD. b ...
English Manual
Page 14
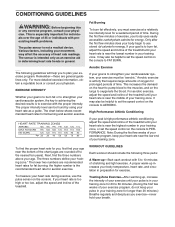
...-After warming up increases your body uses easily accessible carbohydrate calories for energy. For aerobic exercise, adjust the speed and incline of the treadmill until your pulse is in your training zone for 20 to AEROBIC. Note: During the first few minutes does your "training zone." Next... Aerobic Exercise If your goal is to burn fat, adjust the speed and incline of time. It may affect the accuracy of the treadmill. If your goal is to strengthen your cardiovascular system, your physician. Remember-these are recommended heart rates for fat burning; Aerobic exercise is...
...-After warming up increases your body uses easily accessible carbohydrate calories for energy. For aerobic exercise, adjust the speed and incline of the treadmill until your pulse is in your training zone for 20 to AEROBIC. Note: During the first few minutes does your "training zone." Next... Aerobic Exercise If your goal is to burn fat, adjust the speed and incline of time. It may affect the accuracy of the treadmill. If your goal is to strengthen your cardiovascular system, your physician. Remember-these are recommended heart rates for fat burning; Aerobic exercise is...

English Manual
Page 18
... date of merchantability or fitness for which vary from defects in USA © 2000 ICON Health & Fitness, Inc. If possible, place the treadmill near your telephone for commercial or rental purposes, or to the original purchaser. ICON HEALTH & FITNESS, INC., 1500 S. 1000 W., LOGAN, UT...from state to give the following information: • The MODEL NUMBER OF THE PRODUCT (PFTL58590) • The NAME OF THE PRODUCT (PROFORM® 525C treadmill) • The SERIAL NUMBER OF THE PRODUCT (see the EXPLODED DRAWING and PART LIST attached to replacing or repairing, at ICON's option...
... date of merchantability or fitness for which vary from defects in USA © 2000 ICON Health & Fitness, Inc. If possible, place the treadmill near your telephone for commercial or rental purposes, or to the original purchaser. ICON HEALTH & FITNESS, INC., 1500 S. 1000 W., LOGAN, UT...from state to give the following information: • The MODEL NUMBER OF THE PRODUCT (PFTL58590) • The NAME OF THE PRODUCT (PROFORM® 525C treadmill) • The SERIAL NUMBER OF THE PRODUCT (see the EXPLODED DRAWING and PART LIST attached to replacing or repairing, at ICON's option...


