
English Manual
Page 2
... of this manual. 3. Do not use an extension cord. 11. To protect the floor or carpet from the treadmill at least eight feet of clearance behind it. Do not use an extension cord. 12. Never move the walking belt while the power is not working properly. (See BEFORE YOU BEGIN on the... treadmill at 15 amps, with a 14-gauge cord of 12 and pets away from damage, place a mat under the age...
... of this manual. 3. Do not use an extension cord. 11. To protect the floor or carpet from the treadmill at least eight feet of clearance behind it. Do not use an extension cord. 12. Never move the walking belt while the power is not working properly. (See BEFORE YOU BEGIN on the... treadmill at 15 amps, with a 14-gauge cord of 12 and pets away from damage, place a mat under the age...
English Manual
Page 3
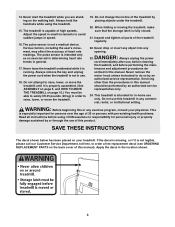
... program, consult your treadmill. If the decal is missing, or if it is not in speed. 16. Never remove the motor hood unless instructed to order a free replacement decal (see ORDERING REPLACEMENT PARTS on the walking belt. Do not use this treadmill in this manual). ...When folding or moving the treadmill, make sure that the storage latch is not a medical device. tenance and adjustment procedures de- 14...
... program, consult your treadmill. If the decal is missing, or if it is not in speed. 16. Never remove the motor hood unless instructed to order a free replacement decal (see ORDERING REPLACEMENT PARTS on the walking belt. Do not use this treadmill in this manual). ...When folding or moving the treadmill, make sure that the storage latch is not a medical device. tenance and adjustment procedures de- 14...
English Manual
Page 4
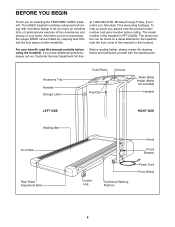
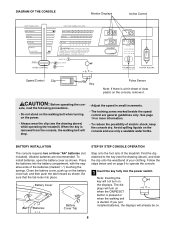
...drawing below and familiarize yourself with innovative design to the treadmill (see the front cover of other treadmills. until 6 p.m. The model number of your benefit, read this manual for selecting the PROFORM¨ 525EX treadmill. The serial number can be found on a decal... The 525EX treadmill combines advanced technology with the labeled parts. For your home. Mountain Time (excluding holidays). Accessory Tray Handrail Storage Latch Towel Rack Console Key/Clip Water Bottle Holder (Bottle not included) Handrail LEFT SIDE RIGHT SIDE Walking Belt Foot Rails Rear...
...drawing below and familiarize yourself with innovative design to the treadmill (see the front cover of other treadmills. until 6 p.m. The model number of your benefit, read this manual for selecting the PROFORM¨ 525EX treadmill. The serial number can be found on a decal... The 525EX treadmill combines advanced technology with the labeled parts. For your home. Mountain Time (excluding holidays). Accessory Tray Handrail Storage Latch Towel Rack Console Key/Clip Water Bottle Holder (Bottle not included) Handrail LEFT SIDE RIGHT SIDE Walking Belt Foot Rails Rear...
English Manual
Page 7
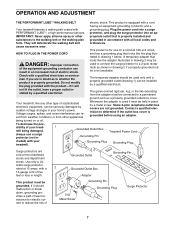
...qualified electrician. grounded in accordance with the productÑif it will deteriorate the walking belt and ordinances. Do not modify the plug provided with all local codes and form. Your treadmill, like the plug illus- Plug the power cord into an ap- cause excessive wear....drawing 1 below. To decrease the pos- This product is equipped with a cord having an equipment-grounding conductor and a Your treadmill features a walking belt coated with a qualified electrician or serviceman if you are not grounded. OPERATION AND ADJUSTMENT THE PERFORMANT LUBETM WALKING...
...qualified electrician. grounded in accordance with the productÑif it will deteriorate the walking belt and ordinances. Do not modify the plug provided with all local codes and form. Your treadmill, like the plug illus- Plug the power cord into an ap- cause excessive wear....drawing 1 below. To decrease the pos- This product is equipped with a cord having an equipment-grounding conductor and a Your treadmill features a walking belt coated with a qualified electrician or serviceman if you are not grounded. OPERATION AND ADJUSTMENT THE PERFORMANT LUBETM WALKING...
English Manual
Page 8
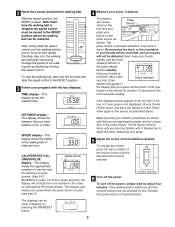
...only. Close the battery cover, push up on the displays. See page 14 or more information. ¥ To reduce the possibility of the treadmill. BATTERY INSTALLATION STEP BY STEP CONSOLE OPERATION The console requires two or three "AA" batteries (not included). Find the clip attached to operate .... sole, read the following precautions. ¥ Do not stand on the walking belt when turning on when the ON/RESET button is pressed or when the walking belt is removed from the console, the walking belt will already be on the console, remove it. Press the batteries into place....
...only. Close the battery cover, push up on the displays. See page 14 or more information. ¥ To reduce the possibility of the treadmill. BATTERY INSTALLATION STEP BY STEP CONSOLE OPERATION The console requires two or three "AA" batteries (not included). Find the clip attached to operate .... sole, read the following precautions. ¥ Do not stand on the walking belt when turning on when the ON/RESET button is pressed or when the walking belt is removed from the console, the walking belt will already be on the console, remove it. Press the batteries into place....
English Manual
Page 9
... speed control must be moved to be reset, if desired, by the mode arrows. Change the speed of the treadmill as described above. Hold your pulse. 5 Adjust the incline of the walking belt as indicated by pressing the ON/RESET button. 9 Try the sensor several times until the walking...position. 3 Follow your thumb slightly until the desired incline level is stationary and the console buttons are applying the proper amount of the walking belt, in miles per hour. TIME displayÑThis display shows the elapsed time. CALORIES/FAT CAL- Next, raise your progress with it ...
... speed control must be moved to be reset, if desired, by the mode arrows. Change the speed of the treadmill as described above. Hold your pulse. 5 Adjust the incline of the walking belt as indicated by pressing the ON/RESET button. 9 Try the sensor several times until the walking...position. 3 Follow your thumb slightly until the desired incline level is stationary and the console buttons are applying the proper amount of the walking belt, in miles per hour. TIME displayÑThis display shows the elapsed time. CALORIES/FAT CAL- Next, raise your progress with it ...
English Manual
Page 13
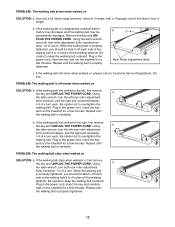
...in the power cord, insert the key and run the treadmill for a few minutes. b. Plug in the power cord, insert the key and run the treadmill for a few minutes. b. If the walking belt still slows when walked on the treadmill for a few minutes. Plug in the power cord, ...a the key and UNPLUG THE POWER CORD. Repeat until the walking belt is centered. Repeat until the walking belt is properly tightened. 13 Repeat until the walking belt is overtightened, treadmill performance may decrease and the walking belt may be able to lift each side of a turn . Be careful...
...in the power cord, insert the key and run the treadmill for a few minutes. b. Plug in the power cord, insert the key and run the treadmill for a few minutes. b. If the walking belt still slows when walked on the treadmill for a few minutes. Plug in the power cord, ...a the key and UNPLUG THE POWER CORD. Repeat until the walking belt is centered. Repeat until the walking belt is properly tightened. 13 Repeat until the walking belt is overtightened, treadmill performance may decrease and the walking belt may be able to lift each side of a turn . Be careful...


