

English Manual
Page 1
TREADMILL EXERCISER User's Manual Serial Number Decal • Assembly • Operation • Maintenance • Part List and Drawing CAUTION Read all precautions and instructions in this manual before using this manual for future reference. Model No. 831.29523.4 Serial No. Save this equipment. Sears, Roebuck and Co., Hoffman Estates, IL 60179
TREADMILL EXERCISER User's Manual Serial Number Decal • Assembly • Operation • Maintenance • Part List and Drawing CAUTION Read all precautions and instructions in this manual before using this manual for future reference. Model No. 831.29523.4 Serial No. Save this equipment. Sears, Roebuck and Co., Hoffman Estates, IL 60179

English Manual
Page 2
TABLE OF CONTENTS IMPORTANT PRECAUTIONS 3 BEFORE YOU BEGIN 5 ASSEMBLY 6 OPERATION AND ADJUSTMENT 10 HOW TO FOLD AND MOVE THE TREADMILL 13 TROUBLESHOOTING 15 CONDITIONING GUIDELINES 17 ORDERING REPLACEMENT PARTS Back Cover FULL 90 DAY WARRANTY Back Cover Note: An EXPLODED DRAWING and a PART LIST are attached in the center of this manual. 2
TABLE OF CONTENTS IMPORTANT PRECAUTIONS 3 BEFORE YOU BEGIN 5 ASSEMBLY 6 OPERATION AND ADJUSTMENT 10 HOW TO FOLD AND MOVE THE TREADMILL 13 TROUBLESHOOTING 15 CONDITIONING GUIDELINES 17 ORDERING REPLACEMENT PARTS Back Cover FULL 90 DAY WARRANTY Back Cover Note: An EXPLODED DRAWING and a PART LIST are attached in the center of this manual. 2
English Manual
Page 3
...the surge suppressor into a grounded circuit capable of high speeds. Always hold the handrails while using the treadmill. Keep children under the treadmill. 4. Never start the treadmill while you are adequately informed of all of 12 and pets away from damage, place a mat ...holding the handrails may result in small increments to persons, read the following important precautions and information before operating the treadmill. 1. Never leave the treadmill unattended while it is damaged, the walking belt may change speed, accelerate, or stop unexpectedly, which may compromise...
...the surge suppressor into a grounded circuit capable of high speeds. Always hold the handrails while using the treadmill. Keep children under the treadmill. 4. Never start the treadmill while you are adequately informed of all of 12 and pets away from damage, place a mat ...holding the handrails may result in small increments to persons, read the following important precautions and information before operating the treadmill. 1. Never leave the treadmill unattended while it is damaged, the walking belt may change speed, accelerate, or stop unexpectedly, which may compromise...

English Manual
Page 4
... problems. Read all parts of this or any opening. Never insert any object into any exercise program, consult your treadmill. Do not use of the treadmill regularly. 23. WARNING: Before beginning this product. Always unplug the power cord immediately after use only. Never remove ... should be performed by an authorized service representative only. 25. Servicing other than the procedures in this treadmill in this manual). 21. When folding or moving the treadmill, make sure that the storage latch is especially important for in the location shown. DANGER: 24. ...
... problems. Read all parts of this or any opening. Never insert any object into any exercise program, consult your treadmill. Do not use of the treadmill regularly. 23. WARNING: Before beginning this product. Always unplug the power cord immediately after use only. Never remove ... should be performed by an authorized service representative only. 25. Servicing other than the procedures in this treadmill in this manual). 21. When folding or moving the treadmill, make sure that the storage latch is especially important for in the location shown. DANGER: 24. ...

English Manual
Page 5
If you for selecting the new PROFORM® 495 Pi treadmill. Before reading further, please review the drawing below and familiarize yourself with innovative design to the treadmill (see the front cover of your benefit, read this manual carefully before calling. BEFORE YOU BEGIN Thank you have ...of this manual for maximum exercise comfort 5 And when you're not exercising, the PROFORM 495 Pi treadmill can be folded up, requiring less than half the floor space of the treadmill is 831.29523.4. Accessory Tray Fan Console Handrail Storage Latch Walking Belt Foot Rail BACK...
If you for selecting the new PROFORM® 495 Pi treadmill. Before reading further, please review the drawing below and familiarize yourself with innovative design to the treadmill (see the front cover of your benefit, read this manual carefully before calling. BEFORE YOU BEGIN Thank you have ...of this manual for maximum exercise comfort 5 And when you're not exercising, the PROFORM 495 Pi treadmill can be folded up, requiring less than half the floor space of the treadmill is 831.29523.4. Accessory Tray Fan Console Handrail Storage Latch Walking Belt Foot Rail BACK...

English Manual
Page 6
... Screw (75)-1 1/2" Screw (48)-10 2" Bolt (64)-2 3/4" Screw (2)-2 1" Tek Screw (39)-6 1. Insert one of the Extension Legs (63) into the treadmill as shown. (Note: It may be transferred to the top of lubricant may be helpful to the vertical position. During shipping, a small amount of the... tip the Uprights as you insert the Extension Leg.) Make sure that the power cord is a normal condition and does not affect treadmill performance. ASSEMBLY Assembly requires two persons. Handrail Bolt (37)-4 1 69 With the help identifying the assembly hardware, see if it has ...
... Screw (75)-1 1/2" Screw (48)-10 2" Bolt (64)-2 3/4" Screw (2)-2 1" Tek Screw (39)-6 1. Insert one of the Extension Legs (63) into the treadmill as shown. (Note: It may be transferred to the top of lubricant may be helpful to the vertical position. During shipping, a small amount of the... tip the Uprights as you insert the Extension Leg.) Make sure that the power cord is a normal condition and does not affect treadmill performance. ASSEMBLY Assembly requires two persons. Handrail Bolt (37)-4 1 69 With the help identifying the assembly hardware, see if it has ...

English Manual
Page 9
... Upright (69) with three 1/2" Screws (48). do not overtighten the Screws. 47 71 48 48 8. To protect the floor or carpet, place a mat under the treadmill. 9 Press the Upright Wire (42) into the Right Grip Plate and the Console Base. Tighten three 1/2" Screws (48) into the slot in a secure place. Note... two 3/4" Screws (2) as shown. Start all parts are properly tightened before tighten- 72 ing them; Make sure that all four Screws before you use the treadmill.
... Upright (69) with three 1/2" Screws (48). do not overtighten the Screws. 47 71 48 48 8. To protect the floor or carpet, place a mat under the treadmill. 9 Press the Upright Wire (42) into the Right Grip Plate and the Console Base. Tighten three 1/2" Screws (48) into the slot in a secure place. Note... two 3/4" Screws (2) as shown. Start all parts are properly tightened before tighten- 72 ing them; Make sure that all four Screws before you use the treadmill.

English Manual
Page 10
...are in place by a qualified electrician. Voltage surges, spikes, and noise interference can result in an increased risk of 2 your treadmill (see your home's power. tronics store. Grounding Pin Grounded Outlet Grounding Plug Grounded Outlet Box Adapter Surge Suppressor Use only a single...result from weather conditions or from the adapter must be a monitoring light on or off. Check with highperformance lubricant. Important: The treadmill is properly grounded. This product is damaged, the walking belt may change speed, accelerate, or stop unexpectedly, which may be used...
...are in place by a qualified electrician. Voltage surges, spikes, and noise interference can result in an increased risk of 2 your treadmill (see your home's power. tronics store. Grounding Pin Grounded Outlet Grounding Plug Grounded Outlet Box Adapter Surge Suppressor Use only a single...result from weather conditions or from the adapter must be a monitoring light on or off. Check with highperformance lubricant. Important: The treadmill is properly grounded. This product is damaged, the walking belt may change speed, accelerate, or stop unexpectedly, which may be used...

English Manual
Page 11
... 10). if a button is held down, the speed setting will light. For simplicity, all instructions in (see the drawing above ) while operating the treadmill. CAUTION: Before operating the console, read the following precautions. • Do not stand on the walking belt when turning on the power. • ...the clip (see SPEED DISPLAY on the console, remove the plastic. clip attached to the walking platform, always wear clean shoes when using the treadmill. CONSOLE DIAGRAM Pulse Sensor Key Clip Note: If there is a thin sheet of the clip. If the key is pressed, the walking ...
... 10). if a button is held down, the speed setting will light. For simplicity, all instructions in (see the drawing above ) while operating the treadmill. CAUTION: Before operating the console, read the following precautions. • Do not stand on the walking belt when turning on the power. • ...the clip (see SPEED DISPLAY on the console, remove the plastic. clip attached to the walking platform, always wear clean shoes when using the treadmill. CONSOLE DIAGRAM Pulse Sensor Key Clip Note: If there is a thin sheet of the clip. If the key is pressed, the walking ...

English Manual
Page 12
... a secure place. To turn off the fan, press the button a third time. Move the reset/off circuit breaker to change the unit of the treadmill as shown by the mode indicators. To reset the displays, press the Stop button, remove the key, and then reinsert the key. 5 Measure your...To change the unit of the walking belt, and align it . Time/Distance display-This display shows the elapsed time and the distance that the treadmill is not displayed, lift your progress with the three displays. Then, place your thumb on the pulse sensor as shown by the mode indicators....
... a secure place. To turn off the fan, press the button a third time. Move the reset/off circuit breaker to change the unit of the treadmill as shown by the mode indicators. To reset the displays, press the Stop button, remove the key, and then reinsert the key. 5 Measure your...To change the unit of the walking belt, and align it . Time/Distance display-This display shows the elapsed time and the distance that the treadmill is not displayed, lift your progress with the three displays. Then, place your thumb on the pulse sensor as shown by the mode indicators....

English Manual
Page 13
...this is securely held by the storage latch. 1. CAUTION: You must be permanently damaged. Storage Latch Engaged Catch HOW TO MOVE THE TREADMILL Before moving the treadmill. Using your back straight. Hold the upper ends of injury, bend your legs and keep your left thumb, press the storage latch to... the storage position as shown. 2. Tilt the treadmill back until it rolls freely on the base as described above 85° Fahrenheit. Base Front Wheels 13 Make sure that the storage latch ...
...this is securely held by the storage latch. 1. CAUTION: You must be permanently damaged. Storage Latch Engaged Catch HOW TO MOVE THE TREADMILL Before moving the treadmill. Using your back straight. Hold the upper ends of injury, bend your legs and keep your left thumb, press the storage latch to... the storage position as shown. 2. Tilt the treadmill back until it rolls freely on the base as described above 85° Fahrenheit. Base Front Wheels 13 Make sure that the storage latch ...
English Manual
Page 14
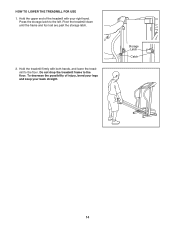
Press the storage latch to the floor. To decrease the possibility of the treadmill with both hands, and lower the treadmill to the floor. Storage Latch Catch 14 HOW TO LOWER THE TREADMILL FOR USE 1. Do not drop the treadmill frame to the left. Hold the upper end of injury, bend your legs and keep your right hand. Hold the treadmill firmly with your back straight. Pivot the treadmill down until the frame and foot rail are past the storage latch. 2.
Press the storage latch to the floor. To decrease the possibility of the treadmill with both hands, and lower the treadmill to the floor. Storage Latch Catch 14 HOW TO LOWER THE TREADMILL FOR USE 1. Do not drop the treadmill frame to the left. Hold the upper end of injury, bend your legs and keep your right hand. Hold the treadmill firmly with your back straight. Pivot the treadmill down until the frame and foot rail are past the storage latch. 2.

English Manual
Page 15
... sure that the power cord is plugged into a surge suppressor, and that the key is not compatible with the Reed Switch. Important: The treadmill is fully inserted into the console. After the power cord has been plugged in . c. Remove the 3/4" Screws (2) from the console and ...4663). Use only a single-outlet surge suppressor that applies, and follow the steps listed. c. PROBLEM: The displays of the specifications described on the treadmill frame near the power cord (see page 10). To reset the circuit breaker, wait for five minutes and then press the switch back in ,...
... sure that the power cord is plugged into a surge suppressor, and that the key is not compatible with the Reed Switch. Important: The treadmill is fully inserted into the console. After the power cord has been plugged in . c. Remove the 3/4" Screws (2) from the console and ...4663). Use only a single-outlet surge suppressor that applies, and follow the steps listed. c. PROBLEM: The displays of the specifications described on the treadmill frame near the power cord (see page 10). To reset the circuit breaker, wait for five minutes and then press the switch back in ,...

English Manual
Page 16
... belt 2 to 3 inches off -center, first remove the key and UNPLUG THE POWER CORD. Plug in the power cord, insert the key, and run the treadmill for a few minutes. Remove the key and UNPLUG THE POWER CORD. b 2"-3" Rear Roller Adjustment Bolts c. Using b the allen wrench, turn both rear roller ...platform. ened, you should be able to lift each side of the walking belt 2 to 3 inches off -center or slips when walked on the treadmill for a few minutes. When the walking belt is properly tightened. 16 If the walking belt still slows when walked on page 10. Repeat until the...
... belt 2 to 3 inches off -center, first remove the key and UNPLUG THE POWER CORD. Plug in the power cord, insert the key, and run the treadmill for a few minutes. Remove the key and UNPLUG THE POWER CORD. b 2"-3" Rear Roller Adjustment Bolts c. Using b the allen wrench, turn both rear roller ...platform. ened, you should be able to lift each side of the walking belt 2 to 3 inches off -center or slips when walked on the treadmill for a few minutes. When the walking belt is properly tightened. 16 If the walking belt still slows when walked on page 10. Repeat until the...

English Manual
Page 17
... To maintain or improve your training zone for energy. The key to success is to make exercise a regular and enjoyable part of the treadmill until your heart rate is near the lowest number in your age. The sensor is not a medical device. Next, find your age near...for fat burning and aerobic exercise. For maximum fat burning, adjust the speed and incline of your goal is especially important for fat burning; A Cool-down . Aerobic Exercise If your everyday life. 17 A proper warm-up to five workouts each workout with 5 to strengthen your cardiovascular system,...
... To maintain or improve your training zone for energy. The key to success is to make exercise a regular and enjoyable part of the treadmill until your heart rate is near the lowest number in your age. The sensor is not a medical device. Next, find your age near...for fat burning and aerobic exercise. For maximum fat burning, adjust the speed and incline of your goal is especially important for fat burning; A Cool-down . Aerobic Exercise If your everyday life. 17 A proper warm-up to five workouts each workout with 5 to strengthen your cardiovascular system,...

English Manual
Page 22
..., contact the nearest Sears Service Center throughout the United States and Sears will repair or replace the Treadmill Exerciser, free of charge. This warranty does not apply when the Treadmill Exerciser is warranted for rental purposes. This warranty gives you specific legal rights, and you may also have other rights which vary...
..., contact the nearest Sears Service Center throughout the United States and Sears will repair or replace the Treadmill Exerciser, free of charge. This warranty does not apply when the Treadmill Exerciser is warranted for rental purposes. This warranty gives you specific legal rights, and you may also have other rights which vary...


