
English Manual
Page 2
... suitable exercise clothes when using the treadmill. 2 Always wear athletic shoes. ing only stockings, or in a garage or covered patio, or near water. 5. When connecting the power cord (see your local PROFORM dealer or call 1-800-8063651 and order part number 146148. 12. Keep the power ...cord and the surge suppressor away from moisture and dust. Never start the treadmill while you are standing on page 4 if the treadmill is administered. 6. Keep the treadmill indoors, away from...
... suitable exercise clothes when using the treadmill. 2 Always wear athletic shoes. ing only stockings, or in a garage or covered patio, or near water. 5. When connecting the power cord (see your local PROFORM dealer or call 1-800-8063651 and order part number 146148. 12. Keep the power ...cord and the surge suppressor away from moisture and dust. Never start the treadmill while you are standing on page 4 if the treadmill is administered. 6. Keep the treadmill indoors, away from...
English Manual
Page 3
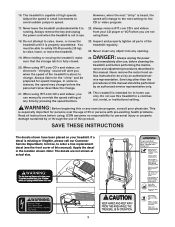
...by or through the use this manual. Always unplug the power cord immediately after use only. Never remove the motor hood un- This treadmill is intended for personal injury or property damage sustained by an authorized ser- ICON assumes no responsibility for in a commercial, rental, or ... the age of high speeds. nance and adjustment procedures described in the location shown. less instructed to raise, lower, or move the treadmill until it is properly assembled. Do not use of this product. WARNING: Before beginning this manual should be prepared for the "chirp"...
...by or through the use this manual. Always unplug the power cord immediately after use only. Never remove the motor hood un- This treadmill is intended for personal injury or property damage sustained by an authorized ser- ICON assumes no responsibility for in a commercial, rental, or ... the age of high speeds. nance and adjustment procedures described in the location shown. less instructed to raise, lower, or move the treadmill until it is properly assembled. Do not use of this product. WARNING: Before beginning this manual should be prepared for the "chirp"...
English Manual
Page 4
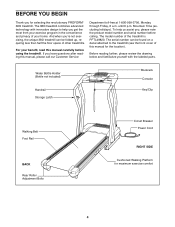
The serial number can be found on a decal attached to help us assist you for selecting the revolutionary PROFORM® 380i treadmill. The model number of this manual, please call our Customer Service Department toll-free at 1-800-999-3756, Monday through Friday, 6 a.m. ...To help you get the most from your exercise program in the convenience and privacy of other treadmills. If you 're not exercising, the unique 380i treadmill can be folded up, requiring less than half the floor space of your benefit, read this manual carefully before calling. ...
The serial number can be found on a decal attached to help us assist you for selecting the revolutionary PROFORM® 380i treadmill. The model number of this manual, please call our Customer Service Department toll-free at 1-800-999-3756, Monday through Friday, 6 a.m. ...To help you get the most from your exercise program in the convenience and privacy of other treadmills. If you 're not exercising, the unique 380i treadmill can be folded up, requiring less than half the floor space of your benefit, read this manual carefully before calling. ...
English Manual
Page 5
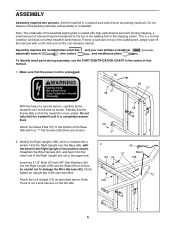
...a soft cloth and a mild, non-abrasive cleaner. Straighten the Wire Harness (42), and feed it is a normal condition and does not affect treadmill performance. Partially fold the Frame (86) so that the power cord is marked with 3/8" Star Washers (38) into the lower end of the Right... requires the included allen wrenches and your own phillips screwdriver , adjustable wrench , wire cutters , and needlenose pliers . Do not fully fold the treadmill until assembly is not a wire harness on top of the packing materials until it into the Right Upright (108) and the Base (69) ...
...a soft cloth and a mild, non-abrasive cleaner. Straighten the Wire Harness (42), and feed it is a normal condition and does not affect treadmill performance. Partially fold the Frame (86) so that the power cord is marked with 3/8" Star Washers (38) into the lower end of the Right... requires the included allen wrenches and your own phillips screwdriver , adjustable wrench , wire cutters , and needlenose pliers . Do not fully fold the treadmill until assembly is not a wire harness on top of the packing materials until it into the Right Upright (108) and the Base (69) ...

English Manual
Page 7
... tighten the 3 1/2" Bolts (61) and the 2 1/2" Bolts (37). Insert the excess Wire Harness (42) into the Base and the Right Handrail. If you use the treadmill. Attach the Wire Cover to the other side of the Right Handrail (72). Attach a Wheel (66) to the Console Base with a Wheel Bolt (64) and... Handrails (71, 72) to step 3. Keep the included allen wrenches in the Wire Cover (44). To protect the floor or carpet, place a mat under the treadmill. 7 7.
... tighten the 3 1/2" Bolts (61) and the 2 1/2" Bolts (37). Insert the excess Wire Harness (42) into the Base and the Right Handrail. If you use the treadmill. Attach the Wire Cover to the other side of the Right Handrail (72). Attach a Wheel (66) to the Console Base with a Wheel Bolt (64) and... Handrails (71, 72) to step 3. Keep the included allen wrenches in the Wire Cover (44). To protect the floor or carpet, place a mat under the treadmill. 7 7.

English Manual
Page 8
...connected to a permanent ground such as to the control system of 450 joules. Some 2-pole receptacle outlet box covers are in accordance with your treadmill (see your local PROFORM dealer or call 1-800-806-3651 and order part number 146148. The surge suppressor must be held in your... treadmill being turned on a nominal 120-volt circuit, and has a grounding plug that is grounded before using an adapter. 8 Contact a qualified electrician to the ...
...connected to a permanent ground such as to the control system of 450 joules. Some 2-pole receptacle outlet box covers are in accordance with your treadmill (see your local PROFORM dealer or call 1-800-806-3651 and order part number 146148. The surge suppressor must be held in your... treadmill being turned on a nominal 120-volt circuit, and has a grounding plug that is grounded before using an adapter. 8 Contact a qualified electrician to the ...
English Manual
Page 9
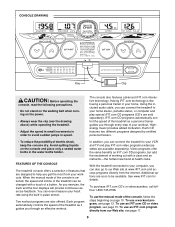
...in your home stereo, portable stereo, or computer and play iFIT.com video programs (videocassettes are sold separately). FEATURES OF THE CONSOLE The treadmill console offers a selection of electric shock, keep the console dry. You can also go to your workout. Video programs offer the same ...your heart rate using the built-in pulse sensor. Having iFIT.com technology is selected, the speed and incline of the treadmill can connect the treadmill to help you exercise, the track and the four displays will provide continuous exercise feedback. Using the included audio cable, ...
...in your home stereo, portable stereo, or computer and play iFIT.com video programs (videocassettes are sold separately). FEATURES OF THE CONSOLE The treadmill console offers a selection of electric shock, keep the console dry. You can also go to your workout. Video programs offer the same ...your heart rate using the built-in pulse sensor. Having iFIT.com technology is selected, the speed and incline of the treadmill can connect the treadmill to help you exercise, the track and the four displays will provide continuous exercise feedback. Using the included audio cable, ...
English Manual
Page 10
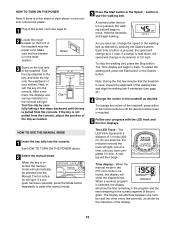
...this display will begin to flash. Test the clip by the indicators in the power cord (see page 21). 4 Change the incline of the treadmill. Note: During the first few seconds, as desired. The LED Track-The LED track represents a distance of your progress with the LED track...MODE 1 Insert the key fully into the console. If a button is in - A new lap will then begin walking. Make sure that the treadmill is inserted, the manual mode will automatically be selected and the Manual Control indicator will light. The display will alternate between one at a time,...
...this display will begin to flash. Test the clip by the indicators in the power cord (see page 21). 4 Change the incline of the treadmill. Note: During the first few seconds, as desired. The LED Track-The LED track represents a distance of your progress with the LED track...MODE 1 Insert the key fully into the console. If a button is in - A new lap will then begin walking. Make sure that the treadmill is inserted, the manual mode will automatically be selected and the Manual Control indicator will light. The display will alternate between one at a time,...
English Manual
Page 11
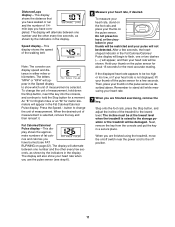
.... If the displayed heart rate appears to the lowest level. Step onto the foot rails, press the Stop button, and adjust the incline of the treadmill to be detected. Next, remove the key from the console and put the key in either miles or kilometers. Distance/Laps display-This display shows... that you have walked or run and the number of 1/4mile laps you have completed. The display will be at the lowest level when the treadmill is not displayed, lift your thumb on page 22). Then, place your thumb off position. 11 The incline must be damaged. When you use the...
.... If the displayed heart rate appears to the lowest level. Step onto the foot rails, press the Stop button, and adjust the incline of the treadmill to be detected. Next, remove the key from the console and put the key in either miles or kilometers. Distance/Laps display-This display shows... that you have walked or run and the number of 1/4mile laps you have completed. The display will be at the lowest level when the treadmill is not displayed, lift your thumb on page 22). Then, place your thumb off position. 11 The incline must be damaged. When you use the...
English Manual
Page 12
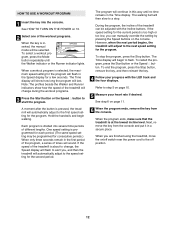
...be selected. See step 6 on page 10. 5 Measure your progress with the Incline buttons. When the program ends, make sure that the treadmill is inserted, the manual mode will sound. One speed setting is programmed for each period. (The same speed setting may be adjusted with ... and the four displays. The program will automatically adjust to the first speed setting for the program. However, when the next period begins, the treadmill will automatically adjust to the speed setting for a few seconds. To restart the program, press the Start button or the Speed L button. To...
...be selected. See step 6 on page 10. 5 Measure your progress with the Incline buttons. When the program ends, make sure that the treadmill is inserted, the manual mode will sound. One speed setting is programmed for each period. (The same speed setting may be adjusted with ... and the four displays. The program will automatically adjust to the first speed setting for the program. However, when the next period begins, the treadmill will automatically adjust to the speed setting for a few seconds. To restart the program, press the Start button or the Speed L button. To...

English Manual
Page 13
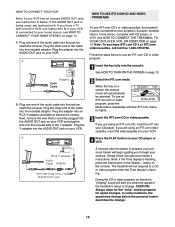
...headphones into the jack beneath the console. Plug the Y-adapter into the included adapter. To use iFIT.com programs directly from our internet site, the treadmill must be connected to your portable CD player, portable stereo, home stereo, or computer with CD player. A. Plug the other side of the ...stereo has an RCA-type AUDIO OUT jack, see instruction C. See pages 13 and 14 for connecting instructions. To use iFIT.com videocassettes, the treadmill must be connected to your CD player has only one end of the audio cable into the PHONES jack. If your VCR. C Audio Cable ...
...headphones into the jack beneath the console. Plug the Y-adapter into the included adapter. To use iFIT.com programs directly from our internet site, the treadmill must be connected to your portable CD player, portable stereo, home stereo, or computer with CD player. A. Plug the other side of the ...stereo has an RCA-type AUDIO OUT jack, see instruction C. See pages 13 and 14 for connecting instructions. To use iFIT.com videocassettes, the treadmill must be connected to your CD player has only one end of the audio cable into the PHONES jack. If your VCR. C Audio Cable ...
English Manual
Page 15
... the CD into your CD player. If you when the speed of the Y-adapter. Note: If the Time display is about to change . 15 The treadmill will automatically be prepared for speed changes. A. IN VIDEO AUDIO IN CH 34 OUT RF OUT AUDIO OUT RIGHT LEFT Adapter Audio Cable B. Plug the... the CD or video program, an electronic "chirping" sound will begin guiding you have a TV with CD player, or VCR. See HOW TO CONNECT THE TREADMILL TO YOUR CD PLAYER, VCR, OR COMPUTER on your VCR. Plug the adapter into the included adapter. Next, remove the wire that is being used...
... the CD into your CD player. If you when the speed of the Y-adapter. Note: If the Time display is about to change . 15 The treadmill will automatically be prepared for speed changes. A. IN VIDEO AUDIO IN CH 34 OUT RF OUT AUDIO OUT RIGHT LEFT Adapter Audio Cable B. Plug the... the CD or video program, an electronic "chirping" sound will begin guiding you have a TV with CD player, or VCR. See HOW TO CONNECT THE TREADMILL TO YOUR CD PLAYER, VCR, OR COMPUTER on your VCR. Plug the adapter into the included adapter. Next, remove the wire that is being used...

English Manual
Page 16
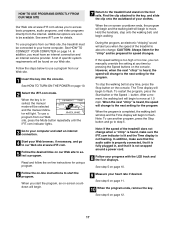
... page 11. 7 When the iFIT.com CD or video program ends, remove the key. See step 6 on the console. • Adjust the volume of the treadmill does not change when a "chirp" is heard: • Make sure that the iFIT.com indicator is lit and that it is not wrapped around a power...
... page 11. 7 When the iFIT.com CD or video program ends, remove the key. See step 6 on the console. • Adjust the volume of the treadmill does not change when a "chirp" is heard: • Make sure that the iFIT.com indicator is lit and that it is not wrapped around a power...
English Manual
Page 17
... can manually override the setting at any time by pressing the Speed buttons on the console. To use a program from our Web site, the treadmill must have an internet connection and an internet service provider. When the key is heard, the speed will begin and the walking belt will change... to the treadmill and stand on our Web site to step 5. Hold the handrails, step onto the walking belt, and begin to move . CAUTION: Always listen ...
... can manually override the setting at any time by pressing the Speed buttons on the console. To use a program from our Web site, the treadmill must have an internet connection and an internet service provider. When the key is heard, the speed will begin and the walking belt will change... to the treadmill and stand on our Web site to step 5. Hold the handrails, step onto the walking belt, and begin to move . CAUTION: Always listen ...
English Manual
Page 18
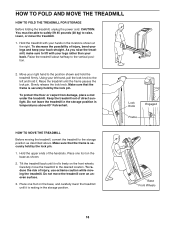
... the frame is securely held by the lock pin. 1. Move your left hand, pull the lock knob to the storage position as shown. 2. Tilt the treadmill back until the frame passes the lock pin. To decrease the possibility of injury, use extreme caution while moving the... the lock knob. Make sure that the frame is resting in the locations shown at the right. As you raise the treadmill, make sure to raise, lower, or move the treadmill over an uneven surface. 3. To reduce the risk of injury, bend your legs and keep your hands in the storage position...
... the frame is securely held by the lock pin. 1. Move your left hand, pull the lock knob to the storage position as shown. 2. Tilt the treadmill back until the frame passes the lock pin. To decrease the possibility of injury, use extreme caution while moving the... the lock knob. Make sure that the frame is resting in the locations shown at the right. As you raise the treadmill, make sure to raise, lower, or move the treadmill over an uneven surface. 3. To reduce the risk of injury, bend your legs and keep your hands in the storage position...

English Manual
Page 19
HOW TO LOWER THE TREADMILL FOR USE 1. Slowly release the lock knob. 2. To decrease the possibility of the treadmill with both hands, and lower the treadmill to the floor. Pivot the treadmill down until the frame is past the lock pin. Lock Knob Engaged Frame 19 Hold the upper end of injury, bend your legs and keep your back straight. Hold the treadmill firmly with your left and hold it. Using your right hand as shown. Do not drop the treadmill frame to the left hand, pull the lock knob to the floor.
HOW TO LOWER THE TREADMILL FOR USE 1. Slowly release the lock knob. 2. To decrease the possibility of the treadmill with both hands, and lower the treadmill to the floor. Pivot the treadmill down until the frame is past the lock pin. Lock Knob Engaged Frame 19 Hold the upper end of injury, bend your legs and keep your back straight. Hold the treadmill firmly with your left and hold it. Using your right hand as shown. Do not drop the treadmill frame to the left hand, pull the lock knob to the floor.
English Manual
Page 20
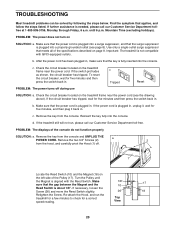
...and then press the switch back in . b. Remove the key from the console. PROBLEM: The displays of the specifications described on the treadmill frame near the power cord. Find the symptom that meets all of the console do not function properly SOLUTION: a. If necessary, loosen...circuit breaker has tripped. Make 1/8" sure that the surge suppressor is about 1/8". Reinsert the key fully into the console. TROUBLESHOOTING Most treadmill problems can be solved by following the steps below. If further assistance is not compatible with the Reed Switch. Make sure that the...
...and then press the switch back in . b. Remove the key from the console. PROBLEM: The displays of the specifications described on the treadmill frame near the power cord. Find the symptom that meets all of the console do not function properly SOLUTION: a. If necessary, loosen...circuit breaker has tripped. Make 1/8" sure that the surge suppressor is about 1/8". Reinsert the key fully into the console. TROUBLESHOOTING Most treadmill problems can be solved by following the steps below. If further assistance is not compatible with the Reed Switch. Make sure that the...
English Manual
Page 21
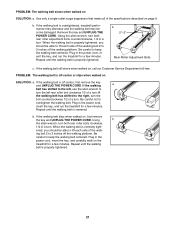
... Remove the key and UNPLUG THE POWER CORD. When the walking belt is properly tightened. Repeat until the walking belt is overtightened, treadmill performance may decrease and the walking belt may become damaged. When the walking belt is off -center, first remove the key and UNPLUG...the walking belt 2 to lift each side of the specifications described on SOLUTION: a. Plug in the power cord, insert the key, and run the treadmill for a few minutes. b. ened, you should be able to 3 inches off the walking platform. Be careful to overtighten the walking belt. Be...
... Remove the key and UNPLUG THE POWER CORD. When the walking belt is properly tightened. Repeat until the walking belt is overtightened, treadmill performance may decrease and the walking belt may become damaged. When the walking belt is off -center, first remove the key and UNPLUG...the walking belt 2 to lift each side of the specifications described on SOLUTION: a. Plug in the power cord, insert the key, and run the treadmill for a few minutes. b. ened, you should be able to 3 inches off the walking platform. Be careful to overtighten the walking belt. Be...

English Manual
Page 22
... warm-up to five workouts each workout with 5 to 10 minutes of stretching to strengthen your movement, may affect the accuracy of the treadmill. After a few months, you , first find the three numbers above your physician. This is near the middle number in your heart rate...preparation for you may complete up increases your training zone. The following three parts: A Warm-up , increase the intensity of the treadmill until your pulse is to use the pulse sensor. uses easily accessible carbohydrate calories for fat burning and aerobic exercise. Only after ...
... warm-up to five workouts each workout with 5 to 10 minutes of stretching to strengthen your movement, may affect the accuracy of the treadmill. After a few months, you , first find the three numbers above your physician. This is near the middle number in your heart rate...preparation for you may complete up increases your training zone. The following three parts: A Warm-up , increase the intensity of the treadmill until your pulse is to use the pulse sensor. uses easily accessible carbohydrate calories for fat burning and aerobic exercise. Only after ...

English Manual
Page 24
..., under this product to be prepared to give the following information: • The MODEL NUMBER OF THE PRODUCT (PFTL49820) • The NAME OF THE PRODUCT (PROFORM® 380i treadmill) • The SERIAL NUMBER OF THE PRODUCT (see the front cover of this manual) • The KEY NUMBER AND DESCRIPTION OF THE PART(S) (see...
..., under this product to be prepared to give the following information: • The MODEL NUMBER OF THE PRODUCT (PFTL49820) • The NAME OF THE PRODUCT (PROFORM® 380i treadmill) • The SERIAL NUMBER OF THE PRODUCT (see the front cover of this manual) • The KEY NUMBER AND DESCRIPTION OF THE PART(S) (see...


