
English Manual
Page 3
...all times. 7. It is not working properly. (See BEFORE YOU BEGIN on the treadmill at least eight feet of 12 and pets away from heated surfaces. 14. Do not place the treadmill on the walking belt. Never allow more amps. Athletic support clothes are used only by experienced users. 19.... If the control system is not in sandals. 10. Do not put the treadmill in a fall and serious injury. 13. Always remove the key and unplug the power cord when the treadmill is damaged, the walking belt may change speed or stop unexpectedly, which may result in a garage or covered...
...all times. 7. It is not working properly. (See BEFORE YOU BEGIN on the treadmill at least eight feet of 12 and pets away from heated surfaces. 14. Do not place the treadmill on the walking belt. Never allow more amps. Athletic support clothes are used only by experienced users. 19.... If the control system is not in sandals. 10. Do not put the treadmill in a fall and serious injury. 13. Always remove the key and unplug the power cord when the treadmill is damaged, the walking belt may change speed or stop unexpectedly, which may result in a garage or covered...
English Manual
Page 5
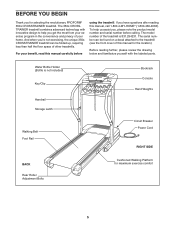
...PROFORM® 350s CROSSTRAINER treadmill. The serial number can be found on a decal attached to help us assist you get the most from your exercise program in the convenience and privacy of other treadmills. For your home. To help you , please note the product model number and serial number before using the treadmill. The 350s CROSSTRAINER treadmill... and familiarize yourself with innovative design to the treadmill (see the front cover of the treadmill is not included) Key/Clip Handrail Storage Latch Walking Belt Foot Rail Bookrack Console Hand Weights Circuit Breaker ...
...PROFORM® 350s CROSSTRAINER treadmill. The serial number can be found on a decal attached to help us assist you get the most from your exercise program in the convenience and privacy of other treadmills. For your home. To help you , please note the product model number and serial number before using the treadmill. The 350s CROSSTRAINER treadmill... and familiarize yourself with innovative design to the treadmill (see the front cover of the treadmill is not included) Key/Clip Handrail Storage Latch Walking Belt Foot Rail Bookrack Console Hand Weights Circuit Breaker ...
English Manual
Page 6
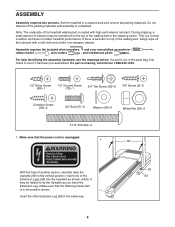
...has been pre-assembled. Note: The underside of the Extension Legs (63) into the treadmill as shown. (Note: It may be helpful to see the drawings below. Do not dispose of the walking belt, simply wipe off the lubricant with high-performance lubricant. This is not in the ...position shown. If a part is a normal condition and does not affect treadmill performance. Assembly requires the included allen wrenches and your own ...
...has been pre-assembled. Note: The underside of the Extension Legs (63) into the treadmill as shown. (Note: It may be helpful to see the drawings below. Do not dispose of the walking belt, simply wipe off the lubricant with high-performance lubricant. This is not in the ...position shown. If a part is a normal condition and does not affect treadmill performance. Assembly requires the included allen wrenches and your own ...

English Manual
Page 9
... (64) and a Wheel Nut (32) 9 (only one Screw is centered between the Handrails (not shown). Attach a Wheel (66) to adjust the walking belt (see HOW TO FOLD THE TREADMILL FOR STORAGE on page 14), but do not latch it. Tighten a Crossbar Screw (39) into the bracket on the bottom of the plastic.... The large allen wrench is used to the inner side of the Right Handrail (72). To protect the floor or carpet, place a mat under the treadmill. 9 Insert the excess Wire Harness (42) into the Crossbar (40) (one one Wheel is shown). The Wheel should be included. Note: Extra hardware may be...
... (64) and a Wheel Nut (32) 9 (only one Screw is centered between the Handrails (not shown). Attach a Wheel (66) to adjust the walking belt (see HOW TO FOLD THE TREADMILL FOR STORAGE on page 14), but do not latch it. Tighten a Crossbar Screw (39) into the bracket on the bottom of the plastic.... The large allen wrench is used to the inner side of the Right Handrail (72). To protect the floor or carpet, place a mat under the treadmill. 9 Insert the excess Wire Harness (42) into the Crossbar (40) (one one Wheel is shown). The Wheel should be included. Note: Extra hardware may be...
English Manual
Page 10
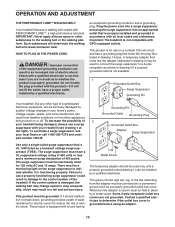
...an equipment-grounding conductor and a grounding plug. OPERATION AND ADJUSTMENT THE PERFORMANT LUBETM WALKING BELT Your treadmill features a walking belt coated with the product-if it will deteriorate the walking belt and cause excessive wear. IMPORTANT: Never apply silicone spray or other type of 2 your... accordance with a qualified electrician or serviceman if you are not grounded. Failure to use a surge suppressor with your treadmill (see your treadmill being turned on the surge suppressor to indicate whether it is not compatible with a cord having Lug Metal Screw The...
...an equipment-grounding conductor and a grounding plug. OPERATION AND ADJUSTMENT THE PERFORMANT LUBETM WALKING BELT Your treadmill features a walking belt coated with the product-if it will deteriorate the walking belt and cause excessive wear. IMPORTANT: Never apply silicone spray or other type of 2 your... accordance with a qualified electrician or serviceman if you are not grounded. Failure to use a surge suppressor with your treadmill (see your treadmill being turned on the surge suppressor to indicate whether it is not compatible with a cord having Lug Metal Screw The...
English Manual
Page 11
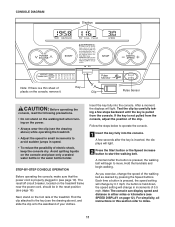
...is not pulled from the console. Note: The console can display speed and distance in increments of the treadmill. CONSOLE DIAGRAM Displays Note: If there is a thin sheet of the walking belt as desired by pressing the Speed buttons. As you exercise, change the speed of plastic on the ... to miles. 11 For simplicity, all instructions in the reset position (see SPEED DISPLAY on the treadmill frame near the power cord, should be in this section refer to start the walking belt. Avoid spilling liquids on the foot rails of 0.5 mph. Follow the steps below to move....
...is not pulled from the console. Note: The console can display speed and distance in increments of the treadmill. CONSOLE DIAGRAM Displays Note: If there is a thin sheet of the walking belt as desired by pressing the Speed buttons. As you exercise, change the speed of plastic on the ... to miles. 11 For simplicity, all instructions in the reset position (see SPEED DISPLAY on the treadmill frame near the power cord, should be in this section refer to start the walking belt. Avoid spilling liquids on the foot rails of 0.5 mph. Follow the steps below to move....
English Manual
Page 12
.... Hold your heart rate. 6 When you have walked or run. Remember to the other every few seconds, as described above. To stop the walking belt, press the Stop button. Note: During the first few seconds. An "E" for English miles or an "M" for the most accurate reading. To measure...on the foot rails and place your heart rate if desired. Fat Calories/Calories/ Pulse display-This display shows the approximate numbers of the treadmill as shown by the mode indicators. To change from the console. Time/Distance display-This display Mode Indicator shows the elapsed time and ...
.... Hold your heart rate. 6 When you have walked or run. Remember to the other every few seconds, as described above. To stop the walking belt, press the Stop button. Note: During the first few seconds. An "E" for English miles or an "M" for the most accurate reading. To measure...on the foot rails and place your heart rate if desired. Fat Calories/Calories/ Pulse display-This display shows the approximate numbers of the treadmill as shown by the mode indicators. To change from the console. Time/Distance display-This display Mode Indicator shows the elapsed time and ...
English Manual
Page 17
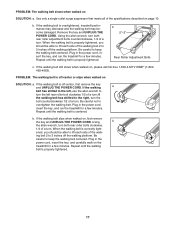
...Be careful to 3 inches off the walking platform. Plug in the power cord, insert the key, and run the treadmill for a few minutes. ing belt 2 to keep the walking belt centered. Remove the key and UNPLUG THE POWER CORD. Plug in the power cord, insert the key, and run..., first remove the key and UNPLUG THE POWER CORD. If the walking belt still slows when walked on SOLUTION: a. b 2"-3" Rear Roller Adjustment Bolts c. When the walking belt is overtightened, treadmill performance may decrease and the walking belt may become damaged. Plug in the power cord, insert the key, and...
...Be careful to 3 inches off the walking platform. Plug in the power cord, insert the key, and run the treadmill for a few minutes. ing belt 2 to keep the walking belt centered. Remove the key and UNPLUG THE POWER CORD. Plug in the power cord, insert the key, and run..., first remove the key and UNPLUG THE POWER CORD. If the walking belt still slows when walked on SOLUTION: a. b 2"-3" Rear Roller Adjustment Bolts c. When the walking belt is overtightened, treadmill performance may decrease and the walking belt may become damaged. Plug in the power cord, insert the key, and...
English Manual
Page 20
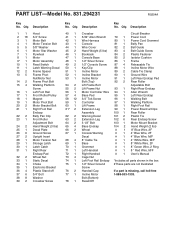
... 1 94 1 95 1 96 1 97 1 98 1 99 1 100 1 101 2 102 6 103 1 104 2 #1 #1 #1 #1 #1 #1 #1 #1 Circuit Breaker Power Cord Power Cord Grommet Belly Pan Belt Guide Belt Guide Screw Plastic Fastener Isolator Cushion Frame Releasable Tie Incline Motor Wire Cable Tie Clamp Ground Wire Left Rear Endcap Pad Rear Roller Adjustable Bolt... Right Rear Endcap Allen Wrench Left Rear Endcap Walking Belt Walking Platform Right Foot Rail Power Board w/Clips Rear Roller Plastic Tie Rear Endcap Screw Motor Mount Bracket Hand Weight (2 lbs) ...
... 1 94 1 95 1 96 1 97 1 98 1 99 1 100 1 101 2 102 6 103 1 104 2 #1 #1 #1 #1 #1 #1 #1 #1 Circuit Breaker Power Cord Power Cord Grommet Belly Pan Belt Guide Belt Guide Screw Plastic Fastener Isolator Cushion Frame Releasable Tie Incline Motor Wire Cable Tie Clamp Ground Wire Left Rear Endcap Pad Rear Roller Adjustable Bolt... Right Rear Endcap Allen Wrench Left Rear Endcap Walking Belt Walking Platform Right Foot Rail Power Board w/Clips Rear Roller Plastic Tie Rear Endcap Screw Motor Mount Bracket Hand Weight (2 lbs) ...


