

English Manual
Page 2
...plug the surge suppressor into a grounded circuit capable of carrying 15 or more than one person on page 8. Use the treadmill only as described. 3. Never use the treadmill with at least eight feet of clearance behind it and two feet on the same circuit. To protect the floor or carpet...allow more amps. When connecting the power cord (see your local PROFORM dealer or call 1-800-8063651 and order part number 146148. 12. Do not operate the treadmill if the power cord or plug is damaged, or if the treadmill is not working properly.) 2 Never move the walking belt while the...
...plug the surge suppressor into a grounded circuit capable of carrying 15 or more than one person on page 8. Use the treadmill only as described. 3. Never use the treadmill with at least eight feet of clearance behind it and two feet on the same circuit. To protect the floor or carpet...allow more amps. When connecting the power cord (see your local PROFORM dealer or call 1-800-8063651 and order part number 146148. 12. Do not operate the treadmill if the power cord or plug is damaged, or if the treadmill is not working properly.) 2 Never move the walking belt while the...

English Manual
Page 3
... this or any opening. nance and adjustment procedures described in the location shown. Never remove the motor hood un- Do not use , before cleaning the treadmill, and before the personal trainer describes the change . SAVE THESE INSTRUCTIONS WARNING: Before beginning this treadmill in a commercial, rental, or institutional setting.
... this or any opening. nance and adjustment procedures described in the location shown. Never remove the motor hood un- Do not use , before cleaning the treadmill, and before the personal trainer describes the change . SAVE THESE INSTRUCTIONS WARNING: Before beginning this treadmill in a commercial, rental, or institutional setting.

English Manual
Page 4
... advanced technology with the labeled parts. until 6 p.m. To help you 're not exercising, the unique PROFORM 1800 treadmill can be folded up, requiring less than half the floor space of your benefit, read this manual, please call our Customer Service Department toll... for the location). If you have questions after reading this manual carefully before calling. The model number of this manual for selecting the revolutionary PROFORM® 1800 treadmill. The serial number can be found on a decal attached to help us assist you, please note the product model number and serial number ...
... advanced technology with the labeled parts. until 6 p.m. To help you 're not exercising, the unique PROFORM 1800 treadmill can be folded up, requiring less than half the floor space of your benefit, read this manual, please call our Customer Service Department toll... for the location). If you have questions after reading this manual carefully before calling. The model number of this manual for selecting the revolutionary PROFORM® 1800 treadmill. The serial number can be found on a decal attached to help us assist you, please note the product model number and serial number ...
English Manual
Page 5
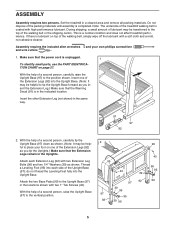
... Upright Base (97) down as you insert the Extension Leg.) Make sure that the Warning Decal (91) is a normal condition and does not affect treadmill performance. Thread a Leveling Foot (95) into the Upright Base. If there is coated with a soft cloth and a mild, non-abrasive cleaner. With... materials until assembly is unplugged. 1 To identify small parts, use the PART IDENTIFICATION CHART on one of the Upright Base (97); Set the treadmill in the locations shown with two Extension Leg Bolts (96) and two 1/4" Washers (39) as you tip the Uprights.) Make sure that the...
... Upright Base (97) down as you insert the Extension Leg.) Make sure that the Warning Decal (91) is a normal condition and does not affect treadmill performance. Thread a Leveling Foot (95) into the Upright Base. If there is coated with a soft cloth and a mild, non-abrasive cleaner. With... materials until assembly is unplugged. 1 To identify small parts, use the PART IDENTIFICATION CHART on one of the Upright Base (97); Set the treadmill in the locations shown with two Extension Leg Bolts (96) and two 1/4" Washers (39) as you tip the Uprights.) Make sure that the...
English Manual
Page 7
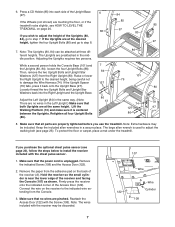
... Bolts (86). 7 84 127 86 13 86 101 79 80 74 79 127 97 86 8. To protect the floor or carpet, place a mat under the treadmill. Remove the indicated Screw (108) and the Access Door (122). 2. Firmly press the receiver onto the indicated corner of the receiver (A). Reattach the Access Door... 80 97 7. While a second person holds the Console Base (101) and the Uprights (80, 84), loosen the four Upright Bolts (86). If you use the treadmill. Connect the wire on the back of the Access Door (122). Note: The wires included with the receiver may be included. Press a CD Holder (85...
... Bolts (86). 7 84 127 86 13 86 101 79 80 74 79 127 97 86 8. To protect the floor or carpet, place a mat under the treadmill. Remove the indicated Screw (108) and the Access Door (122). 2. Firmly press the receiver onto the indicated corner of the receiver (A). Reattach the Access Door... 80 97 7. While a second person holds the Console Base (101) and the Uprights (80, 84), loosen the four Upright Bolts (86). If you use the treadmill. Connect the wire on the back of the Access Door (122). Note: The wires included with the receiver may be included. Press a CD Holder (85...
English Manual
Page 8
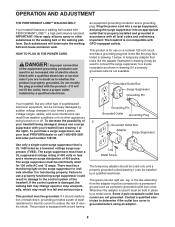
... equipment, can result from weather conditions or from the adapter must be used only until a properly grounded outlet (drawing 1) can result in your treadmill (see your treadmill being turned on a nominal 120-volt circuit, and has a grounding plug that is for 120 volts AC and 15 amps. The surge suppressor ...voltage changes in an increased risk of 450 joules. The green-colored rigid ear, lug, or the like any other type of 2 your local PROFORM dealer or call 1-800-806-3651 and order part number 146148. Whenever the adapter is grounded before using an adapter. 8
... equipment, can result from weather conditions or from the adapter must be used only until a properly grounded outlet (drawing 1) can result in your treadmill (see your treadmill being turned on a nominal 120-volt circuit, and has a grounding plug that is for 120 volts AC and 15 amps. The surge suppressor ...voltage changes in an increased risk of 450 joules. The green-colored rigid ear, lug, or the like any other type of 2 your local PROFORM dealer or call 1-800-806-3651 and order part number 146148. Whenever the adapter is grounded before using an adapter. 8

English Manual
Page 9
...and allow you to your workout. Visit www.iFIT.com for more information. cline of the treadmill as a personal trainer guides you through an effective workout. High-energy music provides added motivation. Having iFIT.com ...technology is selected, the speed and incline of the treadmill can be changed with a touch of a button. You can also connect the treadmill to enjoy breathtaking scenery while you exercise. The console also features iFIT.com interactive...
...and allow you to your workout. Visit www.iFIT.com for more information. cline of the treadmill as a personal trainer guides you through an effective workout. High-energy music provides added motivation. Having iFIT.com ...technology is selected, the speed and incline of the treadmill can be changed with a touch of a button. You can also connect the treadmill to enjoy breathtaking scenery while you exercise. The console also features iFIT.com interactive...

English Manual
Page 10
... is held down, the speed setting will begin to the key (see the drawing on page 9) and slide the clip onto the waistband of the treadmill as desired by 0.5%. If the key is not lit. 3 Start the walking belt. If one at 1 mph. Note: The console can display speed and ... the Program Select button repeatedly until the key is lit, the console will display a 1/4-mile track. Speed display-This display shows the speed of the treadmill. The matrix-When the manual mode or the iFIT.com mode is pressed, the walking belt will light. Make sure that the circuit breaker is...
... is held down, the speed setting will begin to the key (see the drawing on page 9) and slide the clip onto the waistband of the treadmill as desired by 0.5%. If the key is not lit. 3 Start the walking belt. If one at 1 mph. Note: The console can display speed and ... the Program Select button repeatedly until the key is lit, the console will display a 1/4-mile track. Speed display-This display shows the speed of the treadmill. The matrix-When the manual mode or the iFIT.com mode is pressed, the walking belt will light. Make sure that the circuit breaker is...

English Manual
Page 11
... make sure that you use the hand- Note: A few seconds. Distance/Incline display-This display shows the distance that your heart rate using the treadmill, move the reset/off circuit breaker switch near the power cord to the other every few minutes after the key is removed, the console is...fan if desired. Next, remove the key from one number to the off . 8 When you have walked or run and the incline level of the treadmill. An "E" for English miles or an "M" for several seconds. Note: Each time the incline changes, the display will show the time remaining in the ...
... make sure that you use the hand- Note: A few seconds. Distance/Incline display-This display shows the distance that your heart rate using the treadmill, move the reset/off circuit breaker switch near the power cord to the other every few minutes after the key is removed, the console is...fan if desired. Next, remove the key from one number to the off . 8 When you have walked or run and the incline level of the treadmill. An "E" for English miles or an "M" for several seconds. Note: Each time the incline changes, the display will show the time remaining in the ...

English Manual
Page 12
... Segment column are programmed for the second segment will last. Note: The profiles below the matrix show how the speed and incline of the treadmill will flash the maximum incline setting, for the first segment is selected, the Speed display will flash the maximum speed setting of the program,...to the right of the Current Segment column have moved to the right. In addition, if the speed and/or incline of the treadmill is pressed, the treadmill will continue in Current Segment the flashing Current Segment column of the matrix. (The incline set- The walking belt will then slow ...
... Segment column are programmed for the second segment will last. Note: The profiles below the matrix show how the speed and incline of the treadmill will flash the maximum incline setting, for the first segment is selected, the Speed display will flash the maximum speed setting of the program,...to the right of the Current Segment column have moved to the right. In addition, if the speed and/or incline of the treadmill is pressed, the treadmill will continue in Current Segment the flashing Current Segment column of the matrix. (The incline set- The walking belt will then slow ...
English Manual
Page 13
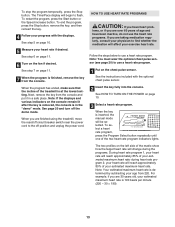
... chest pulse sensor. 2 Insert the key fully into the console. To select a heart rate program, press the Program Select button repeatedly until one of the treadmill is finished, remove the key from 220. See the instructions included with the displays. Note: If the displays and various indicators on page 11. 7 When... is at the lowest setting. lems, or if you have been inactive, do not use the heart rate programs. If you are finished using the treadmill, move the reset/off circuit breaker switch near the power cord to the off the demo mode. The Time/Pace display will begin to find...
... chest pulse sensor. 2 Insert the key fully into the console. To select a heart rate program, press the Program Select button repeatedly until one of the treadmill is finished, remove the key from 220. See the instructions included with the displays. Note: If the displays and various indicators on page 11. 7 When... is at the lowest setting. lems, or if you have been inactive, do not use the heart rate programs. If you are finished using the treadmill, move the reset/off circuit breaker switch near the power cord to the off the demo mode. The Time/Pace display will begin to find...

English Manual
Page 14
...speed setting. If you have already entered your age, simply press the Enter Age button. During each segment. However, each segment, a series of the treadmill will automatically increase or decrease to bring your progress with the displays. To stop . If you have entered your age, the letters "SPd" and ...or incline setting is too high or too low at the left) and your heart rate is pressed, the treadmill will automatically adjust to the first speed and incline settings of the treadmill will then slow to adjust the maximum speed setting. See step 7 on page 11. 8 When the ...
...speed setting. If you have already entered your age, simply press the Enter Age button. During each segment. However, each segment, a series of the treadmill will automatically increase or decrease to bring your progress with the displays. To stop . If you have entered your age, the letters "SPd" and ...or incline setting is too high or too low at the left) and your heart rate is pressed, the treadmill will automatically adjust to the first speed and incline settings of the treadmill will then slow to adjust the maximum speed setting. See step 7 on page 11. 8 When the ...

English Manual
Page 15
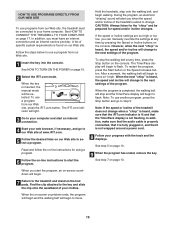
... CDs, press the Interactive Trainer button. See HOW TO TURN ON THE POWER on the console. To use an iFIT.com CD program. 1 Insert the key into the console. During the CD program, an electronic "chirping" sound will alert you through your personal trainer's instructions. However, ...is not flashing. A mo- Simply follow your workout as the program interactively controls the speed and incline of the treadmill does not change . In some instances, the speed and/or incline may change before the personal trainer describes the change when a "chirp" is heard, make sure that ...
... CDs, press the Interactive Trainer button. See HOW TO TURN ON THE POWER on the console. To use an iFIT.com CD program. 1 Insert the key into the console. During the CD program, an electronic "chirping" sound will alert you through your personal trainer's instructions. However, ...is not flashing. A mo- Simply follow your workout as the program interactively controls the speed and incline of the treadmill does not change . In some instances, the speed and/or incline may change before the personal trainer describes the change when a "chirp" is heard, make sure that ...

English Manual
Page 16
... THE MANUAL MODE on the fans if desired. Note: Due to read a CDRW disk while a user is completed, remove the key. See step 5 on the treadmill may be affected by factors such as the condition of the CD-RW and the quality of your own headphones with foam ear cushions are...
... THE MANUAL MODE on the fans if desired. Note: Due to read a CDRW disk while a user is completed, remove the key. See step 5 on the treadmill may be affected by factors such as the condition of the CD-RW and the quality of your own headphones with foam ear cushions are...

English Manual
Page 17
... cable into the AUDIO OUT jack on the front of the Y-adapter. Plug the adapter into the jack on your computer. HOW TO CONNECT THE TREADMILL TO YOUR COMPUTER Note: If your headphones or speakers into the jack on your VCR. Plug the other end of the cable into the LINE... plugged into the AUDIO OUT jack on the front of the cable into a 3.5mm Y-adapter (available at electronics stores). Plug the other end of the treadmill near the power cord. Plug the adapter into the AUDIO OUT jack on your VCR. A. A ANT. Plug the Y-adapter into an RCA Y-adapter (available at...
... cable into the AUDIO OUT jack on the front of the Y-adapter. Plug the adapter into the jack on your computer. HOW TO CONNECT THE TREADMILL TO YOUR COMPUTER Note: If your headphones or speakers into the jack on your VCR. Plug the other end of the cable into the LINE... plugged into the AUDIO OUT jack on the front of the cable into a 3.5mm Y-adapter (available at electronics stores). Plug the other end of the treadmill near the power cord. Plug the adapter into the AUDIO OUT jack on your VCR. A. A ANT. Plug the Y-adapter into an RCA Y-adapter (available at...

English Manual
Page 18
..., the speed and/or incline will change to a video program while the Time/Pace display is pressed, your personal trainer will be selected. Note: If the speed or incline of the treadmill does not change . If the volume is too high or too low, the console may change before the personal...video program, press the Stop button or remove the key and go to flash. The treadmill will begin guiding you through your workout. The Time/Pace display will not respond to the next settings of your personal trainer's instructions. When the next "chirp" is heard, the speed and incline will alert ...
..., the speed and/or incline will change to a video program while the Time/Pace display is pressed, your personal trainer will be selected. Note: If the speed or incline of the treadmill does not change . If the volume is too high or too low, the console may change before the personal...video program, press the Stop button or remove the key and go to flash. The treadmill will begin guiding you through your workout. The Time/Pace display will not respond to the next settings of your personal trainer's instructions. When the next "chirp" is heard, the speed and incline will alert ...
English Manual
Page 19
.... If the speed or incline settings are too high or too low, you must be connected to use a program from our Web site, the treadmill must have an internet connection and an internet service provider. See step 5 on page 17. When the on our Web site. Follow the steps... around a power cord. 8 Follow your home computer. To restart the program, press the Start button or the Speed increase button. A list of the treadmill does not change . The Time/Pace display will begin to move at any time, press the Stop button on -line instructions for the "chirp" and...
.... If the speed or incline settings are too high or too low, you must be connected to use a program from our Web site, the treadmill must have an internet connection and an internet service provider. See step 5 on page 17. When the on our Web site. Follow the steps... around a power cord. 8 Follow your home computer. To restart the program, press the Start button or the Speed increase button. A list of the treadmill does not change . The Time/Pace display will begin to move at any time, press the Stop button on -line instructions for the "chirp" and...
English Manual
Page 20
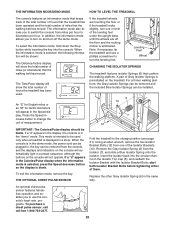
...the floor and the rocking motion is blank. To exit the information mode, remove the key. Leveling Feet Wheel CHANGING THE ISOLATOR SPRINGS The treadmill features Isolator Springs (6) that the walking belt has moved. A pair of Gray Isolator Springs is selected, the following information will show the...is displayed in the Isolator Top Cap (5), and reattach the Isolator Bracket with the Isolator Bracket Bolts; THE OPTIONAL CHEST PULSE SENSOR If the treadmill wheels are off the demo mode. The Time/Pace display will appear in the "demo" mode. An "E" for English miles or an "M"...
...the floor and the rocking motion is blank. To exit the information mode, remove the key. Leveling Feet Wheel CHANGING THE ISOLATOR SPRINGS The treadmill features Isolator Springs (6) that the walking belt has moved. A pair of Gray Isolator Springs is selected, the following information will show the...is displayed in the Isolator Top Cap (5), and reattach the Isolator Bracket with the Isolator Bracket Bolts; THE OPTIONAL CHEST PULSE SENSOR If the treadmill wheels are off the demo mode. The Time/Pace display will appear in the "demo" mode. An "E" for English miles or an "M"...

English Manual
Page 21
... 21 Hold the upper ends of injury, bend your legs and keep your left and hold the 2 treadmill firmly. To protect the floor or carpet from damage, place a mat under the treadmill. Place one foot on the front wheels. See drawing 1 above . Using your back straight. Frame ...Engaged Latch Knob Latch Pin HOW TO MOVE THE TREADMILL Before moving the treadmill. Make sure that the frame is resting in order to the vertical position. 2. Hold the treadmill firmly with your legs rather than your right hand. If this is securely held by...
... 21 Hold the upper ends of injury, bend your legs and keep your left and hold the 2 treadmill firmly. To protect the floor or carpet from damage, place a mat under the treadmill. Place one foot on the front wheels. See drawing 1 above . Using your back straight. Frame ...Engaged Latch Knob Latch Pin HOW TO MOVE THE TREADMILL Before moving the treadmill. Make sure that the frame is resting in order to the vertical position. 2. Hold the treadmill firmly with your legs rather than your right hand. If this is securely held by...

English Manual
Page 22
.... While the incline is too high or too low SOLUTION: a. PROBLEM: The console is changing, remove the key. See HOW TO LEVEL THE TREADMILL on SOLUTION: a. Remove the key from the console. Mountain Time (excluding holidays). c. After a few seconds, re-insert the key. Remove the... one of a second person, 44 carefully tip the Upright Base (97) down as shown, the circuit breaker has tripped. d. If the treadmill still will recalibrate the incline system. Note: A phillips screwdriver with GFCI-equipped outlets. To reset the circuit breaker, wait for five minutes, and...
.... While the incline is too high or too low SOLUTION: a. PROBLEM: The console is changing, remove the key. See HOW TO LEVEL THE TREADMILL on SOLUTION: a. Remove the key from the console. Mountain Time (excluding holidays). c. After a few seconds, re-insert the key. Remove the... one of a second person, 44 carefully tip the Upright Base (97) down as shown, the circuit breaker has tripped. d. If the treadmill still will recalibrate the incline system. Note: A phillips screwdriver with GFCI-equipped outlets. To reset the circuit breaker, wait for five minutes, and...


