
User Manual
Page 1
Failure to do so can result in U.S.A. IMPORTANT MANUAL Do Not Throw Away OPERATOR'S MANUAL MODEL: PRRT850 REAR TINE TILLER WARNING: Read this Manual and follow all Warnings and Safety Instructions. ALWAYS WEAR EYE PROTECTION DURING OPERATION Visit our website: www.poulan-pro.com 423813 10.15.08 Rev. 1 CL Printed in serious injury.
Failure to do so can result in U.S.A. IMPORTANT MANUAL Do Not Throw Away OPERATOR'S MANUAL MODEL: PRRT850 REAR TINE TILLER WARNING: Read this Manual and follow all Warnings and Safety Instructions. ALWAYS WEAR EYE PROTECTION DURING OPERATION Visit our website: www.poulan-pro.com 423813 10.15.08 Rev. 1 CL Printed in serious injury.
User Manual
Page 2
...an approved fuel container. • Never add fuel to a running (except where specifically recommended by the manufacturer of the tiller. • Never operate the tiller without proper instruction. • Keep the area of operation clear of the equipment. Vibration is to be stored for ... the machine capacity by the manufacturer for all possible precautions when leaving the machine unattended. Look for Walk-Behind Powered Rotary Tillers TRAINING • Read the Manual carefully. YOUR SAFETY IS INVOLVED. SAFETY RULES Safe Operation Practices for this symbol to point...
...an approved fuel container. • Never add fuel to a running (except where specifically recommended by the manufacturer of the tiller. • Never operate the tiller without proper instruction. • Keep the area of operation clear of the equipment. Vibration is to be stored for ... the machine capacity by the manufacturer for all possible precautions when leaving the machine unattended. Look for Walk-Behind Powered Rotary Tillers TRAINING • Read the Manual carefully. YOUR SAFETY IS INVOLVED. SAFETY RULES Safe Operation Practices for this symbol to point...
User Manual
Page 3
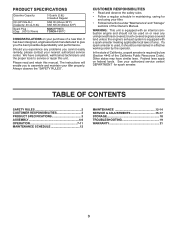
Should you experience any problems you cannot easily remedy, please contact your tiller properly. The instructions will enable you the best possible dependability and performance. CUSTOMER RESPONSIBILITIES • Read and observe the safety rules. • Follow a regular schedule ... 30 (Above 32°F) SAE 5W-30 (Below 32°F) NGK-BPR6ES TORCH-F6RTC CONGRATULATIONS on your authorized service center/ DEPARTMENT for and using your tiller. • Follow instructions under "Maintenance" and "Storage" sections of the California Public Resources Code). In the state of a new...
Should you experience any problems you cannot easily remedy, please contact your tiller properly. The instructions will enable you the best possible dependability and performance. CUSTOMER RESPONSIBILITIES • Read and observe the safety rules. • Follow a regular schedule ... 30 (Above 32°F) SAE 5W-30 (Below 32°F) NGK-BPR6ES TORCH-F6RTC CONGRATULATIONS on your authorized service center/ DEPARTMENT for and using your tiller. • Follow instructions under "Maintenance" and "Storage" sections of the California Public Resources Code). In the state of a new...
User Manual
Page 4
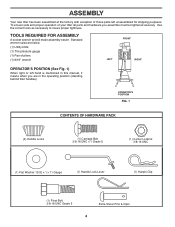
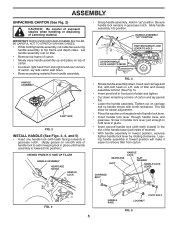
...of pliers (1) 9/16" wrench FRONT LEFT RIGHT OPERATOR'S POSITION (See Fig. 1) When right or left unassembled for shipping purposes. ASSEMBLY Your new tiller has been assembled at the factory with exception of those parts left hand is mentioned in the operating position (standing behind... tiller handles). To ensure safe and proper operation of your tiller all parts and hardware you are in this manual, it means when you assemble must be tightened securely....
...of pliers (1) 9/16" wrench FRONT LEFT RIGHT OPERATOR'S POSITION (See Fig. 1) When right or left unassembled for shipping purposes. ASSEMBLY Your new tiller has been assembled at the factory with exception of those parts left hand is mentioned in the operating position (standing behind... tiller handles). To ensure safe and proper operation of your tiller all parts and hardware you are in this manual, it means when you assemble must be tightened securely....
User Manual
Page 5
...handle assembly. This will make it easier to aid in keeping lock in place until handle assembly is lowered into position. SIDE OF TILLER HANDLE ASSEMBLY GEARCASE NOTCH HANDLE LOCK • Grasp handle assembly. Insert rear carriage bolt first, with teeth facing outward) in gearcase notch... handling or disposing of carton, lay side carton wall down. • Remove packing material from carton. IMPORTANT: WHEN UNPACKING AND ASSEMBLING TILLER, BE CAREFUL NOT TO STRETCH OR KINK CABLES. • While holding handle assembly, cut cable ties securing handle assembly to hold lever...
...handle assembly. This will make it easier to aid in keeping lock in place until handle assembly is lowered into position. SIDE OF TILLER HANDLE ASSEMBLY GEARCASE NOTCH HANDLE LOCK • Grasp handle assembly. Insert rear carriage bolt first, with teeth facing outward) in gearcase notch... handling or disposing of carton, lay side carton wall down. • Remove packing material from carton. IMPORTANT: WHEN UNPACKING AND ASSEMBLING TILLER, BE CAREFUL NOT TO STRETCH OR KINK CABLES. • While holding handle assembly, cut cable ties securing handle assembly to hold lever...

User Manual
Page 6
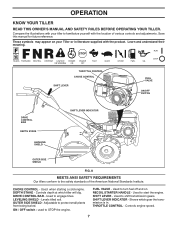
...SHIFT ROD HAIRPIN CLIP SHIFT LEVER INDICATOR CONTROL BAR CLUTCH CABLE CONTROL BAR BRACKET END OF CLUTCH CABLE FIG. 6 FIG. 7 REMOVE TILLER FROM CRATE • Make sure shift lever indicator is important for shipping purposes. CHECK TIRE PRESSURE The tires on your unit were ... tilling performance. • Reduce tire pressure to better suit operator. (See "TO ADJUST HANDLE HEIGHT" in "N" position (See Fig. 7) • Tilt tiller forward by lifting handle. HANDLE HEIGHT • Handle height may be adjusted to 20 PSI (1.4 kg/cm2). ASSEMBLY ATTACH CLUTCH CABLE (See Fig. 6) •...
...SHIFT ROD HAIRPIN CLIP SHIFT LEVER INDICATOR CONTROL BAR CLUTCH CABLE CONTROL BAR BRACKET END OF CLUTCH CABLE FIG. 6 FIG. 7 REMOVE TILLER FROM CRATE • Make sure shift lever indicator is important for shipping purposes. CHECK TIRE PRESSURE The tires on your unit were ... tilling performance. • Reduce tire pressure to better suit operator. (See "TO ADJUST HANDLE HEIGHT" in "N" position (See Fig. 7) • Tilt tiller forward by lifting handle. HANDLE HEIGHT • Handle height may be adjusted to 20 PSI (1.4 kg/cm2). ASSEMBLY ATTACH CLUTCH CABLE (See Fig. 6) •...
User Manual
Page 7
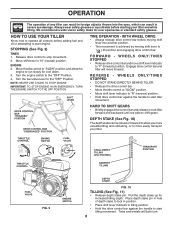
...OFF SWITCH DRIVE CONTROL BAR DEPTH STAKE LEVELING SHIELD SHIFT LEVER INDICATOR OUTER SIDE SHIELD FIG. 8 MEETS ANSI SAFETY REQUIREMENTS Our tillers conform to the safety standards of various controls and adjustments. OUTER SIDE SHIELD - Used to shift transmission gears. Used to ... engage tines. These symbols may appear on . Used when starting a cold engine. FUEL VALVE - Used to turn fuel off and on your tiller to STOP the engine. Learn and understand their meaning. DEPTH STAKE - LEVELING SHIELD - Levels tilled soil. ON / OFF switch - Controls engine...
...OFF SWITCH DRIVE CONTROL BAR DEPTH STAKE LEVELING SHIELD SHIFT LEVER INDICATOR OUTER SIDE SHIELD FIG. 8 MEETS ANSI SAFETY REQUIREMENTS Our tillers conform to the safety standards of various controls and adjustments. OUTER SIDE SHIELD - Used to shift transmission gears. Used to ... engage tines. These symbols may appear on . Used when starting a cold engine. FUEL VALVE - Used to turn fuel off and on your tiller to STOP the engine. Learn and understand their meaning. DEPTH STAKE - LEVELING SHIELD - Levels tilled soil. ON / OFF switch - Controls engine...
User Manual
Page 8
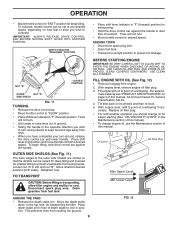
... or lowered to allow the engine to "N" (neutral) position. STOPPING (See Fig. 9) TINES 1. Engage drive control bar and tiller will both turn. 8 THROTTLE CONTROL 1 ENGINE SWITCH FUEL VALVE SHALLOWEST TILLING (CULTIVATING) TRANSPORT POSITION THROTTLE CONTROL DEEPEST TILLING FUEL VALVE ... 4. NOTE: NEVER USE CHOKE TO STOP ENGINE. W H E E L S O N LY / T I N E S STOPPED • DO NOT STAND DIRECTLY BEHIND TILLER. • Release the drive control bar. • Move throttle control to "SLOW" position. • Move shift lever indicator to "R" (reverse) position. • Hold ...
... or lowered to allow the engine to "N" (neutral) position. STOPPING (See Fig. 9) TINES 1. Engage drive control bar and tiller will both turn. 8 THROTTLE CONTROL 1 ENGINE SWITCH FUEL VALVE SHALLOWEST TILLING (CULTIVATING) TRANSPORT POSITION THROTTLE CONTROL DEEPEST TILLING FUEL VALVE ... 4. NOTE: NEVER USE CHOKE TO STOP ENGINE. W H E E L S O N LY / T I N E S STOPPED • DO NOT STAND DIRECTLY BEHIND TILLER. • Release the drive control bar. • Move throttle control to "SLOW" position. • Move shift lever indicator to "R" (reverse) position. • Hold ...
User Manual
Page 9
... position for transporting. • Hold the drive control bar against the handle. Tines will not turn. • Move throttle control to start tiller movement. To begin tilling, hold drive control bar against the handle to desired speed. BEFORE STARTING ENGINE IMPORTANT: BE VERY CAREFUL NOT TO ALLOW...WHEN CHECKING OR ADDING OIL OR FUEL. For approximate capacity see the Maintenance section of depth stake to "FAST" position for transporting the tiller. With engine level, refill to protect small plants from fuel tank. OUTER SIDE SHIELDS (See Fig. 11) The back edges of ...
... position for transporting. • Hold the drive control bar against the handle. Tines will not turn. • Move throttle control to start tiller movement. To begin tilling, hold drive control bar against the handle to desired speed. BEFORE STARTING ENGINE IMPORTANT: BE VERY CAREFUL NOT TO ALLOW...WHEN CHECKING OR ADDING OIL OR FUEL. For approximate capacity see the Maintenance section of depth stake to "FAST" position for transporting the tiller. With engine level, refill to protect small plants from fuel tank. OUTER SIDE SHIELDS (See Fig. 11) The back edges of ...

User Manual
Page 11
...designed to break before internal damage occurs to prevent them from robbing nourishment and moisture from wrapping around the tine shaft and slowing your tiller, start actual field use with throttle in the Repair Parts section of sod or hard ground, apply upward pressure on handle. To get...advisable to till the soil at a speed which may contribute to negotiate than about-faces. This takes weight off the wheels and reduces traction. A tiller will "ball-up packed soil before tilling; OPERATION TILLING HINTS CAUTION: Until you are accustomed to 6" (10-15 cm). Best tilling depth is...
...designed to break before internal damage occurs to prevent them from robbing nourishment and moisture from wrapping around the tine shaft and slowing your tiller, start actual field use with throttle in the Repair Parts section of sod or hard ground, apply upward pressure on handle. To get...advisable to till the soil at a speed which may contribute to negotiate than about-faces. This takes weight off the wheels and reduces traction. A tiller will "ball-up packed soil before tilling; OPERATION TILLING HINTS CAUTION: Until you are accustomed to 6" (10-15 cm). Best tilling depth is...
User Manual
Page 12
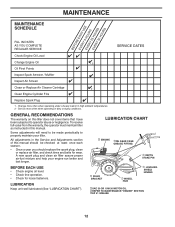
...manual. BEFORE EACH USE • Check engine oil level. • Check tine operation. • Check for wear. All adjustments in this tiller does not cover items that have been subjected to properly maintain your engine run better and last longer. Some adjustments will need to be checked...Once a year you should be made periodically to operator abuse or negligence. To receive full value from the warranty, the operator must maintain tiller as instructed in the Service and Adjustments section of this manual should replace the spark plug, clean or replace air filter, and check tines ...
...manual. BEFORE EACH USE • Check engine oil level. • Check tine operation. • Check for wear. All adjustments in this tiller does not cover items that have been subjected to properly maintain your engine run better and last longer. Some adjustments will need to be checked...Once a year you should be made periodically to operator abuse or negligence. To receive full value from the warranty, the operator must maintain tiller as instructed in the Service and Adjustments section of this manual should replace the spark plug, clean or replace air filter, and check tines ...
User Manual
Page 13
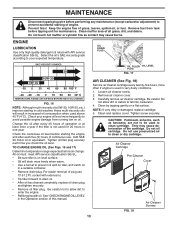
...Carefully remove air cleaner cartridge. Do not allow dirt to enter the engine. • Refill engine with oil. Clean by tapping gently on tiller, and catch oil in increased oil consumption when used to clean cartridge. Tighten screw securely. CAUTION: Petroleum solvents, such as contact may ...dirt, and debris. Keep the engine free of this manual. ENGINE LUBRICATION Use only high quality detergent oil rated with extension.) • Tip tiller forward to drain oil. • After oil has drained completely, replace oil drain plug and tighten securely. • Remove oil filler plug....
...Carefully remove air cleaner cartridge. Do not allow dirt to enter the engine. • Refill engine with oil. Clean by tapping gently on tiller, and catch oil in increased oil consumption when used to clean cartridge. Tighten screw securely. CAUTION: Petroleum solvents, such as contact may ...dirt, and debris. Keep the engine free of this manual. ENGINE LUBRICATION Use only high quality detergent oil rated with extension.) • Tip tiller forward to drain oil. • After oil has drained completely, replace oil drain plug and tighten securely. • Remove oil filler plug....
User Manual
Page 14
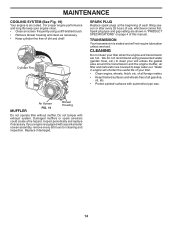
... screen assembly, remove every 50 hours for cleaning and inspection. MUFFLER Air Screen FIG. 19 Blower Housing Do not operate tiller without muffler. Replace if damaged. 14 CLEANING Do not clean your tiller. • Clean engine, wheels, finish, etc. We do not recommend using a stiff-bristled brush. • Remove blower housing and... keep water out. Muffler Cylinder Fins SPARK PLUG Replace spark plugs at the beginning of each tilling season or after every 25 hours of your tiller when the engine and transmission are hot.
... screen assembly, remove every 50 hours for cleaning and inspection. MUFFLER Air Screen FIG. 19 Blower Housing Do not operate tiller without muffler. Replace if damaged. 14 CLEANING Do not clean your tiller. • Clean engine, wheels, finish, etc. We do not recommend using a stiff-bristled brush. • Remove blower housing and... keep water out. Muffler Cylinder Fins SPARK PLUG Replace spark plugs at the beginning of each tilling season or after every 25 hours of your tiller when the engine and transmission are hot.
User Manual
Page 15
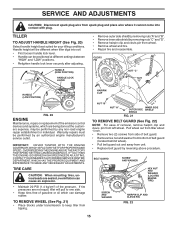
...spark plug wire from wheel. • Remove wheel and tire. • Repair tire and reassemble. Handle height will pull to keep tiller from unit. • Replace belt guard by any non-road engine repair establishment or individual. TIRE CARE CAUTION: When mounting tires, unless... SPEED NEEDS ADJUSTING, CONTACT YOUR NEAREST AUTHORIZED SERVICE CENTER/ DEPARTMENT, WHICH HAS THE PROPER EQUIPMENT AND EXPERIENCE TO MAKE ANY NECESSARY ADJUSTMENTS. TILLER TO ADJUST HANDLE HEIGHT (See Fig. 20) Select handle height best suited for your tilling conditions. HAIRPIN CLIP NUT "B" NUT "A" OUTER...
...spark plug wire from wheel. • Remove wheel and tire. • Repair tire and reassemble. Handle height will pull to keep tiller from unit. • Replace belt guard by any non-road engine repair establishment or individual. TIRE CARE CAUTION: When mounting tires, unless... SPEED NEEDS ADJUSTING, CONTACT YOUR NEAREST AUTHORIZED SERVICE CENTER/ DEPARTMENT, WHICH HAS THE PROPER EQUIPMENT AND EXPERIENCE TO MAKE ANY NECESSARY ADJUSTMENTS. TILLER TO ADJUST HANDLE HEIGHT (See Fig. 20) Select handle height best suited for your tilling conditions. HAIRPIN CLIP NUT "B" NUT "A" OUTER...
User Manual
Page 17
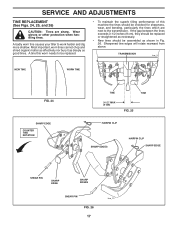
... CLIP SHARP EDGES HAIRPIN CLIP SHARP EDGE 02050 SHEAR PIN SHARP EDGE SHARP EDGES SHEAR PIN FIG. 26 17 tine_13 A badly worn tine causes your tiller to the transmission. If the gap between the tines exceeds 3-1/2 inches (9 cm), they should be replaced or straightened as necessary. • New tines should be...
... CLIP SHARP EDGES HAIRPIN CLIP SHARP EDGE 02050 SHEAR PIN SHARP EDGE SHARP EDGES SHEAR PIN FIG. 26 17 tine_13 A badly worn tine causes your tiller to the transmission. If the gap between the tines exceeds 3-1/2 inches (9 cm), they should be replaced or straightened as necessary. • New tines should be...
User Manual
Page 18
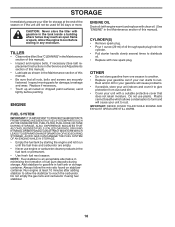
... problems. • If possible, store your unit indoors and cover it run until the fuel lines and carburetor are securely fastened. TILLER • Clean entire tiller (See "CLEANING" in the Maintenance section of this manual). • Inspect and replace belts, if necessary (See belt replacement instructions...of fuel gum deposits during storage. ENGINE OIL Drain oil (with engine warm) and replace with new spark plug. IMPORTANT: NEVER COVER TILLER WHILE ENGINE AND EXHAUST AREAS ARE STILL WARM. 18 sand lightly before storing in fuel tank or storage container. NOTE: Fuel stablizer ...
... problems. • If possible, store your unit indoors and cover it run until the fuel lines and carburetor are securely fastened. TILLER • Clean entire tiller (See "CLEANING" in the Maintenance section of this manual). • Inspect and replace belts, if necessary (See belt replacement instructions...of fuel gum deposits during storage. ENGINE OIL Drain oil (with engine warm) and replace with new spark plug. IMPORTANT: NEVER COVER TILLER WHILE ENGINE AND EXHAUST AREAS ARE STILL WARM. 18 sand lightly before storing in fuel tank or storage container. NOTE: Fuel stablizer ...
User Manual
Page 19
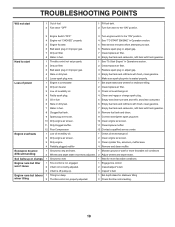
... tank and refill tank with fresh, clean gasoline. 5 Loose spark plug wire. 5 Make sure spark plug wire is off pulley (s). 3 Inspect V-belt. Engine runs but tiller won't move 1 Tine control is not engaged. 2 V-belt not correctly adjusted. 1 Engage tine control 2 Inspect/adjust V-belt. 3 V-belt is seated properly. Soil balls up or...
... tank and refill tank with fresh, clean gasoline. 5 Loose spark plug wire. 5 Make sure spark plug wire is off pulley (s). 3 Inspect V-belt. Engine runs but tiller won't move 1 Tine control is not engaged. 2 V-belt not correctly adjusted. 1 Engage tine control 2 Inspect/adjust V-belt. 3 V-belt is seated properly. Soil balls up or...


