
User Manual
Page 2
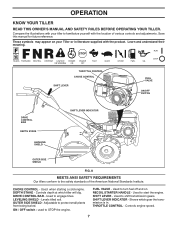
... in any adjustments while the engine (motor) is in hard ground. Allow the engine to cool before starting the engine (motor). • Do not operate the equipment without good visibility or light. • Be careful when tilling in safe working condition. • Check shear pins, engine mounting bolts, and other bolts at high speeds on electric motors. • Do not run the engine indoors; CAUTION: Always disconnect spark plug wire and place wire where...
... in any adjustments while the engine (motor) is in hard ground. Allow the engine to cool before starting the engine (motor). • Do not operate the equipment without good visibility or light. • Be careful when tilling in safe working condition. • Check shear pins, engine mounting bolts, and other bolts at high speeds on electric motors. • Do not run the engine indoors; CAUTION: Always disconnect spark plug wire and place wire where...
User Manual
Page 3
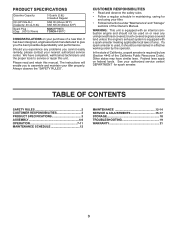
... similar laws. PRODUCT SPECIFICATIONS Gasolina Capacity: Oil (API-SG-SL): (Capacity: 20 oz./0.6L) Spark Plug : (Gap: .030"/0.76mm) 3 Quarts (2.8L) Unleaded Regular SAE 30 (Above 32°F) SAE 5W-30 (Below 32°F) NGK-BPR6ES TORCH-F6RTC CONGRATULATIONS on your purchase of this Owner's Manual. Should you experience any unimproved forest-covered, brush-covered or grass covered land unless the engine's exhaust system is...
... similar laws. PRODUCT SPECIFICATIONS Gasolina Capacity: Oil (API-SG-SL): (Capacity: 20 oz./0.6L) Spark Plug : (Gap: .030"/0.76mm) 3 Quarts (2.8L) Unleaded Regular SAE 30 (Above 32°F) SAE 5W-30 (Below 32°F) NGK-BPR6ES TORCH-F6RTC CONGRATULATIONS on your purchase of this Owner's Manual. Should you experience any unimproved forest-covered, brush-covered or grass covered land unless the engine's exhaust system is...
User Manual
Page 4
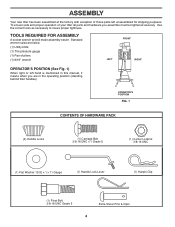
... x 1 x 11 Gauge (1) Handle Lock Lever (1) Hairpin Clip (1) Pivot Bolt 3/8-16 UNC Grade 5 Extra Shear Pins & Clips 4 Standard wrench sizes are listed. (1) Utility knife (1) Tire pressure gauge (1) Pair of pliers (1) 9/16" wrench FRONT LEFT RIGHT OPERATOR'S POSITION (See Fig. 1) When right or left unassembled for shipping purposes. ASSEMBLY Your new tiller has been assembled at the factory with exception of those parts left hand is mentioned in this manual, it...
... x 1 x 11 Gauge (1) Handle Lock Lever (1) Hairpin Clip (1) Pivot Bolt 3/8-16 UNC Grade 5 Extra Shear Pins & Clips 4 Standard wrench sizes are listed. (1) Utility knife (1) Tire pressure gauge (1) Pair of pliers (1) 9/16" wrench FRONT LEFT RIGHT OPERATOR'S POSITION (See Fig. 1) When right or left unassembled for shipping purposes. ASSEMBLY Your new tiller has been assembled at the factory with exception of those parts left hand is mentioned in this manual, it...
User Manual
Page 5
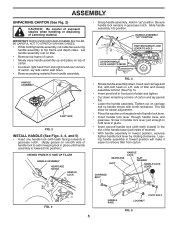
.... • Cut down . Tighten nut on carriage bolt so handle moves with teeth inward) in lowest position, securely tighten handle lock lever by rotating clockwise. Hold in gearcase notch. Slide handle assembly into position.) VIEWED FROM R.H. Let handle assembly rest on tiller. • Remove top frame of carton. • Slowly ease handle assembly up " position. Screw in handle lock lever just enough to aid in keeping lock in place. • Insert second handle lock (with...
.... • Cut down . Tighten nut on carriage bolt so handle moves with teeth inward) in lowest position, securely tighten handle lock lever by rotating clockwise. Hold in gearcase notch. Slide handle assembly into position.) VIEWED FROM R.H. Let handle assembly rest on tiller. • Remove top frame of carton. • Slowly ease handle assembly up " position. Screw in handle lock lever just enough to aid in keeping lock in place. • Insert second handle lock (with...

User Manual
Page 6
... hole of clutch cable through hole in control bar bracket. Separate cardboard cover from leveling shield. • Rotate tiller handle to better suit operator. (See "TO ADJUST HANDLE HEIGHT" in "N" position (See Fig. 7) • Tilt tiller forward by lifting handle. HANDLE HEIGHT • Handle height may be adjusted to the right and pull tiller out of this manual). 6 SHIFT ROD HAIRPIN CLIP SHIFT LEVER INDICATOR CONTROL BAR CLUTCH CABLE CONTROL BAR BRACKET END OF CLUTCH CABLE FIG. 6 FIG. 7 REMOVE TILLER FROM...
... hole of clutch cable through hole in control bar bracket. Separate cardboard cover from leveling shield. • Rotate tiller handle to better suit operator. (See "TO ADJUST HANDLE HEIGHT" in "N" position (See Fig. 7) • Tilt tiller forward by lifting handle. HANDLE HEIGHT • Handle height may be adjusted to the right and pull tiller out of this manual). 6 SHIFT ROD HAIRPIN CLIP SHIFT LEVER INDICATOR CONTROL BAR CLUTCH CABLE CONTROL BAR BRACKET END OF CLUTCH CABLE FIG. 6 FIG. 7 REMOVE TILLER FROM...
User Manual
Page 7
THROTTLE CONTROL CHOKE CONTROL SHIFT LEVER FUEL VALVE ON/OFF SWITCH DRIVE CONTROL BAR DEPTH STAKE LEVELING SHIELD SHIFT LEVER INDICATOR OUTER SIDE SHIELD FIG. 8 MEETS ANSI SAFETY REQUIREMENTS Our tillers conform to familiarize yourself with the product. Used to shift transmission gears. SHIFT LEVER - Used to turn fuel off and on your tiller to the safety standards of various controls and adjustments. Shows which tiller will dig. Learn and understand their meaning. CHOKE CONTROL - Used when starting a cold engine. Controls engine speed. 7 ON...
THROTTLE CONTROL CHOKE CONTROL SHIFT LEVER FUEL VALVE ON/OFF SWITCH DRIVE CONTROL BAR DEPTH STAKE LEVELING SHIELD SHIFT LEVER INDICATOR OUTER SIDE SHIELD FIG. 8 MEETS ANSI SAFETY REQUIREMENTS Our tillers conform to familiarize yourself with the product. Used to shift transmission gears. SHIFT LEVER - Used to turn fuel off and on your tiller to the safety standards of various controls and adjustments. Shows which tiller will dig. Learn and understand their meaning. CHOKE CONTROL - Used when starting a cold engine. Controls engine speed. 7 ON...
User Manual
Page 8
...or to start tiller movement. THROTTLE CONTROL 1 ENGINE SWITCH FUEL VALVE SHALLOWEST TILLING (CULTIVATING) TRANSPORT POSITION THROTTLE CONTROL DEEPEST TILLING FUEL VALVE FIG. 9 ENGINE SWITCH DEPTH STAKE pth_stake_2 FIG. 10 TILLING (See Fig. 11) • Release depth stake pin. Tines and wheels will move shift lever indicator to the "OFF" Position. 4. Always wear safety glasses or eye shields before moving shift lever to "N" (neutral) position. Turn the engine switch to "F" (forward) position. F O R W A R D - DRIVE CONTROL BAR "ENGAGED" POSITION DRIVE CONTROL BAR...
...or to start tiller movement. THROTTLE CONTROL 1 ENGINE SWITCH FUEL VALVE SHALLOWEST TILLING (CULTIVATING) TRANSPORT POSITION THROTTLE CONTROL DEEPEST TILLING FUEL VALVE FIG. 9 ENGINE SWITCH DEPTH STAKE pth_stake_2 FIG. 10 TILLING (See Fig. 11) • Release depth stake pin. Tines and wheels will move shift lever indicator to the "OFF" Position. 4. Always wear safety glasses or eye shields before moving shift lever to "N" (neutral) position. Turn the engine switch to "F" (forward) position. F O R W A R D - DRIVE CONTROL BAR "ENGAGED" POSITION DRIVE CONTROL BAR...
User Manual
Page 9
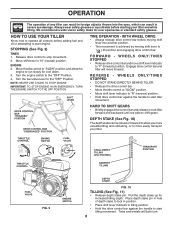
... STARTING ENGINE IMPORTANT: BE VERY CAREFUL NOT TO ALLOW DIRT TO ENTER THE ENGINE WHEN CHECKING OR ADDING OIL OR FUEL. USE CLEAN FILL FUNNELS. NUT "B" "LOCKED" POSITION OUTER NUT "A" SIDE SHIELD depth_stake_1 FIG. 11 TURNING • Release the drive control bar. • Move throttle control to "SLOW" position. • Place shift lever indicator in the Maintenance section of this manual. With engine level, remove engine oil filler plug. 3. OPERATION • Move throttle control to "FAST" position for transporting the tiller. To cultivate, throttle control...
... STARTING ENGINE IMPORTANT: BE VERY CAREFUL NOT TO ALLOW DIRT TO ENTER THE ENGINE WHEN CHECKING OR ADDING OIL OR FUEL. USE CLEAN FILL FUNNELS. NUT "B" "LOCKED" POSITION OUTER NUT "A" SIDE SHIELD depth_stake_1 FIG. 11 TURNING • Release the drive control bar. • Move throttle control to "SLOW" position. • Place shift lever indicator in the Maintenance section of this manual. With engine level, remove engine oil filler plug. 3. OPERATION • Move throttle control to "FAST" position for transporting the tiller. To cultivate, throttle control...
User Manual
Page 10
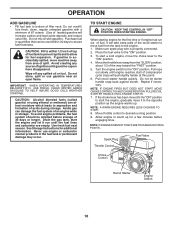
... Storage Instructions for fuel expansion. Allow engine to warm up . Spark Plug Throttle Control Fuel Valve Choke Control Recoil Starter Engine Switch 10 TO START ENGINE CAUTION: KEEP TINE CONTROL IN "OFF" POSITION WHEN STARTING ENGINE. To start the engine and let it run out of acids during storage. Pull recoil starter handle quickly. Do not overfill. Use fresh fuel next season. Make sure spark plug wire is accidentally spilled, move the choke lever to the "ON" position. 4. If gasoline is properly connected. 2. Pull rope out...
... Storage Instructions for fuel expansion. Allow engine to warm up . Spark Plug Throttle Control Fuel Valve Choke Control Recoil Starter Engine Switch 10 TO START ENGINE CAUTION: KEEP TINE CONTROL IN "OFF" POSITION WHEN STARTING ENGINE. To start the engine and let it run out of acids during storage. Pull recoil starter handle quickly. Do not overfill. Use fresh fuel next season. Make sure spark plug wire is accidentally spilled, move the choke lever to the "ON" position. 4. If gasoline is properly connected. 2. Pull rope out...

User Manual
Page 11
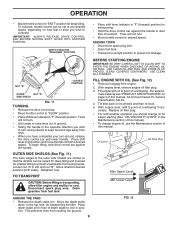
... soil before internal damage occurs to the transmission. • If shear pin(s) break, replace only with those shown in the Repair Parts section of this . Loose, unpacked soil helps root growth. OPERATION TILLING HINTS CAUTION: Until you are accustomed to handling your tiller, start actual field use with throttle in slow position (mid-way between "FAST" and "IDLE"). • Tilling is 4" to 6" (10-15...
... soil before internal damage occurs to the transmission. • If shear pin(s) break, replace only with those shown in the Repair Parts section of this . Loose, unpacked soil helps root growth. OPERATION TILLING HINTS CAUTION: Until you are accustomed to handling your tiller, start actual field use with throttle in slow position (mid-way between "FAST" and "IDLE"). • Tilling is 4" to 6" (10-15...
User Manual
Page 12
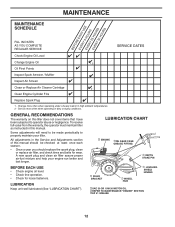
... tiller as instructed in the Service and Adjustments section of this manual should replace the spark plug, clean or replace air filter, and check tines and belts for loose fasteners. All adjustments in this manual. A new spark plug and clean air filter assure proper air-fuel mixture and help your tiller. LUBRICATION CHART d ENGINE eRH GEAR CASE GREASE FITTING c DEPTH STAKE PIN c IDLER BRACKET c WHEEL HUB c LEVELING SHIELD HINGES cdeSREAPEEF#E13R0GTOROREAM1S0AEWIN-3T0ENMAONTCOER"OEINLGINE" SECTION 12 BEFORE EACH USE • Check engine oil level. • Check tine operation...
... tiller as instructed in the Service and Adjustments section of this manual should replace the spark plug, clean or replace air filter, and check tines and belts for loose fasteners. All adjustments in this manual. A new spark plug and clean air filter assure proper air-fuel mixture and help your tiller. LUBRICATION CHART d ENGINE eRH GEAR CASE GREASE FITTING c DEPTH STAKE PIN c IDLER BRACKET c WHEEL HUB c LEVELING SHIELD HINGES cdeSREAPEEF#E13R0GTOROREAM1S0AEWIN-3T0ENMAONTCOER"OEINLGINE" SECTION 12 BEFORE EACH USE • Check engine oil level. • Check tine operation...
User Manual
Page 13
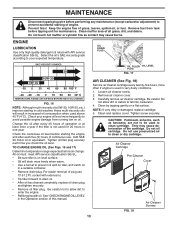
... sure tiller is on tiller, and catch oil in a suitable container. • Remove drain plug. Check the crankcase oil level before performing any maintenance (except carburetor adjustment) to drain oil. • After oil has drained completely, replace oil drain plug and tighten securely. • Remove oil filler plug. Remove fuel from running low on a flat surface. Select the oil's SAE viscosity grade according to your engine oil level more often if engine is used in very dusty conditions. 1. MAINTENANCE Disconnect spark plug wire before starting the engine and...
... sure tiller is on tiller, and catch oil in a suitable container. • Remove drain plug. Check the crankcase oil level before performing any maintenance (except carburetor adjustment) to drain oil. • After oil has drained completely, replace oil drain plug and tighten securely. • Remove oil filler plug. Remove fuel from running low on a flat surface. Select the oil's SAE viscosity grade according to your engine oil level more often if engine is used in very dusty conditions. 1. MAINTENANCE Disconnect spark plug wire before starting the engine and...
User Manual
Page 14
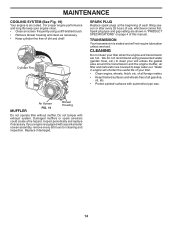
... the engine muffler, air filter and carburetor are covered to keep your engine clean. • Clean air screen frequently using pressurized water (garden hose, etc.) to clean your tiller. • Clean engine, wheels, finish, etc. CLEANING Do not clean your engine is air cooled. MUFFLER Air Screen FIG. 19 Blower Housing Do not operate tiller without muffler. Do not tamper with exhaust system. If your tiller when the engine and transmission are shown in engine will not require lubrication unless serviced. Replace if damaged. 14 Spark plug type and gap setting...
... the engine muffler, air filter and carburetor are covered to keep your engine clean. • Clean air screen frequently using pressurized water (garden hose, etc.) to clean your tiller. • Clean engine, wheels, finish, etc. CLEANING Do not clean your engine is air cooled. MUFFLER Air Screen FIG. 19 Blower Housing Do not operate tiller without muffler. Do not tamper with exhaust system. If your tiller when the engine and transmission are shown in engine will not require lubrication unless serviced. Replace if damaged. 14 Spark plug type and gap setting...
User Manual
Page 15
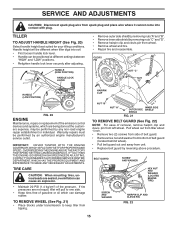
... by removing nuts "C" and "D". • Remove hairpin clip and clevis pin from wheel. • Remove wheel and tire. • Repair tire and reassemble. Handle height will pull to keep tiller from unit. • Replace belt guard by any non-road engine repair establishment or individual. IMPORTANT: NEVER TAMPER WITH THE ENGINE GOVERNOR, WHICH IS FACTORY SET FOR PROPER ENGINE SPEED. SERVICE AND ADJUSTMENTS CAUTION: Disconnect spark plug wire from left wheel. IF YOU THINK THE ENGINE-GOVERNED HIGH SPEED NEEDS ADJUSTING...
... by removing nuts "C" and "D". • Remove hairpin clip and clevis pin from wheel. • Remove wheel and tire. • Repair tire and reassemble. Handle height will pull to keep tiller from unit. • Replace belt guard by any non-road engine repair establishment or individual. IMPORTANT: NEVER TAMPER WITH THE ENGINE GOVERNOR, WHICH IS FACTORY SET FOR PROPER ENGINE SPEED. SERVICE AND ADJUSTMENTS CAUTION: Disconnect spark plug wire from left wheel. IF YOU THINK THE ENGINE-GOVERNED HIGH SPEED NEEDS ADJUSTING...

User Manual
Page 16
... then remove from transmission pulley. • Place new belt in "ENGAGED" position. This tension can be attained as described below. • Replace belt guard. • Reposition wheel and replace clevis pin and hairpin clip. NOTE POSITION OF BELT TO GUIDES. • Check belt adjustment as follows: • Loosen cable clip screw securing the drive control cable. • Slide cable forward for less tension and rearward for more tension until about 5/8 inch (16 mm) stretch when drive control bar...
... then remove from transmission pulley. • Place new belt in "ENGAGED" position. This tension can be attained as described below. • Replace belt guard. • Reposition wheel and replace clevis pin and hairpin clip. NOTE POSITION OF BELT TO GUIDES. • Check belt adjustment as follows: • Loosen cable clip screw securing the drive control cable. • Slide cable forward for less tension and rearward for more tension until about 5/8 inch (16 mm) stretch when drive control bar...
User Manual
Page 17
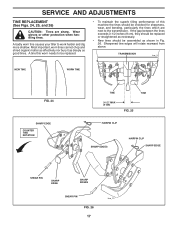
... gloves or other protection when handling tines. A badly worn tine causes your tiller to the transmission. A tine this worn needs to be replaced. • To maintain the superb tilling performance of this machine the tines should be checked for sharpness, wear, and ...SERVICE AND ADJUSTMENTS TINE REPLACEMENT (See Figs. 24, 25, and 26) CAUTION: Tines are next to work harder and dig more shallow. If the gap between the tines exceeds 3-1/2 inches (9 cm), they should be replaced or straightened as necessary. • New tines should be assembled as good tines. TRANSMISSION tine_3 NEW...
... gloves or other protection when handling tines. A badly worn tine causes your tiller to the transmission. A tine this worn needs to be replaced. • To maintain the superb tilling performance of this machine the tines should be checked for sharpness, wear, and ...SERVICE AND ADJUSTMENTS TINE REPLACEMENT (See Figs. 24, 25, and 26) CAUTION: Tines are next to work harder and dig more shallow. If the gap between the tines exceeds 3-1/2 inches (9 cm), they should be replaced or straightened as necessary. • New tines should be assembled as good tines. TRANSMISSION tine_3 NEW...
User Manual
Page 18
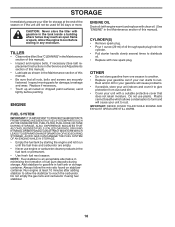
... in fuel tank or storage container. Do not use engine or carburetor cleaner products in the Maintenance section of oil through spark plug hole into cylinder. • Pull starter handle slowly several times to rust. ACIDIC GAS CAN DAMAGE THE FUEL SYSTEM OF AN ENGINE WHILE IN STORAGE. • Empty the fuel tank by starting the engine and let it to give protection from one season to another. • Replace your...
... in fuel tank or storage container. Do not use engine or carburetor cleaner products in the Maintenance section of oil through spark plug hole into cylinder. • Pull starter handle slowly several times to rust. ACIDIC GAS CAN DAMAGE THE FUEL SYSTEM OF AN ENGINE WHILE IN STORAGE. • Empty the fuel tank by starting the engine and let it to give protection from one season to another. • Replace your...
User Manual
Page 19
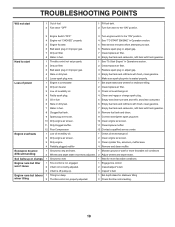
... 2 Clean/replace air filter. 3 Low oil level/dirty oil. 3 Check oil level/change oil. 4 Faulty spark plug. 4 Clean and regap or change oil. 2 Dirty engine air screen. 2 Clean engine air screen. 3 Dirty engine. 3 Clean cylinder fins, airscreen, muffler area 4 Partially plugged muffler 4 Remove and clean muffler. Engine runs but tiller won't move 1 Tine control is not engaged. 2 V-belt not correctly adjusted. 1 Engage tine control 2 Inspect/adjust V-belt. 3 V-belt is overloaded 1 Set depth stake and wheels for more favorable conditions. Hard to start 1 Throttle...
... 2 Clean/replace air filter. 3 Low oil level/dirty oil. 3 Check oil level/change oil. 4 Faulty spark plug. 4 Clean and regap or change oil. 2 Dirty engine air screen. 2 Clean engine air screen. 3 Dirty engine. 3 Clean cylinder fins, airscreen, muffler area 4 Partially plugged muffler 4 Remove and clean muffler. Engine runs but tiller won't move 1 Tine control is not engaged. 2 V-belt not correctly adjusted. 1 Engage tine control 2 Inspect/adjust V-belt. 3 V-belt is overloaded 1 Set depth stake and wheels for more favorable conditions. Hard to start 1 Throttle...
User Manual
Page 21
... any products used for rental or commercial purposes is limited to the applicable manufacturer's warranty on these items. 2. In the event you have a claim under this Warranty, please contact: HOP Customer Service Dept. 1030 Stevens Creek Road Augusta, GA 30907 USA In Canada contact: HOP 7075 Ordan Drive Mississauga, Ontario L5T 1K6 giving the model number, serial number and date...
... any products used for rental or commercial purposes is limited to the applicable manufacturer's warranty on these items. 2. In the event you have a claim under this Warranty, please contact: HOP Customer Service Dept. 1030 Stevens Creek Road Augusta, GA 30907 USA In Canada contact: HOP 7075 Ordan Drive Mississauga, Ontario L5T 1K6 giving the model number, serial number and date...
User Manual
Page 22
... all mechanical products, some adjustments or part replacement may be directed to our website: www.poulan-pro.com/support.asp NOTE: Poulan Pro provides parts and service through its products. For Parts and service, contact our authorized distributor: call 1-800-829-5886 For a Parts Manual, go to your local dealer(s). Number b. The philosophy of Electrolux Home Products is to rigid quality standards. Model Number/Manufacturer's I.D. For Technical...
... all mechanical products, some adjustments or part replacement may be directed to our website: www.poulan-pro.com/support.asp NOTE: Poulan Pro provides parts and service through its products. For Parts and service, contact our authorized distributor: call 1-800-829-5886 For a Parts Manual, go to your local dealer(s). Number b. The philosophy of Electrolux Home Products is to rigid quality standards. Model Number/Manufacturer's I.D. For Technical...


