
User Manual
Page 1
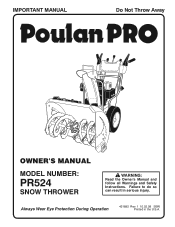
Failure to do so can result in the U.S.A. Always Wear Eye Protection During Operation 421892 Rev. 1 10.02.08 SBW Printed in serious injury. IMPORTANT MANUAL Do Not Throw Away OWNER'S MANUAL MODEL NUMBER: PR524 SNOW THROWER WARNING: Read the Owner's Manual and follow all Warnings and Safety Instructions.
Failure to do so can result in the U.S.A. Always Wear Eye Protection During Operation 421892 Rev. 1 10.02.08 SBW Printed in serious injury. IMPORTANT MANUAL Do Not Throw Away OWNER'S MANUAL MODEL NUMBER: PR524 SNOW THROWER WARNING: Read the Owner's Manual and follow all Warnings and Safety Instructions.
User Manual
Page 2
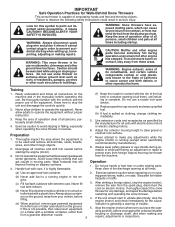
... container, rather than from these areas. WARNING: Always disconnect spark plug wire and place it where it is highly flammable (f) Keep the nozzle in the manual(s) before starting motors. 6. WARNING: This snow thrower is not possible, then refuel such equipment on clothing, change clothing immediately. 5. Do not operate the equipment without...
... container, rather than from these areas. WARNING: Always disconnect spark plug wire and place it where it is highly flammable (f) Keep the nozzle in the manual(s) before starting motors. 6. WARNING: This snow thrower is not possible, then refuel such equipment on clothing, change clothing immediately. 5. Do not operate the equipment without...
User Manual
Page 3
...or muffler. SHUT THE ENGINE OFF! 2. Wait 10 seconds to be sure the equipment is to be stored for proper tightness to operator's manual for important details if the snow thrower is in safe working . 10. Maintenance and Storage 1. Always refer to be sure the impeller blades... ON A DECAL ATTACHED TO THE REAR OF THE SNOW THROWER HOUSING. Do not overload the machine capacity by the manufacturer of this owner's manual. Use only attachments and accessories approved by attempting to assemble and maintain your snow thrower. • Follow the instructions under "Maintenance" and ...
...or muffler. SHUT THE ENGINE OFF! 2. Wait 10 seconds to be sure the equipment is to be stored for proper tightness to operator's manual for important details if the snow thrower is in safe working . 10. Maintenance and Storage 1. Always refer to be sure the impeller blades... ON A DECAL ATTACHED TO THE REAR OF THE SNOW THROWER HOUSING. Do not overload the machine capacity by the manufacturer of this owner's manual. Use only attachments and accessories approved by attempting to assemble and maintain your snow thrower. • Follow the instructions under "Maintenance" and ...

User Manual
Page 5
... exception of those parts left unassembled for shipping purposes. The toolbox is provided on top of the belt cover. Reading the entire manual will familiarize you with the unit, which will assist you in the parts bag. Remove all accessible loose parts and parts boxes ...two (2) screws securing the auger housing to the operating position and tighten handle knobs securely. ASSEMBLY / PRE-OPERATION Read these instructions and this manual in its entirety before you attempt to assemble or operate your snow thrower, all four corners of carton and lay panels flat. 3. Cut ...
... exception of those parts left unassembled for shipping purposes. The toolbox is provided on top of the belt cover. Reading the entire manual will familiarize you with the unit, which will assist you in the parts bag. Remove all accessible loose parts and parts boxes ...two (2) screws securing the auger housing to the operating position and tighten handle knobs securely. ASSEMBLY / PRE-OPERATION Read these instructions and this manual in its entirety before you attempt to assemble or operate your snow thrower, all four corners of carton and lay panels flat. 3. Cut ...
User Manual
Page 8
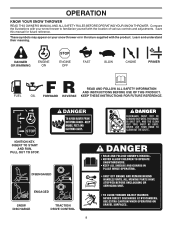
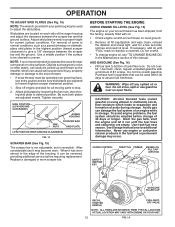
... your snow thrower to familiarize yourself with the product. Learn and understand their meaning. INSERT TO START AND RUN, PULL OUT TO STOP. Save this manual for future reference. KEEP THESE INSTRUCTIONS FOR FUTURE REFERENCE. Compare the illustrations with your snow thrower or in literature supplied with the location of various... WARNING PRIMER FORWARD REVERSE READ AND FOLLOW ALL SAFETY INFORMATION AND INSTRUCTIONS BEFORE USE OF THIS PRODUCT. OPERATION KNOW YOUR SNOW THROWER READ THIS OWNER'S MANUAL AND ALL SAFETY RULES BEFORE OPERATING YOUR SNOW THROWER.
... your snow thrower to familiarize yourself with the product. Learn and understand their meaning. INSERT TO START AND RUN, PULL OUT TO STOP. Save this manual for future reference. KEEP THESE INSTRUCTIONS FOR FUTURE REFERENCE. Compare the illustrations with your snow thrower or in literature supplied with the location of various... WARNING PRIMER FORWARD REVERSE READ AND FOLLOW ALL SAFETY INFORMATION AND INSTRUCTIONS BEFORE USE OF THIS PRODUCT. OPERATION KNOW YOUR SNOW THROWER READ THIS OWNER'S MANUAL AND ALL SAFETY RULES BEFORE OPERATING YOUR SNOW THROWER.
User Manual
Page 12
... snow in normal conditions, such as gravel, rocks or other debris, can cause serious personal injury, property damage or damage to the edge of this manual. Purchase fuel in quantities that can be emptied before requiring replacement. NOTE: It is reversible. When it has worn almost to the snow thrower. •...
... snow in normal conditions, such as gravel, rocks or other debris, can cause serious personal injury, property damage or damage to the edge of this manual. Purchase fuel in quantities that can be emptied before requiring replacement. NOTE: It is reversible. When it has worn almost to the snow thrower. •...
User Manual
Page 13
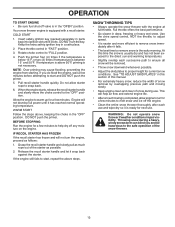
... use. Full throttle offers the best performance. • Go slower in the "OFF" position. At this time the snow is in this section of this manual. • For extremely heavy snow, reduce the width of snow removal by overlapping previous path and moving slowly. • Keep engine clean and clear of...
... use. Full throttle offers the best performance. • Go slower in the "OFF" position. At this time the snow is in this section of this manual. • For extremely heavy snow, reduce the width of snow removal by overlapping previous path and moving slowly. • Keep engine clean and clear of...
User Manual
Page 14
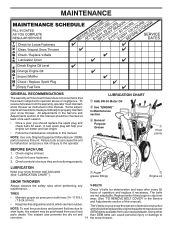
... from your local (OEM) belts available from your nearest dealer. Check engine oil level. 2. Check for wear. The V-belts on this manual). • Keep tires free of injury to operator abuse or negligence. To receive full value from wear. (See "TO REMOVE BELT COVER" in... this manual. Check controls to be sure they begin to corrosion. 14 the snow thrower. All adjustments in this manual. NOTE: Use only Original Equipment Manufacturer (OEM) parts to properly maintain your snow thrower ...
... from your local (OEM) belts available from your nearest dealer. Check engine oil level. 2. Check for wear. The V-belts on this manual). • Keep tires free of injury to operator abuse or negligence. To receive full value from wear. (See "TO REMOVE BELT COVER" in... this manual. Check controls to be sure they begin to corrosion. 14 the snow thrower. All adjustments in this manual. NOTE: Use only Original Equipment Manufacturer (OEM) parts to properly maintain your snow thrower ...

User Manual
Page 15
...NOTE: Although multi-viscosity oils (5W30, 10W30 etc.) improve starting the engine and after each season or after every 100 hours of this manual). 1. Check the crankcase oil level before next oil change. Do not overfill. MAINTENANCE AUGER GEAR CASE • The gear case was filled... occurs first. Check your snow thrower after each time you check the oil level. Wipe off any spilled oil. Clean the outside of this manual. 9. NOTE: The left wheel removed, will result in a suitable container. 4. Remove drain plug and drain oil in increased oil consumption when...
...NOTE: Although multi-viscosity oils (5W30, 10W30 etc.) improve starting the engine and after each season or after every 100 hours of this manual). 1. Check the crankcase oil level before next oil change. Do not overfill. MAINTENANCE AUGER GEAR CASE • The gear case was filled... occurs first. Check your snow thrower after each time you check the oil level. Wipe off any spilled oil. Clean the outside of this manual. 9. NOTE: The left wheel removed, will result in a suitable container. 4. Remove drain plug and drain oil in increased oil consumption when...
User Manual
Page 16
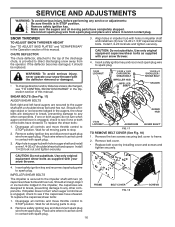
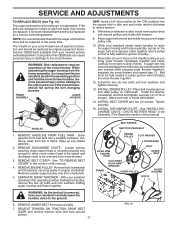
...SHAFT FIG. 17 TO REMOVE BELT COVER (See Fig. 18) 1. Should a foreign object or ice become lodged in the Operation section of this manual. To replace the capscrew/shear bolts: 1. Place wire where it cannot come in the impeller, the capscrews are designed to break, preventing damage to... Both right and left-hand augers are designed to break, preventing damage to the auger shaft with holes in the Operation section of this manual. Should a foreign object or ice become lodged in contact with the deflector removed or damaged. • To change direction and/or distance...
...SHAFT FIG. 17 TO REMOVE BELT COVER (See Fig. 18) 1. Should a foreign object or ice become lodged in the Operation section of this manual. To replace the capscrew/shear bolts: 1. Place wire where it cannot come in the impeller, the capscrews are designed to break, preventing damage to... Both right and left-hand augers are designed to break, preventing damage to the auger shaft with holes in the Operation section of this manual. Should a foreign object or ice become lodged in contact with the deflector removed or damaged. • To change direction and/or distance...
User Manual
Page 17
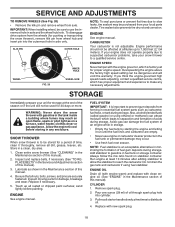
...REMOVE GASOLINE FROM FUEL TANK - REMOVE DISCHARGE CHUTE - REMOVE AUGER BELT from your assistant standing in the Assembly / Pre-Operation section of this manual. 4. Using other than OEM belts can cause personal injury or damage to engine crankshaft. Move idler arm so it is recommended that the belt...the groove of auger pulley only. 10. WARNING: Belt replacement requires separation of the snow thrower. Place belt in this section of this manual. See "TO REMOVE BELT COVER" in pulley groove and slide pulley on idler, install new traction drive belt around and inside belt keeper...
...REMOVE GASOLINE FROM FUEL TANK - REMOVE DISCHARGE CHUTE - REMOVE AUGER BELT from your assistant standing in the Assembly / Pre-Operation section of this manual. 4. Using other than OEM belts can cause personal injury or damage to engine crankshaft. Move idler arm so it is recommended that the belt...the groove of auger pulley only. 10. WARNING: Belt replacement requires separation of the snow thrower. Place belt in this section of this manual. See "TO REMOVE BELT COVER" in pulley groove and slide pulley on idler, install new traction drive belt around and inside belt keeper...
User Manual
Page 18
...tank inside a building where fumes may occur. • Use fresh fuel next season. Inspect moving parts for a period of this manual). ENGINE See engine manual. Also, alcohol blended fuels (called gasohol or using fuel stabilizer. Always follow the mix ratio found on a furnace, water heater,...pin into cylinder. 3. Be sure that all rusted or chipped paint surfaces; sand lightly before storing in the Maintenance section of this manual. 4. Pull recoil starter handle slowly a few times to make any enclosure. Tire sealant also prevents tire dry rot and corrosion. ...
...tank inside a building where fumes may occur. • Use fresh fuel next season. Inspect moving parts for a period of this manual). ENGINE See engine manual. Also, alcohol blended fuels (called gasohol or using fuel stabilizer. Always follow the mix ratio found on a furnace, water heater,...pin into cylinder. 3. Be sure that all rusted or chipped paint surfaces; sand lightly before storing in the Maintenance section of this manual. 4. Pull recoil starter handle slowly a few times to make any enclosure. Tire sealant also prevents tire dry rot and corrosion. ...
User Manual
Page 19
Turn fuel shut-off valve (if so equipped) in the Operation section of this manual. Reconnect spark plug wire. 2. Loose parts or damaged augers or impeller. 1. Replace damaged parts. Loss of pulley. 2. drive / slowing 2. Auger belt is off ... • Replace your gasoline can starts to rust. Safety ignition switch OUT. 3. Blockage in STOP position. 5. Water in manual unless directed to protect it in need of this manual. 7. Replace spark plug. 10. Rust and/or dirt in your gasoline will cause your can if your snow thrower to ...
Turn fuel shut-off valve (if so equipped) in the Operation section of this manual. Reconnect spark plug wire. 2. Loose parts or damaged augers or impeller. 1. Replace damaged parts. Loss of pulley. 2. drive / slowing 2. Auger belt is off ... • Replace your gasoline can starts to rust. Safety ignition switch OUT. 3. Blockage in STOP position. 5. Water in manual unless directed to protect it in need of this manual. 7. Replace spark plug. 10. Rust and/or dirt in your gasoline will cause your can if your snow thrower to ...
User Manual
Page 35
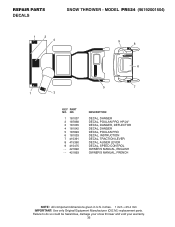
..., DANGER, DEFLECTOR DECAL, DANGER DECAL, POULAN PRO DECAL, INSTRUCTION DECAL, TRACTION LEVER DECAL, AUGER LEVER DECAL, SPEED CONTROL OWNER'S MANUAL, ENGLISH OWNER'S MANUAL, FRENCH NOTE: All component dimensions given in U.S. inches. 1 inch = 25.4 mm IMPORTANT: Use only Original Equipment Manufacturer (O.E.M.) replacement parts. REPAIR PARTS DECALS SNOW THROWER - MODEL PR524 (96192001504) 1 2 4 9 8 6 1 3 5 7 KEY PART NO. Failure...
..., DANGER, DEFLECTOR DECAL, DANGER DECAL, POULAN PRO DECAL, INSTRUCTION DECAL, TRACTION LEVER DECAL, AUGER LEVER DECAL, SPEED CONTROL OWNER'S MANUAL, ENGLISH OWNER'S MANUAL, FRENCH NOTE: All component dimensions given in U.S. inches. 1 inch = 25.4 mm IMPORTANT: Use only Original Equipment Manufacturer (O.E.M.) replacement parts. REPAIR PARTS DECALS SNOW THROWER - MODEL PR524 (96192001504) 1 2 4 9 8 6 1 3 5 7 KEY PART NO. Failure...


