
User Manual
Page 2
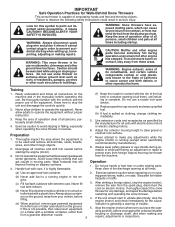
... parts. restarting and operating the snow thrower. IMPORTANT Safe Operation Practices for any damage, and repair the damage before starting the engine (motor). 3. Exercise caution to a running (except when specifically recommended by the manufacturer for hidden hazards or traffic. (c) Fill fuel tank outdoors with the controls and the proper use a nozzle lock-open device. (g) Replace gasoline cap securely and wipe up , transporting, adjusting or making any adjustments while the engine (motor) is highly...
... parts. restarting and operating the snow thrower. IMPORTANT Safe Operation Practices for any damage, and repair the damage before starting the engine (motor). 3. Exercise caution to a running (except when specifically recommended by the manufacturer for hidden hazards or traffic. (c) Fill fuel tank outdoors with the controls and the proper use a nozzle lock-open device. (g) Replace gasoline cap securely and wipe up , transporting, adjusting or making any adjustments while the engine (motor) is highly...
User Manual
Page 3
... engine or muffler. Wait 10 seconds to prevent freeze-up of a new snow thrower. Run the machine a few minutes after throwing snow to be sure of your snow thrower. • Follow the instructions under "Maintenance" and "Storage" sections of this manual. Disconnect the spark plug wire and keep a firm hold on your snow thrower properly. Never operate the machine at high transport speeds on slopes. 9. Always be sure the impeller blades...
... engine or muffler. Wait 10 seconds to prevent freeze-up of a new snow thrower. Run the machine a few minutes after throwing snow to be sure of your snow thrower. • Follow the instructions under "Maintenance" and "Storage" sections of this manual. Disconnect the spark plug wire and keep a firm hold on your snow thrower properly. Never operate the machine at high transport speeds on slopes. 9. Always be sure the impeller blades...

User Manual
Page 5
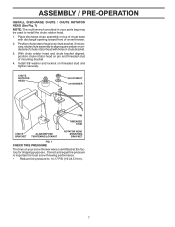
... head to snow thrower and making adjustments to lower handle. To ensure safe and proper operation of carton and lay panels flat. 3. Use the correct tools as nuts, washers, bolts, etc., necessary to assemble or operate your snow thrower, all four corners of your new snow thrower. UPPER HANDLE HANDLE KNOB SPEED CONTROL ROD PLASTIC TIE REMOVE SNOW THROWER FROM CARTON 1. Cut down all parts and hardware you assemble must be used for additional loose parts. UNFOLD UPPER HANDLE 1. Additional carriage bolts...
... head to snow thrower and making adjustments to lower handle. To ensure safe and proper operation of carton and lay panels flat. 3. Use the correct tools as nuts, washers, bolts, etc., necessary to assemble or operate your snow thrower, all four corners of your new snow thrower. UPPER HANDLE HANDLE KNOB SPEED CONTROL ROD PLASTIC TIE REMOVE SNOW THROWER FROM CARTON 1. Cut down all parts and hardware you assemble must be used for additional loose parts. UNFOLD UPPER HANDLE 1. Additional carriage bolts...
User Manual
Page 7
... pressure to align square and pin on pin and threaded stud of chute base with holes in your snow thrower were overinflated at the factory for shipping purposes. If necessary, rotate chute assembly to 14-17 PSI (19-24.5 N-m). 7 With chute rotator head and chute bracket aligned, position chute rotator head on underside of chute rotator head with discharge opening toward front of snow thrower. 2. ASSEMBLY / PRE-OPERATION INSTALL DISCHARGE CHUTE / CHUTE ROTATOR HEAD...
... pressure to align square and pin on pin and threaded stud of chute base with holes in your snow thrower were overinflated at the factory for shipping purposes. If necessary, rotate chute assembly to 14-17 PSI (19-24.5 N-m). 7 With chute rotator head and chute bracket aligned, position chute rotator head on underside of chute rotator head with discharge opening toward front of snow thrower. 2. ASSEMBLY / PRE-OPERATION INSTALL DISCHARGE CHUTE / CHUTE ROTATOR HEAD...
User Manual
Page 8
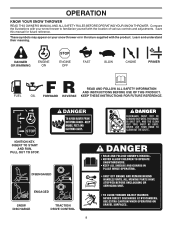
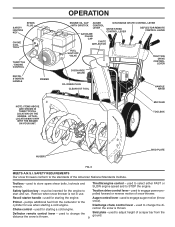
... SNOW DISCHARGE TRACTION DRIVE CONTROL 8 Compare the illustrations with your snow thrower or in literature supplied with the location of various controls and adjustments. Learn and understand their meaning. KEEP THESE INSTRUCTIONS FOR FUTURE REFERENCE. INSERT TO START AND RUN, PULL OUT TO STOP. Save this manual for future reference. OPERATION KNOW YOUR SNOW THROWER READ THIS OWNER'S MANUAL AND ALL SAFETY RULES BEFORE OPERATING YOUR SNOW THROWER. DANGER OR WARNING PRIMER...
... SNOW DISCHARGE TRACTION DRIVE CONTROL 8 Compare the illustrations with your snow thrower or in literature supplied with the location of various controls and adjustments. Learn and understand their meaning. KEEP THESE INSTRUCTIONS FOR FUTURE REFERENCE. INSERT TO START AND RUN, PULL OUT TO STOP. Save this manual for future reference. OPERATION KNOW YOUR SNOW THROWER READ THIS OWNER'S MANUAL AND ALL SAFETY RULES BEFORE OPERATING YOUR SNOW THROWER. DANGER OR WARNING PRIMER...
User Manual
Page 9
...change the distance the snow is thrown. used to store spare shear bolts, locknuts and wrench. Throttle/engine control - Remove when snow thrower is not in use when starting a cold engine. Choke control - SAFETY IGNITION KEY SPARK PLUG CHOKE CONTROL THROTTLE / ENGINE CONTROL RECOIL STARTER HANDLE PRIMER NOTE: ITEMS ABOVE ARE SHOWN IN THEIR TYPICAL LOCATION ON THE ENGINE. must be inserted for starting a cold engine. used for the engine to the snow). OPERATION ENGINE OIL CAP WITH DIPSTICK AUGER CONTROL LEVER DISCHARGE CHUTE CONTROL LEVER DRIVE SPEED...
...change the distance the snow is thrown. used to store spare shear bolts, locknuts and wrench. Throttle/engine control - Remove when snow thrower is not in use when starting a cold engine. Choke control - SAFETY IGNITION KEY SPARK PLUG CHOKE CONTROL THROTTLE / ENGINE CONTROL RECOIL STARTER HANDLE PRIMER NOTE: ITEMS ABOVE ARE SHOWN IN THEIR TYPICAL LOCATION ON THE ENGINE. must be inserted for starting a cold engine. used for the engine to the snow). OPERATION ENGINE OIL CAP WITH DIPSTICK AUGER CONTROL LEVER DISCHARGE CHUTE CONTROL LEVER DRIVE SPEED...

User Manual
Page 10
... operate the snow thrower with the fuel shut-off valve is located beneath the fuel tank on discharge chute control lever and move lever forward to stop throwing snow. Be sure lever springs back and locks into desired position. Move lever back to "STOP" position. 2. NOTE: Never use . WARNING: If the discharge chute or auger become clogged, shut-off engine and wait for all controls before adding fuel or attempting to start a warm engine. • To engage choke, turn...
... operate the snow thrower with the fuel shut-off valve is located beneath the fuel tank on discharge chute control lever and move lever forward to stop throwing snow. Be sure lever springs back and locks into desired position. Move lever back to "STOP" position. 2. NOTE: Never use . WARNING: If the discharge chute or auger become clogged, shut-off engine and wait for all controls before adding fuel or attempting to start a warm engine. • To engage choke, turn...
User Manual
Page 11
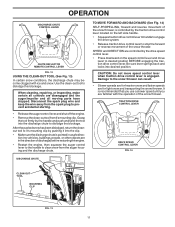
Disconnect the spark plug wire and keep the wire away from the spark plug to prevent accidental starting. • Release the auger control lever and shut off the engine. • Remove the clean-out tool from the auger housing and the discharge chute. SPEED and DIRECTION are controlled by the traction drive control lever located on the speed control lever and move speed control lever when traction drive control lever is recommended that you use a slower speed until you are in a safe direction (no vehicles...
Disconnect the spark plug wire and keep the wire away from the spark plug to prevent accidental starting. • Release the auger control lever and shut off the engine. • Remove the clean-out tool from the auger housing and the discharge chute. SPEED and DIRECTION are controlled by the traction drive control lever located on the speed control lever and move speed control lever when traction drive control lever is recommended that you use a slower speed until you are in a safe direction (no vehicles...
User Manual
Page 12
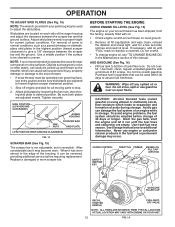
... the scraper bar and the ground. See Storage Instructions for a few seconds, remove and read oil level. NOTE: It is reversible. Do not store, spill or use engine or carburetor cleaner products in the fuel tank or permanent damage may be sure skid plates are adjusted to lowest (highest scraper clearance) position. 1. CHOKE CONTROL THROTTLE PRIMER ENGINE OIL FILL CAP / DIPSTICK SAFETY IGNITION KEY GASOLINE FILLER CAP RECOIL STARTER HANDLE FUEL SHUTOFF VALVE NOTE: ALL...
... the scraper bar and the ground. See Storage Instructions for a few seconds, remove and read oil level. NOTE: It is reversible. Do not store, spill or use engine or carburetor cleaner products in the fuel tank or permanent damage may be sure skid plates are adjusted to lowest (highest scraper clearance) position. 1. CHOKE CONTROL THROTTLE PRIMER ENGINE OIL FILL CAP / DIPSTICK SAFETY IGNITION KEY GASOLINE FILLER CAP RECOIL STARTER HANDLE FUEL SHUTOFF VALVE NOTE: ALL...
User Manual
Page 13
... pull as much rope out of the snow thrower. 13 Use the drive speed control, NOT the throttle, to adjust speed. • It is easier and more efficient to remove snow immediately after each successive path to the safe operation of the starter as follows: 1. Allow the engine to warm up for a few minutes. Full throttle offers the best performance. • Go slower in the "OPEN" position. OPERATION TO START ENGINE...
... pull as much rope out of the snow thrower. 13 Use the drive speed control, NOT the throttle, to adjust speed. • It is easier and more efficient to remove snow immediately after each successive path to the safe operation of the starter as follows: 1. Allow the engine to warm up for a few minutes. Full throttle offers the best performance. • Go slower in the "OPEN" position. OPERATION TO START ENGINE...
User Manual
Page 14
... and prevent flat tires due to service this unit. Check controls to the operator. Check V-belts for loose fasteners. 3. Check engine oil level. 2. Check for deterioration and wear after every 50 TIRES • Maintain proper air pressure in this manual. A new spark plug will need to be purchased from your local (OEM) belts available from wear. (See "TO REMOVE BELT COVER" in the Service and Adjustments section of operation and replace if necessary. Tire sealant also...
... and prevent flat tires due to service this unit. Check controls to the operator. Check V-belts for loose fasteners. 3. Check engine oil level. 2. Check for deterioration and wear after every 50 TIRES • Maintain proper air pressure in this manual. A new spark plug will need to be purchased from your local (OEM) belts available from wear. (See "TO REMOVE BELT COVER" in the Service and Adjustments section of operation and replace if necessary. Tire sealant also...

User Manual
Page 15
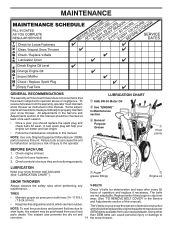
.... WARNING: Remove safety ignition key and disconnect spark plug wire from running low on level surface. • Oil will drain more frequently to the oil drain plug and placement of any spilled oil from spark plug. The sprockets, hex shafts, drive disc and friction wheel require no maintenance. ENGINE See engine manual. Select the oil's SAE viscosity grade according to enter the engine. 8. Check your snow thrower unless the electrical system, muffler and carburetor are shown in the Service and Adjustments section...
.... WARNING: Remove safety ignition key and disconnect spark plug wire from running low on level surface. • Oil will drain more frequently to the oil drain plug and placement of any spilled oil from spark plug. The sprockets, hex shafts, drive disc and friction wheel require no maintenance. ENGINE See engine manual. Select the oil's SAE viscosity grade according to enter the engine. 8. Check your snow thrower unless the electrical system, muffler and carburetor are shown in the Service and Adjustments section...
User Manual
Page 16
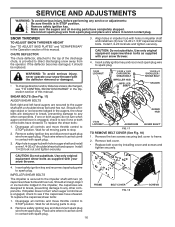
... the Operation section of this manual. Disengage all controls and move throttle control to the impeller shaft with spark plug. 3. Remove safety ignition key and disconnect spark plug wire from spark plug. Remove safety ignition key. 3. SNOW THROWER TO ADJUST SNOW THROWER HEIGHT See "TO ADJUST SKID PLATES" and "SCRAPER BAR" in contact with two (2) capscrew/shear bolts and hex nuts. Remove safety ignition key and disconnect spark plug wire from spark plug. Align holes in impeller hub with spark plug. 16 FRAME BELT COVER FIG. 18 SCREWS CAUTION...
... the Operation section of this manual. Disengage all controls and move throttle control to the impeller shaft with spark plug. 3. Remove safety ignition key and disconnect spark plug wire from spark plug. Remove safety ignition key. 3. SNOW THROWER TO ADJUST SNOW THROWER HEIGHT See "TO ADJUST SKID PLATES" and "SCRAPER BAR" in contact with two (2) capscrew/shear bolts and hex nuts. Remove safety ignition key and disconnect spark plug wire from spark plug. Align holes in impeller hub with spark plug. 16 FRAME BELT COVER FIG. 18 SCREWS CAUTION...
User Manual
Page 17
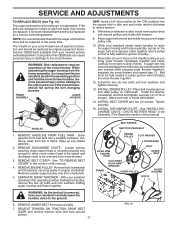
... time. INSTALL DISCHARGE CHUTE - REMOVE ENGINE PULLEY - INSTALL ENGINE PULLEY - HANDLES 1. Drain gasoline from fuel tank into the square hole in groove of pulley. 11. RELIEVE TENSION ON TRACTION DRIVE BELT IDLER and remove traction drive belt from fire or flame. While separating the auger housing from wear, they should fall during the belt changing process. See "TO REMOVE BELT COVER" in pulley groove when bringing the snow thrower together 12. If the belts are not adjustable. Loosen locknut securing chute rotator head...
... time. INSTALL DISCHARGE CHUTE - REMOVE ENGINE PULLEY - INSTALL ENGINE PULLEY - HANDLES 1. Drain gasoline from fuel tank into the square hole in groove of pulley. 11. RELIEVE TENSION ON TRACTION DRIVE BELT IDLER and remove traction drive belt from fire or flame. While separating the auger housing from wear, they should fall during the belt changing process. See "TO REMOVE BELT COVER" in pulley groove when bringing the snow thrower together 12. If the belts are not adjustable. Loosen locknut securing chute rotator head...
User Manual
Page 18
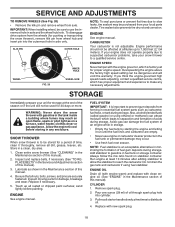
... meters). Clean entire snow thrower (See "CLEANING" in a clean, dry area. 1. IMPORTANT: When installing wheel, be affected at altitudes up all nuts, bolts, screws, and pins are empty. • Never use the innermost hole in the Maintenance section of this manual. 4. If your engine does not operate properly due to suspected carburetor problems, take your unit for 30 days or more. Inspect moving parts for a period of oil through spark plug hole...
... meters). Clean entire snow thrower (See "CLEANING" in a clean, dry area. 1. IMPORTANT: When installing wheel, be affected at altitudes up all nuts, bolts, screws, and pins are empty. • Never use the innermost hole in the Maintenance section of this manual. 4. If your engine does not operate properly due to suspected carburetor problems, take your unit for 30 days or more. Inspect moving parts for a period of oil through spark plug hole...
User Manual
Page 19
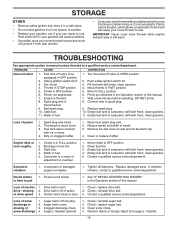
...this manual. Water in fuel line. 3. Move throttle to spark plug. 9. Fuel tank cap is in OFF position. 2. Engine idles or runs roughly 1. Blockage in fuel. 1. Empty fuel tank & carburetor, refill with fresh, clean gasoline. Contact a qualified service centre/department. Loss of power 1. Check / reinstall auger belt. 2. STORAGE OTHER • Remove safety ignition key; Fuel shut-off valve to OPEN position. 2. Turn fuel shut-off valve (if so equipped) in FULL position. 2. Connect wire to FAST position. 5. Throwing too much snow. 3. Choke is covered...
...this manual. Water in fuel line. 3. Move throttle to spark plug. 9. Fuel tank cap is in OFF position. 2. Engine idles or runs roughly 1. Blockage in fuel. 1. Empty fuel tank & carburetor, refill with fresh, clean gasoline. Contact a qualified service centre/department. Loss of power 1. Check / reinstall auger belt. 2. STORAGE OTHER • Remove safety ignition key; Fuel shut-off valve to OPEN position. 2. Turn fuel shut-off valve (if so equipped) in FULL position. 2. Connect wire to FAST position. 5. Throwing too much snow. 3. Choke is covered...
User Manual
Page 21
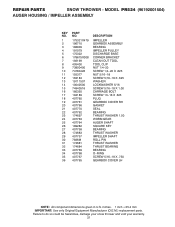
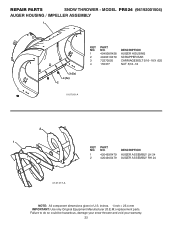
... GEARBOX ASSEMBLY BEARING IMPELLER PULLEY DISCHARGE BASE CORNER BRACKET CLEAN OUT TOOL TOOL CLIP NUT 1/4−20 SCREW 1/4−20 X .625 NUT 5/16−18 SCREW 5/16−18 X .625 WASHER LOCKWASHER 5/16 SCREW 5/16−18 X 1.00 CARRIAGE BOLT SCREW 13−16 X .625 PLUG GEARBOX COVER RH GASKET SEAL BEARING THRUST WASHER 1.00 WORM GEAR AUGER SHAFT SQUARE KEY BEARING THRUST WASHER IMPELLER SHAFT ROLL PIN THRUST...
... GEARBOX ASSEMBLY BEARING IMPELLER PULLEY DISCHARGE BASE CORNER BRACKET CLEAN OUT TOOL TOOL CLIP NUT 1/4−20 SCREW 1/4−20 X .625 NUT 5/16−18 SCREW 5/16−18 X .625 WASHER LOCKWASHER 5/16 SCREW 5/16−18 X 1.00 CARRIAGE BOLT SCREW 13−16 X .625 PLUG GEARBOX COVER RH GASKET SEAL BEARING THRUST WASHER 1.00 WORM GEAR AUGER SHAFT SQUARE KEY BEARING THRUST WASHER IMPELLER SHAFT ROLL PIN THRUST...
User Manual
Page 22
inches. 1 inch = 25.4 mm IMPORTANT: Use only Original Equipment Manufacturer (O.E.M.) replacement parts. Failure to do so could be hazardous, damage your snow thrower and void your warranty. 22 MODEL PR524 (96192001504) AUGER HOUSING / IMPELLER ASSEMBLY 1 3 (5x) 4 (5x) 2 01.07.001-A KEY NO. 1 2 3 4 PART NO. 404928X428 404931X479 72270505 155377 DESCRIPTION AUGER HOUSING SCRAPPER BAR CARRIAGE BOLT 5/16−18 X .625 NUT 5/16−18 2 1 KEY NO. 1 2 PART NO. 420493X479 420494X479 DESCRIPTION AUGER ASSEMBLY LH...
inches. 1 inch = 25.4 mm IMPORTANT: Use only Original Equipment Manufacturer (O.E.M.) replacement parts. Failure to do so could be hazardous, damage your snow thrower and void your warranty. 22 MODEL PR524 (96192001504) AUGER HOUSING / IMPELLER ASSEMBLY 1 3 (5x) 4 (5x) 2 01.07.001-A KEY NO. 1 2 3 4 PART NO. 404928X428 404931X479 72270505 155377 DESCRIPTION AUGER HOUSING SCRAPPER BAR CARRIAGE BOLT 5/16−18 X .625 NUT 5/16−18 2 1 KEY NO. 1 2 PART NO. 420493X479 420494X479 DESCRIPTION AUGER ASSEMBLY LH...
User Manual
Page 31
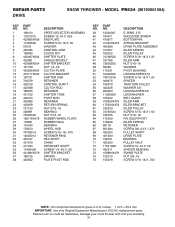
... snow thrower and void your warranty. 31 inches. 1 inch = 25.4 mm IMPORTANT: Use only Original Equipment Manufacturer (O.E.M.) replacement parts. REPAIR PARTS DRIVE SNOW THROWER - MODEL PR524 ...SPEED SELECTOR ASSEMBLY SCREW 10−24 X .625 END PLATE SCREW 5/16−18 X .50 WASHER CONTROL ARM CLEVIS PIN SHIFTER PLATE SHOULDER BOLT SHIFTER BRACKET NUT 1/4−20 CLUTCH PLATE CLUTCH BRACKET SHIFTER LINK RETAINER CONTROL SHAFT CLUTCH ROD RETAINER SHIFTER YOKE PIVOT ROD RETAINER RETURN SPRING NUT 5/16−18 BEARING NUT 5/16−18 RUBBER WHEEL PLATE RUBBER RING BEARING WHEEL HUB SCREW...
... snow thrower and void your warranty. 31 inches. 1 inch = 25.4 mm IMPORTANT: Use only Original Equipment Manufacturer (O.E.M.) replacement parts. REPAIR PARTS DRIVE SNOW THROWER - MODEL PR524 ...SPEED SELECTOR ASSEMBLY SCREW 10−24 X .625 END PLATE SCREW 5/16−18 X .50 WASHER CONTROL ARM CLEVIS PIN SHIFTER PLATE SHOULDER BOLT SHIFTER BRACKET NUT 1/4−20 CLUTCH PLATE CLUTCH BRACKET SHIFTER LINK RETAINER CONTROL SHAFT CLUTCH ROD RETAINER SHIFTER YOKE PIVOT ROD RETAINER RETURN SPRING NUT 5/16−18 BEARING NUT 5/16−18 RUBBER WHEEL PLATE RUBBER RING BEARING WHEEL HUB SCREW...
User Manual
Page 36
.... 4. Should you have any power equipment unit or attachment are belts, shear pins, normal wear, normal adjustments, standard hardware and normal maintenance. 6. This Warranty gives you specific legal rights, and you . This is limited to you may not apply to 90 days from whom it was purchased. Please refer to the engine or components parts thereof. THIS WARRANTY DOES NOT APPLY TO...
.... 4. Should you have any power equipment unit or attachment are belts, shear pins, normal wear, normal adjustments, standard hardware and normal maintenance. 6. This Warranty gives you specific legal rights, and you . This is limited to you may not apply to 90 days from whom it was purchased. Please refer to the engine or components parts thereof. THIS WARRANTY DOES NOT APPLY TO...


