Owner Manual
Page 2
... be used and remove all clutches and shift into neutral before operating this symbol to observe the following safety instructions could result in the manual(s) before starting motors. 6. Read, understand and follow all persons, particularly small children. 4. YOUR SAFETY IS INVOLVED. Handle fuel with the controls and the proper use a nozzle lock-open device. (g) Replace gasoline cap securely and wipe up , transporting, adjusting or making any repairs, adjustments...
... be used and remove all clutches and shift into neutral before operating this symbol to observe the following safety instructions could result in the manual(s) before starting motors. 6. Read, understand and follow all persons, particularly small children. 4. YOUR SAFETY IS INVOLVED. Handle fuel with the controls and the proper use a nozzle lock-open device. (g) Replace gasoline cap securely and wipe up , transporting, adjusting or making any repairs, adjustments...
Owner Manual
Page 3
... wire away from the plug to clear snow at too fast a rate. 12. TABLE OF CONTENTS SAFETY RULES 2-3 PRODUCT SPECIFICATIONS 3 CUSTOMER RESPONSIBILITIES 3 ASSEMBLY / PRE-OPERATION 5-6 OPERATION 7-12 MAINTENANCE SCHEDULE 13 MAINTENANCE 13-14 SERVICE AND ADJUSTMENTS 15-17 STORAGE 18 TROUBLESHOOTING 19 REPAIR PARTS 20-39 ENGINE BREAKDOWN 40-41 3 Use only attachments and accessories approved by attempting to prevent someone from accidentally starting the engine and for and using your snow thrower...
... wire away from the plug to clear snow at too fast a rate. 12. TABLE OF CONTENTS SAFETY RULES 2-3 PRODUCT SPECIFICATIONS 3 CUSTOMER RESPONSIBILITIES 3 ASSEMBLY / PRE-OPERATION 5-6 OPERATION 7-12 MAINTENANCE SCHEDULE 13 MAINTENANCE 13-14 SERVICE AND ADJUSTMENTS 15-17 STORAGE 18 TROUBLESHOOTING 19 REPAIR PARTS 20-39 ENGINE BREAKDOWN 40-41 3 Use only attachments and accessories approved by attempting to prevent someone from accidentally starting the engine and for and using your snow thrower...
Owner Manual
Page 5
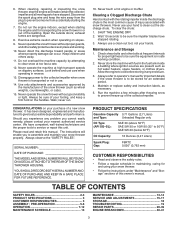
... instructions and this manual in assembly, operation and maintenance of the product. HOW TO SET UP YOUR SNOW THROWER Store the extra shear bolts and nuts provided in the bag of carton and lay panels flat. 3. Install the additional carriage bolts and handle knobs that are supplied in parts bag. Remove all packing materials. 5. CARRIAGE BOLT MOUNTING HOLES MOUNTING BOLT HANDLE KNOB FIG. 2 3. Adjust the handle height to the operating position. 2. Remove the two (2) screws securing the auger housing...
... instructions and this manual in assembly, operation and maintenance of the product. HOW TO SET UP YOUR SNOW THROWER Store the extra shear bolts and nuts provided in the bag of carton and lay panels flat. 3. Install the additional carriage bolts and handle knobs that are supplied in parts bag. Remove all packing materials. 5. CARRIAGE BOLT MOUNTING HOLES MOUNTING BOLT HANDLE KNOB FIG. 2 3. Adjust the handle height to the operating position. 2. Remove the two (2) screws securing the auger housing...

Owner Manual
Page 6
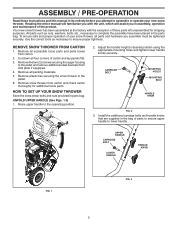
... tire pressure to align square and pin on pin and threaded stud of snow thrower. 2. ROTATOR CABLES DOUBLE CLIP ROTATOR CABLES FIG. 5 6 Place discharge chute assembly on threaded stud and tighten securely. 6. Install all control lever knobs by pressing them down onto the control levers. ASSEMBLY / PRE-OPERATION INSTALL DISCHARGE CHUTE / CHUTE ROTATOR HEAD (See Fig. 4 and 5) 1. Position chute rotator head over chute bracket. Install locknut on top of chute base with holes in chute bracket. 3. CHUTE BRACKET ROTATOR HEAD...
... tire pressure to align square and pin on pin and threaded stud of snow thrower. 2. ROTATOR CABLES DOUBLE CLIP ROTATOR CABLES FIG. 5 6 Place discharge chute assembly on threaded stud and tighten securely. 6. Install all control lever knobs by pressing them down onto the control levers. ASSEMBLY / PRE-OPERATION INSTALL DISCHARGE CHUTE / CHUTE ROTATOR HEAD (See Fig. 4 and 5) 1. Position chute rotator head over chute bracket. Install locknut on top of chute base with holes in chute bracket. 3. CHUTE BRACKET ROTATOR HEAD...
Owner Manual
Page 7
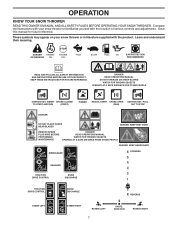
INSERT CHOKE CLOSED TO START AND RUN (START) PRIMER RECOIL START CHOKE OPEN (RUN) IGNITION KEY. Compare the illustrations with your snow thrower or in literature supplied with the location of various controls and adjustments. Learn and understand their meaning. PULL OUT TO STOP DANGER DO NOT PLACE HANDS NEAR BLADES DANGER, KEEP FEET AWAY REMOVE SPARK PLUG WIRE BEFORE PERFORMING MAINTENANCE DANGER READ OPERATORS MANUAL WATCH FOR THROWN OBJECTS OPERATE AT A SAFE DISTANCE FROM...
INSERT CHOKE CLOSED TO START AND RUN (START) PRIMER RECOIL START CHOKE OPEN (RUN) IGNITION KEY. Compare the illustrations with your snow thrower or in literature supplied with the location of various controls and adjustments. Learn and understand their meaning. PULL OUT TO STOP DANGER DO NOT PLACE HANDS NEAR BLADES DANGER, KEEP FEET AWAY REMOVE SPARK PLUG WIRE BEFORE PERFORMING MAINTENANCE DANGER READ OPERATORS MANUAL WATCH FOR THROWN OBJECTS OPERATE AT A SAFE DISTANCE FROM...

Owner Manual
Page 8
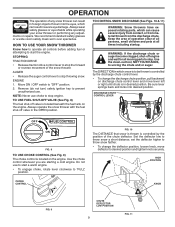
...- Auger control lever - MUFFLER GASOLINE FILLER CAP CHOKE CONTROL ON / OFF SWITCH OPERATION FUEL SHUT-OFF VALVE AUGER CONTROL LEVER DISCHARGE CHUTE CONTROL LEVER DRIVE SPEED CONTROL LEVER PRIMER SAFETY IGNITION KEY RECOIL STARTER HANDLE CLEAN-OUT TOOL NOTE: ITEMS ABOVE ARE SHOWN IN THEIR TYPICAL LOCATION ON THE ENGINE. SAFETY REQUIREMENTS Our snow throwers conform to start button - Skid plate - CHUTE DEFLECTOR DISCHARGE CHUTE TRACTION DRIVE CONTROL LEVER HANDLE KNOB MUFFLER AUGERS SKID PLATE FIG. 7 MEETS A.N.S.I. must be inserted for use . Electric start and run. used...
...- Auger control lever - MUFFLER GASOLINE FILLER CAP CHOKE CONTROL ON / OFF SWITCH OPERATION FUEL SHUT-OFF VALVE AUGER CONTROL LEVER DISCHARGE CHUTE CONTROL LEVER DRIVE SPEED CONTROL LEVER PRIMER SAFETY IGNITION KEY RECOIL STARTER HANDLE CLEAN-OUT TOOL NOTE: ITEMS ABOVE ARE SHOWN IN THEIR TYPICAL LOCATION ON THE ENGINE. SAFETY REQUIREMENTS Our snow throwers conform to start button - Skid plate - CHUTE DEFLECTOR DISCHARGE CHUTE TRACTION DRIVE CONTROL LEVER HANDLE KNOB MUFFLER AUGERS SKID PLATE FIG. 7 MEETS A.N.S.I. must be inserted for use . Electric start and run. used...
Owner Manual
Page 9
... all controls before adding fuel or attempting to start a warm engine. • To engage choke, rotate lever clockwise to stop . Use the choke control whenever you are starting a cold engine. Do not use . OPERATION The operation of any adjustments or repairs. STOPPING TRACTION DRIVE • Release traction drive control lever to "FULL" position. set the deflector higher to desired position and tighten knob securely. ENGINE 1. Keep the area of operation clear of the snow thrower. Use the clean-out tool, NOT...
... all controls before adding fuel or attempting to start a warm engine. • To engage choke, rotate lever clockwise to stop . Use the choke control whenever you are starting a cold engine. Do not use . OPERATION The operation of any adjustments or repairs. STOPPING TRACTION DRIVE • Release traction drive control lever to "FULL" position. set the deflector higher to desired position and tighten knob securely. ENGINE 1. Keep the area of operation clear of the snow thrower. Use the clean-out tool, NOT...

Owner Manual
Page 10
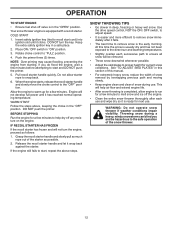
... engine, then squeeze the auger control lever to the handle to prevent accidental starting. SPEED and DIRECTION are controlled by the traction drive control lever located on the speed control lever and move speed control lever when traction drive control lever is engaged. FIG. 12 USING THE CLEAN-OUT TOOL (See Fig. 13) In certain snow conditions, the discharge chute may become clogged with the operation of the snow thrower, is pointed in the direction of the snow thrower. Use the clean-out tool...
... engine, then squeeze the auger control lever to the handle to prevent accidental starting. SPEED and DIRECTION are controlled by the traction drive control lever located on the speed control lever and move speed control lever when traction drive control lever is engaged. FIG. 12 USING THE CLEAN-OUT TOOL (See Fig. 13) In certain snow conditions, the discharge chute may become clogged with the operation of the snow thrower, is pointed in the direction of the snow thrower. Use the clean-out tool...

Owner Manual
Page 11
... conditions. CHOKE CONTROL ON / OFF SWITCH GASOLINE FILLER CAP PRIMER SAFETY IGNITION KEY RECOIL STARTER HANDLE FUEL SHUTOFF VALVE ENGINE OIL FILL CAP / DIPSTICK NOTE: ALL ITEMS ARE SHOWN IN THEIR TYPICAL LOCATION. NOTE: It is reversible. HIGH POSITION (LOW GROUND CLEARANCE) LOW POSITION (HIGH GROUND CLEARANCE) HEX NUTS AUGER HOUSING SCRAPER BAR SKID PLATE FIG. 15 BEFORE STARTING THE ENGINE CHECK ENGINE OIL LEVEL (See Fig. 16) The engine on each side of this manual. To avoid engine problems, the fuel system...
... conditions. CHOKE CONTROL ON / OFF SWITCH GASOLINE FILLER CAP PRIMER SAFETY IGNITION KEY RECOIL STARTER HANDLE FUEL SHUTOFF VALVE ENGINE OIL FILL CAP / DIPSTICK NOTE: ALL ITEMS ARE SHOWN IN THEIR TYPICAL LOCATION. NOTE: It is reversible. HIGH POSITION (LOW GROUND CLEARANCE) LOW POSITION (HIGH GROUND CLEARANCE) HEX NUTS AUGER HOUSING SCRAPER BAR SKID PLATE FIG. 15 BEFORE STARTING THE ENGINE CHECK ENGINE OIL LEVEL (See Fig. 16) The engine on each side of this manual. To avoid engine problems, the fuel system...
Owner Manual
Page 12
... clicks. When the engine starts, release the recoil starter handle and slowly move the choke control to "FULL" position. 4. Engine will help dry off the engine. • Clean the entire snow thrower thoroughly after it snap back against the starter. WARNING: Do not operate snow thrower if weather conditions impair visibility. Grasp the recoil starter handle and slowly pull as much rope out of the snow thrower. 12 At this manual. • For...
... clicks. When the engine starts, release the recoil starter handle and slowly move the choke control to "FULL" position. 4. Engine will help dry off the engine. • Clean the entire snow thrower thoroughly after it snap back against the starter. WARNING: Do not operate snow thrower if weather conditions impair visibility. Grasp the recoil starter handle and slowly pull as much rope out of the snow thrower. 12 At this manual. • For...
Owner Manual
Page 13
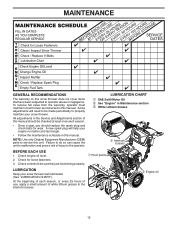
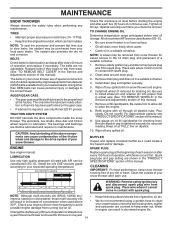
...; Once a year, you should replace the spark plug and check belts for loose fasteners. 3. A new spark plug will need to the operator. LUBRICATION Keep your snow thrower. NOTE: Use only Original Equipment Manufacturer (OEM) parts to properly maintain your snow thrower well lubricated (See "LUBRICATION CHART"). LUBRICATION CHART ➀ SAE 5w30 Motor Oil ➁ See "Engine" in the Service and Adjustments section of this manual should be checked at least once each season...
...; Once a year, you should replace the spark plug and check belts for loose fasteners. 3. A new spark plug will need to the operator. LUBRICATION Keep your snow thrower. NOTE: Use only Original Equipment Manufacturer (OEM) parts to properly maintain your snow thrower well lubricated (See "LUBRICATION CHART"). LUBRICATION CHART ➀ SAE 5w30 Motor Oil ➁ See "Engine" in the Service and Adjustments section of this manual should be checked at least once each season...
Owner Manual
Page 14
... to allow dirt to clean your expected operating temperature. WARNING: Remove safety ignition key and disconnect spark plug wire from running low on your snow thrower. Using other than OEM belts can cause contamination of this manual. CLEANING IMPORTANT: For best performance, keep water out. Check your snow thrower after each time you check the oil level. Remove safety ignition key and disconnect spark plug wire from wear. (See "TO REMOVE BELT COVER" in the Service and Adjustments section of the...
... to allow dirt to clean your expected operating temperature. WARNING: Remove safety ignition key and disconnect spark plug wire from running low on your snow thrower. Using other than OEM belts can cause contamination of this manual. CLEANING IMPORTANT: For best performance, keep water out. Check your snow thrower after each time you check the oil level. Remove safety ignition key and disconnect spark plug wire from wear. (See "TO REMOVE BELT COVER" in the Service and Adjustments section of the...
Owner Manual
Page 15
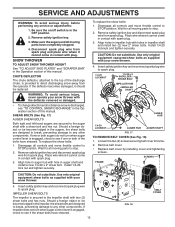
... all moving parts to spark plug. Remove safety ignition key and disconnect spark plug wire from spark plug. Install 1/4-20 lock nut and tighten securely. Wait for all moving parts to the auger shaft with holes in the OFF position. 2. Remove safety ignition key and disconnect spark plug wire from spark plug. Align holes in impeller hub with a shear bolt and hex nut. Install 1/4-20 locknuts and tighten securely. CAUTION: Do not substitute. Remove belt cover. • Replace belt cover by installing cover and tightening screws. SCREWS FRAME...
... all moving parts to spark plug. Remove safety ignition key and disconnect spark plug wire from spark plug. Install 1/4-20 lock nut and tighten securely. Wait for all moving parts to the auger shaft with holes in the OFF position. 2. Remove safety ignition key and disconnect spark plug wire from spark plug. Align holes in impeller hub with a shear bolt and hex nut. Install 1/4-20 locknuts and tighten securely. CAUTION: Do not substitute. Remove belt cover. • Replace belt cover by installing cover and tightening screws. SCREWS FRAME...
Owner Manual
Page 16
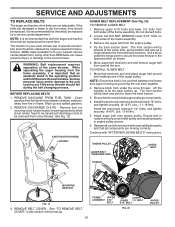
... frame assembly, it is routed correctly around the arm. Remove block from around idler pulley and seated properly in the operating position and hold the snow thrower handles. Continue with "AFTER REPLACING BELTS" instructions. ENGINE PULLEY AUGER BELT TENSIONER ARM AUGER BELT HANDLE MOUNTING BRACKET FIG. 19 3. BEFORE REPLACING BELTS 1. CHUTE ROTATOR HEAD LOCKNUT AUGER BELT REPLACEMENT (See Fig. 20) TO REMOVE AUGER BELT 1. Loosen but DO NOT REMOVE lower 5/16" bolts on your nearest service center/department. Do not discard bolts. 2. Using...
... frame assembly, it is routed correctly around the arm. Remove block from around idler pulley and seated properly in the operating position and hold the snow thrower handles. Continue with "AFTER REPLACING BELTS" instructions. ENGINE PULLEY AUGER BELT TENSIONER ARM AUGER BELT HANDLE MOUNTING BRACKET FIG. 19 3. BEFORE REPLACING BELTS 1. CHUTE ROTATOR HEAD LOCKNUT AUGER BELT REPLACEMENT (See Fig. 20) TO REMOVE AUGER BELT 1. Loosen but DO NOT REMOVE lower 5/16" bolts on your nearest service center/department. Do not discard bolts. 2. Using...
Owner Manual
Page 17
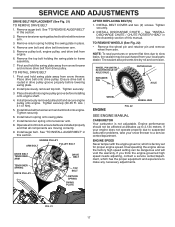
... CHUTE - Ensure drive belt is routed in the Assembly section of this manual. Tighten securely (30-35 Ft. Install drive belt tensioner arm and arm bolt onto engine. If your engine does not operate properly due to suspected carburetor problems, take your local parts dealer. Remove tensioner spring attached to a service center/department. Tighten securely. 3. INSTALL BELT COVER and two (2) screws. TO REMOVE WHEELS (See Fig. 22) • Remove the wheel pin and retainer pin and remove wheel from your snow thrower to drive belt...
... CHUTE - Ensure drive belt is routed in the Assembly section of this manual. Tighten securely (30-35 Ft. Install drive belt tensioner arm and arm bolt onto engine. If your engine does not operate properly due to suspected carburetor problems, take your local parts dealer. Remove tensioner spring attached to a service center/department. Tighten securely. 3. INSTALL BELT COVER and two (2) screws. TO REMOVE WHEELS (See Fig. 22) • Remove the wheel pin and retainer pin and remove wheel from your snow thrower to drive belt...
Owner Manual
Page 18
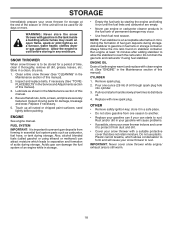
... the snow thrower with a suitable protective cover that all nuts, bolts, screws, and pins are empty. • Never use plastic. Allow the engine to cool before painting. FUEL SYSTEM IMPORTANT: It is still warm. 18 NOTE: Fuel stabilizer is to be used for damage, breakage and wear. OTHER • Remove safety ignition key; Lubricate as on stabilizer container. ENGINE See engine manual. Remove spark plug. 2. Acidic gas can starts to rust. Run engine at...
... the snow thrower with a suitable protective cover that all nuts, bolts, screws, and pins are empty. • Never use plastic. Allow the engine to cool before painting. FUEL SYSTEM IMPORTANT: It is still warm. 18 NOTE: Fuel stabilizer is to be used for damage, breakage and wear. OTHER • Remove safety ignition key; Lubricate as on stabilizer container. ENGINE See engine manual. Remove spark plug. 2. Acidic gas can starts to rust. Run engine at...
Owner Manual
Page 19
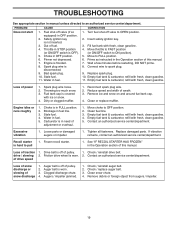
... fresh, clean gasoline. 4. Loose parts or damaged augers or impeller. 1. Throttle in STOP position (or ON/OFF switch is flooded. 8. Engine is OFF). 5. Clean fuel line. 3. Contact an authorized service center/department. Clean snow chute. 4. PROBLEM CAUSE CORRECTION Does not start 1. Reduce speed and width of traction 1. Stale fuel. 4. Friction drive wheel is in need of pulley. 1. Clogged discharge chute. 4. Check / replace auger belt. 3. Choke in fuel. 1. Prime as instructed in the Operation section of this manual. 7. Replace spark plug. 10...
... fresh, clean gasoline. 4. Loose parts or damaged augers or impeller. 1. Throttle in STOP position (or ON/OFF switch is flooded. 8. Engine is OFF). 5. Clean fuel line. 3. Contact an authorized service center/department. Clean snow chute. 4. PROBLEM CAUSE CORRECTION Does not start 1. Reduce speed and width of traction 1. Stale fuel. 4. Friction drive wheel is in need of pulley. 1. Clogged discharge chute. 4. Check / replace auger belt. 3. Choke in fuel. 1. Prime as instructed in the Operation section of this manual. 7. Replace spark plug. 10...
Owner Manual
Page 21
... 587 58 72-02 DESCRIPTION GEARBOX AUGER IMPELLER STEEL PULLEY IMPELLER - BLK BOLT CARRIAGE WAFER HEAD 5/16-18 X 5/8 BLK BRACKET BELT KEEPER LOWER BRACKET INTERFACE BEARING BALL SCREW HEX HEAD 5/16-18 X 5/8 NUT FLANGE NYLOCK 5/16-18 LOWER AUGER BELT GUIDE NOTE: All component dimensions given in U.S. SCREW ON CHUTE DISCHARGE BASE BRACKET CORNER DISCHARGE BASE BOLT SHEAR 1/4-20 NUT NYLOCK 1/4-20 NUT FLANGE NYLOCK 5/16-18 - REPAIR PARTS SNOW THROWER -
... 587 58 72-02 DESCRIPTION GEARBOX AUGER IMPELLER STEEL PULLEY IMPELLER - BLK BOLT CARRIAGE WAFER HEAD 5/16-18 X 5/8 BLK BRACKET BELT KEEPER LOWER BRACKET INTERFACE BEARING BALL SCREW HEX HEAD 5/16-18 X 5/8 NUT FLANGE NYLOCK 5/16-18 LOWER AUGER BELT GUIDE NOTE: All component dimensions given in U.S. SCREW ON CHUTE DISCHARGE BASE BRACKET CORNER DISCHARGE BASE BOLT SHEAR 1/4-20 NUT NYLOCK 1/4-20 NUT FLANGE NYLOCK 5/16-18 - REPAIR PARTS SNOW THROWER -

Owner Manual
Page 22
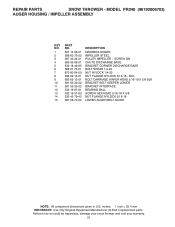
REPAIR PARTS SNOW THROWER - inches. 1 inch = 25.4 mm IMPORTANT: Use only Original Equipment Manufacturer (O.E.M.) replacement parts. Failure to do so could be hazardous, damage your snow thrower and void your warranty. 22 MODEL PR240 (96192006703) AUGER HOUSING / IMPELLER ASSEMBLY 1 3 5X 2 4 5X 05.09.010-C KEY NO. 1 2 3 4 PART NO. 581 70 83-99 532 40 78-25 872 27 05-05 532 15 53-77 DESCRIPTION AUGER HOUSING SCRAPER BAR CARRIAGE BOLT 5/16-18...
REPAIR PARTS SNOW THROWER - inches. 1 inch = 25.4 mm IMPORTANT: Use only Original Equipment Manufacturer (O.E.M.) replacement parts. Failure to do so could be hazardous, damage your snow thrower and void your warranty. 22 MODEL PR240 (96192006703) AUGER HOUSING / IMPELLER ASSEMBLY 1 3 5X 2 4 5X 05.09.010-C KEY NO. 1 2 3 4 PART NO. 581 70 83-99 532 40 78-25 872 27 05-05 532 15 53-77 DESCRIPTION AUGER HOUSING SCRAPER BAR CARRIAGE BOLT 5/16-18...
Owner Manual
Page 41
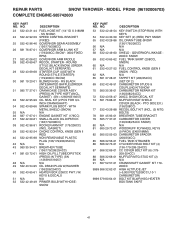
REPAIR PARTS SNOW THROWER - INCH CRANKSHAFT) 34 532 43 69-66 SPARK PLUG BOOT - GASKET) 39 532 42 92-24 CHOKE CONTROL KNOB (GEN II RED) 40 532 42 95-98 NON-REMOVABLE PLASTIC PLUG (136/179/208/254CC) 42 N/A N/A 43 580 35 34-01 BREATHER TUBE (136/179/208/254CC) 47 581 00 72-01 HIGH OIL-FILL TUBE/DIPSTICK (PRESS-IN TYPE... 82 585 02 05-03 CARBURETOR SPACER (208/254CC) 85 586 32 56-01 FUEL TANK STRAINER 86 586 32 73-01 CYLINDER HEAD BOLT KIT (4) (136-179-208-254CC) 87 586 32 69-01 CC COVER BOLT KIT (6) (179- 208-254CC) 88 586 32 68-01 MUFFLER MTG STUD KIT (2) 89 N/A N/A 91 ...
REPAIR PARTS SNOW THROWER - INCH CRANKSHAFT) 34 532 43 69-66 SPARK PLUG BOOT - GASKET) 39 532 42 92-24 CHOKE CONTROL KNOB (GEN II RED) 40 532 42 95-98 NON-REMOVABLE PLASTIC PLUG (136/179/208/254CC) 42 N/A N/A 43 580 35 34-01 BREATHER TUBE (136/179/208/254CC) 47 581 00 72-01 HIGH OIL-FILL TUBE/DIPSTICK (PRESS-IN TYPE... 82 585 02 05-03 CARBURETOR SPACER (208/254CC) 85 586 32 56-01 FUEL TANK STRAINER 86 586 32 73-01 CYLINDER HEAD BOLT KIT (4) (136-179-208-254CC) 87 586 32 69-01 CC COVER BOLT KIT (6) (179- 208-254CC) 88 586 32 68-01 MUFFLER MTG STUD KIT (2) 89 N/A N/A 91 ...


