

User Manual
Page 2
...drop-offs, ditches, or embankments. Children are explosive. - Never refuel the machine indoors. - Check their ability to operate the riding mower safely enough to protect themselves and others from serious injury. Allow machine to cool before refueling. Always look down and behind before dismounting... the blade(s) or wear gloves, and use grass catcher on the slope. • Follow the manufacturer's recommendations for Ride-On Mowers IMPORTANT: THIS CUTTING MACHINE IS CAPABLE OF AMPUTATING HANDS AND FEET AND THROWING OBJECTS. GENERAL OPERATION • Read, understand, and follow...
...drop-offs, ditches, or embankments. Children are explosive. - Never refuel the machine indoors. - Check their ability to operate the riding mower safely enough to protect themselves and others from serious injury. Allow machine to cool before refueling. Always look down and behind before dismounting... the blade(s) or wear gloves, and use grass catcher on the slope. • Follow the manufacturer's recommendations for Ride-On Mowers IMPORTANT: THIS CUTTING MACHINE IS CAPABLE OF AMPUTATING HANDS AND FEET AND THROWING OBJECTS. GENERAL OPERATION • Read, understand, and follow...

User Manual
Page 3
... of your tractor. BECOME ALERT!!! Tires can hide obstacles. • Use slow speed. Wash hands after handling. 3 SAFETY RULES Safe Operation Practices for Ride-On Mowers • Be sure the area is dangerous. Tall grass can lose traction with the blades off if children enter the area. • Before and when...
... of your tractor. BECOME ALERT!!! Tires can hide obstacles. • Use slow speed. Wash hands after handling. 3 SAFETY RULES Safe Operation Practices for Ride-On Mowers • Be sure the area is dangerous. Tall grass can lose traction with the blades off if children enter the area. • Before and when...

User Manual
Page 7
...allows you to press clutch/brake pedal all instructions in the Operation section of this manual. FLAT WASHER ADJUSTMENT KNOB FIG. 3 YOUR MOWER CAME FACTORY EQUIPPED WITH HIGH PERFORMANCE BLADES, WHICH ARE THE BEST BLADES FOR BAGGING AND DISCHARGING. TO DRIVE TRACTOR OFF SKID (See ...) • Press lift lever plunger and raise attachment lift lever to its highest position. • Start the engine. TO SET UP YOUR MOWER FOR MULCHING • Remove high performance blades and install mulcher blades, (see BLADE REMOVAL in the CUSTOMER RESPONSABILITY section of tractor. •...
...allows you to press clutch/brake pedal all instructions in the Operation section of this manual. FLAT WASHER ADJUSTMENT KNOB FIG. 3 YOUR MOWER CAME FACTORY EQUIPPED WITH HIGH PERFORMANCE BLADES, WHICH ARE THE BEST BLADES FOR BAGGING AND DISCHARGING. TO DRIVE TRACTOR OFF SKID (See ...) • Press lift lever plunger and raise attachment lift lever to its highest position. • Start the engine. TO SET UP YOUR MOWER FOR MULCHING • Remove high performance blades and install mulcher blades, (see BLADE REMOVAL in the CUSTOMER RESPONSABILITY section of tractor. •...

User Manual
Page 8
... loose parts in the Service and Adjustments section of optional grass catcher accessory. Seat is at the factory for shipping purposes. Check mower and drive belts. Before driving tractor, be properly leveled. Engine oil is adjusted comfortably and tightened securely. ! Operate them before ...PROPER POSITION OF ALL BELTS See the figures that are properly inflated. (For shipping purposes, the tires were overinflated at 6 amps). ! Be sure mower deck is properly prepared and charged. (Minimum 1 hour at the factory). ! Check wiring. See "TO ADJUST BRAKE" in operation. It is...
... loose parts in the Service and Adjustments section of optional grass catcher accessory. Seat is at the factory for shipping purposes. Check mower and drive belts. Before driving tractor, be properly leveled. Engine oil is adjusted comfortably and tightened securely. ! Operate them before ...PROPER POSITION OF ALL BELTS See the figures that are properly inflated. (For shipping purposes, the tires were overinflated at 6 amps). ! Be sure mower deck is properly prepared and charged. (Minimum 1 hour at the factory). ! Check wiring. See "TO ADJUST BRAKE" in operation. It is...

User Manual
Page 9
OPERATION These symbols may appear on your tractor or in literature supplied with the product. BATTERY CAUTION OR WARNING REVERSE FORWARD FAST SLOW ENGINE ON ENGINE OFF OIL PRESSURE LIGHTS ON OVER TEMP LIGHT FUEL CHOKE MOWER HEIGHT PARKING BRAKE LOCKED UNLOCKED MOWER LIFT ATTACHMENT REVERSE CLUTCH ENGAGED NEUTRAL HIGH P LOW PARKING BRAKE 15 15 15 IGNITION ATTACHMENT CLUTCH DISENGAGED KEEP AREA CLEAR SLOPE HAZARDS (SEE SAFETY RULES SECTION) DANGER, KEEP HANDS AND FEET AWAY 9 FREE WHEEL (Automatic Models only) Learn and understand their meaning.
OPERATION These symbols may appear on your tractor or in literature supplied with the product. BATTERY CAUTION OR WARNING REVERSE FORWARD FAST SLOW ENGINE ON ENGINE OFF OIL PRESSURE LIGHTS ON OVER TEMP LIGHT FUEL CHOKE MOWER HEIGHT PARKING BRAKE LOCKED UNLOCKED MOWER LIFT ATTACHMENT REVERSE CLUTCH ENGAGED NEUTRAL HIGH P LOW PARKING BRAKE 15 15 15 IGNITION ATTACHMENT CLUTCH DISENGAGED KEEP AREA CLEAR SLOPE HAZARDS (SEE SAFETY RULES SECTION) DANGER, KEEP HANDS AND FEET AWAY 9 FREE WHEEL (Automatic Models only) Learn and understand their meaning.

User Manual
Page 10
... YOUR TRACTOR Compare the illustrations with your tractor to familiarize yourself with the engine off . ATTACHMENT CLUTCH LEVER: Used to engage the mower blades, or other attachments mounted to your tractor. AMMETER - ATTACHMENT LIFT LEVER: Used to raise, lower, and adjust the... LEVER IGNITION SWITCH THROTTLE CONTROL CLUTCH/BRAKE PEDAL FREE WHEEL CONTROL PARKING BRAKE LIGHT SWITCH POSITION LIFT LEVER PLUNGER ATTACHMENT LIFT LEVER MOWER DECK HEIGHT ADJUSTMENT POSITIONS MOTION CONTROL LEVER FIG. 5 Our tractors conform to release attachment lift lever when changing its position.
... YOUR TRACTOR Compare the illustrations with your tractor to familiarize yourself with the engine off . ATTACHMENT CLUTCH LEVER: Used to engage the mower blades, or other attachments mounted to your tractor. AMMETER - ATTACHMENT LIFT LEVER: Used to raise, lower, and adjust the... LEVER IGNITION SWITCH THROTTLE CONTROL CLUTCH/BRAKE PEDAL FREE WHEEL CONTROL PARKING BRAKE LIGHT SWITCH POSITION LIFT LEVER PLUNGER ATTACHMENT LIFT LEVER MOWER DECK HEIGHT ADJUSTMENT POSITIONS MOTION CONTROL LEVER FIG. 5 Our tractors conform to release attachment lift lever when changing its position.

User Manual
Page 11
... whenever you are approximate and may cause engine to "backfire". • Turn ignition key to "OFF" position and remove key. TO ADJUST MOWER CUTTING HEIGHT (See Fig. 6) The position of the attachment lift lever determines the cutting height. • Grasp lift lever. • Press...SET PARKING BRAKE (See Fig. 6) Your tractor is approximately 1-1/2 to approximately 2-1/2 inches during hot months. GROUND DRIVE • To stop mower blades,move throttle control to slow position and • allowing engine to over spectacles or standard safety glasses. We recommend a wide vision ...
... whenever you are approximate and may cause engine to "backfire". • Turn ignition key to "OFF" position and remove key. TO ADJUST MOWER CUTTING HEIGHT (See Fig. 6) The position of the attachment lift lever determines the cutting height. • Grasp lift lever. • Press...SET PARKING BRAKE (See Fig. 6) Your tractor is approximately 1-1/2 to approximately 2-1/2 inches during hot months. GROUND DRIVE • To stop mower blades,move throttle control to slow position and • allowing engine to over spectacles or standard safety glasses. We recommend a wide vision ...

User Manual
Page 12
...opposite side installing gauge wheel in same adjustment hole. 3/8-16 LOCKNUT GUAGE WHEEL MOUNTING BRACKET 3/8 WASHER GAUGE WHEEL SHOULDER BOLT FIG. 7 TO OPERATE MOWER (See Fig. 8) Your tractor is closed and secured to neutral (N) position. IMPORTANT: THE MOTION CONTROL LEVER DOES NOT RETURN TO NEUTRAL (N)... grass over 6 inches in height should be assembled so they are slightly off the ground. Make the first cut . • Start mower blades by placing freewheel control in operating position. TO ADJUST GAUGE WHEELS (See Fig. 7) Gauge wheels are properly adjusted when they are ...
...opposite side installing gauge wheel in same adjustment hole. 3/8-16 LOCKNUT GUAGE WHEEL MOUNTING BRACKET 3/8 WASHER GAUGE WHEEL SHOULDER BOLT FIG. 7 TO OPERATE MOWER (See Fig. 8) Your tractor is closed and secured to neutral (N) position. IMPORTANT: THE MOTION CONTROL LEVER DOES NOT RETURN TO NEUTRAL (N)... grass over 6 inches in height should be assembled so they are slightly off the ground. Make the first cut . • Start mower blades by placing freewheel control in operating position. TO ADJUST GAUGE WHEELS (See Fig. 7) Gauge wheels are properly adjusted when they are ...

User Manual
Page 14
..., start by selecting a low enough gear to give best performance of the attachment being removed from dried clippings. See "TO LEVEL MOWER HOUSING" in the Service and Adjustments section of this section of manual). • Sitting in neutral (N) position, slowly disengage clutch/brake... CAUTION: Never engage or disengage freewheel lever while the engine is running, move motion control lever to reverse position. This procedure will plug mower and leave undesirable clumps. After the engine is running , move throttle control to half (1/2) speed. NOTE: During this section of manual...
..., start by selecting a low enough gear to give best performance of the attachment being removed from dried clippings. See "TO LEVEL MOWER HOUSING" in the Service and Adjustments section of this section of manual). • Sitting in neutral (N) position, slowly disengage clutch/brake... CAUTION: Never engage or disengage freewheel lever while the engine is running, move motion control lever to reverse position. This procedure will plug mower and leave undesirable clumps. After the engine is running , move throttle control to half (1/2) speed. NOTE: During this section of manual...

User Manual
Page 15
... across or perpendicular to the first cut on each pass and mow slowly. • Certain types of grass and grass conditions may require that the mower cuts off only the top one week then change to east to form clumps and interferes with your cutting pattern from week to mow your... lawn when it is the early afternoon. OPERATION MULCHING MOWING TIPS IMPORTANT: FOR BEST PERFORMANCE, KEEP MOWER HOUSING FREE OF BUILT-UP GRASS AND TRASH. Wet grass tends to west the next week. At this will disperse into the grass and not...
... across or perpendicular to the first cut on each pass and mow slowly. • Certain types of grass and grass conditions may require that the mower cuts off only the top one week then change to east to form clumps and interferes with your cutting pattern from week to mow your... lawn when it is the early afternoon. OPERATION MULCHING MOWING TIPS IMPORTANT: FOR BEST PERFORMANCE, KEEP MOWER HOUSING FREE OF BUILT-UP GRASS AND TRASH. Wet grass tends to west the next week. At this will disperse into the grass and not...

User Manual
Page 16
.... • Check brake operation. • Check tire pressure. • Check operator presence and interlock systems for proper operation. • Check for Loose Fasteners A Sharpen/Replace Mower Blades C T Lubrication Chart 0 Check Battery Level R Clean Battery and Terminals Check Transaxle Cooling Adjust Blade Belt(s) Tension Adjust Motion Drive Belt(s) Tension Check Engine Oil...
.... • Check brake operation. • Check tire pressure. • Check operator presence and interlock systems for proper operation. • Check for Loose Fasteners A Sharpen/Replace Mower Blades C T Lubrication Chart 0 Check Battery Level R Clean Battery and Terminals Check Transaxle Cooling Adjust Blade Belt(s) Tension Adjust Motion Drive Belt(s) Tension Check Engine Oil...

User Manual
Page 17
...tractor requires more than six (6) feet stopping distance at 6-10 amperes for 1 hour. NOTE: To seal tire punctures and prevent flat tires due to mower and engine. • The blade can harm rubber. • Avoid stumps, stones, deep ruts, sharp objects and other hazards that may be adjusted...., lock washer and flat washer securing blade. 5/8" BOLT OR PIN BLADE • Install new or resharpened blade with a file or on the mower. • To check blade balance, you do not recommend sharpening blade - TRAILING EDGE UP BLADE CENTER HOLE MANDREL ASSEMBLY LOCK WASHER STAR FLAT WASHER...
...tractor requires more than six (6) feet stopping distance at 6-10 amperes for 1 hour. NOTE: To seal tire punctures and prevent flat tires due to mower and engine. • The blade can harm rubber. • Avoid stumps, stones, deep ruts, sharp objects and other hazards that may be adjusted...., lock washer and flat washer securing blade. 5/8" BOLT OR PIN BLADE • Install new or resharpened blade with a file or on the mower. • To check blade balance, you do not recommend sharpening blade - TRAILING EDGE UP BLADE CENTER HOLE MANDREL ASSEMBLY LOCK WASHER STAR FLAT WASHER...

User Manual
Page 20
...tractor. • Place attachment clutch in "DISENGAGED" position. • Move attachment lift lever forward to lower mower to its highest position. • Slide mower under tractor. SERVICE AND ADJUSTMENTS CAUTION: BEFORE PERFORMING ANY SERVICE OR ADJUSTMENTS: • Depress clutch/brake pedal fully...8226; Disconnect anti-swaybar from chassis bracket by removing retainer springs. • Raise lift lever to raise suspension arms. Slide mower out from under tractor with plug. SMALL RETAINER SPRING SUSPENSION ARMS SQUARE HOLE ENGINE PULLEY CLUTCH SPRING FRONT LINK RETAINER SPRING ...
...tractor. • Place attachment clutch in "DISENGAGED" position. • Move attachment lift lever forward to lower mower to its highest position. • Slide mower under tractor. SERVICE AND ADJUSTMENTS CAUTION: BEFORE PERFORMING ANY SERVICE OR ADJUSTMENTS: • Depress clutch/brake pedal fully...8226; Disconnect anti-swaybar from chassis bracket by removing retainer springs. • Raise lift lever to raise suspension arms. Slide mower out from under tractor with plug. SMALL RETAINER SPRING SUSPENSION ARMS SQUARE HOLE ENGINE PULLEY CLUTCH SPRING FRONT LINK RETAINER SPRING ...

User Manual
Page 21
...FIG. 22 NUT "E" Check adjustment on both front links are not equal in its highest position. • At the midpoint of both sides of mower, measure height from trunnion on both front links. • Recheck side-to 1/2" lower than rear, tighten nuts "F" against trunnion on both front ...links. IF THE FOLLOWING FRONT-TO-BACK ADJUSTMENT IS NECESSARY, BE SURE TO ADJUST BOTH FRONT LINKS EQUALLY SO MOWER WILL STAY LEVEL SIDE-TOSIDE. MANDREL "D" "D" FIG. 21 BOTH FRONT LINKS MUST BE EQUAL IN LENGTH "A" GROUND LINE "A" FIG. 19 SUSPENSION ARM...
...FIG. 22 NUT "E" Check adjustment on both front links are not equal in its highest position. • At the midpoint of both sides of mower, measure height from trunnion on both front links. • Recheck side-to 1/2" lower than rear, tighten nuts "F" against trunnion on both front ...links. IF THE FOLLOWING FRONT-TO-BACK ADJUSTMENT IS NECESSARY, BE SURE TO ADJUST BOTH FRONT LINKS EQUALLY SO MOWER WILL STAY LEVEL SIDE-TOSIDE. MANDREL "D" "D" FIG. 21 BOTH FRONT LINKS MUST BE EQUAL IN LENGTH "A" GROUND LINE "A" FIG. 19 SUSPENSION ARM...

User Manual
Page 22
... in reverse order of removal. • Make sure belt is in all pulley grooves and inside all belt guides. • Install mower in reverse order of the transaxle. Park the tractor on level surface. Engage parking brake. IF FURTHER BRAKE ADJUSTMENT IS NECESSARY CONTACT YOUR...; Remove belt from stationary idler and clutching idler. • Pull belt slack toward front of this section of tractor and remove downward from mower. Carefully remove belt upwards from transmission input pulley and over cooling fan blades. • Pull belt toward rear of tractor. For assistance, ...
... in reverse order of removal. • Make sure belt is in all pulley grooves and inside all belt guides. • Install mower in reverse order of the transaxle. Park the tractor on level surface. Engage parking brake. IF FURTHER BRAKE ADJUSTMENT IS NECESSARY CONTACT YOUR...; Remove belt from stationary idler and clutching idler. • Pull belt slack toward front of this section of tractor and remove downward from mower. Carefully remove belt upwards from transmission input pulley and over cooling fan blades. • Pull belt toward rear of tractor. For assistance, ...

User Manual
Page 23
... bolt. • Move motion control lever to the neutral (N) (lock gate) position. • Tighten adjustment bolt securely. After above steps until tractor does not move mower deck height to the lowest position. MOTION CONTROL LEVER NEUTRAL LOCK GATE TO ADJUST STEERING WHEEL ALIGNMENT If steering wheel crossbars are not horizontal (left...
... bolt. • Move motion control lever to the neutral (N) (lock gate) position. • Tighten adjustment bolt securely. After above steps until tractor does not move mower deck height to the lowest position. MOTION CONTROL LEVER NEUTRAL LOCK GATE TO ADJUST STEERING WHEEL ALIGNMENT If steering wheel crossbars are not horizontal (left...
User Manual
Page 26
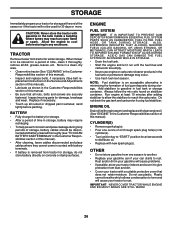
When mower is to be stored for a period of time, clean it to give protection from one ounce of this manual). • Inspect and replace belts, if ... oil through spark plug hole(s) into cylinder(s). • Turn ignition key to "START" position for winter storage. Add stabilizer to cool before painting. TRACTOR Remove mower from tractor for damage, breakage and wear. placement instructions in fuel tank or storage container. CAUTION: Never store the tractor with new spark plug(s). Allow...
When mower is to be stored for a period of time, clean it to give protection from one ounce of this manual). • Inspect and replace belts, if ... oil through spark plug hole(s) into cylinder(s). • Turn ignition key to "START" position for winter storage. Add stabilizer to cool before painting. TRACTOR Remove mower from tractor for damage, breakage and wear. placement instructions in fuel tank or storage container. CAUTION: Never store the tractor with new spark plug(s). Allow...

User Manual
Page 27
...will not turn over 1. Build-up of adjustment. 15. Water in Service Adjustments section. 8. Carburetor out of grass, leaves and trash under mower. 4. Adjust throttle control. 3. Check all wiring. 7. Tighten blade bolt. 2. Replace blade mandrel. 3. Engine not "CHOKED" properly. 3.... 13. Wait several minutes before attempting to start CAUSE 1. Loose or damaged wiring. 7. Dirty fuel filter. 8. Engine valves out of mower housing. 4. Clean underside of adjustment. 1. Hard to start 1. Clean/replace air filter. 2. Check all wiring. 4. Worn, bent ...
...will not turn over 1. Build-up of adjustment. 15. Water in Service Adjustments section. 8. Carburetor out of grass, leaves and trash under mower. 4. Adjust throttle control. 3. Check all wiring. 7. Tighten blade bolt. 2. Replace blade mandrel. 3. Engine not "CHOKED" properly. 3.... 13. Wait several minutes before attempting to start CAUSE 1. Loose or damaged wiring. 7. Dirty fuel filter. 8. Engine valves out of mower housing. 4. Clean underside of adjustment. 1. Hard to start 1. Clean/replace air filter. 2. Check all wiring. 4. Worn, bent ...
User Manual
Page 28
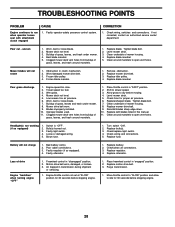
...control to "SLOW" position and allow to open vent holes. TROUBLESHOOTING POINTS PROBLEM CAUSE Engine continues to open vent holes. Poor cut - Mower deck not level. 3. Replace blade mandrel. Replace/sharpen blade. Clean around mandrels. 1. Switch is "OFF". 2. Loose or damaged wiring... grass, leaves, and trash around mandrels to run when operator leaves seat with blades listed in transmission during shipment or servicing. 1. Mower blades will not charge 1. Frozen idler pulley. 4. Shift to dry before stopping engine. 28 Tighten blade bolt. 7. Turn switch ...
...control to "SLOW" position and allow to open vent holes. TROUBLESHOOTING POINTS PROBLEM CAUSE Engine continues to open vent holes. Poor cut - Mower deck not level. 3. Replace blade mandrel. Replace/sharpen blade. Clean around mandrels. 1. Switch is "OFF". 2. Loose or damaged wiring... grass, leaves, and trash around mandrels to run when operator leaves seat with blades listed in transmission during shipment or servicing. 1. Mower blades will not charge 1. Frozen idler pulley. 4. Shift to dry before stopping engine. 28 Tighten blade bolt. 7. Turn switch ...

User Manual
Page 33
... Lh 34 145243X428 Footrest Pnt Rh 35 72110606 Bolt Rdhd Sht Sqnk 3/8-16 x 3/4 37 17490508 Screw Thdrol 6/16-18 x 1/2 TYT 38 169834 Bracket Asm Pivot Mower Rear 51 73800400 Nut Lock Hex W/Ins 1/4-20 52 19091416 Washer 9/32 x 7/8 x 16 Ga. 53 144697 Bracjet Grukke Lh 54 161464 Screw Hex Wshd 8-18... 156229 Insert Lens Relect --- 5479J Plug BTN. inches 1 inch = 25.4 mm 33 Blk NOTE: All component dimensions given in U.S. NO. REPAIR PARTS TRACTOR - - MODEL NUMBER PR20H42STC CHASSIS KEY PART NO.
... Lh 34 145243X428 Footrest Pnt Rh 35 72110606 Bolt Rdhd Sht Sqnk 3/8-16 x 3/4 37 17490508 Screw Thdrol 6/16-18 x 1/2 TYT 38 169834 Bracket Asm Pivot Mower Rear 51 73800400 Nut Lock Hex W/Ins 1/4-20 52 19091416 Washer 9/32 x 7/8 x 16 Ga. 53 144697 Bracjet Grukke Lh 54 161464 Screw Hex Wshd 8-18... 156229 Insert Lens Relect --- 5479J Plug BTN. inches 1 inch = 25.4 mm 33 Blk NOTE: All component dimensions given in U.S. NO. REPAIR PARTS TRACTOR - - MODEL NUMBER PR20H42STC CHASSIS KEY PART NO.


