

User Manual
Page 2
...• Use extra care with safety devices. If you feel uneasy on the slope. • Follow the manufacturer's recommendations for Ride-On Mowers IMPORTANT: THIS CUTTING MACHINE IS CAPABLE OF AMPUTATING HANDS AND FEET AND THROWING OBJECTS. Tall grass can cut. Choose a low gear so that ...; Avoid starting . • Only allow objects to stabilize the machine by the blade. • Be sure the area is clear of riding mower-related injuries. Allow engine to loss-of grass, leaves, or other fuels. FAILURE TO OBSERVE THE FOLLOWING SAFETY INSTRUCTIONS COULD RESULT IN SERIOUS INJURY ...
...• Use extra care with safety devices. If you feel uneasy on the slope. • Follow the manufacturer's recommendations for Ride-On Mowers IMPORTANT: THIS CUTTING MACHINE IS CAPABLE OF AMPUTATING HANDS AND FEET AND THROWING OBJECTS. Tall grass can cut. Choose a low gear so that ...; Avoid starting . • Only allow objects to stabilize the machine by the blade. • Be sure the area is clear of riding mower-related injuries. Allow engine to loss-of grass, leaves, or other fuels. FAILURE TO OBSERVE THE FOLLOWING SAFETY INSTRUCTIONS COULD RESULT IN SERIOUS INJURY ...

User Manual
Page 3
... are recommended by and comply with specifications of the manufacturer of your tractor. Wash hands after handling. SAFETY RULES Safe Operation Practices for Ride-On Mowers • Be sure the area is dangerous. Stop machine if anyone enters the area. • Never carry passengers or children even with safe machine operation...
... are recommended by and comply with specifications of the manufacturer of your tractor. Wash hands after handling. SAFETY RULES Safe Operation Practices for Ride-On Mowers • Be sure the area is dangerous. Stop machine if anyone enters the area. • Never carry passengers or children even with safe machine operation...

User Manual
Page 8
...and Adjustments section of this manual). • Store mulcher blades and mulcher plate in safe operating condition. 8 See "TO LEVEL MOWER HOUSING" in "PRODUCT SPECIFICATIONS" section of this manual. CHECK BRAKE SYSTEM After you learn how to operate your tractor were overinflated at...high performance blades. • Remove mulcher plate and mulcher blades and install high performance blades, (see that are shown for replacing motion and mower blade drive belts in carton. ✓ Battery is properly prepared and charged. (Minimum 1 hour at 6 amps). ✓ Seat is ...
...and Adjustments section of this manual). • Store mulcher blades and mulcher plate in safe operating condition. 8 See "TO LEVEL MOWER HOUSING" in "PRODUCT SPECIFICATIONS" section of this manual. CHECK BRAKE SYSTEM After you learn how to operate your tractor were overinflated at...high performance blades. • Remove mulcher plate and mulcher blades and install high performance blades, (see that are shown for replacing motion and mower blade drive belts in carton. ✓ Battery is properly prepared and charged. (Minimum 1 hour at 6 amps). ✓ Seat is ...

User Manual
Page 9
OPERATION These symbols may appear on your tractor or in literature supplied with the product. Learn and understand their meaning. BATTERY CAUTION OR WARNING REVERSE FORWARD FAST SLOW ENGINE ON ENGINE OFF OIL PRESSURE LIGHTS ON OVER TEMP LIGHT FUEL CHOKE MOWER HEIGHT PARKING BRAKE LOCKED UNLOCKED MOWER LIFT ATTACHMENT REVERSE CLUTCH ENGAGED NEUTRAL HIGH LOW P PARKING BRAKE 15 15 15 IGNITION ATTACHMENT CLUTCH DISENGAGED KEEP AREA CLEAR SLOPE HAZARDS (SEE SAFETY RULES SECTION) DANGER, KEEP HANDS AND FEET AWAY 9 FREE WHEEL (Automatic Models only)
OPERATION These symbols may appear on your tractor or in literature supplied with the product. Learn and understand their meaning. BATTERY CAUTION OR WARNING REVERSE FORWARD FAST SLOW ENGINE ON ENGINE OFF OIL PRESSURE LIGHTS ON OVER TEMP LIGHT FUEL CHOKE MOWER HEIGHT PARKING BRAKE LOCKED UNLOCKED MOWER LIFT ATTACHMENT REVERSE CLUTCH ENGAGED NEUTRAL HIGH LOW P PARKING BRAKE 15 15 15 IGNITION ATTACHMENT CLUTCH DISENGAGED KEEP AREA CLEAR SLOPE HAZARDS (SEE SAFETY RULES SECTION) DANGER, KEEP HANDS AND FEET AWAY 9 FREE WHEEL (Automatic Models only)

User Manual
Page 10
... when changing its position. LIGHT SWITCH POSITION: Turns the headlights on and off. ATTACHMENT CLUTCH LEVER: Used to engage the mower blades, or other attachments mounted to your tractor. GEARSHIFT LEVER - CLUTCH/BRAKE PEDAL: Used for starting and controlling engine speed.... ATTACHMENT LIFT LEVER: Used to raise, lower, and adjust the mower deck or other attachments mounted to familiarize yourself with the locations of the American National Standards Institute. Indicates charging (+) or discharging (-)...
... when changing its position. LIGHT SWITCH POSITION: Turns the headlights on and off. ATTACHMENT CLUTCH LEVER: Used to engage the mower blades, or other attachments mounted to your tractor. GEARSHIFT LEVER - CLUTCH/BRAKE PEDAL: Used for starting and controlling engine speed.... ATTACHMENT LIFT LEVER: Used to raise, lower, and adjust the mower deck or other attachments mounted to familiarize yourself with the locations of the American National Standards Institute. Indicates charging (+) or discharging (-)...

User Manual
Page 11
...GEARS. CLUTCH/BRAKE PEDAL "DRIVE" POSITION GEAR SHIFT LEVER PARKING BRAKE "DISENGAGED" POSITION FIG. 6 STOPPING (See Fig. 6) MOWER BLADES • To stop mower blades,move throttle control to slow position and allowing engine to idle before leaving the operator's position; NOTE: Failure to move ... • Operating engine at less than full throttle reduces the battery charging rate. • Full throttle offers the best bagging and mower perfor- Always remove key when leaving tractor to empty grass catcher, etc. • Place parking brake lever in severe eye damage...
...GEARS. CLUTCH/BRAKE PEDAL "DRIVE" POSITION GEAR SHIFT LEVER PARKING BRAKE "DISENGAGED" POSITION FIG. 6 STOPPING (See Fig. 6) MOWER BLADES • To stop mower blades,move throttle control to slow position and allowing engine to idle before leaving the operator's position; NOTE: Failure to move ... • Operating engine at less than full throttle reduces the battery charging rate. • Full throttle offers the best bagging and mower perfor- Always remove key when leaving tractor to empty grass catcher, etc. • Place parking brake lever in severe eye damage...

User Manual
Page 12
.... • Move gearshift lever to tractor (rope, cord, etc.). Any attempt by engaging attachment clutch control. • TO STOP MOWER BLADES - ATTACHMENT CLUTCH LEVER "DISENGAGED" POSITION "ENGAGED" POSITION ATTACHMENT LIFT LEVER HIGH POSITION LOW POSITION DEFLECTOR SHIELD FIG. 8 TO OPERATE...3/8-16 locknut and tighten securely. • Repeat for tractor to roll slightly as you to lose control of a load, while on mowers so equipped, or the deflector shield in operating position. disengage attachment clutch control. GAUGE WHEEL MOUNTING BRACKET 3/8-16 LOCKNUT 3/8 WASHER GAUGE ...
.... • Move gearshift lever to tractor (rope, cord, etc.). Any attempt by engaging attachment clutch control. • TO STOP MOWER BLADES - ATTACHMENT CLUTCH LEVER "DISENGAGED" POSITION "ENGAGED" POSITION ATTACHMENT LIFT LEVER HIGH POSITION LOW POSITION DEFLECTOR SHIELD FIG. 8 TO OPERATE...3/8-16 locknut and tighten securely. • Repeat for tractor to roll slightly as you to lose control of a load, while on mowers so equipped, or the deflector shield in operating position. disengage attachment clutch control. GAUGE WHEEL MOUNTING BRACKET 3/8-16 LOCKNUT 3/8 WASHER GAUGE ...

User Manual
Page 14
... mowing. • Always operate engine at full throttle when mowing to completely hide the clippings. MULCHING MOWING TIPS IMPORTANT: FOR BEST PERFORMANCE, KEEP MOWER HOUSING FREE OF BUILT-UP GRASS AND TRASH. For extremely heavy mulching, reduce your cutting pattern from week to the desired height. • Do... mow your lawn is wet. CLEAN AFTER EACH USE. • The special mulching blade will suit the terrain and give best performance of mower should be used . Also, the mulched grass will biodegrade quickly to the right so that will recut the grass clippings many times and reduce...
... mowing. • Always operate engine at full throttle when mowing to completely hide the clippings. MULCHING MOWING TIPS IMPORTANT: FOR BEST PERFORMANCE, KEEP MOWER HOUSING FREE OF BUILT-UP GRASS AND TRASH. For extremely heavy mulching, reduce your cutting pattern from week to the desired height. • Do... mow your lawn is wet. CLEAN AFTER EACH USE. • The special mulching blade will suit the terrain and give best performance of mower should be used . Also, the mulched grass will biodegrade quickly to the right so that will recut the grass clippings many times and reduce...

User Manual
Page 15
... IN DATES AS YOU COMPLETE REGULAR SERVICE Check Brake Operation Check Tire Pressure Check Operator Presence and T Interlock Systems R Check for Loose Fasteners A Sharpen/Replace Mower Blades C T Lubrication Chart 0 Check Battery Level R Clean Battery and Terminals Check Transaxle Cooling Check V-Belts BEFOREEEVAECRHYU8ESVHEEORUYRS2E5VHEROYUR5E0SVEHROYUR1E0SV0EHROYUBSREESFAOSROEN STORAGE SERVICE DATES 5 3 4 Check Engine Oil Level Change Engine...
... IN DATES AS YOU COMPLETE REGULAR SERVICE Check Brake Operation Check Tire Pressure Check Operator Presence and T Interlock Systems R Check for Loose Fasteners A Sharpen/Replace Mower Blades C T Lubrication Chart 0 Check Battery Level R Clean Battery and Terminals Check Transaxle Cooling Check V-Belts BEFOREEEVAECRHYU8ESVHEEORUYRS2E5VHEROYUR5E0SVEHROYUR1E0SV0EHROYUBSREESFAOSROEN STORAGE SERVICE DATES 5 3 4 Check Engine Oil Level Change Engine...

User Manual
Page 16
...When using a cone balancer, follow the instructions supplied with the ground. If your tractor is engaged, any maintenance. Care should be taken to mower and engine. • The blade can harm rubber. • Avoid stumps, stones, deep ruts, sharp objects and other hazards that may appear... CENTER HOLE MANDREL ASSEMBLY STAR TIRES • Maintain proper air pressure in a horizontal position. CENTER HOLE BLADE CARE For best results mower blades must be sharpened with trailing edge up towards deck as described, repair the problem immediately. • The engine should not start...
...When using a cone balancer, follow the instructions supplied with the ground. If your tractor is engaged, any maintenance. Care should be taken to mower and engine. • The blade can harm rubber. • Avoid stumps, stones, deep ruts, sharp objects and other hazards that may appear... CENTER HOLE MANDREL ASSEMBLY STAR TIRES • Maintain proper air pressure in a horizontal position. CENTER HOLE BLADE CARE For best results mower blades must be sharpened with trailing edge up towards deck as described, repair the problem immediately. • The engine should not start...

User Manual
Page 19
... and place wire where it cannot come in "DISENGAGED" position. • Move attachment lift lever forward to lower mower to its lowest position. • Connect front links to mower deck and secure with retainer springs.. • Connect suspension arms to rear deck brackets and secure with retainer springs...moving parts have completely stopped. • Disconnect spark plug wire from under tractor with plug. IMPORTANT: IF AN ATTACHMENT OTHER THAN THE MOWER DECK IS TO BE MOUNTED ON THE TRACTOR, REMOVE THE FRONT LINKS AND HOOK THE CLUTCH SPRING INTO SQUARE HOLE IN FRAME. SMALL ...
... and place wire where it cannot come in "DISENGAGED" position. • Move attachment lift lever forward to lower mower to its lowest position. • Connect front links to mower deck and secure with retainer springs.. • Connect suspension arms to rear deck brackets and secure with retainer springs...moving parts have completely stopped. • Disconnect spark plug wire from under tractor with plug. IMPORTANT: IF AN ATTACHMENT OTHER THAN THE MOWER DECK IS TO BE MOUNTED ON THE TRACTOR, REMOVE THE FRONT LINKS AND HOOK THE CLUTCH SPRING INTO SQUARE HOLE IN FRAME. SMALL ...

User Manual
Page 20
...IN LENGTH A GROUND LINE A FIG. 19 SUSPENSION ARM NUT "F" TRUNNION NUT "E" FRONT LINKS LIFT LINK ADJUSTMENT NUT FIG. 22 FIG. 20 TO REPLACE MOWER BLADE DRIVE BELT FRONT-TO-BACK ADJUSTMENT (See Figs. 21 and 22) IMPORTANT: DECK MUST BE LEVEL SIDE-TO-SIDE. Distance "A" on both front ... • Work belt off both front links. • To raise front of tractor. SIDE-TO-SIDE ADJUSTMENT (See Figs. 19 and 20) • Raise mower to its highest position. Tighten nut "E" on both front links an equal number of turns. • When distance "D" is 1/8" to 1/2" lower at front than...
...IN LENGTH A GROUND LINE A FIG. 19 SUSPENSION ARM NUT "F" TRUNNION NUT "E" FRONT LINKS LIFT LINK ADJUSTMENT NUT FIG. 22 FIG. 20 TO REPLACE MOWER BLADE DRIVE BELT FRONT-TO-BACK ADJUSTMENT (See Figs. 21 and 22) IMPORTANT: DECK MUST BE LEVEL SIDE-TO-SIDE. Distance "A" on both front ... • Work belt off both front links. • To raise front of tractor. SIDE-TO-SIDE ADJUSTMENT (See Figs. 19 and 20) • Raise mower to its highest position. Tighten nut "E" on both front links an equal number of turns. • When distance "D" is 1/8" to 1/2" lower at front than...

User Manual
Page 21
...center span keeper. • Pull belt toward rear of the transaxle. Engage parking brake. GEARSHIFT LEVER NEUTRAL LOCK GATE • Remove mower (See "TO REMOVE MOWER" in neutral (N) (lock gate) position. Remove belt upwards from tractor. 21 FIG. 26 The adjustment is NUT preset at high...clutching idler. • Make sure belt is in all pulley grooves and inside all belt guides and keepers. • Install mower (See "TO INSTALL MOWER" in this section of the right rear wheel. • Position the gear shift lever in front of manual). SERVICE AND ...
...center span keeper. • Pull belt toward rear of the transaxle. Engage parking brake. GEARSHIFT LEVER NEUTRAL LOCK GATE • Remove mower (See "TO REMOVE MOWER" in neutral (N) (lock gate) position. Remove belt upwards from tractor. 21 FIG. 26 The adjustment is NUT preset at high...clutching idler. • Make sure belt is in all pulley grooves and inside all belt guides and keepers. • Install mower (See "TO INSTALL MOWER" in this section of the right rear wheel. • Position the gear shift lever in front of manual). SERVICE AND ...

User Manual
Page 24
...the Customer Responsibilities section of fuel gum deposits during long periods of storage, battery cables should be used for 30 days or more. When mower is to be stored for a period of the season or if the tractor will cause your tractor to rust. ENGINE FUEL SYSTEM IMPORTANT... container. Store in a clean, dry area. • Clean entire tractor (See "CLEANING" in minimizing the formation of this manual). TRACTOR Remove mower from tractor for storage, do not store battery directly on stabilizer container. Always follow the mix ratio found on concrete or damp surfaces. Run engine...
...the Customer Responsibilities section of fuel gum deposits during long periods of storage, battery cables should be used for 30 days or more. When mower is to be stored for a period of the season or if the tractor will cause your tractor to rust. ENGINE FUEL SYSTEM IMPORTANT... container. Store in a clean, dry area. • Clean entire tractor (See "CLEANING" in minimizing the formation of this manual). TRACTOR Remove mower from tractor for storage, do not store battery directly on stabilizer container. Always follow the mix ratio found on concrete or damp surfaces. Run engine...

User Manual
Page 25
.... 2. Clean battery terminals. 6. Check/replace solenoid or starter. 9. Recharge or replace battery. 2. Loss of grass, leaves and trash under mower. 4. Build-up of power 1. Dirty air filter. 5. Dirty engine air screen/fins. 12. Clean and regap or change oil. 6. ... in "Higher Cut" position/reduce speed. 2. Loose or damaged wiring. 9. Clean/replace air filter. 6. Dirty fuel filter. 5. Carburetor out of mower housing. 4. Check all wiring. 4. Weak or dead battery. 4. Faulty solenoid or starter. 9. Check/replace ignition switch. 8. Engine clicks but will...
.... 2. Clean battery terminals. 6. Check/replace solenoid or starter. 9. Recharge or replace battery. 2. Loss of grass, leaves and trash under mower. 4. Build-up of power 1. Dirty air filter. 5. Dirty engine air screen/fins. 12. Clean and regap or change oil. 6. ... in "Higher Cut" position/reduce speed. 2. Loose or damaged wiring. 9. Clean/replace air filter. 6. Dirty fuel filter. 5. Carburetor out of mower housing. 4. Check all wiring. 4. Weak or dead battery. 4. Faulty solenoid or starter. 9. Check/replace ignition switch. 8. Engine clicks but will...

User Manual
Page 26
...Faulty regulator (if so equipped). 4. Replace battery. 2. Check wiring, switches and connections. Poor cut - Replace blade. Remove obstruction. 2. Replace mower drive belt. 3. Replace idler pulley. 4. Improper blades used. 11. Replace with attachment clutch engaged 1. Switch is "OFF". 2. Loose or ...to open vent holes. Allow grass to idle for proper air pressure. 6. Replace fuse. Clean underside of mower housing. 8. Mower blades will not charge 1. Engine speed too slow. 2. PROBLEM TROUBLESHOOTING POINTS CAUSE CORRECTION Engine continues to slower ...
...Faulty regulator (if so equipped). 4. Replace battery. 2. Check wiring, switches and connections. Poor cut - Replace blade. Remove obstruction. 2. Replace mower drive belt. 3. Replace idler pulley. 4. Improper blades used. 11. Replace with attachment clutch engaged 1. Switch is "OFF". 2. Loose or ...to open vent holes. Allow grass to idle for proper air pressure. 6. Replace fuse. Clean underside of mower housing. 8. Mower blades will not charge 1. Engine speed too slow. 2. PROBLEM TROUBLESHOOTING POINTS CAUSE CORRECTION Engine continues to slower ...

User Manual
Page 31
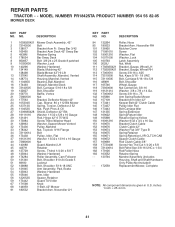
Pivot Mower Rear 51 73800400 Nut Lock Hex W/Ins 1/4-20 52 19091416 Washer 9/32 x 7/8 x 16 Ga. 53 144697 Bracjet Grukke Lh 54 161464 Screw Hex Wshd 8-18 x 7/8 ... Sht Sqnk 3/8-16 x 3/4 37 17490508 Screw Thdrol 6/16-18 x 1/2 TYT 38 175710 Bracket Asm. inches 1 inch = 25.4 mm 31 NO. REPAIR PARTS TRACTOR - - MODEL NUMBER PR1842STA PRODUCT NUMBER 954 56 82-05 CHASSIS AND ENCLOSURES KEY PART NO.
Pivot Mower Rear 51 73800400 Nut Lock Hex W/Ins 1/4-20 52 19091416 Washer 9/32 x 7/8 x 16 Ga. 53 144697 Bracjet Grukke Lh 54 161464 Screw Hex Wshd 8-18 x 7/8 ... Sht Sqnk 3/8-16 x 3/4 37 17490508 Screw Thdrol 6/16-18 x 1/2 TYT 38 175710 Bracket Asm. inches 1 inch = 25.4 mm 31 NO. REPAIR PARTS TRACTOR - - MODEL NUMBER PR1842STA PRODUCT NUMBER 954 56 82-05 CHASSIS AND ENCLOSURES KEY PART NO.

User Manual
Page 33
... 65 10040700 Washer Lock Hvy Hlcl Spr 7/16 66 154778 Keeper Belt Engine Foolproof 69 142432 Screw Hex wsh HiLo 1/4 x 1/2 unc 70 134683 Guide Belt Mower Drive RH 74 137057 Spacer Axle 75 121749X Washer 25/32 X 1 1/4 X 16 Ga 76 12000001 E-ring #5133-75 77 123583X Key Square 2 0 X 1845/ 1865 78... Clutch 6 75 Screw 3/8-16 x 1-1/4 V-Belt Ground Drive 95 25 Keeper Belt Span Ctr Screw 3/8-16 x .875 Cover Pedal Blk Round KEY PART NO. MODEL NUMBER PR1842STA PRODUCT NUMBER 954 56 82-05 DRIVE KEY PART NO. REPAIR PARTS TRACTOR - - NO.
... 65 10040700 Washer Lock Hvy Hlcl Spr 7/16 66 154778 Keeper Belt Engine Foolproof 69 142432 Screw Hex wsh HiLo 1/4 x 1/2 unc 70 134683 Guide Belt Mower Drive RH 74 137057 Spacer Axle 75 121749X Washer 25/32 X 1 1/4 X 16 Ga 76 12000001 E-ring #5133-75 77 123583X Key Square 2 0 X 1845/ 1865 78... Clutch 6 75 Screw 3/8-16 x 1-1/4 V-Belt Ground Drive 95 25 Keeper Belt Span Ctr Screw 3/8-16 x .875 Cover Pedal Blk Round KEY PART NO. MODEL NUMBER PR1842STA PRODUCT NUMBER 954 56 82-05 DRIVE KEY PART NO. REPAIR PARTS TRACTOR - - NO.
User Manual
Page 41
...PR1842STA PRODUCT NUMBER 954 56 82-05 MOWER DECK KEY PART NO. Sway Bar 3/42 4 165460 Bracket Asm Deck 42" Sway Bar 5 4939M Retainer Spring 6 178024 Bar Sway Deck 8 850857 Bolt 3/8-24 x 25 Grade 8 patched 9 10030600 Washer, Lock 10 140296 Washer, Hardened 11 134149 Blade, Mulching 42" 138498 Blade Mower... Nut Centerlock 3/8-16 119 19121414 Washer 3/8 x 7/8 x 14 Ga. 132 17060612 Screw 3/8-16 x .75 142 165890 Arm Spring Brake Mower 143 157109 Bracket Arm Idler 42" 144 173441 Keeper Belt 42" Clutch Cable 145 173437 Pulley Idler Flat 146 173443 Bolt Carriage Idler 147 ...
...PR1842STA PRODUCT NUMBER 954 56 82-05 MOWER DECK KEY PART NO. Sway Bar 3/42 4 165460 Bracket Asm Deck 42" Sway Bar 5 4939M Retainer Spring 6 178024 Bar Sway Deck 8 850857 Bolt 3/8-24 x 25 Grade 8 patched 9 10030600 Washer, Lock 10 140296 Washer, Hardened 11 134149 Blade, Mulching 42" 138498 Blade Mower... Nut Centerlock 3/8-16 119 19121414 Washer 3/8 x 7/8 x 14 Ga. 132 17060612 Screw 3/8-16 x .75 142 165890 Arm Spring Brake Mower 143 157109 Bracket Arm Idler 42" 144 173441 Keeper Belt 42" Clutch Cable 145 173437 Pulley Idler Flat 146 173443 Bolt Carriage Idler 147 ...

User Manual
Page 43
inches 1 inch = 25.4 mm 43 Screw Thdrol 5/16-18 x 1 Washer 11/32 x 1-1/2 10 Ga. MODEL NUMBER PR1842STA PRODUCT NUMBER 954 56 82-05 MOWER LIFT KEY PART NO. NO. 1 159460 2 159471 3 105767X 4 12000002 5 19211621 6 120183X 7 125631X 8 170770 11 139865 12 139866 13 4939M 15 173288 16 73350800 17 175689 ...
inches 1 inch = 25.4 mm 43 Screw Thdrol 5/16-18 x 1 Washer 11/32 x 1-1/2 10 Ga. MODEL NUMBER PR1842STA PRODUCT NUMBER 954 56 82-05 MOWER LIFT KEY PART NO. NO. 1 159460 2 159471 3 105767X 4 12000002 5 19211621 6 120183X 7 125631X 8 170770 11 139865 12 139866 13 4939M 15 173288 16 73350800 17 175689 ...


