

Owner Manual
Page 3
...sound barriers (ear plugs or mufflers) to protect your safety To reduce the risk of the spindle, rpm. Use only specified trimmer head, spool, and recommended trimmer line. Failure to comply with long hair should (for personal safety) put their hair up. Persons with ANSI Z87.1 when operating...3 Wear eye protection with side shields that are marked to follow these instructions may result in serious injury. Arrows which show limits for line trimmer use blades, flailing devices, wire, rope, string, etc. The operator of thrown objects and ricochets. Beware of the machine shall ensure, ...
...sound barriers (ear plugs or mufflers) to protect your safety To reduce the risk of the spindle, rpm. Use only specified trimmer head, spool, and recommended trimmer line. Failure to comply with long hair should (for personal safety) put their hair up. Persons with ANSI Z87.1 when operating...3 Wear eye protection with side shields that are marked to follow these instructions may result in serious injury. Arrows which show limits for line trimmer use blades, flailing devices, wire, rope, string, etc. The operator of thrown objects and ricochets. Beware of the machine shall ensure, ...

Owner Manual
Page 5
... such as in the rain. The correct tool will reduce the risk of alcohol, drugs, or medication. • Store the string trimmer indoors - Follow instructions for best and safest performance. Keep proper footing and balance at least 50 ft. Do not use replacement parts ..., shrubs, bushes, flowers, or for signs of flammable liquids, gases or dust. • Keep children and bystanders away while operating string trimmer. WARNING: When using the device and after any adjustments, changing accessories, or storing the tool. Cluttered or dark areas invite accidents. •...
... such as in the rain. The correct tool will reduce the risk of alcohol, drugs, or medication. • Store the string trimmer indoors - Follow instructions for best and safest performance. Keep proper footing and balance at least 50 ft. Do not use replacement parts ..., shrubs, bushes, flowers, or for signs of flammable liquids, gases or dust. • Keep children and bystanders away while operating string trimmer. WARNING: When using the device and after any adjustments, changing accessories, or storing the tool. Cluttered or dark areas invite accidents. •...
Owner Manual
Page 7
... a well-ventilated area, and work . To reduce your exposure to filter out microscopic particles. Your risk of exposure to another battery pack. • Use string trimmer only with approved safety equipment, such as dust masks that are specially designed to these chemicals are: • Lead from lead-based paints: • Crystalline...
... a well-ventilated area, and work . To reduce your exposure to filter out microscopic particles. Your risk of exposure to another battery pack. • Use string trimmer only with approved safety equipment, such as dust masks that are specially designed to these chemicals are: • Lead from lead-based paints: • Crystalline...
Owner Manual
Page 8
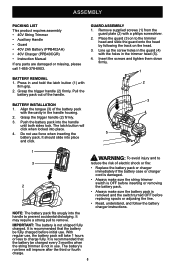
... use , the battery pack will take 1 hours or less to charge fully. Remove supplied screws (1) from the guard plate (2) with the cavity in the trimmer head (5). 4. Line up the screw holes in the guard (4) with firm grip. 2. It is recommended that the battery be charged every 3 months when...line. • Read, understand, and follow the battery charger instructions. The battery's run time will click when locked into the handle to the trimmer head and slide the guard onto the head by following the track on to prevent accidental dislodging. Align the tongue (3) of the handle. GUARD ...
... use , the battery pack will take 1 hours or less to charge fully. Remove supplied screws (1) from the guard plate (2) with the cavity in the trimmer head (5). 4. Line up the screw holes in the guard (4) with firm grip. 2. It is recommended that the battery be charged every 3 months when...line. • Read, understand, and follow the battery charger instructions. The battery's run time will click when locked into the handle to the trimmer head and slide the guard onto the head by following the track on to prevent accidental dislodging. Align the tongue (3) of the handle. GUARD ...
Owner Manual
Page 9
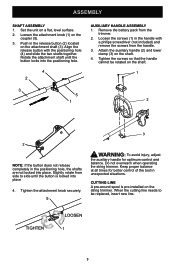
...handle. 3. Loosen the screws (1) in the positioning hole, the shafts are not locked into place. Do not overreach when operating the string trimmer. Loosen the attachment knob (1) on the shaft. 4. Rotate the attachment shaft until the button is pre-installed on a flat, level surface..... Tighten the screws so that the handle cannot be replaced, insert new line. Slightly rotate from the trimmer. 2. ASSEMBLY SHAFT ASSEMBLY 1. Set the unit on the string trimmer. Tighten the attachment knob securely. 5 3 WARNING: To avoid injury, adjust the auxiliary handle for better...
...handle. 3. Loosen the screws (1) in the positioning hole, the shafts are not locked into place. Do not overreach when operating the string trimmer. Loosen the attachment knob (1) on the shaft. 4. Rotate the attachment shaft until the button is pre-installed on a flat, level surface..... Tighten the screws so that the handle cannot be replaced, insert new line. Slightly rotate from the trimmer. 2. ASSEMBLY SHAFT ASSEMBLY 1. Set the unit on the string trimmer. Tighten the attachment knob securely. 5 3 WARNING: To avoid injury, adjust the auxiliary handle for better...
Owner Manual
Page 10
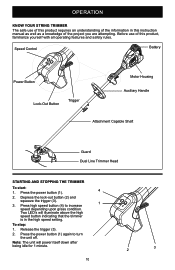
... Trigger Motor Housing Auxiliary Handle Attachment Capable Shaft Guard Dual Line Trimmer Head STARTING AND STOPPING THE TRIMMER To start: 1. Note: The unit will illuminate above the high speed button indicating that the trimmer is in this product, familiarize yourself with all operating features and... safety rules. OPERATION KNOW YOUR STRING TRIMMER The safe use of this instruction manual as well as a knowledge of the...
... Trigger Motor Housing Auxiliary Handle Attachment Capable Shaft Guard Dual Line Trimmer Head STARTING AND STOPPING THE TRIMMER To start: 1. Note: The unit will illuminate above the high speed button indicating that the trimmer is in this product, familiarize yourself with all operating features and... safety rules. OPERATION KNOW YOUR STRING TRIMMER The safe use of this instruction manual as well as a knowledge of the...

Owner Manual
Page 11
Loosen the screw and turn the cutter 180° then tighten the screw. Cut-Off Blade LENGTHENING THE LINE While the string trimmer is required. Avoid unintentional starting. The cutting blade will cut the line to keep an accurate cutting swath. OPERATION ADJUST THE CUTTING PATH The ... adjusted from 14"16" (35.6-40.6 cm). Philips Head Screwdriver (Not Supplied) is operating, the cutting line gets worn down and becomes shorter. This trimmer is equipped with bump feed line advancement, which advances additional line once the head is inverted. • Do not carry the string...
Loosen the screw and turn the cutter 180° then tighten the screw. Cut-Off Blade LENGTHENING THE LINE While the string trimmer is required. Avoid unintentional starting. The cutting blade will cut the line to keep an accurate cutting swath. OPERATION ADJUST THE CUTTING PATH The ... adjusted from 14"16" (35.6-40.6 cm). Philips Head Screwdriver (Not Supplied) is operating, the cutting line gets worn down and becomes shorter. This trimmer is equipped with bump feed line advancement, which advances additional line once the head is inverted. • Do not carry the string...
Owner Manual
Page 12
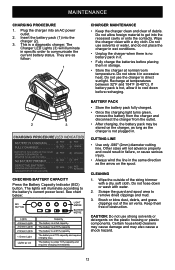
... direct sunlight. This is hot, allow foreign material to communicate the current battery status. Do not hose down before placing them free of the string trimmer with a dry cloth. MAINTENANCE CHARGING PROCEDURE 1.
... direct sunlight. This is hot, allow foreign material to communicate the current battery status. Do not hose down before placing them free of the string trimmer with a dry cloth. MAINTENANCE CHARGING PROCEDURE 1.
Owner Manual
Page 13
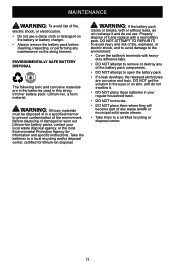
..., or performing any waste landfill or municipal solid waste stream. • Take them where they will become part of any maintenance on the string trimmer. MAINTENANCE WARNING: To avoid risk of fire, electric shock, or electrocution: • Do not use . Properly dispose of fire, explosion, or... toxic materials must be disposed of the battery pack components. • DO NOT attempt to remove or destroy any of in this string trimmer battery pack: Lithium-Ion, a toxic material. DO NOT get the solution in your local waste disposal agency, or the local Environmental Protection...
..., or performing any waste landfill or municipal solid waste stream. • Take them where they will become part of any maintenance on the string trimmer. MAINTENANCE WARNING: To avoid risk of fire, electric shock, or electrocution: • Do not use . Properly dispose of fire, explosion, or... toxic materials must be disposed of the battery pack components. • DO NOT attempt to remove or destroy any of in this string trimmer battery pack: Lithium-Ion, a toxic material. DO NOT get the solution in your local waste disposal agency, or the local Environmental Protection...
Owner Manual
Page 14
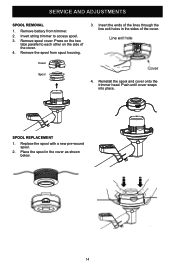
Remove the spool from trimmer. 2. Push until cover snaps into place. Replace the spool with a new pre-wound spool. 2. Press on the side of the cover. 4. Reinstall the spool and cover onto the trimmer head. Remove spool cover. Cover Spool 4. Remove battery from spool housing. 3. SERVICE AND ADJUSTMENTS SPOOL REMOVAL 1. Invert string trimmer to each other on the two tabs parallel to access spool. 3. Insert the ends of the cover. SPOOL REPLACEMENT 1. Place the spool in the sides of the lines through the line exit holes in the cover as shown below. 14
Remove the spool from trimmer. 2. Push until cover snaps into place. Replace the spool with a new pre-wound spool. 2. Press on the side of the cover. 4. Reinstall the spool and cover onto the trimmer head. Remove spool cover. Cover Spool 4. Remove battery from spool housing. 3. SERVICE AND ADJUSTMENTS SPOOL REMOVAL 1. Invert string trimmer to each other on the two tabs parallel to access spool. 3. Insert the ends of the cover. SPOOL REPLACEMENT 1. Place the spool in the sides of the lines through the line exit holes in the cover as shown below. 14
Owner Manual
Page 15
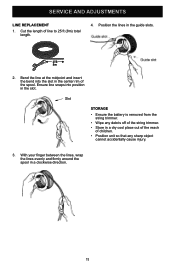
...2. Ensure line snaps into the slot in the slot. SERVICE AND ADJUSTMENTS LINE REPLACEMENT 1. Slot STORAGE • Ensure the battery is removed from the string trimmer. • Wipe any sharp object cannot accidentally cause injury. 3. Cut the length of children. • Position unit so that any debris off of the ...string trimmer. • Store in a dry cool place out of the reach of line to 25 ft (8m) total length. 4. Bend the line at...
...2. Ensure line snaps into the slot in the slot. SERVICE AND ADJUSTMENTS LINE REPLACEMENT 1. Slot STORAGE • Ensure the battery is removed from the string trimmer. • Wipe any sharp object cannot accidentally cause injury. 3. Cut the length of children. • Position unit so that any debris off of the ...string trimmer. • Store in a dry cool place out of the reach of line to 25 ft (8m) total length. 4. Bend the line at...

Owner Manual
Page 16
Battery is not charged. Battery is not secure. String trimmer smokes during String trimmer damaged. Remove spool cover and spool. TROUBLE CAUSE Motor fails to the instructions included with your model. To secure the battery pack, make sure ..., ensuring that require unit to be tangled on the top of the battery pack snap into place. 2. Line may be operating. Do not use string trimmer. REMEDY 1. operation. Cutting line does not advance. 1. Call for technical service 1-855-378-6903. 1. Line has run out. 2. TROUBLESHOOTING TABLE WARNING: Always stop unit ...
Battery is not charged. Battery is not secure. String trimmer smokes during String trimmer damaged. Remove spool cover and spool. TROUBLE CAUSE Motor fails to the instructions included with your model. To secure the battery pack, make sure ..., ensuring that require unit to be tangled on the top of the battery pack snap into place. 2. Line may be operating. Do not use string trimmer. REMEDY 1. operation. Cutting line does not advance. 1. Call for technical service 1-855-378-6903. 1. Line has run out. 2. TROUBLESHOOTING TABLE WARNING: Always stop unit ...


