

Owner Manual
Page 2
TABLE OF CONTENTS TABLE OF CONTENTS ...2 IDENTIFICATION OF SAFETY SYMBOLS 3 PRODUCT SPECIFICATIONS ...4 SAFETY RULES ...5 ASSEMBLY ...8 OPERATION ...10 MAINTENANCE ...12 SERVICE AND ADJUSTMENTS 14 TROUBLESHOOTING TABLE 16 LIMITED WARRANTY ...17 EXPLODED VIEW ...18 PARTS LIST ...19 2
TABLE OF CONTENTS TABLE OF CONTENTS ...2 IDENTIFICATION OF SAFETY SYMBOLS 3 PRODUCT SPECIFICATIONS ...4 SAFETY RULES ...5 ASSEMBLY ...8 OPERATION ...10 MAINTENANCE ...12 SERVICE AND ADJUSTMENTS 14 TROUBLESHOOTING TABLE 16 LIMITED WARRANTY ...17 EXPLODED VIEW ...18 PARTS LIST ...19 2

Owner Manual
Page 3
... attachment is designed for line trimmer use blades, flailing devices, wire, rope, string, etc. Maximum rotational frequency of the machine shall ensure, while working, that no persons or animals come closer than 15 meters (50 feet). Beware of injury, user must read and understand instruction manual before using this equipment. Wear hearing protection Always use: • sound barriers (ear plugs or mufflers) to follow these instructions...
... attachment is designed for line trimmer use blades, flailing devices, wire, rope, string, etc. Maximum rotational frequency of the machine shall ensure, while working, that no persons or animals come closer than 15 meters (50 feet). Beware of injury, user must read and understand instruction manual before using this equipment. Wear hearing protection Always use: • sound barriers (ear plugs or mufflers) to follow these instructions...

Owner Manual
Page 4
PRODUCT SPECIFICATIONS Motor: Speed: Battery: Battery Run-Time Battery Charge-Time: Cutting Path: Feed: Line Diameter: Unit Weight (without battery): Unit Weight (with this product. IDENTIFICATION OF SAFETY SYMBOLS The following signal words and meanings are intended to explain the levels of risk associated with battery): 40V 5500 (±10%) RPM (no load) 40V, 2Ah Lithium-Ion Up to 25 Minutes 1 Hour 14" or 16...
PRODUCT SPECIFICATIONS Motor: Speed: Battery: Battery Run-Time Battery Charge-Time: Cutting Path: Feed: Line Diameter: Unit Weight (without battery): Unit Weight (with this product. IDENTIFICATION OF SAFETY SYMBOLS The following signal words and meanings are intended to explain the levels of risk associated with battery): 40V 5500 (±10%) RPM (no load) 40V, 2Ah Lithium-Ion Up to 25 Minutes 1 Hour 14" or 16...

Owner Manual
Page 5
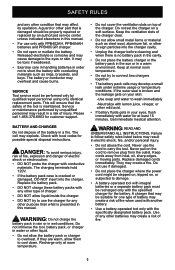
... a lawn mower. • This string trimmer is intended. • Avoid Unintentional Starting - Do not use replacement parts or accessories not provided or recommended by the manufacturer. • Disconnect battery pack from tool before making any impact, check for composting purposes. • Keep work area clean and well lit. Distractions can be followed. Always wear eye protection. Do not operate string trimmer when you to lose control...
... a lawn mower. • This string trimmer is intended. • Avoid Unintentional Starting - Do not use replacement parts or accessories not provided or recommended by the manufacturer. • Disconnect battery pack from tool before making any impact, check for composting purposes. • Keep work area clean and well lit. Distractions can be followed. Always wear eye protection. Do not operate string trimmer when you to lose control...
Owner Manual
Page 6
... be suitable for one type of battery may create a risk of fire when used with another battery. • Use a battery-operated tool only with the specifically designated battery pack. A guard or other part that the safety of fire. 6 This will ensure that is maintained. WARNING: Do not charge the battery pack in rain or in this manual. SERVICE Tool service must be properly repaired or replaced by unqualified personnel...
... be suitable for one type of battery may create a risk of fire when used with another battery. • Use a battery-operated tool only with the specifically designated battery pack. A guard or other part that the safety of fire. 6 This will ensure that is maintained. WARNING: Do not charge the battery pack in rain or in this manual. SERVICE Tool service must be properly repaired or replaced by unqualified personnel...
Owner Manual
Page 7
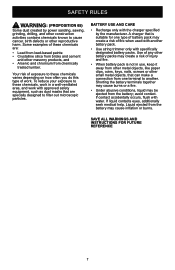
... contacts eyes, additionally seek medical help. Use of any other battery packs may create a risk of injury and fire. • When battery pack is suitable for one terminal to filter out microscopic particles. Some examples of these chemicals are specially designed to another battery pack. • Use string trimmer only with specifically designated battery packs. BATTERY USE AND CARE • Recharge only...
... contacts eyes, additionally seek medical help. Use of any other battery packs may create a risk of injury and fire. • When battery pack is suitable for one terminal to filter out microscopic particles. Some examples of these chemicals are specially designed to another battery pack. • Use string trimmer only with specifically designated battery packs. BATTERY USE AND CARE • Recharge only...
Owner Manual
Page 8
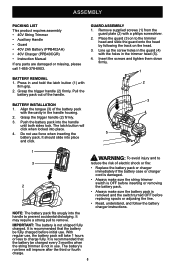
... head. 3. ASSEMBLY PACKING LIST This product requires assembly • 40V String Trimmer • Auxiliary Handle • Guard • 40V 2Ah Battery (PPB402AH) • 40V Charger (PPB40CGR) • Instruction Manual If any parts are damaged or missing, please call 1-855-378-6903. IMPORTANT: The battery is not in the guard (4) with a philips screwdriver. 2. BATTERY INSTALLATION 1. Line up the screw holes in use force when inserting the battery pack. Grasp the trigger handle (2) firmly. 3. GUARD ASSEMBLY 1. BATTERY REMOVAL...
... head. 3. ASSEMBLY PACKING LIST This product requires assembly • 40V String Trimmer • Auxiliary Handle • Guard • 40V 2Ah Battery (PPB402AH) • 40V Charger (PPB40CGR) • Instruction Manual If any parts are damaged or missing, please call 1-855-378-6903. IMPORTANT: The battery is not in the guard (4) with a philips screwdriver. 2. BATTERY INSTALLATION 1. Line up the screw holes in use force when inserting the battery pack. Grasp the trigger handle (2) firmly. 3. GUARD ASSEMBLY 1. BATTERY REMOVAL...
Owner Manual
Page 9
... operating the string trimmer. Tighten the screws so that the handle cannot be replaced, insert new line. Rotate the attachment shaft until the button is pre-installed on the shaft. 4. Slightly rotate from the trimmer. 2. Push in the positioning hole, the shafts are not locked into place. Loosen the screws (1) in unexpected situations. CUTTING LINE A pre-wound spool is locked into the positioning hole. 4 2 AUXILIARY HANDLE ASSEMBLY 1. ASSEMBLY SHAFT ASSEMBLY 1. Keep proper balance at all times for optimum control...
... operating the string trimmer. Tighten the screws so that the handle cannot be replaced, insert new line. Rotate the attachment shaft until the button is pre-installed on the shaft. 4. Slightly rotate from the trimmer. 2. Push in the positioning hole, the shafts are not locked into place. Loosen the screws (1) in unexpected situations. CUTTING LINE A pre-wound spool is locked into the positioning hole. 4 2 AUXILIARY HANDLE ASSEMBLY 1. ASSEMBLY SHAFT ASSEMBLY 1. Keep proper balance at all times for optimum control...
Owner Manual
Page 10
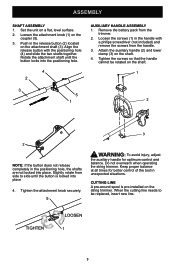
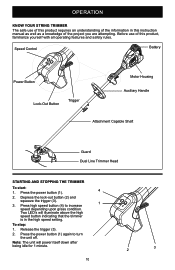
... squeeze the trigger (3). 3. Press the power button (1) again to increase 1 speed depending upon grass condition. OPERATION KNOW YOUR STRING TRIMMER The safe use of this instruction manual as well as a knowledge of the information in the high speed setting. Two LED's will power itself down after being idle for 1 minute. 10 2 3 Speed Control Battery Power Button Lock-Out Button Trigger Motor Housing Auxiliary Handle Attachment Capable Shaft Guard Dual Line Trimmer Head STARTING AND STOPPING THE TRIMMER To start: 1. Press the power button (1). 4 2. Release the trigger...
... squeeze the trigger (3). 3. Press the power button (1) again to increase 1 speed depending upon grass condition. OPERATION KNOW YOUR STRING TRIMMER The safe use of this instruction manual as well as a knowledge of the information in the high speed setting. Two LED's will power itself down after being idle for 1 minute. 10 2 3 Speed Control Battery Power Button Lock-Out Button Trigger Motor Housing Auxiliary Handle Attachment Capable Shaft Guard Dual Line Trimmer Head STARTING AND STOPPING THE TRIMMER To start: 1. Press the power button (1). 4 2. Release the trigger...

Owner Manual
Page 11
... string trimmer/edger is bumped on the trigger. OPERATION ADJUST THE CUTTING PATH The cutting path can be adjusted from 14"16" (35.6-40.6 cm). Bump knob 11 Avoid unintentional starting. This trimmer is equipped with bump feed line advancement, which advances additional line once the head is inverted. • Do not carry the string trimmer/edger with your finger on the ground while rotating. The cutting blade will cut the line...
... string trimmer/edger is bumped on the trigger. OPERATION ADJUST THE CUTTING PATH The cutting path can be adjusted from 14"16" (35.6-40.6 cm). Bump knob 11 Avoid unintentional starting. This trimmer is equipped with bump feed line advancement, which advances additional line once the head is inverted. • Do not carry the string trimmer/edger with your finger on the ground while rotating. The cutting blade will cut the line...
Owner Manual
Page 12
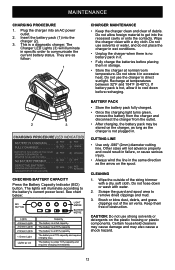
... the battery's current power level. Wipe the charger clean with water. 2. Do not use the charger in excessive heat. Brush or blow dust, debris, and grass clippings out of the string trimmer with a dry, soft cloth. Plug the charger into the charger (2). 3. Do not allow it to cool down or wash with a dry cloth. CUTTING LINE • Use only .080" (2mm) diameter cutting line. Do...
... the battery's current power level. Wipe the charger clean with water. 2. Do not use the charger in excessive heat. Brush or blow dust, debris, and grass clippings out of the string trimmer with a dry, soft cloth. Plug the charger into the charger (2). 3. Do not allow it to cool down or wash with a dry cloth. CUTTING LINE • Use only .080" (2mm) diameter cutting line. Do...
Owner Manual
Page 13
... any maintenance on the battery or battery charger. • Always remove the battery pack before cleaning, inspecting, or performing any of the battery pack components. • DO NOT attempt to a local recycling and/or disposal center, certified for information and specific instructions. Take the batteries to open the battery pack. • If a leak develops, the released electrolytes are in the batteries used in...
... any maintenance on the battery or battery charger. • Always remove the battery pack before cleaning, inspecting, or performing any of the battery pack components. • DO NOT attempt to a local recycling and/or disposal center, certified for information and specific instructions. Take the batteries to open the battery pack. • If a leak develops, the released electrolytes are in the batteries used in...
Owner Manual
Page 14
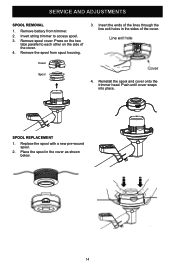
SPOOL REPLACEMENT 1. Remove the spool from trimmer. 2. Press on the side of the cover. Place the spool in the sides of the cover. 4. Insert the ends of the lines through the line exit holes in the cover as shown below. 14 Replace the spool with a new pre-wound spool. 2. Invert string trimmer to each other on the two tabs parallel to access spool. 3. Push until cover snaps into place. SERVICE AND ADJUSTMENTS SPOOL REMOVAL 1. Cover Spool 4. Reinstall the spool and cover onto the trimmer head. Remove spool cover. Remove battery from spool housing. 3.
SPOOL REPLACEMENT 1. Remove the spool from trimmer. 2. Press on the side of the cover. Place the spool in the sides of the cover. 4. Insert the ends of the lines through the line exit holes in the cover as shown below. 14 Replace the spool with a new pre-wound spool. 2. Invert string trimmer to each other on the two tabs parallel to access spool. 3. Push until cover snaps into place. SERVICE AND ADJUSTMENTS SPOOL REMOVAL 1. Cover Spool 4. Reinstall the spool and cover onto the trimmer head. Remove spool cover. Remove battery from spool housing. 3.
Owner Manual
Page 15
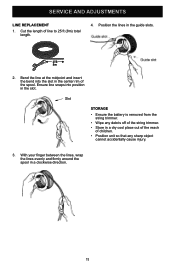
... the reach of children. • Position unit so that any debris off of line to 25 ft (8m) total length. 4. Slot STORAGE • Ensure the battery is removed from the string trimmer. • Wipe any sharp object cannot accidentally cause injury. 3. Bend the line at the midpoint and insert the bend into position in a clockwise direction. 15 SERVICE AND ADJUSTMENTS LINE REPLACEMENT 1.
... the reach of children. • Position unit so that any debris off of line to 25 ft (8m) total length. 4. Slot STORAGE • Ensure the battery is removed from the string trimmer. • Wipe any sharp object cannot accidentally cause injury. 3. Bend the line at the midpoint and insert the bend into position in a clockwise direction. 15 SERVICE AND ADJUSTMENTS LINE REPLACEMENT 1.
Owner Manual
Page 16
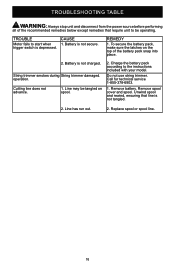
TROUBLE CAUSE Motor fails to the instructions included with your model. Do not use string trimmer. Line has run out. 2. REMEDY 1. Call for technical service 1-855-378-6903. 1. String trimmer smokes during String trimmer damaged. Cutting line does not advance. 1. Remove battery. Replace spool or spool line. 16 Battery is not secure. Charge the battery pack according to start when 1. Remove spool cover and spool. Line may be operating. Unwind spool and rewind, ensuring that require unit to be tangled on the top...
TROUBLE CAUSE Motor fails to the instructions included with your model. Do not use string trimmer. Line has run out. 2. REMEDY 1. Call for technical service 1-855-378-6903. 1. String trimmer smokes during String trimmer damaged. Cutting line does not advance. 1. Remove battery. Replace spool or spool line. 16 Battery is not secure. Charge the battery pack according to start when 1. Remove spool cover and spool. Line may be operating. Unwind spool and rewind, ensuring that require unit to be tangled on the top...

Owner Manual
Page 17
.... Batteries must be charged in accordance with the operator's manuals directions and regulations in materials, parts, or workmanship. This limited warranty within the meaning of that have any power equipment unit or attachment are the responsibility of charge to be valid. The policy of the authorized dealer from improper handling, commercial use, abuse, neglect, accident, improper maintenance, alteration, or the use , free...
.... Batteries must be charged in accordance with the operator's manuals directions and regulations in materials, parts, or workmanship. This limited warranty within the meaning of that have any power equipment unit or attachment are the responsibility of charge to be valid. The policy of the authorized dealer from improper handling, commercial use, abuse, neglect, accident, improper maintenance, alteration, or the use , free...

Owner Manual
Page 19
PARTS LIST Item Description 1 Bare Tool Assembly 2 Auxiliary Handle 3 Auxiliary Handle Cap 4 Screw 5 Plate 6 Plate 7 Bolt 8 Sleeve 9 Fixed Seat 10 Spool Head Assembly 11 Guard 12 Cut-off Blade 13 Screw 14 Spring Washer Drawing Qty 311151437 1 311191437 1 341081468 1 32201836 2 311201437 1 333021410 1 333081410 4 339031410 1 339011437 1 311171437 1 341021437 1 333051410 1 32201319 2 32916131 2 19
PARTS LIST Item Description 1 Bare Tool Assembly 2 Auxiliary Handle 3 Auxiliary Handle Cap 4 Screw 5 Plate 6 Plate 7 Bolt 8 Sleeve 9 Fixed Seat 10 Spool Head Assembly 11 Guard 12 Cut-off Blade 13 Screw 14 Spring Washer Drawing Qty 311151437 1 311191437 1 341081468 1 32201836 2 311201437 1 333021410 1 333081410 4 339031410 1 339011437 1 311171437 1 341021437 1 333051410 1 32201319 2 32916131 2 19


