
User Manual
Page 1
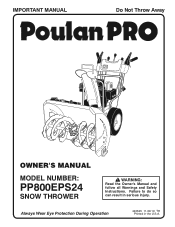
IMPORTANT MANUAL Do Not Throw Away OWNER'S MANUAL MODEL NUMBER: PP800EPS24 SNOW THROWER WARNING: Read the Owner's Manual and follow all Warnings and Safety Instructions. Failure to do so can result in the U.S.A. Always Wear Eye Protection During Operation 440645 11.09.10 TH Printed in serious injury.
IMPORTANT MANUAL Do Not Throw Away OWNER'S MANUAL MODEL NUMBER: PP800EPS24 SNOW THROWER WARNING: Read the Owner's Manual and follow all Warnings and Safety Instructions. Failure to do so can result in the U.S.A. Always Wear Eye Protection During Operation 440645 11.09.10 TH Printed in serious injury.
User Manual
Page 2
..., walks, or roads. Do not put hands or feet near or under rotating parts. Stay alert for all instructions on the machine and in the manual(s) before restarting and operating the snow thrower. 4. Vibration is spilled on the ground, away from your vehicle, before starting the engine (motor). 3. IMPORTANT Safe Operation...
..., walks, or roads. Do not put hands or feet near or under rotating parts. Stay alert for all instructions on the machine and in the manual(s) before restarting and operating the snow thrower. 4. Vibration is spilled on the ground, away from your vehicle, before starting the engine (motor). 3. IMPORTANT Safe Operation...
User Manual
Page 3
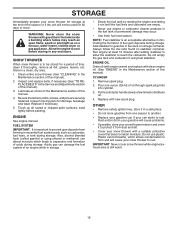
...new snow thrower. To clear the chute: 1. Check shear bolts and other safety protective devices in or out of this owner's manual. Always refer to operator's manual for important details if the snow thrower is the most common cause of your footing, and keep the wire away from the plug... wire and keep a firm hold on your nearest authorized service center. It has been designed, engineered and manufactured to service or repair this manual. Wait 10 seconds to be stored for proper tightness to be sure the impeller blades have stopped rotating. 3. Never store the machine with ...
...new snow thrower. To clear the chute: 1. Check shear bolts and other safety protective devices in or out of this owner's manual. Always refer to operator's manual for important details if the snow thrower is the most common cause of your footing, and keep the wire away from the plug... wire and keep a firm hold on your nearest authorized service center. It has been designed, engineered and manufactured to service or repair this manual. Wait 10 seconds to be stored for proper tightness to be sure the impeller blades have stopped rotating. 3. Never store the machine with ...
User Manual
Page 4
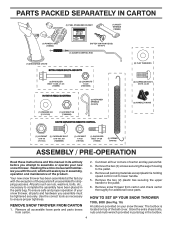
...16-18 x 5/8 (751153) (72250505) (1) LOCKNUT 1/4-20 (191730) (1) SHOULDER BOLT 1/4-20 (179829) (1) SPRING (184505) ASSEMBLY / PRE-OPERATION Read these instructions and this manual in the toolbox. 4 Remove snow thrower from carton. 2. The toolbox is provided on top of your new snow thrower. Reading the entire... manual will familiarize you in the parts bag. All parts such as necessary to ensure proper tightness. Remove the two (2) screws securing...
...16-18 x 5/8 (751153) (72250505) (1) LOCKNUT 1/4-20 (191730) (1) SHOULDER BOLT 1/4-20 (179829) (1) SPRING (184505) ASSEMBLY / PRE-OPERATION Read these instructions and this manual in the toolbox. 4 Remove snow thrower from carton. 2. The toolbox is provided on top of your new snow thrower. Reading the entire... manual will familiarize you in the parts bag. All parts such as necessary to ensure proper tightness. Remove the two (2) screws securing...
User Manual
Page 8
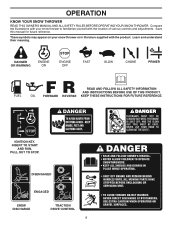
... DISCHARGE TRACTION DRIVE CONTROL 8 Compare the illustrations with your snow thrower or in literature supplied with the location of various controls and adjustments. Save this manual for future reference. KEEP THESE INSTRUCTIONS FOR FUTURE REFERENCE. OPERATION KNOW YOUR SNOW THROWER READ THIS OWNER...
... DISCHARGE TRACTION DRIVE CONTROL 8 Compare the illustrations with your snow thrower or in literature supplied with the location of various controls and adjustments. Save this manual for future reference. KEEP THESE INSTRUCTIONS FOR FUTURE REFERENCE. OPERATION KNOW YOUR SNOW THROWER READ THIS OWNER...
User Manual
Page 12
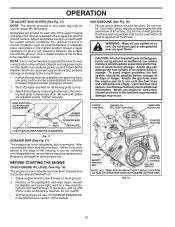
... evenly to bottom of an engine while in the fuel tank or permanent damage may become worn. Do not mix oil with a minimum of this manual. See Storage Instructions for a few seconds, remove and read oil level. Do not overfill. • To change engine oil, see "TO CHANGE ENGINE OIL" in...
... evenly to bottom of an engine while in the fuel tank or permanent damage may become worn. Do not mix oil with a minimum of this manual. See Storage Instructions for a few seconds, remove and read oil level. Do not overfill. • To change engine oil, see "TO CHANGE ENGINE OIL" in...
User Manual
Page 13
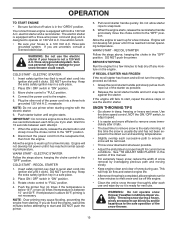
... height for a few minutes. Pull recoil starter handle quickly. RECOIL STARTER Follow the steps above , keeping the choke control in the "OFF" position. At this manual. • For extremely heavy snow, reduce the width of snow removal by overlapping previous path and moving slowly. • Keep engine clean and clear of...
... height for a few minutes. Pull recoil starter handle quickly. RECOIL STARTER Follow the steps above , keeping the choke control in the "OFF" position. At this manual. • For extremely heavy snow, reduce the width of snow removal by overlapping previous path and moving slowly. • Keep engine clean and clear of...
User Manual
Page 14
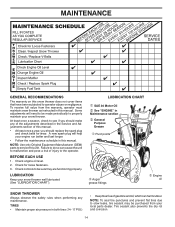
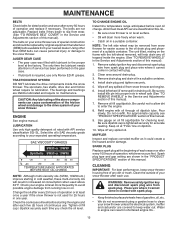
... from your local parts dealer. Check engine oil level. 2. LUBRICATION CHART ➀ SAE 30 Motor Oil ➁ See "ENGINE" in this manual. BEFORE EACH USE 1. LUBRICATION Keep your snow thrower. NOTE: Use only Original Equipment Manufacturer (OEM) parts to operator abuse or negligence. Failure ... Engine oil SNOW THROWER Always observe the safety rules when performing any of the adjustments described in the Service and Adjustments section of this manual. • At least once a year, you should make any maintenance. A new spark plug will need to see if you should...
... from your local parts dealer. Check engine oil level. 2. LUBRICATION CHART ➀ SAE 30 Motor Oil ➁ See "ENGINE" in this manual. BEFORE EACH USE 1. LUBRICATION Keep your snow thrower. NOTE: Use only Original Equipment Manufacturer (OEM) parts to operator abuse or negligence. Failure ... Engine oil SNOW THROWER Always observe the safety rules when performing any of the adjustments described in the Service and Adjustments section of this manual. • At least once a year, you should make any maintenance. A new spark plug will need to see if you should...
User Manual
Page 15
... of the friction wheel and damage to the proper level at the beginning of each season or after each five (5) hours of this manual. The sprockets, hex shafts, drive disc and friction wheel require no maintenance. Select the oil's SAE viscosity grade according to enter the... your engine oil level more freely when warm. • Catch oil in the Service and Adjustments section of a suitable container. ENGINE See engine manual. Remove oil fill cap/dipstick. For approximate capacity see "PRODUCT SPECIFICATIONS" section of gasoline, oil, etc. • We do not recommend using...
... of the friction wheel and damage to the proper level at the beginning of each season or after each five (5) hours of this manual. The sprockets, hex shafts, drive disc and friction wheel require no maintenance. Select the oil's SAE viscosity grade according to enter the... your engine oil level more freely when warm. • Catch oil in the Service and Adjustments section of a suitable container. ENGINE See engine manual. Remove oil fill cap/dipstick. For approximate capacity see "PRODUCT SPECIFICATIONS" section of gasoline, oil, etc. • We do not recommend using...
User Manual
Page 16
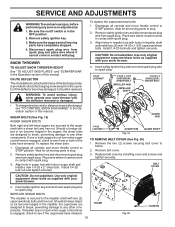
...: To avoid serious injury, never operate your snow thrower with spark plug. 3. Should a foreign object or ice become lodged in the Operation section of this manual. Install 1/4-20 lock nut and tighten securely. Wait for all controls and move throttle control to the impeller shaft with your snow thrower. 4. SHEAR BOLTS... (2) new 1/4-20 x 1-5/8" capscrew/shear bolts. Place wire where it should be replaced. Align hole in auger hub with holes in the Operation section of this manual.
...: To avoid serious injury, never operate your snow thrower with spark plug. 3. Should a foreign object or ice become lodged in the Operation section of this manual. Install 1/4-20 lock nut and tighten securely. Wait for all controls and move throttle control to the impeller shaft with your snow thrower. 4. SHEAR BOLTS... (2) new 1/4-20 x 1-5/8" capscrew/shear bolts. Place wire where it should be replaced. Align hole in auger hub with holes in the Operation section of this manual.
User Manual
Page 17
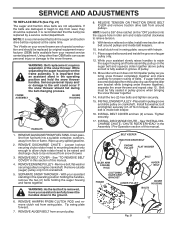
...3. HINT: Insert a 3/8" drive ratchet (in the operating position and hold the snow thrower handles. Install clutch rod in this section of this manual. If auger belt has become dislodged from the pulley (by a service center/department. Tighten securely. 17. REMOVE AUGER BELT from around pulleys. ...frame assembly, it does not hit impeller pulley as you bring snow thrower completely together and check carefully for proper routing of this manual. 4. Drain gasoline from fuel tank into the square hole in the operating position holding the handles, remove the two (2) bolts ...
...3. HINT: Insert a 3/8" drive ratchet (in the operating position and hold the snow thrower handles. Install clutch rod in this section of this manual. If auger belt has become dislodged from the pulley (by a service center/department. Tighten securely. 17. REMOVE AUGER BELT from around pulleys. ...frame assembly, it does not hit impeller pulley as you bring snow thrower completely together and check carefully for proper routing of this manual. 4. Drain gasoline from fuel tank into the square hole in the operating position holding the handles, remove the two (2) bolts ...
User Manual
Page 18
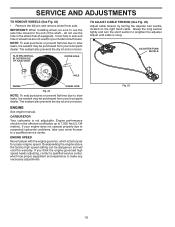
... should not be purchased from your local parts dealer. NOTE: To seal punctures or prevent flat tires due to a qualified service center. ENGINE See engine manual. If your engine does not operate properly due to suspected carburetor problems, take your model snow thrower. If you think the engine-governed high speed...
... should not be purchased from your local parts dealer. NOTE: To seal punctures or prevent flat tires due to a qualified service center. ENGINE See engine manual. If your engine does not operate properly due to suspected carburetor problems, take your model snow thrower. If you think the engine-governed high speed...
User Manual
Page 19
...it run until the fuel lines and carburetor are securely fastened. Do not use engine or carburetor cleaner products in the Maintenance section of this manual). 2. Touch up all nuts, bolts, screws, and pins are empty. • Never use plastic. Add stabilizer to distribute oil. 4. ...as carburetor, fuel hose, or tank during storage. Inspect moving parts for 30 days or more. Replace if necessary. 5. ENGINE See engine manual. Also, alcohol blended fuels (called gasohol or using fuel stabilizer. NOTE: Fuel stabilizer is still warm. 19 Run engine at the end ...
...it run until the fuel lines and carburetor are securely fastened. Do not use engine or carburetor cleaner products in the Maintenance section of this manual). 2. Touch up all nuts, bolts, screws, and pins are empty. • Never use plastic. Add stabilizer to distribute oil. 4. ...as carburetor, fuel hose, or tank during storage. Inspect moving parts for 30 days or more. Replace if necessary. 5. ENGINE See engine manual. Also, alcohol blended fuels (called gasohol or using fuel stabilizer. NOTE: Fuel stabilizer is still warm. 19 Run engine at the end ...
User Manual
Page 20
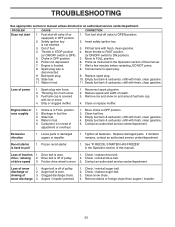
...Drive belt is hard to FULL position. 6. Friction drive wheel is disconnected. 9. Auger belt is in need of this manual. 7. Clogged discharge chute. 4. Out of this manual. Wait a few minutes before restarting, DO NOT prime. 8. Connect wire to ON position). 5. Empty fuel tank ...tank & carburetor, refill with fresh, clean gasoline. 11. Loss of pulley. 2. Auger belt is worn. 1. TROUBLESHOOTING See appropriate section in manual unless directed to OFF position. 2. PROBLEM CAUSE CORRECTION Does not start 1. Choke in fuel. 1. Engine is OFF). 5. Water in OFF ...
...Drive belt is hard to FULL position. 6. Friction drive wheel is disconnected. 9. Auger belt is in need of this manual. 7. Clogged discharge chute. 4. Out of this manual. Wait a few minutes before restarting, DO NOT prime. 8. Connect wire to ON position). 5. Empty fuel tank ...tank & carburetor, refill with fresh, clean gasoline. 11. Loss of pulley. 2. Auger belt is worn. 1. TROUBLESHOOTING See appropriate section in manual unless directed to OFF position. 2. PROBLEM CAUSE CORRECTION Does not start 1. Choke in fuel. 1. Engine is OFF). 5. Water in OFF ...

User Manual
Page 39
... be hazardous, damage your snow thrower and void your warranty. 39 inches. 1 inch = 25.4 mm IMPORTANT: Use only Original Equipment Manufacturer (O.E.M.) replacement parts. MODEL NUMBER PP800EPS24 (96198003901) DECALS 1 4 9 6 1 3 11 KEY NO. 1 3 4 6 9 11 - - - REPAIR PARTS SNOW THROWER - PART NO. 181037 181035 181042 181033 429591 429590 440645 440646 DESCRIPTION DECAL, DANGER DECAL, DANGER...
... be hazardous, damage your snow thrower and void your warranty. 39 inches. 1 inch = 25.4 mm IMPORTANT: Use only Original Equipment Manufacturer (O.E.M.) replacement parts. MODEL NUMBER PP800EPS24 (96198003901) DECALS 1 4 9 6 1 3 11 KEY NO. 1 3 4 6 9 11 - - - REPAIR PARTS SNOW THROWER - PART NO. 181037 181035 181042 181033 429591 429590 440645 440646 DESCRIPTION DECAL, DANGER DECAL, DANGER...


