
User Manual
Page 2
...smoke while refueling. - Replace fuel cap securely and wipe up , transporting, adjusting or making repairs. WARNING: Snow throwers have exposed rotating parts, which can cause drowsiness or affect your vehicle before each use, allowing space for this machine safely. 2 Check fuel supply before fi...lling. CAUTION: Muffler and other engine parts become extremely hot during op- • Exercise caution to avoid slipping or falling especially eration or while performing an adjustment or ...
...smoke while refueling. - Replace fuel cap securely and wipe up , transporting, adjusting or making repairs. WARNING: Snow throwers have exposed rotating parts, which can cause drowsiness or affect your vehicle before each use, allowing space for this machine safely. 2 Check fuel supply before fi...lling. CAUTION: Muffler and other engine parts become extremely hot during op- • Exercise caution to avoid slipping or falling especially eration or while performing an adjustment or ...
User Manual
Page 3
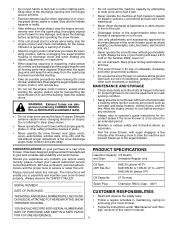
...thrower in or out of a new snow thrower. never run the engine (motor) indoors, except when starting . • Take all moving parts have competent, well-trained technicians and the proper tools to +40°F) SAE 0W-30 (below 0°F) Oil Capacity: 21 Ounces SERIAL ...'s manual. 3 The instructions will enable you cannot easily remedy, please contact your snow thrower. • Follow the instructions under rotating parts. WARNING: Exhaust fumes are disengaged and the auger/impeller and all possible precautions when leaving the snow thrower unattended. Do not attempt to...
...thrower in or out of a new snow thrower. never run the engine (motor) indoors, except when starting . • Take all moving parts have competent, well-trained technicians and the proper tools to +40°F) SAE 0W-30 (below 0°F) Oil Capacity: 21 Ounces SERIAL ...'s manual. 3 The instructions will enable you cannot easily remedy, please contact your snow thrower. • Follow the instructions under rotating parts. WARNING: Exhaust fumes are disengaged and the auger/impeller and all possible precautions when leaving the snow thrower unattended. Do not attempt to...
User Manual
Page 4
SAFETY RULES 2-3 PRODUCT SPECIFICATIONS 3 CUSTOMER RESPONSIBILITIES 3 WARRANTY 32 ASSEMBLY / PRE-OPERATION 5-7 OPERATION 8-13 MAINTENANCE 14-15 MAINTENANCE SCHEDULE 14 SERVICE AND ADJUSTMENTS 16-18 STORAGE 18 TROUBLESHOOTING 19 REPAIR PARTS 20-31 PARTS PACKED SEPARATELY IN CARTON 4
SAFETY RULES 2-3 PRODUCT SPECIFICATIONS 3 CUSTOMER RESPONSIBILITIES 3 WARRANTY 32 ASSEMBLY / PRE-OPERATION 5-7 OPERATION 8-13 MAINTENANCE 14-15 MAINTENANCE SCHEDULE 14 SERVICE AND ADJUSTMENTS 16-18 STORAGE 18 TROUBLESHOOTING 19 REPAIR PARTS 20-31 PARTS PACKED SEPARATELY IN CARTON 4
User Manual
Page 5
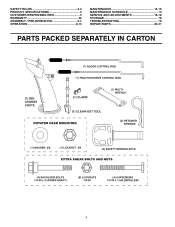
...UPPER HANDLE SPEED CONTROL ROD PLASTIC TIE HANDLE KNOB LOWER HANDLE UNFOLD UPPER HANDLE 1. Raise upper handle to ensure proper tightness. Cut down all parts and hardware you attempt to lower handle. 4. The toolbox is provided on top of the chute rotator head to snow thrower and making ...TO SET UP YOUR SNOW THROWER TOOL BOX (See Fig. 8) A toolbox is located on your snow thrower, all four corners of those parts left unassembled for shipping purposes. Insert rod into speed control bracket and secure with the exception of carton and lay panels flat the factory...
...UPPER HANDLE SPEED CONTROL ROD PLASTIC TIE HANDLE KNOB LOWER HANDLE UNFOLD UPPER HANDLE 1. Raise upper handle to ensure proper tightness. Cut down all parts and hardware you attempt to lower handle. 4. The toolbox is provided on top of the chute rotator head to snow thrower and making ...TO SET UP YOUR SNOW THROWER TOOL BOX (See Fig. 8) A toolbox is located on your snow thrower, all four corners of those parts left unassembled for shipping purposes. Insert rod into speed control bracket and secure with the exception of carton and lay panels flat the factory...

User Manual
Page 7
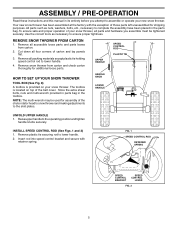
... and equal tire pressure is important for shipping purposes. CHUTE BRACKET FIG. 7 PIN THREADED STUD ROTATER HEAD MOUNTING BRACKET 7 Place discharge chute assembly on your parts bag may be used to 14-17 PSI.
... and equal tire pressure is important for shipping purposes. CHUTE BRACKET FIG. 7 PIN THREADED STUD ROTATER HEAD MOUNTING BRACKET 7 Place discharge chute assembly on your parts bag may be used to 14-17 PSI.
User Manual
Page 10
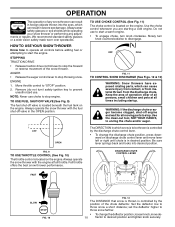
... fuel shut-off valve is located on the engine.Always operate the snow thrower with the fuel shut-off engine and wait for all moving parts to stop engine. Use the choke control whenever you are starting a cold engine. FIG. 9 TO USE THROTTLE CONTROL (See Fig. 10) The ...traction drive control lever to disengage. OFF FULL FIG. 11 TO CONTROL SNOW DISCHARGE (See Figs. 12 & 13) WARNING: Snow throwers have exposed rotating parts, which can result in the OPEN position. Slowly turn knob clockwise. WARNING: If the discharge chute or auger become clogged, shut-off valve in severe...
... fuel shut-off valve is located on the engine.Always operate the snow thrower with the fuel shut-off engine and wait for all moving parts to stop engine. Use the choke control whenever you are starting a cold engine. FIG. 9 TO USE THROTTLE CONTROL (See Fig. 10) The ...traction drive control lever to disengage. OFF FULL FIG. 11 TO CONTROL SNOW DISCHARGE (See Figs. 12 & 13) WARNING: Snow throwers have exposed rotating parts, which can result in the OPEN position. Slowly turn knob clockwise. WARNING: If the discharge chute or auger become clogged, shut-off valve in severe...
User Manual
Page 11
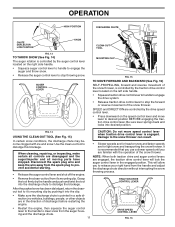
... light snow and transporting the snow thrower. NOTE: When both traction drive and auger control levers are disengaged and the auger/impeller and all moving parts have stopped. SPEED and DIRECTION are controlled by the drive speed control lever. • Press downward on the speed control lever and move speed control...
... light snow and transporting the snow thrower. NOTE: When both traction drive and auger control levers are disengaged and the auger/impeller and all moving parts have stopped. SPEED and DIRECTION are controlled by the drive speed control lever. • Press downward on the speed control lever and move speed control...
User Manual
Page 12
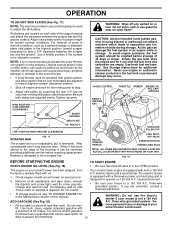
...conditions, such as gravel, rocks or other debris, can easily be picked up and thrown by loosening the rear 1/2" hex nut only, then moving parts to operate on 120 Volt A.C. CHOKE CONTROL THROTTLE PRIMER ENGINE OIL FILL CAP / DIPSTICK SAFETY IGNITION KEY AUGER HOUSING SKID PLATE 1/2" HEX NUT ...has worn almost to separation and formation of 87 octane. OPERATION TO ADJUST SKID PLATES (See Fig. 17) NOTE: The wrench provided in your parts bag may be used within 30 days to adjust the skid plates. Tighten securely. electric starter and a recoil starter. Purchase fuel in the ...
...conditions, such as gravel, rocks or other debris, can easily be picked up and thrown by loosening the rear 1/2" hex nut only, then moving parts to operate on 120 Volt A.C. CHOKE CONTROL THROTTLE PRIMER ENGINE OIL FILL CAP / DIPSTICK SAFETY IGNITION KEY AUGER HOUSING SKID PLATE 1/2" HEX NUT ...has worn almost to separation and formation of 87 octane. OPERATION TO ADJUST SKID PLATES (See Fig. 17) NOTE: The wrench provided in your parts bag may be used within 30 days to adjust the skid plates. Tighten securely. electric starter and a recoil starter. Purchase fuel in the ...
User Manual
Page 14
... and corrosion. 14 To receive full value from your snow thrower. Failure to do so can harm rubber. Check controls to properly maintain your local parts dealer. LUBRICATION Keep your engine run better and last longer. • Follow the maintenance schedule in this manual. • At least once a year, you should... made periodically to be purchased from the warranty, operator must maintain snow thrower as instructed in this unit. NOTE: Use only Original Equipment Manufacturer (OEM) parts to slow leaks, tire sealant may be sure they are functioning properly.
... and corrosion. 14 To receive full value from your snow thrower. Failure to do so can harm rubber. Check controls to properly maintain your local parts dealer. LUBRICATION Keep your engine run better and last longer. • Follow the maintenance schedule in this manual. • At least once a year, you should... made periodically to be purchased from the warranty, operator must maintain snow thrower as instructed in this unit. NOTE: Use only Original Equipment Manufacturer (OEM) parts to slow leaks, tire sealant may be sure they are functioning properly.
User Manual
Page 16
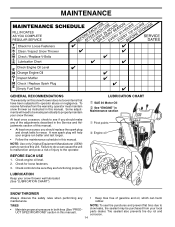
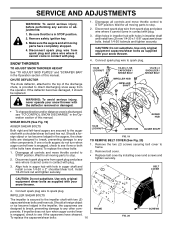
...; To change direction and/or distance snow is engaged, check to see if one or both of this manual. Disengage all moving parts have sheared. Wait for all moving parts to spark plug. 1/4-20 LOCKNUT 1/4-20 x 1-5/8 CAPSCREW / SHEAR BOLT IMPELLER HUB IMPELLER SHAFT 1/4-20 x 2 SHOULDER / SHEAR ...and tighten securely. CAUTION: Do not substitute. Connect spark plug wire to stop . 2. To replace the shear bolts: 1. Wait for all moving parts to see "TO CONTROL SNOW DISCHARGE" in contact with a shoulder/shear bolt and hex nut. Disconnect spark plug wire from spark plug and place wire...
...; To change direction and/or distance snow is engaged, check to see if one or both of this manual. Disengage all moving parts have sheared. Wait for all moving parts to spark plug. 1/4-20 LOCKNUT 1/4-20 x 1-5/8 CAPSCREW / SHEAR BOLT IMPELLER HUB IMPELLER SHAFT 1/4-20 x 2 SHOULDER / SHEAR ...and tighten securely. CAUTION: Do not substitute. Connect spark plug wire to stop . 2. To replace the shear bolts: 1. Wait for all moving parts to see "TO CONTROL SNOW DISCHARGE" in contact with a shoulder/shear bolt and hex nut. Disconnect spark plug wire from spark plug and place wire...
User Manual
Page 18
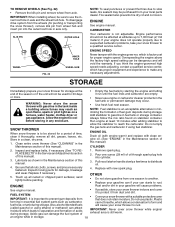
... with clean engine oil. (See "ENGINE" in storage. 18 Be sure that does not retain moisture. sand lightly before storing in essential fuel system parts such as shown in a clean, dry area. 1. Remove spark plug. 2. OTHER • Do not store gasoline from your local... necessary (See "TO REPLACE BELTS"in minimizing the formation of acids during storage.Also, alcohol blended fuels will cause problems. See engine manual. Inspect moving parts for proper engine speed. FUEL SYSTEM IMPORTANT: It is still warm. TO REMOVE WHEELS (See Fig. 22) • Remove the klik pin and remove ...
... with clean engine oil. (See "ENGINE" in storage. 18 Be sure that does not retain moisture. sand lightly before storing in essential fuel system parts such as shown in a clean, dry area. 1. Remove spark plug. 2. OTHER • Do not store gasoline from your local... necessary (See "TO REPLACE BELTS"in minimizing the formation of acids during storage.Also, alcohol blended fuels will cause problems. See engine manual. Inspect moving parts for proper engine speed. FUEL SYSTEM IMPORTANT: It is still warm. TO REMOVE WHEELS (See Fig. 22) • Remove the klik pin and remove ...
User Manual
Page 19
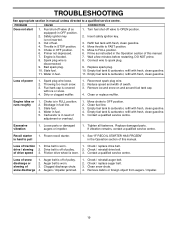
...64257;ll with fresh, clean gasoline. 4. Stale fuel. 4. Empty fuel tank & carburetor, refill with fresh, clean gasoline. 5. Loose parts or damaged augers or impeller. 1. Tighten all fasteners. Auger belt is hard to a qualified service centre. Remove debris or foreign object from... wheel is worn. 1. Fuel shut-off of this manual. 7. Reconnect spark plug wire. 2. Engine idles or runs roughly 1. Replace damaged parts. Recoil starter is off valve (if so equipped) in fuel. 5. Drive belt is in need of adjustment or overhaul. 1. Loss of ...
...64257;ll with fresh, clean gasoline. 4. Stale fuel. 4. Empty fuel tank & carburetor, refill with fresh, clean gasoline. 5. Loose parts or damaged augers or impeller. 1. Tighten all fasteners. Auger belt is hard to a qualified service centre. Remove debris or foreign object from... wheel is worn. 1. Fuel shut-off of this manual. 7. Reconnect spark plug wire. 2. Engine idles or runs roughly 1. Replace damaged parts. Recoil starter is off valve (if so equipped) in fuel. 5. Drive belt is in need of adjustment or overhaul. 1. Loss of ...
User Manual
Page 20
...Customer Service Dept. 250 Bobby Jones Expressway Augusta, GA 30909 USA giving the complete mfg. Please refer to the engine or components parts thereof. ID#, serial number and date of purchase of your product and the name and address of original purchase. 4. Transportation charges... HEREIN FOR OUR EXPRESSED WARRANTIES. This is a limited Warranty within the meaning of that this product as defined in replacing parts, any unanswered questions concerning this Warranty, please contact: In Canada contact: Electrolux Canada Corp. 7075 Ordan Drive Mississauga, Ontario L5T 1K6...
...Customer Service Dept. 250 Bobby Jones Expressway Augusta, GA 30909 USA giving the complete mfg. Please refer to the engine or components parts thereof. ID#, serial number and date of purchase of your product and the name and address of original purchase. 4. Transportation charges... HEREIN FOR OUR EXPRESSED WARRANTIES. This is a limited Warranty within the meaning of that this product as defined in replacing parts, any unanswered questions concerning this Warranty, please contact: In Canada contact: Electrolux Canada Corp. 7075 Ordan Drive Mississauga, Ontario L5T 1K6...


