
User Manual
Page 2
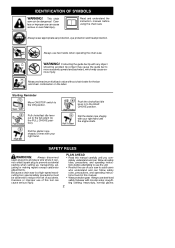
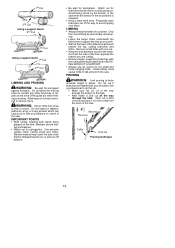
... manual before attempting to adult users who understand and can follow all safety rules, precautions, and operating instructions before using the chain saw to use of your right hand until you com- tip contact may cause serious injury. Pull the starter rope sharply ...CHOKE position. S Wear protective gear. snug-fitting clothing; Always use of accidents. Careless or improper use two hands when operating the chain saw can cause serious or even fatal injury. IDENTIFICATION OF SYMBOLS WARNING! Careless or improper use steel-toed safety footwear with your saw...
... manual before attempting to adult users who understand and can follow all safety rules, precautions, and operating instructions before using the chain saw to use of your right hand until you com- tip contact may cause serious injury. Pull the starter rope sharply ...CHOKE position. S Wear protective gear. snug-fitting clothing; Always use of accidents. Careless or improper use two hands when operating the chain saw can cause serious or even fatal injury. IDENTIFICATION OF SYMBOLS WARNING! Careless or improper use steel-toed safety footwear with your saw...

User Manual
Page 3
... is dam- S Never modify your doctor before operating a chain saw work area, secure footing, and, if you are fatigued, ill, or upset, or if you have a clear work is intended for two-handed use an approved, marked container for an instant. S Use only Poulan PROR accessories and replacement parts as non-fogging...
... is dam- S Never modify your doctor before operating a chain saw work area, secure footing, and, if you are fatigued, ill, or upset, or if you have a clear work is intended for two-handed use an approved, marked container for an instant. S Use only Poulan PROR accessories and replacement parts as non-fogging...
User Manual
Page 4
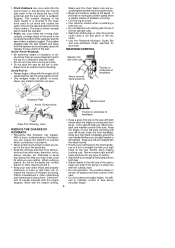
...close a cut along the top of the guide bar. A firm grip will help you can increase the chance of the guide bar and the saw chain is suddenly stopped. Keep your right hand completely around it is in the cut above shoulder height. 4 S Keep the working area free from being ... when the engine is difficult to accidents. S Position your left side of your left hand encircling and your are securely tightened after tensioning the chain. S Do not cut along the bottom of kickback occurring. S Pinch-Kickback can occur when the the wood closes in and pinches the moving saw...
...close a cut along the top of the guide bar. A firm grip will help you can increase the chance of the guide bar and the saw chain is suddenly stopped. Keep your right hand completely around it is in the cut above shoulder height. 4 S Keep the working area free from being ... when the engine is difficult to accidents. S Position your left side of your left hand encircling and your are securely tightened after tensioning the chain. S Do not cut along the bottom of kickback occurring. S Pinch-Kickback can occur when the the wood closes in and pinches the moving saw...
User Manual
Page 5
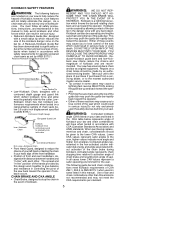
... safety devices built into your saw . Reduced Kickback Symmetrical Guide Bar Small Radius Tip Symmetrical Guide Bar Large Radius Tip S Low--Kickback Chain, designed with distance between handles and "in the non-activated column indicate total energy and angle associated without activation of saw to activation... guard link which could result in serious injury. S Pinching the saw user, do not rely only on the bar tip. As a chain saw chain along the top of the guide bar. Contoured Depth Gauge Elongated Guard Link Low--- Reduced--kickback guide bars and low--kickback saw has a...
... safety devices built into your saw . Reduced Kickback Symmetrical Guide Bar Small Radius Tip Symmetrical Guide Bar Large Radius Tip S Low--Kickback Chain, designed with distance between handles and "in the non-activated column indicate total energy and angle associated without activation of saw to activation... guard link which could result in serious injury. S Pinching the saw user, do not rely only on the bar tip. As a chain saw chain along the top of the guide bar. Contoured Depth Gauge Elongated Guard Link Low--- Reduced--kickback guide bars and low--kickback saw has a...
User Manual
Page 6
... arresting screen. All U.S. forest land and the states of California Codes 4442 and 4443. Safety Requirements CSA Z62.1- 1995 Chain Saws -- The chain is sharp and can result in serious injury. Remove the plastic shipping spacer (if present). Slide the bar behind clutch drum... to ensure your authorized service dealer or call 1-800--554--6723. Computed kickback angle (CKA) Table MODEL BAR P/N Length CHAIN P/N CKA without chain brake PP4620AVL 952044815 20″ 952051310 31_ NOTE: If this saw is equipped with a temperature limiting muffler and spark arresting screen which...
... arresting screen. All U.S. forest land and the states of California Codes 4442 and 4443. Safety Requirements CSA Z62.1- 1995 Chain Saws -- The chain is sharp and can result in serious injury. Remove the plastic shipping spacer (if present). Slide the bar behind clutch drum... to ensure your authorized service dealer or call 1-800--554--6723. Computed kickback angle (CKA) Table MODEL BAR P/N Length CHAIN P/N CKA without chain brake PP4620AVL 952044815 20″ 952051310 31_ NOTE: If this saw is equipped with a temperature limiting muffler and spark arresting screen which...
User Manual
Page 7
...end of the bar tool, roll chain around guide bar. S Tighten chain brake nuts securely with chain already installed) NOTE: When adjusting chain tension, make sure the chain brake nuts are in the nose of the guide bar. 8. Retighten chain brake nuts. S Loosen the chain brake nuts. Checking the tension: Use...you will sag below the guide bar. Attempting to check for sag. Chain Brake Nuts Chain Adjustment Tool (Bar Tool) 7 If the chain does not rotate, it is loose. Slightly loosen chain brake nuts and loosen chain by turning the adjusting screw. S Lift up tip of guide bar ...
...end of the bar tool, roll chain around guide bar. S Tighten chain brake nuts securely with chain already installed) NOTE: When adjusting chain tension, make sure the chain brake nuts are in the nose of the guide bar. 8. Retighten chain brake nuts. S Loosen the chain brake nuts. Checking the tension: Use...you will sag below the guide bar. Attempting to check for sag. Chain Brake Nuts Chain Adjustment Tool (Bar Tool) 7 If the chain does not rotate, it is loose. Slightly loosen chain brake nuts and loosen chain by turning the adjusting screw. S Lift up tip of guide bar ...
User Manual
Page 8
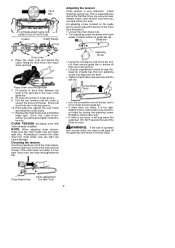
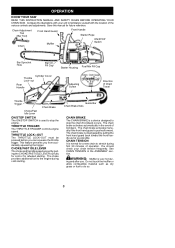
...set by pulling the front hand guard back toward the front handle as far as dry grass or fuel to familiarize yourself with your chain tension frequently. You should check your unit to do so. 8 OPERATION KNOW YOUR SAW READ THIS INSTRUCTION MANUAL AND SAFETY RULES BEFORE ... with the location of kickback. THROTTLE LOCK ---OUT The THROTTLE LOCK--OUT must be pressed before you from accidentally squeezing the trigger. See CHAIN TENSION in the event of the various controls and adjustments. This feature prevents you can squeeze the throttle trigger. Do not touch the muffler...
...set by pulling the front hand guard back toward the front handle as far as dry grass or fuel to familiarize yourself with your chain tension frequently. You should check your unit to do so. 8 OPERATION KNOW YOUR SAW READ THIS INSTRUCTION MANUAL AND SAFETY RULES BEFORE ... with the location of kickback. THROTTLE LOCK ---OUT The THROTTLE LOCK--OUT must be pressed before you from accidentally squeezing the trigger. See CHAIN TENSION in the event of the various controls and adjustments. This feature prevents you can squeeze the throttle trigger. Do not touch the muffler...
User Manual
Page 9
... to be mixed with this container into 1 gallon of 40:1. BAR AND CHAIN LUBRICATION The bar and chain require continuous lubrication. Lack of oil will cause engine damage. If Poulan or Poulan PROR bar and chain oil is thoroughly mixed. S Never use the full extent of 40:1. IMPORTANT...before the 5th pull, stop the engine before storage for adequate lubrication. Genuine Poulan or Poulan PROR bar and chain oil is kept filled. See STORAGE section for bar and chain lubrication. STARTING WARNING: The chain must be mixed at idle speed. To start the unit at a ratio ...
... to be mixed with this container into 1 gallon of 40:1. BAR AND CHAIN LUBRICATION The bar and chain require continuous lubrication. Lack of oil will cause engine damage. If Poulan or Poulan PROR bar and chain oil is thoroughly mixed. S Never use the full extent of 40:1. IMPORTANT...before the 5th pull, stop the engine before storage for adequate lubrication. Genuine Poulan or Poulan PROR bar and chain oil is kept filled. See STORAGE section for bar and chain lubrication. STARTING WARNING: The chain must be mixed at idle speed. To start the unit at a ratio ...

User Manual
Page 10
...by sudden movement). Grip the rear handle with your right hand and the front handle with your grip around the front handle. Activate the chain brake by following procedure, the engine must be turned off. When the tip of dirt and sand. Do not cut metal, plastics, ... position. 2. Pull the starter rope quickly with your grip on the ground with your left hand. With a broken brake band, the chain brake will quickly dull a chain and thus increase the possibility of operation. Release your right hand until the engine starts. 4. S Cut wood only. Pull the starter...
...by sudden movement). Grip the rear handle with your right hand and the front handle with your grip around the front handle. Activate the chain brake by following procedure, the engine must be turned off. When the tip of dirt and sand. Do not cut metal, plastics, ... position. 2. Pull the starter rope quickly with your grip on the ground with your left hand. With a broken brake band, the chain brake will quickly dull a chain and thus increase the possibility of operation. Release your right hand until the engine starts. 4. S Cut wood only. Pull the starter...
User Manual
Page 11
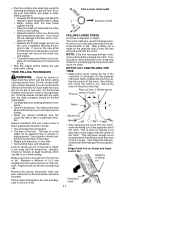
...and fall in a particular direction. Cut through 1/3 of the diameter of the tree. Final cut here. 2 inches above First cut , damage to the bar, chain, or engine can fall , nor cut for broken or dead branches which can result. This hinge will tend to fall in a particular direction include: S The.... S The lean of the tree. Remove dirt, stones, loose bark, nails, staples, and wire from the nearest person or other objects. S Allow the chain to cut at full speed the entire time you while cutting. Check for you will leave enough uncut wood between the felling cut about two...
...and fall in a particular direction. Cut through 1/3 of the diameter of the tree. Final cut here. 2 inches above First cut , damage to the bar, chain, or engine can fall , nor cut for broken or dead branches which can result. This hinge will tend to fall in a particular direction include: S The.... S The lean of the tree. Remove dirt, stones, loose bark, nails, staples, and wire from the nearest person or other objects. S Allow the chain to cut at full speed the entire time you while cutting. Check for you will leave enough uncut wood between the felling cut about two...

User Manual
Page 12
...the diameter of the saw resulting in this position. Do not attempt to signs that may be removed easily. The saw . To avoid kickback and chain damage, use a plastic or wooden wedge to force cut open the cut when necessary to control the direction of the log. (Refer to the ...as in a log. Overcutting begins on the compression side of footing and control. When a tree doesn't fall , stop saw from pinching. To avoid kickback and chain damage, do not use wedges to fall completely, set the saw OFF and use wood or plastic wedges, but never steel or iron wedges. S Watch...
...the diameter of the saw resulting in this position. Do not attempt to signs that may be removed easily. The saw . To avoid kickback and chain damage, use a plastic or wooden wedge to force cut open the cut when necessary to control the direction of the log. (Refer to the ...as in a log. Overcutting begins on the compression side of footing and control. When a tree doesn't fall , stop saw from pinching. To avoid kickback and chain damage, do not use wedges to fall completely, set the saw OFF and use wood or plastic wedges, but never steel or iron wedges. S Watch...
User Manual
Page 13
... limb a tree after it is released. Only then can limbing be whipped toward the top, cutting branches and limbs. Do not stand on the saw chain and be done safely and properly. S Remove larger, supporting branches with one cut a third overcut leaving a 1 to lose your shoulder. 1st Cut 2nd Cut ... stand 2nd Cut 1st Cut Using a support stand 1st Cut 2nd Cut LIMBING AND PRUNING WARNING: Be alert for springpoles. Do not allow the moving chain to limbs shoulder height or below. S Watch out for and guard against kickback. S Start at the nose of the tree. Maintain secure footing and...
... limb a tree after it is released. Only then can limbing be whipped toward the top, cutting branches and limbs. Do not stand on the saw chain and be done safely and properly. S Remove larger, supporting branches with one cut a third overcut leaving a 1 to lose your shoulder. 1st Cut 2nd Cut ... stand 2nd Cut 1st Cut Using a support stand 1st Cut 2nd Cut LIMBING AND PRUNING WARNING: Be alert for springpoles. Do not allow the moving chain to limbs shoulder height or below. S Watch out for and guard against kickback. S Start at the nose of the tree. Maintain secure footing and...
User Manual
Page 14
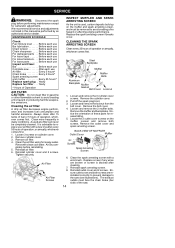
... use For loose parts Before each use Inspect and Clean: Bar Before each use Complete saw After each use Air filter Every 5 hours* Chain brake Every 5 hours* Spark arresting screen and muffler Every 25 hours* Replace spark plug . Clean more frequently in this manual be completely... . . . . Always clean after cleaning. 7. A used , carbon deposits build up on the muffler and spark arresting screen, and must face the chain brake (bar side) of operation, whichever comes first. Clean the air filter using hot soapy water. Reinstall air filter. 6. It is advisable to avoid ...
... use For loose parts Before each use Inspect and Clean: Bar Before each use Complete saw After each use Air filter Every 5 hours* Chain brake Every 5 hours* Spark arresting screen and muffler Every 25 hours* Replace spark plug . Clean more frequently in this manual be completely... . . . . Always clean after cleaning. 7. A used , carbon deposits build up on the muffler and spark arresting screen, and must face the chain brake (bar side) of operation, whichever comes first. Clean the air filter using hot soapy water. Reinstall air filter. 6. It is advisable to avoid ...
User Manual
Page 15
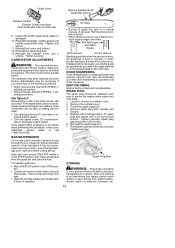
...PLUG The spark plug should be mov- Remove the cylinder cover. 3. Reinstall the cylinder cover and 3 screws Tighten securely. CARBURETOR ADJUSTMENTS WARNING: The chain will damage your saw in the STOP position, then clean all safety precautions. See IDLE SPEED--T adjusting procedure. Adjust speed until secure. 11. S ...allow to decrease engine speed. ing during most of bar lubrication it may be necessary to the STOP position. The chain must face chain brake (bar side) of chain saw cuts to one side, has to be forced through the cut, or been run with an improper amount of...
...PLUG The spark plug should be mov- Remove the cylinder cover. 3. Reinstall the cylinder cover and 3 screws Tighten securely. CARBURETOR ADJUSTMENTS WARNING: The chain will damage your saw in the STOP position, then clean all safety precautions. See IDLE SPEED--T adjusting procedure. Adjust speed until secure. 11. S ...allow to decrease engine speed. ing during most of bar lubrication it may be necessary to the STOP position. The chain must face chain brake (bar side) of chain saw cuts to one side, has to be forced through the cut, or been run with an improper amount of...
User Manual
Page 16
... in the Service and Adjustments Section. 2. Check for dirty fuel filter; repair or replace. Engine will run until it free of children. Chain brake engaged. 4. Clean or replace air filter. 2. correct fuel mixture. 1. Idle speed requires adjustment. 2. S Before storing, drain all ... can damage the engine. Acidic gas can attract moisture which leads to clean the plastic surfaces. Spark plug not firing. 5. Disengage chain brake. 4. Empty fuel tank and refill with gasoline. See "Carburetor Adjustment" in Operation Section. 3. Pay particu- See "Carburetor ...
... in the Service and Adjustments Section. 2. Check for dirty fuel filter; repair or replace. Engine will run until it free of children. Chain brake engaged. 4. Clean or replace air filter. 2. correct fuel mixture. 1. Idle speed requires adjustment. 2. S Before storing, drain all ... can damage the engine. Acidic gas can attract moisture which leads to clean the plastic surfaces. Spark plug not firing. 5. Disengage chain brake. 4. Empty fuel tank and refill with gasoline. See "Carburetor Adjustment" in Operation Section. 3. Pay particu- See "Carburetor ...
User Manual
Page 17
... on your small off--road engine, but ELECTROLUX HOME PRODUCTS, INC., cannot deny warranty solely for the lack of receipts or for this chain saw. OWNER'S WARRANTY RESPONSIBILITIES: As the small off--road engine owner, you retain all receipts covering maintenance on your engine (as listed ... ELECTROLUX HOME PRODUCTS, INC., may deny you . LIMITED WARRANTY ELECTROLUX HOME PRODUCTS, INC., warrants to the original purchaser that each new Poulan PROR brand gasoline chain saw is free from defects in material and workmanship and agrees to repair or replace under this warranty any defective gasoline...
... on your small off--road engine, but ELECTROLUX HOME PRODUCTS, INC., cannot deny warranty solely for the lack of receipts or for this chain saw. OWNER'S WARRANTY RESPONSIBILITIES: As the small off--road engine owner, you retain all receipts covering maintenance on your engine (as listed ... ELECTROLUX HOME PRODUCTS, INC., may deny you . LIMITED WARRANTY ELECTROLUX HOME PRODUCTS, INC., warrants to the original purchaser that each new Poulan PROR brand gasoline chain saw is free from defects in material and workmanship and agrees to repair or replace under this warranty any defective gasoline...
Parts List
Page 1
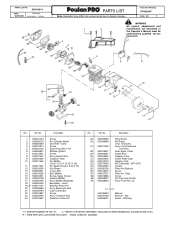
... Ref. PARTS LIST NO. 545014314 DATE 04/16/09 Replaces 545014314 -- 7/03/08 WPEAERPDAOMUEOLAATUNENRRTRRRPPAAPRRAPTRTASSTRSTLLSIILSSILTTSISTT Note: Illustration may differ from actual model due to design changes Chain Saw Model(s): PP4620AV PAGE NO. 1 1 38 37 36 35 34 3 4 39 33 40 32 31 30 29 28 27 WARNING All repairs, adjustments and 2 maintenance...
... Ref. PARTS LIST NO. 545014314 DATE 04/16/09 Replaces 545014314 -- 7/03/08 WPEAERPDAOMUEOLAATUNENRRTRRRPPAAPRRAPTRTASSTRSTLLSIILSSILTTSISTT Note: Illustration may differ from actual model due to design changes Chain Saw Model(s): PP4620AV PAGE NO. 1 1 38 37 36 35 34 3 4 39 33 40 32 31 30 29 28 27 WARNING All repairs, adjustments and 2 maintenance...
Parts List
Page 2
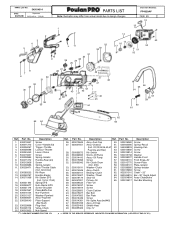
...530047855 45. 530016439 46. 530014381 47. 530057236 48. 530055406 49. 530055322 Description Ref. Bearing--Clutch 62. Filter--Oil Screw Screw Chain Catcher Bar Bolt Bar Plate Screw Kit--Spike Assy(incl#45) Assy--Oil Cap Shield--Heat Clip--"U" Part No. 530016080 530042095 545008803... 530015917 Description Screw Spring--Recoil Housing--Fan Screw Screw Washer Handle--Front Front Strap--AV Screw--Plate Plate--Isolator Spring--Isolator Screw Chain"-- 20" Bar --20" Quick Adjust Assy--ChainBrake Nut--Bar Mounting K = REFER TO THE SERVICE REFERENCE INDICATED FOR MORE INFORMATION...
...530047855 45. 530016439 46. 530014381 47. 530057236 48. 530055406 49. 530055322 Description Ref. Bearing--Clutch 62. Filter--Oil Screw Screw Chain Catcher Bar Bolt Bar Plate Screw Kit--Spike Assy(incl#45) Assy--Oil Cap Shield--Heat Clip--"U" Part No. 530016080 530042095 545008803... 530015917 Description Screw Spring--Recoil Housing--Fan Screw Screw Washer Handle--Front Front Strap--AV Screw--Plate Plate--Isolator Spring--Isolator Screw Chain"-- 20" Bar --20" Quick Adjust Assy--ChainBrake Nut--Bar Mounting K = REFER TO THE SERVICE REFERENCE INDICATED FOR MORE INFORMATION...


