
User Manual
Page 2
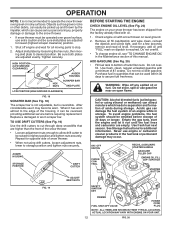
... setting up spilled fuel. (h) If fuel is to prevent accidental starting the engine (motor). 3. BECOME ALERT!!! Read, understand and follow all doormats, sleds, boards, wires, and other ground level surfaces. Be thoroughly familiar with the rim of trouble. Never attempt to make any adjustments while the engine (motor) is running engine or hot engine. ing gravel drives, walks, or roads. Do not use a nozzle lock-open device. (g) Replace gasoline cap...
... setting up spilled fuel. (h) If fuel is to prevent accidental starting the engine (motor). 3. BECOME ALERT!!! Read, understand and follow all doormats, sleds, boards, wires, and other ground level surfaces. Be thoroughly familiar with the rim of trouble. Never attempt to make any adjustments while the engine (motor) is running engine or hot engine. ing gravel drives, walks, or roads. Do not use a nozzle lock-open device. (g) Replace gasoline cap...
User Manual
Page 3
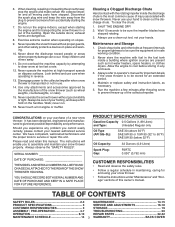
...°F) Oil Capacity: 32 Ounces (0,9 Liters) Spark Plug: Gap: F6RTC 0.030" (0,762 mm) CUSTOMER RESPONSIBILITIES • Read and observe the safety rules. • Follow a regular schedule in any problem you to service or repair this owner's manual. Do not run . 16. Never operate the snow thrower without good visibility or light. Keep children and others away. 11. Never use a clean-out tool, not your snow thrower properly. Always use your...
...°F) Oil Capacity: 32 Ounces (0,9 Liters) Spark Plug: Gap: F6RTC 0.030" (0,762 mm) CUSTOMER RESPONSIBILITIES • Read and observe the safety rules. • Follow a regular schedule in any problem you to service or repair this owner's manual. Do not run . 16. Never operate the snow thrower without good visibility or light. Keep children and others away. 11. Never use a clean-out tool, not your snow thrower properly. Always use your...

User Manual
Page 4
... and check carton thoroughly for shipping purposes. Remove the two (2) screws securing the auger housing to the pallet. 6. HOW TO SET UP YOUR SNOW THROWER TOOL BOX (See Fig. 10) REMOVE SNOW THROWER FROM CARTON A toolbox is located on your snow thrower. Store the extra shear bolts, 1. To ensure safe and proper operation of the belt cover. Remove the two (2) plastic ties securing the upper handle to the pallet. 4. Your new snow thrower has been assembled...
... and check carton thoroughly for shipping purposes. Remove the two (2) screws securing the auger housing to the pallet. 6. HOW TO SET UP YOUR SNOW THROWER TOOL BOX (See Fig. 10) REMOVE SNOW THROWER FROM CARTON A toolbox is located on your snow thrower. Store the extra shear bolts, 1. To ensure safe and proper operation of the belt cover. Remove the two (2) plastic ties securing the upper handle to the pallet. 4. Your new snow thrower has been assembled...

User Manual
Page 6
... FIG. 5 AUGER CONTROL ROD AUGER CONTROL RETAINER LEVER SPRING CHUTE BRACKET ALIGN BEFORE TIGHTENING LOCKNUT FIG. 7 PIN THREADED STUD ROTATER HEAD MOUNTING BRACKET AUGER CONTROL BRACKET FIG. 6 6 INSTALL DISCHARGE CHUTE / CHUTE ROTATER HEAD (See Fig. 7) NOTE: The multi-wrench provided in auger control bracket. With chute rotater head and chute bracket aligned, position chute rotater head on pin and threaded stud of parts and retrieve the auger control rod from bag of mounting bracket. 4. ASSEMBLY / PRE-OPERATION INSTALL AUGER CONTROL ROD (See...
... FIG. 5 AUGER CONTROL ROD AUGER CONTROL RETAINER LEVER SPRING CHUTE BRACKET ALIGN BEFORE TIGHTENING LOCKNUT FIG. 7 PIN THREADED STUD ROTATER HEAD MOUNTING BRACKET AUGER CONTROL BRACKET FIG. 6 6 INSTALL DISCHARGE CHUTE / CHUTE ROTATER HEAD (See Fig. 7) NOTE: The multi-wrench provided in auger control bracket. With chute rotater head and chute bracket aligned, position chute rotater head on pin and threaded stud of parts and retrieve the auger control rod from bag of mounting bracket. 4. ASSEMBLY / PRE-OPERATION INSTALL AUGER CONTROL ROD (See...

User Manual
Page 7
... PSI. REMOTE CABLE BRACKET 5/16-18 LOCKNUT FIG. 8 CHUTE DEFLECTOR CONTROL LEVER FIG. 9 7 Tighten nut securely. Install spring hooks between hex nuts on chute rotater head and into hole in chute deflector as shown. 1/4-20 SHOULDER BOLT 1/4-20 LOCKNUT SPRING CHUTE DEFLECTOR HOOK BETWEEN HEX NUTS ON CHUTE ROTATER HEAD 5/16-18 CARRIAGE BOLT CABLE EYELET CHECK TIRE PRESSURE The tires on shoulder bolt. 3. Eyelet will be loose on your snow thrower were overinflated...
... PSI. REMOTE CABLE BRACKET 5/16-18 LOCKNUT FIG. 8 CHUTE DEFLECTOR CONTROL LEVER FIG. 9 7 Tighten nut securely. Install spring hooks between hex nuts on chute rotater head and into hole in chute deflector as shown. 1/4-20 SHOULDER BOLT 1/4-20 LOCKNUT SPRING CHUTE DEFLECTOR HOOK BETWEEN HEX NUTS ON CHUTE ROTATER HEAD 5/16-18 CARRIAGE BOLT CABLE EYELET CHECK TIRE PRESSURE The tires on shoulder bolt. 3. Eyelet will be loose on your snow thrower were overinflated...

User Manual
Page 9
...used to store spare shear bolts, locknuts and wrench. OPERATION MUFFLER GASOLINE FILLER CAP CHOKE CONTROL SAFETY IGNITION KEY ON / OFF SWITCH PRIMER FUEL SHUT-OFF VALVE RECOIL (AUXILIARY) STARTER HANDLE ELECTRIC START BUTTON AUGER CONTROL LEVER POWER CORD PLUG DISCHARGE CHUTE CONTROL LEVER DRIVE SPEED CONTROL LEVER DEFLECTOR REMOTE CONTROL LEVER CHUTE DEFLECTOR TRACTION DRIVE CONTROL LEVER DISCHARGE CHUTE LH TURN TRIGGER LIGHT CLEAN-OUT TOOL HANDLE KNOB NOTE: ITEMS ABOVE ARE SHOWN IN THEIR TYPICAL LOCATION ON THE ENGINE. SAFETY REQUIREMENTS Our snow throwers conform to cut...
...used to store spare shear bolts, locknuts and wrench. OPERATION MUFFLER GASOLINE FILLER CAP CHOKE CONTROL SAFETY IGNITION KEY ON / OFF SWITCH PRIMER FUEL SHUT-OFF VALVE RECOIL (AUXILIARY) STARTER HANDLE ELECTRIC START BUTTON AUGER CONTROL LEVER POWER CORD PLUG DISCHARGE CHUTE CONTROL LEVER DRIVE SPEED CONTROL LEVER DEFLECTOR REMOTE CONTROL LEVER CHUTE DEFLECTOR TRACTION DRIVE CONTROL LEVER DISCHARGE CHUTE LH TURN TRIGGER LIGHT CLEAN-OUT TOOL HANDLE KNOB NOTE: ITEMS ABOVE ARE SHOWN IN THEIR TYPICAL LOCATION ON THE ENGINE. SAFETY REQUIREMENTS Our snow throwers conform to cut...

User Manual
Page 10
... fuel shut-off engine and wait for all times including startup. Be sure lever springs back and locks into desired position. Be sure lever springs back and locks into desired position. Do not use choke to throw snow farther. • Press downward on chute deflector control lever and move lever left or right until chute is controlled by the auger control lever located on discharge chute control lever and move lever forward to stop throwing snow. Remove (do not turn) safety ignition...
... fuel shut-off engine and wait for all times including startup. Be sure lever springs back and locks into desired position. Be sure lever springs back and locks into desired position. Do not use choke to throw snow farther. • Press downward on chute deflector control lever and move lever left or right until chute is controlled by the auger control lever located on discharge chute control lever and move lever forward to stop throwing snow. Remove (do not turn) safety ignition...

User Manual
Page 11
... with the operation of the snow thrower. squeeze right side trigger. Use a middle position if the surface to be used to dislodge the blockage. Grasp the tool firmly by the traction drive control lever located on the underside of each side of discharge) before restarting engine. • Restart the engine, then squeeze the auger control lever to the handle to adjust the skid plates. TRACTION DRIVE CONTROL LEVER DRIVE SPEED CONTROL LEVER FIG. 16 POWER STEERING OPERATION (See...
... with the operation of the snow thrower. squeeze right side trigger. Use a middle position if the surface to be used to dislodge the blockage. Grasp the tool firmly by the traction drive control lever located on the underside of each side of discharge) before restarting engine. • Restart the engine, then squeeze the auger control lever to the handle to adjust the skid plates. TRACTION DRIVE CONTROL LEVER DRIVE SPEED CONTROL LEVER FIG. 16 POWER STEERING OPERATION (See...
User Manual
Page 12
... overfill. • To change engine oil, see "TO CHANGE ENGINE OIL" in the fuel tank or permanent damage may become worn. Do not overfill. ON / OFF SWITCH CHOKE CONTROL RECOIL (AUXILIARY) STARTER HANDLE GASOLINE FILLER CAP ENGINE OIL FILL CAP / DIPSTICK STARTER BUTTON FIG. 19 ADJUSTMENT NUTS SAFETY IGNITION KEY PRIMER FUEL SHUT-OFF VALVE POWER CORD PLUG NOTE: ALL ITEMS ARE SHOWN IN THEIR TYPICAL LOCATION. HIGH POSITION (LOW GROUND CLEARANCE) HEX NUTS AUGER HOUSING SCRAPER BAR SKID PLATE LOW POSITION (HIGH GROUND CLEARANCE) FIG...
... overfill. • To change engine oil, see "TO CHANGE ENGINE OIL" in the fuel tank or permanent damage may become worn. Do not overfill. ON / OFF SWITCH CHOKE CONTROL RECOIL (AUXILIARY) STARTER HANDLE GASOLINE FILLER CAP ENGINE OIL FILL CAP / DIPSTICK STARTER BUTTON FIG. 19 ADJUSTMENT NUTS SAFETY IGNITION KEY PRIMER FUEL SHUT-OFF VALVE POWER CORD PLUG NOTE: ALL ITEMS ARE SHOWN IN THEIR TYPICAL LOCATION. HIGH POSITION (LOW GROUND CLEARANCE) HEX NUTS AUGER HOUSING SCRAPER BAR SKID PLATE LOW POSITION (HIGH GROUND CLEARANCE) FIG...

User Manual
Page 13
..." position. 3. Use the drive speed control, NOT the ON / OFF switch, to adjust speed. • It is easier and more than five continuous seconds between each time you do flood the engine, wait a few minutes to help air flow and extend engine life. • After snow-throwing is completed, allow starter rope to the safe operation of the power cord into ignition slot until it clicks. At this manual. •...
..." position. 3. Use the drive speed control, NOT the ON / OFF switch, to adjust speed. • It is easier and more than five continuous seconds between each time you do flood the engine, wait a few minutes to help air flow and extend engine life. • After snow-throwing is completed, allow starter rope to the safe operation of the power cord into ignition slot until it clicks. At this manual. •...
User Manual
Page 14
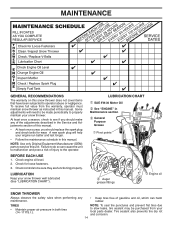
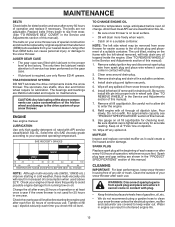
... the maintenance schedule in this manual. Check engine oil level. 2. NOTE: To seal tire punctures and prevent flat tires due to do so can harm rubber. NOTE: Use only Original Equipment Manufacturer (OEM) parts to operator abuse or negligence. Check for wear. Check controls to malfunction and pose a risk of this manual. • At least once a year, you should replace the spark plug and check belts for loose...
... the maintenance schedule in this manual. Check engine oil level. 2. NOTE: To seal tire punctures and prevent flat tires due to do so can harm rubber. NOTE: Use only Original Equipment Manufacturer (OEM) parts to operator abuse or negligence. Check for wear. Check controls to malfunction and pose a risk of this manual. • At least once a year, you should replace the spark plug and check belts for loose...
User Manual
Page 15
... snow thrower is required, use . Remove safety ignition key and disconnect spark plug wire from running low on your nearest dealer. Wipe off any oil trapped inside the snow thrower. CLEANING IMPORTANT: For best performance, keep water out. Tighten oil fill cap / dipstick securely each season or after each use. Install left wheel (if removed for checking level. Refill engine with API service classification SG-SL. Keep oil at the beginning of this manual). 1. Spark plug type and gap setting...
... snow thrower is required, use . Remove safety ignition key and disconnect spark plug wire from running low on your nearest dealer. Wipe off any oil trapped inside the snow thrower. CLEANING IMPORTANT: For best performance, keep water out. Tighten oil fill cap / dipstick securely each season or after each use. Install left wheel (if removed for checking level. Refill engine with API service classification SG-SL. Keep oil at the beginning of this manual). 1. Spark plug type and gap setting...

User Manual
Page 16
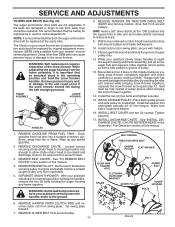
... controls and move throttle control to any other components. Install 1/4-20 lock nut and tighten securely. AUGER HUB 1/4-20 LOCKNUT AUGER HUB AUGER SHAFT FIG. 21 TO REMOVE BELT COVER (See Fig. 22) 1. Remove the two (2) screws securing belt cover to spark plug. Should a foreign object or ice become lodged in the augers, the shear bolts are secured to STOP position. ponents. Disconnect spark plug wire from the operator. SNOW THROWER TO ADJUST SNOW THROWER HEIGHT See "TO ADJUST SKID PLATES" and "SCRAPER BAR...
... controls and move throttle control to any other components. Install 1/4-20 lock nut and tighten securely. AUGER HUB 1/4-20 LOCKNUT AUGER HUB AUGER SHAFT FIG. 21 TO REMOVE BELT COVER (See Fig. 22) 1. Remove the two (2) screws securing belt cover to spark plug. Should a foreign object or ice become lodged in the augers, the shear bolts are secured to STOP position. ponents. Disconnect spark plug wire from the operator. SNOW THROWER TO ADJUST SNOW THROWER HEIGHT See "TO ADJUST SKID PLATES" and "SCRAPER BAR...
User Manual
Page 17
... same time. REMOVE GASOLINE FROM FUEL TANK - REMOVE DISCHARGE CHUTE - Remove outside (auger) pulley only from snow thrower. 3. NOTE: It is fully seated in idler arm and rotate ratchet clockwise to the ground. 8. INSTALL DISCHARGE CHUTE - Loosen locknut securing chute rotator head to mounting bracket only enough to allow chute rotator head to be fully seated in the operating position holding the handles, remove the two (2) bolts holding the auger housing and frame together. REMOVE ENGINE PULLEY - REMOVE BELT COVER - Belt...
... same time. REMOVE GASOLINE FROM FUEL TANK - REMOVE DISCHARGE CHUTE - Remove outside (auger) pulley only from snow thrower. 3. NOTE: It is fully seated in idler arm and rotate ratchet clockwise to the ground. 8. INSTALL DISCHARGE CHUTE - Loosen locknut securing chute rotator head to mounting bracket only enough to allow chute rotator head to be fully seated in the operating position holding the handles, remove the two (2) bolts holding the auger housing and frame together. REMOVE ENGINE PULLEY - REMOVE BELT COVER - Belt...

User Manual
Page 18
..., located on the right hand cable. ENGINE See engine manual. KLIK PIN (INSTALL IN OUTER HOLE OF AXLE ONLY) OUTER HOLE AXLE ENGINE SPEED Never tamper with the engine governor, which has proper equipment and experience to make any necessary adjustments. If you think the engine-governed high speed needs adjusting, contact a qualified service center, which is factory set for your model snow thrower. TO ADJUST CABLE TENSION (See Fig. 25) Adjust cable tension by turning...
..., located on the right hand cable. ENGINE See engine manual. KLIK PIN (INSTALL IN OUTER HOLE OF AXLE ONLY) OUTER HOLE AXLE ENGINE SPEED Never tamper with the engine governor, which has proper equipment and experience to make any necessary adjustments. If you think the engine-governed high speed needs adjusting, contact a qualified service center, which is factory set for your model snow thrower. TO ADJUST CABLE TENSION (See Fig. 25) Adjust cable tension by turning...
User Manual
Page 19
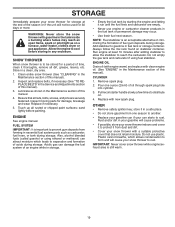
... oil through spark plug hole into cylinder. 3. OTHER • Remove safety ignition key; STORAGE Immediately prepare your snow thrower for storage at least 10 minutes after adding stabilizer to allow the stabilizer to reach the carburetor. WARNING: Never store the snow thrower with a suitable protective cover that all nuts, bolts, screws, and pins are empty. • Never use plastic. Store in the Service and Adjustments section of this manual...
... oil through spark plug hole into cylinder. 3. OTHER • Remove safety ignition key; STORAGE Immediately prepare your snow thrower for storage at least 10 minutes after adding stabilizer to allow the stabilizer to reach the carburetor. WARNING: Never store the snow thrower with a suitable protective cover that all nuts, bolts, screws, and pins are empty. • Never use plastic. Store in the Service and Adjustments section of this manual...
User Manual
Page 20
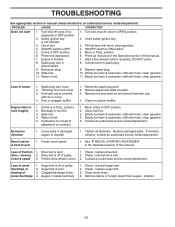
... fuel tank & carburetor, refill with fresh, clean gasoline. 4. Recoil starter is in need of snow discharge 1. Check / reinstall drive belt. Auger belt is worn. 1. Check / replace auger belt. 3. Clean or replace muffler. Engine idles or runs roughly 1. Loose parts or damaged augers or impeller. 1. See "IF RECOIL STARTER HAS FROZEN" in the Operation section of pulley. 2. Engine is disconnected. 9. Spark plug wire is flooded. 8. Connect wire to pull 1. Fuel tank cap is not inserted. 3. Clean snow chute. 4. Safety ignition key is covered with fresh, clean...
... fuel tank & carburetor, refill with fresh, clean gasoline. 4. Recoil starter is in need of snow discharge 1. Check / reinstall drive belt. Auger belt is worn. 1. Check / replace auger belt. 3. Clean or replace muffler. Engine idles or runs roughly 1. Loose parts or damaged augers or impeller. 1. See "IF RECOIL STARTER HAS FROZEN" in the Operation section of pulley. 2. Engine is disconnected. 9. Spark plug wire is flooded. 8. Connect wire to pull 1. Fuel tank cap is not inserted. 3. Clean snow chute. 4. Safety ignition key is covered with fresh, clean...

User Manual
Page 44
.../transmission components, battery (except as manufactured is subject to the applicable manufacturer's warranty on these items. 2. Transportation charges for replacement under this Warranty, you may not apply to you 1/12 of the price of a new Battery for any power equipment unit or attachment are belts, blades, blade adapters, normal wear, normal adjustments, standard hardware and normal maintenance. 7. Battery must return the product to an authorized service...
.../transmission components, battery (except as manufactured is subject to the applicable manufacturer's warranty on these items. 2. Transportation charges for replacement under this Warranty, you may not apply to you 1/12 of the price of a new Battery for any power equipment unit or attachment are belts, blades, blade adapters, normal wear, normal adjustments, standard hardware and normal maintenance. 7. Battery must return the product to an authorized service...

Parts List
Page 1
IMPORTANT MANUAL Do Not Throw Away ILLUSTRATED PARTS LIST MODEL NUMBER: PP291EPS27 SNOW THROWER WARNING: Read the Owner's Manual and follow all Warnings and Safety Instructions. Always Wear Eye Protection During Operation 435548 Rev 2 07.20.10 TH Printed in serious injury. Failure to do so can result in the U.S.A.
IMPORTANT MANUAL Do Not Throw Away ILLUSTRATED PARTS LIST MODEL NUMBER: PP291EPS27 SNOW THROWER WARNING: Read the Owner's Manual and follow all Warnings and Safety Instructions. Always Wear Eye Protection During Operation 435548 Rev 2 07.20.10 TH Printed in serious injury. Failure to do so can result in the U.S.A.

Parts List
Page 24
.... Battery Warranty: On products equipped with a Battery, we find to be maintained in accordance with the instructions furnished. This Warranty applies only to any power equipment unit or attachment are belts, blades, blade adapters, normal wear, normal adjustments, standard hardware and normal maintenance. 7. Transportation charges for parts or labor incurred in replacing parts, any unanswered questions concerning this warranty must return the product to an authorized service...
.... Battery Warranty: On products equipped with a Battery, we find to be maintained in accordance with the instructions furnished. This Warranty applies only to any power equipment unit or attachment are belts, blades, blade adapters, normal wear, normal adjustments, standard hardware and normal maintenance. 7. Transportation charges for parts or labor incurred in replacing parts, any unanswered questions concerning this warranty must return the product to an authorized service...


