
User Manual
Page 2
... the area of operation clear of the fuel tank or container opening at all doormats, sleds, boards, wires, and other engine parts become extremely hot during operation or while performing an adjustment or repair to observe the following safety instructions could result in contact with the...: Always disconnect spark plug wire and place it where it on a trailer with extreme care. WARNING: Snow throwers have exposed rotating parts, which can get caught in order to operate the equipment without wearing adequate winter garments. Read, understand and follow all clutches and shift...
... the area of operation clear of the fuel tank or container opening at all doormats, sleds, boards, wires, and other engine parts become extremely hot during operation or while performing an adjustment or repair to observe the following safety instructions could result in contact with the...: Always disconnect spark plug wire and place it where it on a trailer with extreme care. WARNING: Snow throwers have exposed rotating parts, which can get caught in order to operate the equipment without wearing adequate winter garments. Read, understand and follow all clutches and shift...
User Manual
Page 3
...PRODUCT SPECIFICATIONS 3 SERVICE AND ADJUSTMENTS 16-18 CUSTOMER RESPONSIBILITIES 3 STORAGE 19 ASSEMBLY / PRE-OPERATION 5-7 TROUBLESHOOTING 20 OPERATION 8-13 REPAIR PARTS 21-39 MAINTENANCE SCHEDULE 14 3 WARRANTY BACK COVER When cleaning, repairing or inspecting the snow thrower, stop the engine and make ...certain the collector/impeller and all moving parts have competent, well-trained technicians and the proper tools to give best possible dependability and performance. Open the outside doors;...
...PRODUCT SPECIFICATIONS 3 SERVICE AND ADJUSTMENTS 16-18 CUSTOMER RESPONSIBILITIES 3 STORAGE 19 ASSEMBLY / PRE-OPERATION 5-7 TROUBLESHOOTING 20 OPERATION 8-13 REPAIR PARTS 21-39 MAINTENANCE SCHEDULE 14 3 WARRANTY BACK COVER When cleaning, repairing or inspecting the snow thrower, stop the engine and make ...certain the collector/impeller and all moving parts have competent, well-trained technicians and the proper tools to give best possible dependability and performance. Open the outside doors;...

User Manual
Page 4
PARTS PACKED SEPARATELY IN CARTON (1) POWER CORD (198563) (1) MULTIWRENCH (180684) (3) RETAINER SPRINGS (169675) (2) FLAT WASHERS (2) SHEAR BOLTS 1/4-20 x 1-3/4 (192090) (2) LOCKNUTS 1/4-20 (73800400) (2) CARRIAGE BOLTS 3/8-16 x 2.25 (2) HANDLE KNOBS SAFTEY IGNITION KEY(S) (422663) (1) WASHER 3/8 (19131316) (1) LOCKNUT 3/8 (73800600) (1) LOCKNUT 5/16-18 (751153) (1) CARRIAGE BOLT 5/16-18 x 5/8 (72250505) (1) LOCKNUT 1/4-20 (191730) (1) SHOULDER BOLT 1/4-20 (179829) (1) SPRING (184505) 4
PARTS PACKED SEPARATELY IN CARTON (1) POWER CORD (198563) (1) MULTIWRENCH (180684) (3) RETAINER SPRINGS (169675) (2) FLAT WASHERS (2) SHEAR BOLTS 1/4-20 x 1-3/4 (192090) (2) LOCKNUTS 1/4-20 (73800400) (2) CARRIAGE BOLTS 3/8-16 x 2.25 (2) HANDLE KNOBS SAFTEY IGNITION KEY(S) (422663) (1) WASHER 3/8 (19131316) (1) LOCKNUT 3/8 (73800600) (1) LOCKNUT 5/16-18 (751153) (1) CARRIAGE BOLT 5/16-18 x 5/8 (72250505) (1) LOCKNUT 1/4-20 (191730) (1) SHOULDER BOLT 1/4-20 (179829) (1) SPRING (184505) 4
User Manual
Page 5
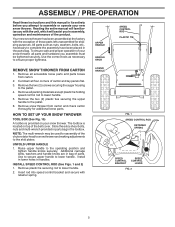
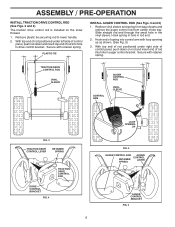
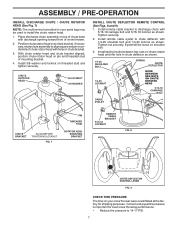
...in its entirety before you attempt to assemble or operate your snow thrower. Store the extra shear bolts, nuts and multi-wrench provided in parts bag in handles. UNFOLD UPPER HANDLE 1. Additional carriage bolts, washers and handle knobs are in bag of your snow thrower, all four ...assembly, operation and maintenance of the belt cover. Insert rod into speed control bracket and secure with the exception of those parts left unassembled for additional loose parts. Reading the entire manual will familiarize you with the unit, which will assist you assemble must be used for assembly ...
...in its entirety before you attempt to assemble or operate your snow thrower. Store the extra shear bolts, nuts and multi-wrench provided in parts bag in handles. UNFOLD UPPER HANDLE 1. Additional carriage bolts, washers and handle knobs are in bag of your snow thrower, all four ...assembly, operation and maintenance of the belt cover. Insert rod into speed control bracket and secure with the exception of those parts left unassembled for additional loose parts. Reading the entire manual will familiarize you with the unit, which will assist you assemble must be used for assembly ...
User Manual
Page 6
... OPENING UP FIG. 5 AUGER CONTROL ROD AUGER CONTROL RETAINER LEVER SPRING AUGER CONTROL BRACKET FIG. 6 With top end of rod positioned under left side of parts and retrieve the auger control rod from carton chute tray.
... OPENING UP FIG. 5 AUGER CONTROL ROD AUGER CONTROL RETAINER LEVER SPRING AUGER CONTROL BRACKET FIG. 6 With top end of rod positioned under left side of parts and retrieve the auger control rod from carton chute tray.
User Manual
Page 7
... THREADED STUD ROTATOR HEAD MOUNTING BRACKET REMOTE CABLE BRACKET 5/16-18 LOCKNUT FIG. 8 CHUTE DEFLECTOR CONTROL LEVER FIG. 9 CHECK TIRE PRESSURE The tires on your parts bag may be loose on chute rotater head and into hole in chute bracket. 3. Install remote cable bracket to chute deflector with 5/16-18 carriage...
... THREADED STUD ROTATOR HEAD MOUNTING BRACKET REMOTE CABLE BRACKET 5/16-18 LOCKNUT FIG. 8 CHUTE DEFLECTOR CONTROL LEVER FIG. 9 CHECK TIRE PRESSURE The tires on your parts bag may be loose on chute rotater head and into hole in chute bracket. 3. Install remote cable bracket to chute deflector with 5/16-18 carriage...
User Manual
Page 10
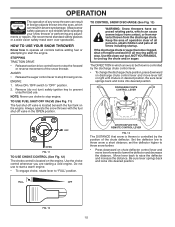
...the forward or reverse movement of the snow thrower. Keep the area of operation clear of all persons, small children and pets at all moving parts to stop throwing snow. Use the choke control whenever you are starting a cold engine. set the deflector higher to stop . STOPPING TRACTION ...engine. • To engage choke, rotate lever to stop engine. TO CONTROL SNOW DISCHARGE (See Fig. 13) WARNING: Snow throwers have exposed rotating parts, which can result in severe eye damage. We recommend standard safety glasses or a wide vision safety mask worn over spectacles. HOW TO USE YOUR ...
...the forward or reverse movement of the snow thrower. Keep the area of operation clear of all persons, small children and pets at all moving parts to stop throwing snow. Use the choke control whenever you are starting a cold engine. set the deflector higher to stop . STOPPING TRACTION ...engine. • To engage choke, rotate lever to stop engine. TO CONTROL SNOW DISCHARGE (See Fig. 13) WARNING: Snow throwers have exposed rotating parts, which can result in severe eye damage. We recommend standard safety glasses or a wide vision safety mask worn over spectacles. HOW TO USE YOUR ...
User Manual
Page 11
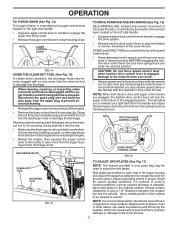
...this blockage. Damage to the snow thrower can easily be used to dislodge the blockage. When cleaning, repairing, or inspecting, make certain all moving parts have stopped. After the packed snow has been dislodged, return the cleanout tool to clear snow from the auger housing and the discharge chute. ...It is recommended that you use a slower speed until you to release your parts bag may become clogged with the operation of the snow thrower. AUGER CONTROL LEVER FIG. 14 USING THE CLEAN-OUT TOOL (See Fig. 15...
...this blockage. Damage to the snow thrower can easily be used to dislodge the blockage. When cleaning, repairing, or inspecting, make certain all moving parts have stopped. After the packed snow has been dislodged, return the cleanout tool to clear snow from the auger housing and the discharge chute. ...It is recommended that you use a slower speed until you to release your parts bag may become clogged with the operation of the snow thrower. AUGER CONTROL LEVER FIG. 14 USING THE CLEAN-OUT TOOL (See Fig. 15...

User Manual
Page 12
... Fig. 19) • Fill fuel tank to bottom of this manual. Purchase fuel in storage. Adjust skid plates by loosening the hex nuts, then moving parts to stop. 2. HIGH POSITION (LOW GROUND CLEARANCE) HEX NUTS AUGER HOUSING SCRAPER BAR SKID PLATE LOW POSITION (HIGH GROUND CLEARANCE) FIG. 17 SCRAPER BAR (See...
... Fig. 19) • Fill fuel tank to bottom of this manual. Purchase fuel in storage. Adjust skid plates by loosening the hex nuts, then moving parts to stop. 2. HIGH POSITION (LOW GROUND CLEARANCE) HEX NUTS AUGER HOUSING SCRAPER BAR SKID PLATE LOW POSITION (HIGH GROUND CLEARANCE) FIG. 17 SCRAPER BAR (See...
User Manual
Page 14
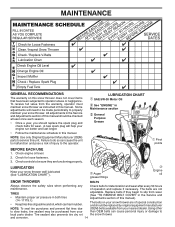
... proper air pressure in the Service and Adjustments section of gasoline and oil, which can harm rubber. NOTE: Use only Original Equipment Manufacturer (OEM) parts to service this manual should be checked at least once each season. • Once a year, you should be sure they begin to be replaced...engine run better and last longer. • Follow the maintenance schedule in the Service and Adjustments section of this unit. of injury to local parts dealer. Tire sealant also prevents tire dry rot the snow thrower. Failure to do so can cause personal injury or damage to the operator....
... proper air pressure in the Service and Adjustments section of gasoline and oil, which can harm rubber. NOTE: Use only Original Equipment Manufacturer (OEM) parts to service this manual should be checked at least once each season. • Once a year, you should be sure they begin to be replaced...engine run better and last longer. • Follow the maintenance schedule in the Service and Adjustments section of this unit. of injury to local parts dealer. Tire sealant also prevents tire dry rot the snow thrower. Failure to do so can cause personal injury or damage to the operator....
User Manual
Page 16
...and install a new 1/4-20 x 2" shear bolt. Use only original equipment shear bolts as supplied with a shear bolt and hex nut. Disengage all moving parts to the auger shaft with your snow thrower. 4. Insert safety ignition key and reconnect spark plug wire to frame. 2. Remove the two (2) screws securing ... move throttle control to the top of the discharge chute, is in the Operation section of this manual. Wait for all moving parts have completely stopped. 4. Insert safety ignition key and reconnect spark plug wire to see if the capscrews have sheared. Wait for all moving...
...and install a new 1/4-20 x 2" shear bolt. Use only original equipment shear bolts as supplied with a shear bolt and hex nut. Disengage all moving parts to the auger shaft with your snow thrower. 4. Insert safety ignition key and reconnect spark plug wire to frame. 2. Remove the two (2) screws securing ... move throttle control to the top of the discharge chute, is in the Operation section of this manual. Wait for all moving parts have completely stopped. 4. Insert safety ignition key and reconnect spark plug wire to see if the capscrews have sheared. Wait for all moving...
User Manual
Page 18
.... KLIK PIN OUTER HOLE INNER HOLE ENGINE See engine manual. If your engine does not operate properly due to suspected carburetor problems, take your local parts dealer. If you think the engine-governed high speed needs adjusting, contact a service center/department, which is factory set for pushing or transporting the snow...
.... KLIK PIN OUTER HOLE INNER HOLE ENGINE See engine manual. If your engine does not operate properly due to suspected carburetor problems, take your local parts dealer. If you think the engine-governed high speed needs adjusting, contact a service center/department, which is factory set for pushing or transporting the snow...
User Manual
Page 19
Clean entire snow thrower (See "CLEANING" in any enclosure. Be sure that does not retain moisture. Inspect moving parts for 30 days or more. sand lightly before storing in the Maintenance section of this manual). 3. Also, alcohol blended fuels (called gasohol or using... Do not drain the gas tank and carburetor if using ethanol or methanol) can starts to prevent gum deposits from forming in essential fuel system parts such as shown in the Service and Adjustments section of this manual. 4. CYLINDER 1. STORAGE Immediately prepare your unit for storage at least 10 minutes...
Clean entire snow thrower (See "CLEANING" in any enclosure. Be sure that does not retain moisture. Inspect moving parts for 30 days or more. sand lightly before storing in the Maintenance section of this manual). 3. Also, alcohol blended fuels (called gasohol or using... Do not drain the gas tank and carburetor if using ethanol or methanol) can starts to prevent gum deposits from forming in essential fuel system parts such as shown in the Service and Adjustments section of this manual. 4. CYLINDER 1. STORAGE Immediately prepare your unit for storage at least 10 minutes...
User Manual
Page 20
... runs roughly 1. Water in the Operation section of this manual. Clean fuel line. 3. Contact an authorized service center/department. Replace damaged parts. Loss of pulley. 2. Drive belt is in manual unless directed to an authorized service center/department. Check / reinstall auger belt. 2.... refill with fresh, clean gasoline. 11. Auger belt is worn. 1. Spark plug wire is worn. 3. Spark plug wire loose. 2. Loose parts or damaged augers or impeller. 1. Fuel tank cap is hard to FULL position. 6. Blockage in OFF position. 2. Loss of snow discharge or...
... runs roughly 1. Water in the Operation section of this manual. Clean fuel line. 3. Contact an authorized service center/department. Replace damaged parts. Loss of pulley. 2. Drive belt is in manual unless directed to an authorized service center/department. Check / reinstall auger belt. 2.... refill with fresh, clean gasoline. 11. Auger belt is worn. 1. Spark plug wire is worn. 3. Spark plug wire loose. 2. Loose parts or damaged augers or impeller. 1. Fuel tank cap is hard to FULL position. 6. Blockage in OFF position. 2. Loss of snow discharge or...
User Manual
Page 21
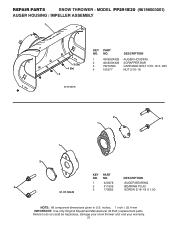
...inch = 25.4 mm IMPORTANT: Use only Original Equipment Manufacturer (O.E.M.) replacement parts. Failure to do so could be hazardous, damage your snow thrower and void your warranty. 21 NO. REPAIR PARTS SNOW THROWER - MODEL PP291E30 (96198003001) AUGER HOUSING / IMPELLER ASSEMBLY 1 3 (5x) 4 (5x...) 2 01.07.003-A KEY NO. 1 2 3 4 PART NO. 404930X428 404933X428 72270505 155377 DESCRIPTION AUGER HOUSING SCRAPPER BAR CARRIAGE...
...inch = 25.4 mm IMPORTANT: Use only Original Equipment Manufacturer (O.E.M.) replacement parts. Failure to do so could be hazardous, damage your snow thrower and void your warranty. 21 NO. REPAIR PARTS SNOW THROWER - MODEL PP291E30 (96198003001) AUGER HOUSING / IMPELLER ASSEMBLY 1 3 (5x) 4 (5x...) 2 01.07.003-A KEY NO. 1 2 3 4 PART NO. 404930X428 404933X428 72270505 155377 DESCRIPTION AUGER HOUSING SCRAPPER BAR CARRIAGE...
User Manual
Page 22
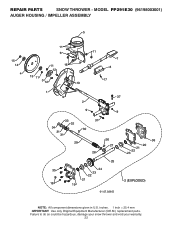
inches. 1 inch = 25.4 mm IMPORTANT: Use only Original Equipment Manufacturer (O.E.M.) replacement parts. Failure to do so could be hazardous, damage your snow thrower and void your warranty. 22 MODEL PP291E30 (96198003001) AUGER HOUSING / IMPELLER ASSEMBLY 5 15 14 4 11 6 11 16 12 13 11 3 12 10 11 7 8 17 1 9 37 2 9 9 33 37 32 34 30 31 31 29 28 26 27 36 20 21 22 23 25 35 24 23 22 21 18 19 2 (EXPLODED) 01.07.026-D NOTE: All component dimensions given in U.S. REPAIR PARTS SNOW THROWER -
inches. 1 inch = 25.4 mm IMPORTANT: Use only Original Equipment Manufacturer (O.E.M.) replacement parts. Failure to do so could be hazardous, damage your snow thrower and void your warranty. 22 MODEL PP291E30 (96198003001) AUGER HOUSING / IMPELLER ASSEMBLY 5 15 14 4 11 6 11 16 12 13 11 3 12 10 11 7 8 17 1 9 37 2 9 9 33 37 32 34 30 31 31 29 28 26 27 36 20 21 22 23 25 35 24 23 22 21 18 19 2 (EXPLODED) 01.07.026-D NOTE: All component dimensions given in U.S. REPAIR PARTS SNOW THROWER -
User Manual
Page 23
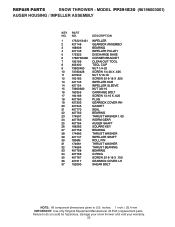
MODEL PP291E30 (96198003001) AUGER HOUSING / IMPELLER ASSEMBLY KEY NO. 1 2 3 4 5 6 7 8 9 10 11 12 13 14 15 16 17 18 19 20 21 22 23 24 25 26 27 28 29 30 31 32 33 34 35 36 37 PART NO. 175321X431 427148 188909 427146 175322 178675X008 192199 405400 73800400 74780426 427942 163183 427145 427154... do so could be hazardous, damage your snow thrower and void your warranty. 23 inches. 1 inch = 25.4 mm IMPORTANT: Use only Original Equipment Manufacturer (O.E.M.) replacement parts. REPAIR PARTS SNOW THROWER -
MODEL PP291E30 (96198003001) AUGER HOUSING / IMPELLER ASSEMBLY KEY NO. 1 2 3 4 5 6 7 8 9 10 11 12 13 14 15 16 17 18 19 20 21 22 23 24 25 26 27 28 29 30 31 32 33 34 35 36 37 PART NO. 175321X431 427148 188909 427146 175322 178675X008 192199 405400 73800400 74780426 427942 163183 427145 427154... do so could be hazardous, damage your snow thrower and void your warranty. 23 inches. 1 inch = 25.4 mm IMPORTANT: Use only Original Equipment Manufacturer (O.E.M.) replacement parts. REPAIR PARTS SNOW THROWER -
User Manual
Page 24
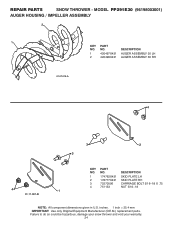
...inch = 25.4 mm IMPORTANT: Use only Original Equipment Manufacturer (O.E.M.) replacement parts. DESCRIPTION 1 420497X431 AUGER ASSEMBLY 30 LH 2 420498X431 AUGER ASSEMBLY 30 RH 01.07.019-A 4 3 2 3 4 1 01.11.001-B KEY NO. 1 2 3 4 PART NO. 174762X431 178777X431 72270506 751153 DESCRIPTION SKID PLATE LH SKID PLATE RH...18 X .75 NUT 5/16−18 NOTE: All component dimensions given in U.S. REPAIR PARTS SNOW THROWER - NO. MODEL PP291E30 (96198003001) AUGER HOUSING / IMPELLER ASSEMBLY 2 1 KEY PART NO. Failure to do so could be hazardous, damage your snow thrower and void your...
...inch = 25.4 mm IMPORTANT: Use only Original Equipment Manufacturer (O.E.M.) replacement parts. DESCRIPTION 1 420497X431 AUGER ASSEMBLY 30 LH 2 420498X431 AUGER ASSEMBLY 30 RH 01.07.019-A 4 3 2 3 4 1 01.11.001-B KEY NO. 1 2 3 4 PART NO. 174762X431 178777X431 72270506 751153 DESCRIPTION SKID PLATE LH SKID PLATE RH...18 X .75 NUT 5/16−18 NOTE: All component dimensions given in U.S. REPAIR PARTS SNOW THROWER - NO. MODEL PP291E30 (96198003001) AUGER HOUSING / IMPELLER ASSEMBLY 2 1 KEY PART NO. Failure to do so could be hazardous, damage your snow thrower and void your...
User Manual
Page 25
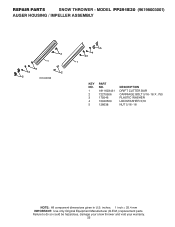
inches. 1 inch = 25.4 mm IMPORTANT: Use only Original Equipment Manufacturer (O.E.M.) replacement parts. MODEL PP291E30 (96198003001) AUGER HOUSING / IMPELLER ASSEMBLY 2 1 3 4 2 5 01.16.001-B 5 4 3 1 KEY NO. 1 2 3 4 5 PART NO. 181160X431 72270506 179246 10040500 128638 DESCRIPTION DRIFT CUTTER BAR CARRIAGE BOLT 5/16−18 X .750 PLASTIC WASHER LOCKWASHER 5/16 NUT 5/16−18 NOTE: All component dimensions given in U.S. Failure to do so could be hazardous, damage your snow thrower and void your warranty. 25 REPAIR PARTS SNOW THROWER -
inches. 1 inch = 25.4 mm IMPORTANT: Use only Original Equipment Manufacturer (O.E.M.) replacement parts. MODEL PP291E30 (96198003001) AUGER HOUSING / IMPELLER ASSEMBLY 2 1 3 4 2 5 01.16.001-B 5 4 3 1 KEY NO. 1 2 3 4 5 PART NO. 181160X431 72270506 179246 10040500 128638 DESCRIPTION DRIFT CUTTER BAR CARRIAGE BOLT 5/16−18 X .750 PLASTIC WASHER LOCKWASHER 5/16 NUT 5/16−18 NOTE: All component dimensions given in U.S. Failure to do so could be hazardous, damage your snow thrower and void your warranty. 25 REPAIR PARTS SNOW THROWER -
User Manual
Page 26
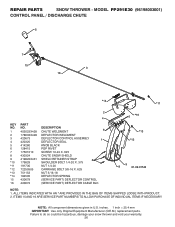
... to do so could be hazardous, damage your snow thrower and void your warranty. 26 MODEL PP291E30 (96198003001) CONTROL PANEL / DISCHARGE CHUTE 5 7 15 3 16 *14 *11 2 4 KEY NO. 1 2 3 4 5 6 7 8 9 *10 *11 *12 *13 *14 15 16 PART NO. 405023X428 178633X428 420673 420325 414280 128415 17501010 430324 419822X431 179829 191730 72250505 751153 184505 420679...
... to do so could be hazardous, damage your snow thrower and void your warranty. 26 MODEL PP291E30 (96198003001) CONTROL PANEL / DISCHARGE CHUTE 5 7 15 3 16 *14 *11 2 4 KEY NO. 1 2 3 4 5 6 7 8 9 *10 *11 *12 *13 *14 15 16 PART NO. 405023X428 178633X428 420673 420325 414280 128415 17501010 430324 419822X431 179829 191730 72250505 751153 184505 420679...


