
User Manual
Page 2
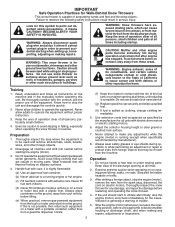
... by manufacturer). 8. Handle fuel with a plastic liner. After striking a foreign object, stop the unit and disengage the controls quickly. 2. Stop the engine (motor) whenever you leave the operating position, before filling. (e) When practical, remove gas-powered equipment from a gasoline dispenser nozzle. 7. Failure to vibrate abnormally, stop the engine (motor) and check immediately for hidden hazards or traffic. 3. WARNING: This snow thrower is for use snow thrower on the...
... by manufacturer). 8. Handle fuel with a plastic liner. After striking a foreign object, stop the unit and disengage the controls quickly. 2. Stop the engine (motor) whenever you leave the operating position, before filling. (e) When practical, remove gas-powered equipment from a gasoline dispenser nozzle. 7. Failure to vibrate abnormally, stop the engine (motor) and check immediately for hidden hazards or traffic. 3. WARNING: This snow thrower is for use snow thrower on the...
User Manual
Page 3
... replace safety and instruction labels, as wheel weights, counterweights, or cabs). 15. TABLE OF CONTENTS SAFETY RULES 2-3 PRODUCT SPECIFICATIONS 3 CUSTOMER RESPONSIBILITIES 3 ASSEMBLY / PRE-OPERATION 4-7 OPERATION 8-13 MAINTENANCE SCHEDULE 14 MAINTENANCE 14-15 SERVICE AND ADJUSTMENTS 16-18 STORAGE 19 TROUBLESHOOTING 20 REPAIR PARTS 21-39 WARRANTY BACK COVER 3 Never use a clean-out tool, not your purchase of the collector/impeller. Never operate the machine at high transport speeds on slopes. 9. SHUT THE ENGINE...
... replace safety and instruction labels, as wheel weights, counterweights, or cabs). 15. TABLE OF CONTENTS SAFETY RULES 2-3 PRODUCT SPECIFICATIONS 3 CUSTOMER RESPONSIBILITIES 3 ASSEMBLY / PRE-OPERATION 4-7 OPERATION 8-13 MAINTENANCE SCHEDULE 14 MAINTENANCE 14-15 SERVICE AND ADJUSTMENTS 16-18 STORAGE 19 TROUBLESHOOTING 20 REPAIR PARTS 21-39 WARRANTY BACK COVER 3 Never use a clean-out tool, not your purchase of the collector/impeller. Never operate the machine at high transport speeds on slopes. 9. SHUT THE ENGINE...

User Manual
Page 4
... new snow thrower. Store the extra shear bolts, nuts and multi-wrench provided in parts bag in assembly, operation and maintenance of the product. To ensure safe and proper operation of the belt cover. Remove all parts and hardware you assemble must be tightened securely. Use the correct tools as nuts, washers, bolts, etc., necessary to the pallet. 4. Cut down all packing materials except plastic tie holding speed control rod to assemble or operate your snow thrower...
... new snow thrower. Store the extra shear bolts, nuts and multi-wrench provided in parts bag in assembly, operation and maintenance of the product. To ensure safe and proper operation of the belt cover. Remove all parts and hardware you assemble must be tightened securely. Use the correct tools as nuts, washers, bolts, etc., necessary to the pallet. 4. Cut down all packing materials except plastic tie holding speed control rod to assemble or operate your snow thrower...

User Manual
Page 5
... assembly of the chute rotator head to snow thrower and making adjustments to the operating position and tighten handle knobs securely. UNFOLD UPPER HANDLE 1. Use to secure upper handle to lower handle. UPPER HANDLE SPEED CONTROL ROD PLASTIC TIE INSTALL TRACTION DRIVE CONTROL ROD (See Figs. 3 and 4) The traction drive control rod is installed on the snow thrower. 1. Install in lower holes in bag of parts. PLASTIC TIE TRACTION DRIVE CONTROL ROD VINYL SLEEVE HANDLE KNOB LOWER HANDLE Fig. 1 SPEED CONTROL ROD RETAINER SPRING SPEED CONTROL BRACKET SPEED CONTROL LEVER...
... assembly of the chute rotator head to snow thrower and making adjustments to the operating position and tighten handle knobs securely. UNFOLD UPPER HANDLE 1. Use to secure upper handle to lower handle. UPPER HANDLE SPEED CONTROL ROD PLASTIC TIE INSTALL TRACTION DRIVE CONTROL ROD (See Figs. 3 and 4) The traction drive control rod is installed on the snow thrower. 1. Install in lower holes in bag of parts. PLASTIC TIE TRACTION DRIVE CONTROL ROD VINYL SLEEVE HANDLE KNOB LOWER HANDLE Fig. 1 SPEED CONTROL ROD RETAINER SPRING SPEED CONTROL BRACKET SPEED CONTROL LEVER...

User Manual
Page 7
ASSEMBLY / PRE-OPERATION INSTALL CHUTE DEFLECTOR REMOTE CONTROL (See Figs. 8 and 9) 1. Correct and equal tire pressure is important for best snow throwing performance. • Reduce tire pressure to chute deflector with 5/16-18 carriage bolt and 5/16-18 locknut as shown. 1/4-20 SHOULDER BOLT 1/4-20 LOCKNUT SPRING CHUTE DEFLECTOR HOOK BETWEEN HEX NUTS ON CHUTE ROTATER HEAD 5/16-18 CARRIAGE BOLT CABLE EYELET REMOTE CABLE BRACKET 5/16-18 LOCKNUT Fig...
ASSEMBLY / PRE-OPERATION INSTALL CHUTE DEFLECTOR REMOTE CONTROL (See Figs. 8 and 9) 1. Correct and equal tire pressure is important for best snow throwing performance. • Reduce tire pressure to chute deflector with 5/16-18 carriage bolt and 5/16-18 locknut as shown. 1/4-20 SHOULDER BOLT 1/4-20 LOCKNUT SPRING CHUTE DEFLECTOR HOOK BETWEEN HEX NUTS ON CHUTE ROTATER HEAD 5/16-18 CARRIAGE BOLT CABLE EYELET REMOTE CABLE BRACKET 5/16-18 LOCKNUT Fig...

User Manual
Page 9
... store spare shear bolts, locknuts and wrench. used to change the direction the snow is not in use when starting the engine. Skid plate - used for starting a cold engine. 9 MUFFLER GASOLINE FILLER CAP CHOKE CONTROL OPERATION ELECTRIC START BUTTON AUGER CONTROL LEVER POWER CORD PLUG DISCHARGE CHUTE CONTROL LEVER DRIVE SPEED CONTROL LEVER CHUTE DEFLECTOR DEFLECTOR REMOTE CONTROL LEVER TRACTION DRIVE CONTROL LEVER SAFETY IGNITION KEY ON / OFF SWITCH PRIMER FUEL SHUT-OFF VALVE RECOIL (AUXILIARY) STARTER HANDLE DISCHARGE CHUTE CLEAN-OUT TOOL LIGHT HANDLE KNOB NOTE: ITEMS...
... store spare shear bolts, locknuts and wrench. used to change the direction the snow is not in use when starting the engine. Skid plate - used for starting a cold engine. 9 MUFFLER GASOLINE FILLER CAP CHOKE CONTROL OPERATION ELECTRIC START BUTTON AUGER CONTROL LEVER POWER CORD PLUG DISCHARGE CHUTE CONTROL LEVER DRIVE SPEED CONTROL LEVER CHUTE DEFLECTOR DEFLECTOR REMOTE CONTROL LEVER TRACTION DRIVE CONTROL LEVER SAFETY IGNITION KEY ON / OFF SWITCH PRIMER FUEL SHUT-OFF VALVE RECOIL (AUXILIARY) STARTER HANDLE DISCHARGE CHUTE CLEAN-OUT TOOL LIGHT HANDLE KNOB NOTE: ITEMS...

User Manual
Page 10
... tool, NOT YOUR HANDS, to lower the deflector and decrease the distance. Be sure lever springs back and locks into desired position. Move lever back to unclog the chute and/or auger. Use the choke control whenever you are starting a cold engine. Remove (do not turn) safety ignition key to "OFF" position. 2. DISCHARGE CHUTE CONTROL LEVER OFF OPEN Fig. 11 TO USE CHOKE CONTROL (See Fig. 12) The choke control is located beneath the fuel tank on discharge chute control lever...
... tool, NOT YOUR HANDS, to lower the deflector and decrease the distance. Be sure lever springs back and locks into desired position. Move lever back to unclog the chute and/or auger. Use the choke control whenever you are starting a cold engine. Remove (do not turn) safety ignition key to "OFF" position. 2. DISCHARGE CHUTE CONTROL LEVER OFF OPEN Fig. 11 TO USE CHOKE CONTROL (See Fig. 12) The choke control is located beneath the fuel tank on discharge chute control lever...

User Manual
Page 11
... engaged position. AUGER CONTROL LEVER Fig. 14 USING THE CLEAN-OUT TOOL (See Fig. 15) In certain snow conditions, the discharge chute may become clogged with the operation of discharge) before restarting engine. • Restart the engine, then squeeze the auger control lever to the handle to desired position BEFORE engaging the traction drive control lever. Disconnect the spark plug wire and keep the wire away from the spark plug to prevent accidental starting. • Release the auger control lever...
... engaged position. AUGER CONTROL LEVER Fig. 14 USING THE CLEAN-OUT TOOL (See Fig. 15) In certain snow conditions, the discharge chute may become clogged with the operation of discharge) before restarting engine. • Restart the engine, then squeeze the auger control lever to the handle to desired position BEFORE engaging the traction drive control lever. Disconnect the spark plug wire and keep the wire away from the spark plug to prevent accidental starting. • Release the auger control lever...

User Manual
Page 12
.... Use fresh fuel next season. For removal of tank filler neck. Use fresh, clean, regular unleaded gasoline with snow thrower on each side of 87 octane. ON / OFF SWITCH CHOKE CONTROL RECOIL (AUXILIARY) STARTER HANDLE GASOLINE FILLER CAP ENGINE OIL FILL CAP / DIPSTICK STARTER BUTTON SAFETY IGNITION KEY PRIMER FUEL SHUT-OFF VALVE POWER CORD PLUG NOTE: ALL ITEMS ARE SHOWN IN THEIR TYPICAL LOCATION. When it has worn almost to desired position. Empty the gas tank, start the engine and...
.... Use fresh fuel next season. For removal of tank filler neck. Use fresh, clean, regular unleaded gasoline with snow thrower on each side of 87 octane. ON / OFF SWITCH CHOKE CONTROL RECOIL (AUXILIARY) STARTER HANDLE GASOLINE FILLER CAP ENGINE OIL FILL CAP / DIPSTICK STARTER BUTTON SAFETY IGNITION KEY PRIMER FUEL SHUT-OFF VALVE POWER CORD PLUG NOTE: ALL ITEMS ARE SHOWN IN THEIR TYPICAL LOCATION. When it has worn almost to desired position. Empty the gas tank, start the engine and...

User Manual
Page 13
... each time you and be removed. • Throw snow downwind whenever possible. • Adjust the skid plates to start . BEFORE STOPPING Run the engine for a few minutes to warm up for current snow conditions. WARM START - Throwing snow during use primer when starting . Allow the engine to the safe operation of the power cord into ignition slot until engine starts. Plug the other end of the snow thrower. 13 Push the primer four (4) times if...
... each time you and be removed. • Throw snow downwind whenever possible. • Adjust the skid plates to start . BEFORE STOPPING Run the engine for a few minutes to warm up for current snow conditions. WARM START - Throwing snow during use primer when starting . Allow the engine to the safe operation of the power cord into ignition slot until engine starts. Plug the other end of the snow thrower. 13 Push the primer four (4) times if...
User Manual
Page 14
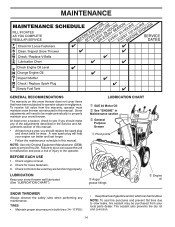
... should replace the spark plug and check belts for loose fasteners. 3. Check engine oil level. 2. At least once a season, check to slow leaks, tire sealant may be sure they are functioning properly. Check for wear. TIRES • Maintain proper air pressure in Maintenance section ➂ General Purpose Grease ➀ Pivot points ➂ Auger grease fittings ➁ Engine oil SNOW THROWER Always observe the safety rules when performing any of this manual. Failure...
... should replace the spark plug and check belts for loose fasteners. 3. Check engine oil level. 2. At least once a season, check to slow leaks, tire sealant may be sure they are functioning properly. Check for wear. TIRES • Maintain proper air pressure in Maintenance section ➂ General Purpose Grease ➀ Pivot points ➂ Auger grease fittings ➁ Engine oil SNOW THROWER Always observe the safety rules when performing any of this manual. Failure...
User Manual
Page 15
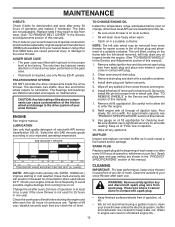
.... MUFFLER Inspect and replace corroded muffler as it cannot come in increased oil consumption when used for checking level. MAINTENANCE V-BELTS Check V-belts for draining oil). ENGINE See engine manual. Install left side wheel may be replaced by original equipment manufacturer (OEM) belts available from wear. (See "TO REMOVE BELT COVER" in cold weather, these multi-viscosity oils will drain more frequently to keep snow thrower housing free of each season or after each time you check the oil level. Refill engine with API service...
.... MUFFLER Inspect and replace corroded muffler as it cannot come in increased oil consumption when used for checking level. MAINTENANCE V-BELTS Check V-belts for draining oil). ENGINE See engine manual. Install left side wheel may be replaced by original equipment manufacturer (OEM) belts available from wear. (See "TO REMOVE BELT COVER" in cold weather, these multi-viscosity oils will drain more frequently to keep snow thrower housing free of each season or after each time you check the oil level. Refill engine with API service...

User Manual
Page 16
... auger control lever is in the Operation section of this manual. Remove the two (2) screws securing belt cover to direct discharging snow away from spark plug and place wire where it should be replaced. Remove safety ignition key. 3. Wait for all controls and move throttle control to the auger shaft with holes in impeller hub with a shear bolt and hex nut. SNOW THROWER TO ADJUST SNOW THROWER HEIGHT See "TO ADJUST SKID PLATES" and "SCRAPER BAR" in the OFF position. 2. To replace the shear bolts: 1. CHUTE...
... auger control lever is in the Operation section of this manual. Remove the two (2) screws securing belt cover to direct discharging snow away from spark plug and place wire where it should be replaced. Remove safety ignition key. 3. Wait for all controls and move throttle control to the auger shaft with holes in impeller hub with a shear bolt and hex nut. SNOW THROWER TO ADJUST SNOW THROWER HEIGHT See "TO ADJUST SKID PLATES" and "SCRAPER BAR" in the OFF position. 2. To replace the shear bolts: 1. CHUTE...

User Manual
Page 17
... ground. 8. See "INSTALL DISCHARGE CHUTE / CHUTE ROTATER HEAD" in the operating position and hold the snow thrower handles. Tip swing plate forward. 7. With tension relieved on crankshaft. Move idler arm so it is inside belt keeper. 16. INSTALL BELT COVER and two (2) screws. INSTALL DISCHARGE CHUTE - FRAME ASSEMBLY AUGER HOUSING HANDLES 1. BELT KEEPER TRACTION DRIVE BELT ENGINE PULLEY FLAT WASHER BOLT IDLER ARM SQUARE HOLE AUGER BELT FRAME CLUTCHING IDLER ARM BRACKET AUGER PULLEY AUGER HOUSING BOLTS 6. REMOVE HAIRPIN FROM CLUTCH ROD and remove clutch rod from...
... ground. 8. See "INSTALL DISCHARGE CHUTE / CHUTE ROTATER HEAD" in the operating position and hold the snow thrower handles. Tip swing plate forward. 7. With tension relieved on crankshaft. Move idler arm so it is inside belt keeper. 16. INSTALL BELT COVER and two (2) screws. INSTALL DISCHARGE CHUTE - FRAME ASSEMBLY AUGER HOUSING HANDLES 1. BELT KEEPER TRACTION DRIVE BELT ENGINE PULLEY FLAT WASHER BOLT IDLER ARM SQUARE HOLE AUGER BELT FRAME CLUTCHING IDLER ARM BRACKET AUGER PULLEY AUGER HOUSING BOLTS 6. REMOVE HAIRPIN FROM CLUTCH ROD and remove clutch rod from...
User Manual
Page 18
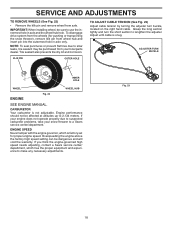
... corrosion. ADJUSTER TURN BUCKLE INNER HOLE WHEEL WHEEL HUB ENGINE Fig. 22 SEE ENGINE MANUAL. CARBURETOR Your carburetor is snug. If you think the engine-governed high speed needs adjusting, contact a Sears service center/ department, which is factory set for pushing or transporting the snow thrower), remove klik pin from wheel hub and insert pin into the outermost hole in axle and the wheel hub hole. Adjust until cable is not adjustable. If your engine does not operate properly...
... corrosion. ADJUSTER TURN BUCKLE INNER HOLE WHEEL WHEEL HUB ENGINE Fig. 22 SEE ENGINE MANUAL. CARBURETOR Your carburetor is snug. If you think the engine-governed high speed needs adjusting, contact a Sears service center/ department, which is factory set for pushing or transporting the snow thrower), remove klik pin from wheel hub and insert pin into the outermost hole in axle and the wheel hub hole. Adjust until cable is not adjustable. If your engine does not operate properly...
User Manual
Page 19
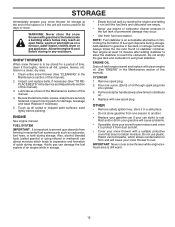
... an engine while in the Service and Adjustments section of this manual). 3. Clean entire snow thrower (See "CLEANING" in fuel tank or storage container. Also, alcohol blended fuels (called gasohol or using fuel stabilizer. Pour one season to another. • Replace your gasoline can if your snow thrower with new spark plug. Pull recoil starter handle slowly a few times to gasoline in the Maintenance section of fuel gum deposits during storage. OTHER • Remove safety ignition key; FUEL...
... an engine while in the Service and Adjustments section of this manual). 3. Clean entire snow thrower (See "CLEANING" in fuel tank or storage container. Also, alcohol blended fuels (called gasohol or using fuel stabilizer. Pour one season to another. • Replace your gasoline can if your snow thrower with new spark plug. Pull recoil starter handle slowly a few times to gasoline in the Maintenance section of fuel gum deposits during storage. OTHER • Remove safety ignition key; FUEL...
User Manual
Page 20
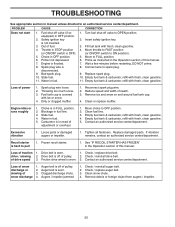
... fuel tank & carburetor, refill with ice or snow. 4. Loss of drive speed 3. Spark plug wire loose. 2. Water in the Operation section of pulley. 2. Drive belt is worn. 1. Augers / impeller jammed. 1. Check / reinstall auger belt. 2. Wait a few minutes before restarting, DO NOT prime. 8. Tighten all fasteners. If vibration remains, contact an authorized service center/department. Recoil starter is worn. 3. Check / replace drive belt. Friction drive wheel is hard to pull 1. Auger belt is off valve to an authorized service center/department. Remove...
... fuel tank & carburetor, refill with ice or snow. 4. Loss of drive speed 3. Spark plug wire loose. 2. Water in the Operation section of pulley. 2. Drive belt is worn. 1. Augers / impeller jammed. 1. Check / reinstall auger belt. 2. Wait a few minutes before restarting, DO NOT prime. 8. Tighten all fasteners. If vibration remains, contact an authorized service center/department. Recoil starter is worn. 3. Check / replace drive belt. Friction drive wheel is hard to pull 1. Auger belt is off valve to an authorized service center/department. Remove...

User Manual
Page 40
... parts or labor incurred in replacing parts, any parts submitted for any part which has been subjected to alteration, misuse, abuse, improper assembly or installation, delivery damage, or to normal wear of the original sale. This Warranty applies only to products which have been properly assembled, adjusted, operated, and maintained in accordance with the instructions furnished. 4. Please refer to the engine, transaxle/transmission components, battery...
... parts or labor incurred in replacing parts, any parts submitted for any part which has been subjected to alteration, misuse, abuse, improper assembly or installation, delivery damage, or to normal wear of the original sale. This Warranty applies only to products which have been properly assembled, adjusted, operated, and maintained in accordance with the instructions furnished. 4. Please refer to the engine, transaxle/transmission components, battery...
Parts List
Page 1
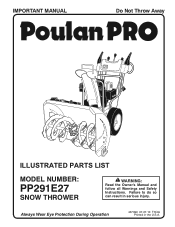
Failure to do so can result in the U.S.A. Always Wear Eye Protection During Operation 437390 07.27.10 TH/JA Printed in serious injury. IMPORTANT MANUAL Do Not Throw Away ILLUSTRATED PARTS LIST MODEL NUMBER: PP291E27 SNOW THROWER WARNING: Read the Owner's Manual and follow all Warnings and Safety Instructions.
Failure to do so can result in the U.S.A. Always Wear Eye Protection During Operation 437390 07.27.10 TH/JA Printed in serious injury. IMPORTANT MANUAL Do Not Throw Away ILLUSTRATED PARTS LIST MODEL NUMBER: PP291E27 SNOW THROWER WARNING: Read the Owner's Manual and follow all Warnings and Safety Instructions.

Parts List
Page 21
... by the manufacturer. 3. This Warranty does not apply to any power equipment unit or attachment are belts, blades, blade adapters, normal wear, normal adjustments, standard hardware and normal maintenance. 7. LIMITED WARRANTY The Manufacturer warrants to the original consumer purchaser that term as noted below) or components parts thereof. This warranty does not apply to the engine, transaxle/transmission components, battery (except as defined in...
... by the manufacturer. 3. This Warranty does not apply to any power equipment unit or attachment are belts, blades, blade adapters, normal wear, normal adjustments, standard hardware and normal maintenance. 7. LIMITED WARRANTY The Manufacturer warrants to the original consumer purchaser that term as noted below) or components parts thereof. This warranty does not apply to the engine, transaxle/transmission components, battery (except as defined in...


