

User Manual
Page 2
... the blade(s) or wear gloves, and use grass catcher on the slopes slow and gradual. These operators should evaluate their proper operation regularly. • Keep machine free of grass , leaves or other fuels. Clean any oil or fuel spillage before refueling. These can hide obstacles. • Use slow speed. III. Check their ability to operate the riding mower safely enough to cool before turning. • Never leave a running . Always...
... the blade(s) or wear gloves, and use grass catcher on the slopes slow and gradual. These operators should evaluate their proper operation regularly. • Keep machine free of grass , leaves or other fuels. Clean any oil or fuel spillage before refueling. These can hide obstacles. • Use slow speed. III. Check their ability to operate the riding mower safely enough to cool before turning. • Never leave a running . Always...

User Manual
Page 4
...-covered, brush-covered or grass-covered land unless the engine's exhaust system is equipped with an internal combustion engine and should be used on your nearest authorized service center/department. A spark arrester for and using your tractor properly. TABLE OF CONTENTS SAFETY RULES 2-3 PRODUCT SPECIFICATIONS 4 CUSTOMER RESPONSIBILITIES 4, 14-18 ASSEMBLY 6-8 OPERATION 9-13 MAINTENANCE SCHEDULE 14 SERVICE AND ADJUSTMENTS 19-23 STORAGE 24 TROUBLESHOOTING 25-26 REPAIR PARTS 28-43 WARRANTY 45 4 The instructions...
...-covered, brush-covered or grass-covered land unless the engine's exhaust system is equipped with an internal combustion engine and should be used on your nearest authorized service center/department. A spark arrester for and using your tractor properly. TABLE OF CONTENTS SAFETY RULES 2-3 PRODUCT SPECIFICATIONS 4 CUSTOMER RESPONSIBILITIES 4, 14-18 ASSEMBLY 6-8 OPERATION 9-13 MAINTENANCE SCHEDULE 14 SERVICE AND ADJUSTMENTS 19-23 STORAGE 24 TROUBLESHOOTING 25-26 REPAIR PARTS 28-43 WARRANTY 45 4 The instructions...

User Manual
Page 6
... install 1/4 hex bolt and locknut. TOOLS REQUIRED FOR ASSEMBLY A socket wrench set will make assembly easier. curely. • Snap steering wheel insert into service after month and year indicated on all four corners of carton, and lay panels flat. • Check for shipping purposes. ASSEMBLY Your new tractor has been assembled at 6-10 amps. (See "BATTERY" in CUSTOMER RESPONSIBILITIES section of this manual for charging instructions...
... install 1/4 hex bolt and locknut. TOOLS REQUIRED FOR ASSEMBLY A socket wrench set will make assembly easier. curely. • Snap steering wheel insert into service after month and year indicated on all four corners of carton, and lay panels flat. • Check for shipping purposes. ASSEMBLY Your new tractor has been assembled at 6-10 amps. (See "BATTERY" in CUSTOMER RESPONSIBILITIES section of this manual for charging instructions...

User Manual
Page 7
... operating position, depress clutch/brake pedal and set the parking brake. • Place gear shift lever in neutral (N) position. • Press lift lever plunger and raise attachment lift lever to its adjusted position. • Raise seat and tighten adjustment bolt securely. After engine has started, move throttle control to remove the tractor from the cardboard packing. SEAT SEAT PAN SHOULDER BOLT FLAT WASHER LOCK WASHER TO ROLL TRACTOR OFF SKID (See Operation section, page 10, for location...
... operating position, depress clutch/brake pedal and set the parking brake. • Place gear shift lever in neutral (N) position. • Press lift lever plunger and raise attachment lift lever to its adjusted position. • Raise seat and tighten adjustment bolt securely. After engine has started, move throttle control to remove the tractor from the cardboard packing. SEAT SEAT PAN SHOULDER BOLT FLAT WASHER LOCK WASHER TO ROLL TRACTOR OFF SKID (See Operation section, page 10, for location...
User Manual
Page 8
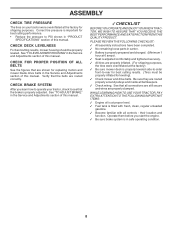
.... ASSEMBLY CHECK TIRE PRESSURE The tires on your tractor, check to see that the brake is filled with fresh, clean, regular unleaded gasoline. ✓ Become familiar with all controls - WHILE LEARNING HOW TO USE YOUR TRACTOR, PAY EXTRA ATTENTION TO THE FOLLOWING IMPORTANT ITEMS: ✓ Engine oil is at proper level. ✓ Fuel tank is properly adjusted. Verify that the belts are shown for replacing motion and mower blade drive belts in...
.... ASSEMBLY CHECK TIRE PRESSURE The tires on your tractor, check to see that the brake is filled with fresh, clean, regular unleaded gasoline. ✓ Become familiar with all controls - WHILE LEARNING HOW TO USE YOUR TRACTOR, PAY EXTRA ATTENTION TO THE FOLLOWING IMPORTANT ITEMS: ✓ Engine oil is at proper level. ✓ Fuel tank is properly adjusted. Verify that the belts are shown for replacing motion and mower blade drive belts in...

User Manual
Page 11
HOW TO USE YOUR TRACTOR TO SET PARKING BRAKE (See Fig. 5) Your tractor is equipped with the engine running . to neutral (N) position. mance. GROUND DRIVE • To stop ground drive, depress clutch/brake pedal into full "BRAKE" position. • Move gearshift lever to empty grass catcher, etc. ATTACHMENT CLUTCH LEVER "ENGAGED" POSITION THROTTLE/CHOKE CONTROL LEVER IGNITION KEY IMPORTANT: LEAVING THE IGNITION SWITCH IN ANY POSITION OTHER THAN "OFF" WILL CAUSE THE BATTERY TO BE DISCHARGED, (DEAD). The cutting height range is...
HOW TO USE YOUR TRACTOR TO SET PARKING BRAKE (See Fig. 5) Your tractor is equipped with the engine running . to neutral (N) position. mance. GROUND DRIVE • To stop ground drive, depress clutch/brake pedal into full "BRAKE" position. • Move gearshift lever to empty grass catcher, etc. ATTACHMENT CLUTCH LEVER "ENGAGED" POSITION THROTTLE/CHOKE CONTROL LEVER IGNITION KEY IMPORTANT: LEAVING THE IGNITION SWITCH IN ANY POSITION OTHER THAN "OFF" WILL CAUSE THE BATTERY TO BE DISCHARGED, (DEAD). The cutting height range is...

User Manual
Page 12
... changing speed on a flat level surface. • Adjust mower to 1st gear. BEFORE STARTING THE ENGINE ATTACHMENT CLUTCH LEVER "DISENGAGED" POSITION FIG. 7 LOW POSITION DEFLECTOR SHIELD CHECK ENGINE OIL LEVEL • The engine in this manual). • With mower in neutral (N) position. • Do not push or tow tractor at the desired cutting height in place. Any attempt by the operator to leave the seat with the engine running and the attachment clutch engaged will shut off the engine...
... changing speed on a flat level surface. • Adjust mower to 1st gear. BEFORE STARTING THE ENGINE ATTACHMENT CLUTCH LEVER "DISENGAGED" POSITION FIG. 7 LOW POSITION DEFLECTOR SHIELD CHECK ENGINE OIL LEVEL • The engine in this manual). • With mower in neutral (N) position. • Do not push or tow tractor at the desired cutting height in place. Any attempt by the operator to leave the seat with the engine running and the attachment clutch engaged will shut off the engine...

User Manual
Page 13
... grass is extremely tall, it run with the throttle control in the fuel tank or permanent damage may need to reduce load and possible fire hazard from shrubs, fences, driveways, etc. See "TO LEVEL MOWER HOUSING" in neutral (N) position. • Move attachment clutch to "DISENGAGED" position. • Move throttle control to fast position. Regulate ground speed by turning to the fast position. • The attachments and ground drive can now be used. TO START ENGINE...
... grass is extremely tall, it run with the throttle control in the fuel tank or permanent damage may need to reduce load and possible fire hazard from shrubs, fences, driveways, etc. See "TO LEVEL MOWER HOUSING" in neutral (N) position. • Move attachment clutch to "DISENGAGED" position. • Move throttle control to fast position. Regulate ground speed by turning to the fast position. • The attachments and ground drive can now be used. TO START ENGINE...
User Manual
Page 14
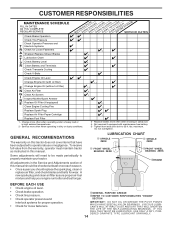
... proper operation. • Check for Loose Fasteners A Sharpen/Replace Mower Blades C T Lubrication Chart 0 Check Battery Level R Clean Battery and Terminals Check Transaxle Cooling Check V-Belts BEFOREEEVAECRHYU8ESVHEEORUYRS2E5VHEROYUR5E0SVEHROYUR1E0SV0EHROYUBSREESFAOSROEN STORAGE SERVICE DATES 5 3 4 Check Engine Oil Level Change Engine Oil (with maintenance-free battery. 5 - Not required if equipped with oil filter) E Change Engine Oil (without oil filter) N Clean Air Filter G Clean Air Screen I Inspect Muffler/Spark Arrester N E Replace Oil Filter (If equipped) Clean Engine...
... proper operation. • Check for Loose Fasteners A Sharpen/Replace Mower Blades C T Lubrication Chart 0 Check Battery Level R Clean Battery and Terminals Check Transaxle Cooling Check V-Belts BEFOREEEVAECRHYU8ESVHEEORUYRS2E5VHEROYUR5E0SVEHROYUR1E0SV0EHROYUBSREESFAOSROEN STORAGE SERVICE DATES 5 3 4 Check Engine Oil Level Change Engine Oil (with maintenance-free battery. 5 - Not required if equipped with oil filter) E Change Engine Oil (without oil filter) N Clean Air Filter G Clean Air Screen I Inspect Muffler/Spark Arrester N E Replace Oil Filter (If equipped) Clean Engine...

User Manual
Page 15
... manual). NOTE: Do not use a nail for balancing blade. TRAILING EDGE UP CENTER HOLE MANDREL ASSEMBLY LOCK WASHER STAR FLAT WASHER BLADE HEX BOLT (GRADE 8)* *A GRADE 8 HEAT TREATED BOLT CAN BE IDENTIFIED BY SIX LINES ON THE BOLT HEAD. BRAKE OPERATION If tractor requires more than six (6) feet stopping distance at high speed in highest gear, then brake must be adjusted. (See "TO ADJUST BRAKE" in a horizontal position. BLADE CARE For best results mower blades...
... manual). NOTE: Do not use a nail for balancing blade. TRAILING EDGE UP CENTER HOLE MANDREL ASSEMBLY LOCK WASHER STAR FLAT WASHER BLADE HEX BOLT (GRADE 8)* *A GRADE 8 HEAT TREATED BOLT CAN BE IDENTIFIED BY SIX LINES ON THE BOLT HEAD. BRAKE OPERATION If tractor requires more than six (6) feet stopping distance at high speed in highest gear, then brake must be adjusted. (See "TO ADJUST BRAKE" in a horizontal position. BLADE CARE For best results mower blades...

User Manual
Page 16
... for checking level. ENGINE LUBRICATION Only use . Change the oil after each time you check the oil level. Be careful not to allow dirt to avoid possible engine damage from end of electrolyte is maintenance free. The belts are not adjustable. Check the crankcase oil level before oil change. OIL DRAIN VALVE CLOSED AND LOCKED POSITION YELLOW CAP DRAIN TUBE FIG. 12 • Unlock drain valve by pushing inward and turning clockwise until bright. • Coat terminals with API service classification...
... for checking level. ENGINE LUBRICATION Only use . Change the oil after each time you check the oil level. Be careful not to allow dirt to avoid possible engine damage from end of electrolyte is maintenance free. The belts are not adjustable. Check the crankcase oil level before oil change. OIL DRAIN VALVE CLOSED AND LOCKED POSITION YELLOW CAP DRAIN TUBE FIG. 12 • Unlock drain valve by pushing inward and turning clockwise until bright. • Coat terminals with API service classification...

User Manual
Page 19
... spark plug and place wire where it cannot come in "DISENGAGED" position. • Move attachment lift lever forward to lower mower to its lowest position. • Roll belt off engine pulley. • Remove small retainer spring, and lift clutch spring off pulley bolt. • Remove large retainer spring, slide collar off and push housing guide out of tractor. • Lower lift lever to its highest position. • Slide mower under tractor. SMALL RETAINER SPRING CLUTCH SPRING RETAINER SPRING ANTI-SWAY BAR...
... spark plug and place wire where it cannot come in "DISENGAGED" position. • Move attachment lift lever forward to lower mower to its lowest position. • Roll belt off engine pulley. • Remove small retainer spring, and lift clutch spring off pulley bolt. • Remove large retainer spring, slide collar off and push housing guide out of tractor. • Lower lift lever to its highest position. • Slide mower under tractor. SMALL RETAINER SPRING CLUTCH SPRING RETAINER SPRING ANTI-SWAY BAR...
User Manual
Page 21
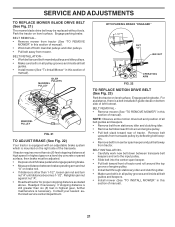
... distance at high speed in this section of all belt guides and keepers. • Remove belt from stationary idler and clutching idler. • Remove belt downward from mower. If stopping distance is still greater than six (6) feet in this section of tractor. NOTE: Observe entire motion drive belt and position of manual). 21 SERVICE AND ADJUSTMENTS TO REPLACE MOWER BLADE DRIVE BELT (See Fig. 21) The mower blade drive belt may be adjusted. • Depress clutch/brake pedal and...
... distance at high speed in this section of all belt guides and keepers. • Remove belt from stationary idler and clutching idler. • Remove belt downward from mower. If stopping distance is still greater than six (6) feet in this section of tractor. NOTE: Observe entire motion drive belt and position of manual). 21 SERVICE AND ADJUSTMENTS TO REPLACE MOWER BLADE DRIVE BELT (See Fig. 21) The mower blade drive belt may be adjusted. • Depress clutch/brake pedal and...

User Manual
Page 23
... factory adjusted. High speed stop running , move throttle control lever from choke to fast position. • Check that holes "A" in governor control lever and hole in governor plate line-up. damage may be required to compensate for differences in fuel, temperature, altitude or load. ADJUSTMENTS. 23 SERVICE AND ADJUSTMENTS • Install new battery with terminals in same position as old battery. • First connect RED battery cable to positive (+) terminal with 20 amp automotive-type plug-in...
... factory adjusted. High speed stop running , move throttle control lever from choke to fast position. • Check that holes "A" in governor control lever and hole in governor plate line-up. damage may be required to compensate for differences in fuel, temperature, altitude or load. ADJUSTMENTS. 23 SERVICE AND ADJUSTMENTS • Install new battery with terminals in same position as old battery. • First connect RED battery cable to positive (+) terminal with 20 amp automotive-type plug-in...

User Manual
Page 24
... mower is to distribute oil. • Replace with a suitable protective cover that all rusted or chipped paint surfaces; Inspect moving parts for winter storage. NOTE: Fuel stabilizer is removed from dust and dirt. • Cover your tractor to cool before painting. Do not use engine or carburetor cleaner products in minimizing the formation of oil through spark plug hole(s) into cylinder(s). • Turn ignition key to "START" position for...
... mower is to distribute oil. • Replace with a suitable protective cover that all rusted or chipped paint surfaces; Inspect moving parts for winter storage. NOTE: Fuel stabilizer is removed from dust and dirt. • Cover your tractor to cool before painting. Do not use engine or carburetor cleaner products in minimizing the formation of oil through spark plug hole(s) into cylinder(s). • Turn ignition key to "START" position for...

User Manual
Page 25
...battery. 2. Check/replace solenoid or starter. Throttle in Service Adjustments section. 15. Build-up of adjustment. 1. Low oil level/dirty oil. 6. Connect and tighten spark plug wire. 11. See "To Adjust Carburetor" in "CHOKE" position. 3. Replace blade. Tighten loose part(s). Replace damaged parts. Engine flooded. 4. Dirty air filter. 2. Contact an authorized service center/department. Corroded battery terminals. 3. Drain fuel tank and refill with fresh gasoline and replace fuel filter. 10. Clean engine air screen/fins. 12. Clean/replace muffler...
...battery. 2. Check/replace solenoid or starter. Throttle in Service Adjustments section. 15. Build-up of adjustment. 1. Low oil level/dirty oil. 6. Connect and tighten spark plug wire. 11. See "To Adjust Carburetor" in "CHOKE" position. 3. Replace blade. Tighten loose part(s). Replace damaged parts. Engine flooded. 4. Dirty air filter. 2. Contact an authorized service center/department. Corroded battery terminals. 3. Drain fuel tank and refill with fresh gasoline and replace fuel filter. 10. Clean engine air screen/fins. 12. Clean/replace muffler...
User Manual
Page 26
... attachment clutch engaged 1. Switch is "OFF". 2. Blown fuse. 1. Check wiring and connections. 5. Battery will not rotate 1. Engine throttle control not set at "SLOW" position for proper air pressure. 6. Faulty operator-safety presence control system. 1. Obstruction in "FAST" position. 2. Replace blade mandrel. Engine speed too slow. 2. Worn, bent or loose blade. 7. Blades improperly installed. 10. Tighten blade bolt. 7. Check/replace light switch. 4. Replace regulator. 4. Engine "backfires" when turning engine "OFF" 1. Level mower deck. 3. Frozen blade...
... attachment clutch engaged 1. Switch is "OFF". 2. Blown fuse. 1. Check wiring and connections. 5. Battery will not rotate 1. Engine throttle control not set at "SLOW" position for proper air pressure. 6. Faulty operator-safety presence control system. 1. Obstruction in "FAST" position. 2. Replace blade mandrel. Engine speed too slow. 2. Worn, bent or loose blade. 7. Blades improperly installed. 10. Tighten blade bolt. 7. Check/replace light switch. 4. Replace regulator. 4. Engine "backfires" when turning engine "OFF" 1. Level mower deck. 3. Frozen blade...

User Manual
Page 39
... Decal Clutch/brake English Decal Fender Decal V-belt Schematic 42" Decal Battery Danger/Poison Decal HP Engine Decal Lift Handle Manual Owner's English Manual Owner's French WHEELS & TIRES 1 2 5,8 4,10 7 6 KEY PART NO. inches 1 inch = 25.4 mm 39 DESCRIPTION 1 59192 Cap Valve Tire 2 65139 Stem Valve 3 106222X Tire F Ts 15 X 6 0 - 6 Service 4 59904 Tube Front (Service Item Only) 5 106732X427 Rim Asm 6"front White Service 6 278H Fitting Grease (Front Wheel Only) 3,9 7 9040H Bearing Flange (Front Wheel Only...
... Decal Clutch/brake English Decal Fender Decal V-belt Schematic 42" Decal Battery Danger/Poison Decal HP Engine Decal Lift Handle Manual Owner's English Manual Owner's French WHEELS & TIRES 1 2 5,8 4,10 7 6 KEY PART NO. inches 1 inch = 25.4 mm 39 DESCRIPTION 1 59192 Cap Valve Tire 2 65139 Stem Valve 3 106222X Tire F Ts 15 X 6 0 - 6 Service 4 59904 Tube Front (Service Item Only) 5 106732X427 Rim Asm 6"front White Service 6 278H Fitting Grease (Front Wheel Only) 3,9 7 9040H Bearing Flange (Front Wheel Only...

User Manual
Page 43
... Bolt, Shoulder 5/16-18 UNC KEY PART NO. Arm Spring Brake Mower Bracket Arm Idler 42" Keeper Belt 42" Clutch Cable Pulley Idler Flat Bolt Carriage Idler Spring Extension Spring Return Idler Retainer Spring Yellow Washer 9/32 x 3/4 x 16 Ga. REPAIR PARTS TRACTOR - - Pulley Not Included) Replacement Mower, Complete NOTE: All component dimensions given in U.S. NO. DESCRIPTION 1 165894 Mower Deck Assembly, 42" 2 72140506 Bolt 3 138017 Bracket Asm Fr. MODEL NUMBER PO16542B, PRODUCT NO. 954 56 78-02 MOWER DECK KEY PART...
... Bolt, Shoulder 5/16-18 UNC KEY PART NO. Arm Spring Brake Mower Bracket Arm Idler 42" Keeper Belt 42" Clutch Cable Pulley Idler Flat Bolt Carriage Idler Spring Extension Spring Return Idler Retainer Spring Yellow Washer 9/32 x 3/4 x 16 Ga. REPAIR PARTS TRACTOR - - Pulley Not Included) Replacement Mower, Complete NOTE: All component dimensions given in U.S. NO. DESCRIPTION 1 165894 Mower Deck Assembly, 42" 2 72140506 Bolt 3 138017 Bracket Asm Fr. MODEL NUMBER PO16542B, PRODUCT NO. 954 56 78-02 MOWER DECK KEY PART...

User Manual
Page 45
... equipped with a Battery, we will replace, without charge for any battery which has been subjected to alteration, misuse, abuse, improper assembly or installation, delivery damage, or to be defective in accordance with the instructions furnished. 4. The Warranty period for parts or labor incurred in replacing parts, any power equipment unit or attachment are belts, blades, blade adapters, normal wear, normal adjustments, standard hardware and normal maintenance. 7. In...
... equipped with a Battery, we will replace, without charge for any battery which has been subjected to alteration, misuse, abuse, improper assembly or installation, delivery damage, or to be defective in accordance with the instructions furnished. 4. The Warranty period for parts or labor incurred in replacing parts, any power equipment unit or attachment are belts, blades, blade adapters, normal wear, normal adjustments, standard hardware and normal maintenance. 7. In...


