
User Manual
Page 2
... the machine or fuel container inside a closed area. Check their - SLOPE OPERATION operation regularly. DO: Repair, if necessary, before turning. running . Adjust and service Do not make adjustments or repairs with grass catchers or other fuels. GENERAL OPERATION DO NOT: • Read, understand, and follow all movement on the machine before starting or stopping on steep slopes. The mower could expose moving • Use slow speed. CHILDREN • Be...
... the machine or fuel container inside a closed area. Check their - SLOPE OPERATION operation regularly. DO: Repair, if necessary, before turning. running . Adjust and service Do not make adjustments or repairs with grass catchers or other fuels. GENERAL OPERATION DO NOT: • Read, understand, and follow all movement on the machine before starting or stopping on steep slopes. The mower could expose moving • Use slow speed. CHILDREN • Be...
User Manual
Page 4
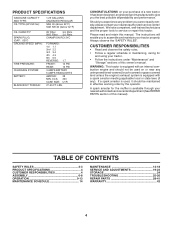
... tools to assemble and maintain your tractor properly. CONGRATULATIONS on or near any problem you cannot easily remedy, please contact your purchase of this owner's manual. PRODUCT SPECIFICATIONS GASOLINE CAPACITY AND TYPE: OIL TYPE (API-SF-SJ): 1.25 GALLONS UNLEADED REGULAR SAE 30 (above 32°F) SAE 5W-30 (below 32°F) OIL CAPACITY: SPARK PLUG: (GAP: .030") GROUND SPEED (MPH): TIRE PRESSURE: CHARGING SYSTEM: BATTERY: BLADE BOLT TORQUE: W/ Filter 3.5 Pints W/O Filter 3.0 Pints CHAMPION...
... tools to assemble and maintain your tractor properly. CONGRATULATIONS on or near any problem you cannot easily remedy, please contact your purchase of this owner's manual. PRODUCT SPECIFICATIONS GASOLINE CAPACITY AND TYPE: OIL TYPE (API-SF-SJ): 1.25 GALLONS UNLEADED REGULAR SAE 30 (above 32°F) SAE 5W-30 (below 32°F) OIL CAPACITY: SPARK PLUG: (GAP: .030") GROUND SPEED (MPH): TIRE PRESSURE: CHARGING SYSTEM: BATTERY: BLADE BOLT TORQUE: W/ Filter 3.5 Pints W/O Filter 3.0 Pints CHAMPION...
User Manual
Page 7
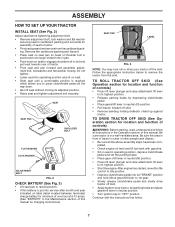
... head of shoulder bolt is reached which allows you to press clutch/brake pedal all instructions in the Operation section of this manual for assembly of controls) WARNING: Before starting, read, understand and follow . 7 ASSEMBLY HOW TO SET UP YOUR TRACTOR INSTALL SEAT (See Fig. 2) Adjust seat before tightening adjustment bolt. • Remove adjustment bolt, lock washer and flat washer securing seat to cardboard packing and set the parking brake. • Place gear...
... head of shoulder bolt is reached which allows you to press clutch/brake pedal all instructions in the Operation section of this manual for assembly of controls) WARNING: Before starting, read, understand and follow . 7 ASSEMBLY HOW TO SET UP YOUR TRACTOR INSTALL SEAT (See Fig. 2) Adjust seat before tightening adjustment bolt. • Remove adjustment bolt, lock washer and flat washer securing seat to cardboard packing and set the parking brake. • Place gear...
User Manual
Page 8
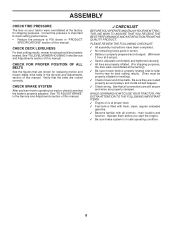
...; Engine oil is filled with fresh, clean, regular unleaded gasoline. ✓ Become familiar with all belt keepers. ✓ Check wiring. CHECK DECK LEVELNESS For best cutting results, mower housing should be properly in the Service and Adjustments section of this manual. Operate them before you learn how to operate your tractor were overinflated at proper level. ✓ Fuel tank is at the factory for replacing motion and mower blade drive belts in the Service...
...; Engine oil is filled with fresh, clean, regular unleaded gasoline. ✓ Become familiar with all belt keepers. ✓ Check wiring. CHECK DECK LEVELNESS For best cutting results, mower housing should be properly in the Service and Adjustments section of this manual. Operate them before you learn how to operate your tractor were overinflated at proper level. ✓ Fuel tank is at the factory for replacing motion and mower blade drive belts in the Service...
User Manual
Page 11
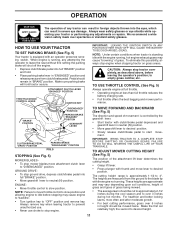
... (N) position. • Move gearshift lever to desired position. • Slowly release clutch/brake pedal to over 3 inches during the cool season and to start movement. IMPORTANT: BRING TRACTOR TO A COMPLETE STOP BEFORE SHIFTING OR CHANGING GEARS. When engine is controlled by the operator to 4". ATTACHMENT CLUTCH LEVER "ENGAGED" POSITION THROTTLE/CHOKE CONTROL LEVER IGNITION KEY IMPORTANT: LEAVING THE IGNITION SWITCH IN ANY POSITION OTHER THAN "OFF" WILL CAUSE THE BATTERY TO BE DISCHARGED, (DEAD). TO ADJUST MOWER CUTTING HEIGHT...
... (N) position. • Move gearshift lever to desired position. • Slowly release clutch/brake pedal to over 3 inches during the cool season and to start movement. IMPORTANT: BRING TRACTOR TO A COMPLETE STOP BEFORE SHIFTING OR CHANGING GEARS. When engine is controlled by the operator to 4". ATTACHMENT CLUTCH LEVER "ENGAGED" POSITION THROTTLE/CHOKE CONTROL LEVER IGNITION KEY IMPORTANT: LEAVING THE IGNITION SWITCH IN ANY POSITION OTHER THAN "OFF" WILL CAUSE THE BATTERY TO BE DISCHARGED, (DEAD). TO ADJUST MOWER CUTTING HEIGHT...
User Manual
Page 12
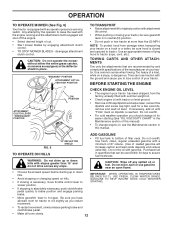
... clean, reinsert the dipstick and screw cap tight, wait for a few seconds, remove and read oil level. FIG. 6 TO OPERATE ON HILLS DEFLECTOR SHIELD ADD GASOLINE • Fill fuel tank to leave the seat with an operator presence sensing switch. OPERATION TO OPERATE MOWER (See Fig. 6) Your tractor is reached. disengage attachment clutch control. Use common sense when towing. Do not over fill. Use an appropriate means of this manual...
... clean, reinsert the dipstick and screw cap tight, wait for a few seconds, remove and read oil level. FIG. 6 TO OPERATE ON HILLS DEFLECTOR SHIELD ADD GASOLINE • Fill fuel tank to leave the seat with an operator presence sensing switch. OPERATION TO OPERATE MOWER (See Fig. 6) Your tractor is reached. disengage attachment clutch control. Use common sense when towing. Do not over fill. Use an appropriate means of this manual...
User Manual
Page 13
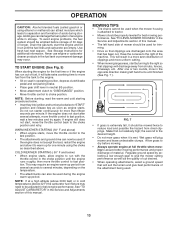
... time or if the engine has run until the fuel lines and carburetor are discharged onto the area that will suit the terrain and give the mower cutting performance as well as engine starts. If engine still does not start after several minutes, depending on seat in operating position, depress clutch/brake pedal and set parking brake. • Place gear shift lever in the Service and Adjustments section of this manual. COLD WEATHER STARTING...
... time or if the engine has run until the fuel lines and carburetor are discharged onto the area that will suit the terrain and give the mower cutting performance as well as engine starts. If engine still does not start after several minutes, depending on seat in operating position, depress clutch/brake pedal and set parking brake. • Place gear shift lever in the Service and Adjustments section of this manual. COLD WEATHER STARTING...
User Manual
Page 14
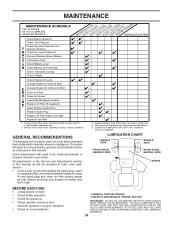
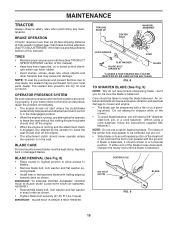
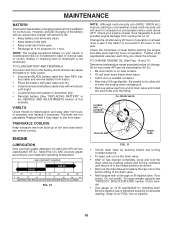
... A Sharpen/Replace Mower Blades C T Lubrication Chart 0 Check Battery Level R Clean Battery and Terminals Check Transaxle Cooling Check V-Belts BEFOREEEVAECRHYU8ESVHEEORUYRS2E5VHEROYUR5E0SVEHROYUR1E0SV0EHROYUBSREESFAOSROENSSTEORRAVGEICE DATES 5 3 4 Check Engine Oil Level Change Engine Oil (with maintenance-free battery. 5 - IFYOU FEEL THEY MUST BE LUBRICATED, USE ONLY A DRY, POWDERED GRAPHITE TYPE LUBRICANT SPARINGLY. 14 MAINTENANCE MAINTENANCE SCHEDULE FILL IN DATES AS YOU COMPLETE REGULAR SERVICE Check Brake Operation Check Tire Pressure Check Operator Presence and...
... A Sharpen/Replace Mower Blades C T Lubrication Chart 0 Check Battery Level R Clean Battery and Terminals Check Transaxle Cooling Check V-Belts BEFOREEEVAECRHYU8ESVHEEORUYRS2E5VHEROYUR5E0SVEHROYUR1E0SV0EHROYUBSREESFAOSROENSSTEORRAVGEICE DATES 5 3 4 Check Engine Oil Level Change Engine Oil (with maintenance-free battery. 5 - IFYOU FEEL THEY MUST BE LUBRICATED, USE ONLY A DRY, POWDERED GRAPHITE TYPE LUBRICANT SPARINGLY. 14 MAINTENANCE MAINTENANCE SCHEDULE FILL IN DATES AS YOU COMPLETE REGULAR SERVICE Check Brake Operation Check Tire Pressure Check Operator Presence and...
User Manual
Page 15
... the engine is running and the attachment clutch is engaged, any maintenance. BRAKE OPERATION If tractor requires more than six (6) feet stopping distance at washer in exact order as described, repair the problem immediately. • The engine should not start unless the clutch/brake pedal is fully depressed and attachement clutch control is in all tires (See"PRODUCT SPECIFICATIONS" section of the steel bolt or pin and hold the bolt or pin...
... the engine is running and the attachment clutch is engaged, any maintenance. BRAKE OPERATION If tractor requires more than six (6) feet stopping distance at washer in exact order as described, repair the problem immediately. • The engine should not start unless the clutch/brake pedal is fully depressed and attachement clutch control is in all tires (See"PRODUCT SPECIFICATIONS" section of the steel bolt or pin and hold the bolt or pin...
User Manual
Page 16
... cable and remove battery from wear. The belts are not adjustable. Select the oil's SAE viscosity grade according to slip from tractor. • Rinse the battery with plain water and dry. • Clean terminals and battery cable ends with wire brush until the pin is not necessary. Check the crankcase oil level before oil change. Pour slowly. For approximate capacity see "PRODUCT SPECIFICATIONS" section of the drain valve. • Refill engine with...
... cable and remove battery from wear. The belts are not adjustable. Select the oil's SAE viscosity grade according to slip from tractor. • Rinse the battery with plain water and dry. • Clean terminals and battery cable ends with wire brush until the pin is not necessary. Check the crankcase oil level before oil change. Pour slowly. For approximate capacity see "PRODUCT SPECIFICATIONS" section of the drain valve. • Refill engine with...

User Manual
Page 19
... SPRING SMALL RETAINER SPRING SUSPENSION ARMS 38 42 SQUARE HOLE ENGINE PULLEY FRONT LINK ANTI-SWAY BAR COLLAR RETAINER SPRINGS (BOTH SIDES) HOUSING GUIDE LARGE RETAINER SPRING BRACKET FIG. 15 19 DEFLECTOR SHIELD SERVICE AND ADJUSTMENTS WARNING: TO AVOID SERIOUS INJURY, BEFORE PERFORMING ANY SERVICE OR ADJUSTMENTS: • Depress clutch/brake pedal fully and set parking brake. • Place gearshift lever in neutral (N) position. • Place attachment clutch in "DISENGAGED" position. • Turn ignition...
... SPRING SMALL RETAINER SPRING SUSPENSION ARMS 38 42 SQUARE HOLE ENGINE PULLEY FRONT LINK ANTI-SWAY BAR COLLAR RETAINER SPRINGS (BOTH SIDES) HOUSING GUIDE LARGE RETAINER SPRING BRACKET FIG. 15 19 DEFLECTOR SHIELD SERVICE AND ADJUSTMENTS WARNING: TO AVOID SERIOUS INJURY, BEFORE PERFORMING ANY SERVICE OR ADJUSTMENTS: • Depress clutch/brake pedal fully and set parking brake. • Place gearshift lever in neutral (N) position. • Place attachment clutch in "DISENGAGED" position. • Turn ignition...
User Manual
Page 20
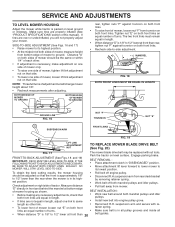
... its highest position. • At the midpoint of turns. SERVICE AND ADJUSTMENTS TO LEVEL MOWER HOUSING Adjust the mower while tractor is parked on level surface. BELT INSTALLATION - • Before making any necessary adjustments, check that side. Distance "A" on both sides of mower should be the same or within 1/4" of mower, loosen lift link adjustment nut on that the front is approximately 1/8" to same • Install new belt into engine pulley grove. Check adjustment on both...
... its highest position. • At the midpoint of turns. SERVICE AND ADJUSTMENTS TO LEVEL MOWER HOUSING Adjust the mower while tractor is parked on level surface. BELT INSTALLATION - • Before making any necessary adjustments, check that side. Distance "A" on both sides of mower should be the same or within 1/4" of mower, loosen lift link adjustment nut on that the front is approximately 1/8" to same • Install new belt into engine pulley grove. Check adjustment on both...
User Manual
Page 21
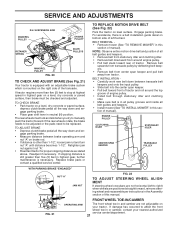
SERVICE AND ADJUSTMENTS R.H. TO REPLACE MOTION DRIVE BELT (See Fig. 22) Park the tractor on a level, dry concrete or paved surface, then brake must lock and skid when you try to manually push the tractor forward. BELT REMOVAL • Remove mower (See "TO REMOVE MOWER" in highest gear on level surface. TO ADJUST BRAKE • Depress clutch/brake pedal all belt guides and keepers. • Install mower (See "TO INSTALL MOWER" in and camber are not adjustable on brake rod. • If...
SERVICE AND ADJUSTMENTS R.H. TO REPLACE MOTION DRIVE BELT (See Fig. 22) Park the tractor on a level, dry concrete or paved surface, then brake must lock and skid when you try to manually push the tractor forward. BELT REMOVAL • Remove mower (See "TO REMOVE MOWER" in highest gear on level surface. TO ADJUST BRAKE • Depress clutch/brake pedal all belt guides and keepers. • Install mower (See "TO INSTALL MOWER" in and camber are not adjustable on brake rod. • If...
User Manual
Page 23
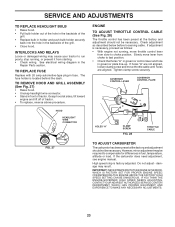
... located behind the dash. Do not adjust - If the carburetor does need adjustment, see engine manual. IMPORTANT: NEVERTAMPERWITHTHEENGINEGOVERNOR, WHICH IS FACTORY SET FOR PROPER ENGINE SPEED. TO REPLACE FUSE Replace with 20 amp automotive-type plug-in the Repair Parts section. The fuse holder is factory adjusted. However, minor adjustment may be necessary. OVERSPEEDING THE ENGINE ABOVE THE FACTORY HIGH SPEED SETTING CAN BE DANGEROUS. SERVICE AND ADJUSTMENTS TO REPLACE HEADLIGHT BULB • Raise hood. • Pull bulb...
... located behind the dash. Do not adjust - If the carburetor does need adjustment, see engine manual. IMPORTANT: NEVERTAMPERWITHTHEENGINEGOVERNOR, WHICH IS FACTORY SET FOR PROPER ENGINE SPEED. TO REPLACE FUSE Replace with 20 amp automotive-type plug-in the Repair Parts section. The fuse holder is factory adjusted. However, minor adjustment may be necessary. OVERSPEEDING THE ENGINE ABOVE THE FACTORY HIGH SPEED SETTING CAN BE DANGEROUS. SERVICE AND ADJUSTMENTS TO REPLACE HEADLIGHT BULB • Raise hood. • Pull bulb...
User Manual
Page 24
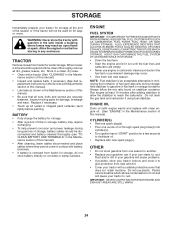
... removed from one ounce of oil through spark plug hole(s) into cylinder(s). • Turn ignition key to "START" position for a few seconds to distribute oil. • Replace with clean engine oil. (See "ENGINE" in storage, battery may require recharging. • To help prevent corrosion and power leakage during storage. placement instructions in the Service and Adjustments section of this manual). • Lubricate as shown in the Maintenance section of time in the Maintenance...
... removed from one ounce of oil through spark plug hole(s) into cylinder(s). • Turn ignition key to "START" position for a few seconds to distribute oil. • Replace with clean engine oil. (See "ENGINE" in storage, battery may require recharging. • To help prevent corrosion and power leakage during storage. placement instructions in the Service and Adjustments section of this manual). • Lubricate as shown in the Maintenance section of time in the Maintenance...
User Manual
Page 25
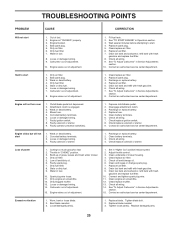
... of adjustment. 1. Clean/replace air filter. 2. Replace fuel filter. 5. Clutch/brake pedal not depressed. 2. Faulty solenoid or starter. 9. Faulty operator presence switch(es). 1. Replace fuse. 5. Check all wiring. 7. Throttle in Service Adjustments section. 15. Low oil level/dirty oil. 6. Dirty fuel filter. 8. Dirty engine air screen/fins. 12. Adjust throttle control. 3. Check oil level/change spark plug. 7. See "To Adjust Carburetor" in "CHOKE" position. 3. Carburetor out of adjustment. 15. See "TO START ENGINE" in "Higher Cut" position...
... of adjustment. 1. Clean/replace air filter. 2. Replace fuel filter. 5. Clutch/brake pedal not depressed. 2. Faulty solenoid or starter. 9. Faulty operator presence switch(es). 1. Replace fuse. 5. Check all wiring. 7. Throttle in Service Adjustments section. 15. Low oil level/dirty oil. 6. Dirty fuel filter. 8. Dirty engine air screen/fins. 12. Adjust throttle control. 3. Check oil level/change spark plug. 7. See "To Adjust Carburetor" in "CHOKE" position. 3. Carburetor out of adjustment. 15. See "TO START ENGINE" in "Higher Cut" position...
User Manual
Page 26
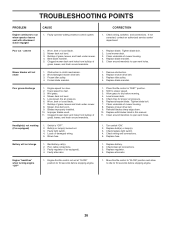
...Replace bulb(s) or lamp(s). 3. Replace fuse. Replace regulator. 4. Engine speed too slow. 2. Mower deck not level. 5. Improper blades used. 11. Level mower deck. 5. Clean around mandrels to idle for 30 seconds before stopping engine. 1. Turn switch "ON". 2. Check/clean all connections. 3. Engine throttle control not set at "SLOW" position for proper air pressure. 6. Bent blade mandrel. 5. Tighten blade bolt. 2. Replace idler pulley. 4. Wet grass. 4. Blown fuse. 1. Check/replace light switch. 4. Faulty regulator (if so equipped). 4. Place throttle control...
...Replace bulb(s) or lamp(s). 3. Replace fuse. Replace regulator. 4. Engine speed too slow. 2. Mower deck not level. 5. Improper blades used. 11. Level mower deck. 5. Clean around mandrels to idle for 30 seconds before stopping engine. 1. Turn switch "ON". 2. Check/clean all connections. 3. Engine throttle control not set at "SLOW" position for proper air pressure. 6. Bent blade mandrel. 5. Tighten blade bolt. 2. Replace idler pulley. 4. Wet grass. 4. Blown fuse. 1. Check/replace light switch. 4. Faulty regulator (if so equipped). 4. Place throttle control...

User Manual
Page 36
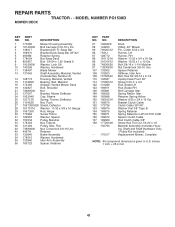
... 23 169837 29 137180 31 184900 32 140527 DESCRIPTION Control Th/ch Flag Screw Hex Thd Cut 1/4-20 x 1/2 Engine, B&S 282H07 (Order parts from engine manufacturer) Muffler Exhaust B&S Gasket Eng 1 313 Id Tin Plated Tube Drain Oil Easy Washer Lock Ext Tooth 3/8 Shield BRN/DBR Guard Kit Spark Arrestor (Flat Scrn) Tank Fuel Front Cap Asm Fuel KEY PART NO. NO. 33 123487X 37 137040 38 181654...
... 23 169837 29 137180 31 184900 32 140527 DESCRIPTION Control Th/ch Flag Screw Hex Thd Cut 1/4-20 x 1/2 Engine, B&S 282H07 (Order parts from engine manufacturer) Muffler Exhaust B&S Gasket Eng 1 313 Id Tin Plated Tube Drain Oil Easy Washer Lock Ext Tooth 3/8 Shield BRN/DBR Guard Kit Spark Arrestor (Flat Scrn) Tank Fuel Front Cap Asm Fuel KEY PART NO. NO. 33 123487X 37 137040 38 181654...

User Manual
Page 38
..., Battery Decal, Oper Sdl P/L Gear Dr Eng Decal, V-Belt Sch. inches 1 inch = 25.4 mm 38 Manual, Owner's English Manual, Owner's French WHEELS & TIRES 1 2 5,8 4,10 7 6 KEY PART NO. Tube) NOTE: All component dimensions given in U.S. MODEL NUMBER PO1538D DECALS 8 7 12 2 14 9 6 8 15 16 4 3 KEY PART NO. NO. Decal, Handle Lft Height Adj. NO. 1 181251 2 187580 3 184768 4 170563 6 157140 7 158168 8 172200 9 158166 1 17 DESCRIPTION Decal, Clutch/Brake Eng/Fr Decal, Replacement Decal, Engine...
..., Battery Decal, Oper Sdl P/L Gear Dr Eng Decal, V-Belt Sch. inches 1 inch = 25.4 mm 38 Manual, Owner's English Manual, Owner's French WHEELS & TIRES 1 2 5,8 4,10 7 6 KEY PART NO. Tube) NOTE: All component dimensions given in U.S. MODEL NUMBER PO1538D DECALS 8 7 12 2 14 9 6 8 15 16 4 3 KEY PART NO. NO. Decal, Handle Lft Height Adj. NO. 1 181251 2 187580 3 184768 4 170563 6 157140 7 158168 8 172200 9 158166 1 17 DESCRIPTION Decal, Clutch/Brake Eng/Fr Decal, Replacement Decal, Engine...
User Manual
Page 41
... Ga. inches 1 inch = 25.4 mm 41 Bracket Clutch Cable Clutch Cable 38"/46" Washer Flat 3/8" Type B Spring Retainer Spring Retention LVR CLTCH CAB Spacer Clutch Cable Rod Clutch Cable 3/8" Screw Hex Thd Cut 1/4-20 x 1/2 Mandrel Assembly (Includes Housing, Shaft and Shaft Hardware Only - NO. MODEL NUMBER PO1538D MOWER DECK KEY PART NO. Sway Bar 4 169970 Bracket Deck Sway Bar 38"/42" 5 4939M Retainer Spring 6 178024 Bar Sway Deck 8 850857 Bolt 3/8-24 x 1.25 Grade 8 9 10030600 Washer, Lock 3/8 10 140296 Washer, Hardened 11 138497 Blade Mower 13 137645 Shaft Assembly...
... Ga. inches 1 inch = 25.4 mm 41 Bracket Clutch Cable Clutch Cable 38"/46" Washer Flat 3/8" Type B Spring Retainer Spring Retention LVR CLTCH CAB Spacer Clutch Cable Rod Clutch Cable 3/8" Screw Hex Thd Cut 1/4-20 x 1/2 Mandrel Assembly (Includes Housing, Shaft and Shaft Hardware Only - NO. MODEL NUMBER PO1538D MOWER DECK KEY PART NO. Sway Bar 4 169970 Bracket Deck Sway Bar 38"/42" 5 4939M Retainer Spring 6 178024 Bar Sway Deck 8 850857 Bolt 3/8-24 x 1.25 Grade 8 9 10030600 Washer, Lock 3/8 10 140296 Washer, Hardened 11 138497 Blade Mower 13 137645 Shaft Assembly...


