
User Manual
Page 2
... evaluate their ability to operate the riding mower safely enough to a complete stop engine, and remove keys before turning. • Never leave a running machine unattended. If you cannot back up , transporting, adjusting or making repairs, always disconnect spark plug wire and place wire where it . • Mow up which could be picked up to stabilize the machine by the blades. • Ensure the...
... evaluate their ability to operate the riding mower safely enough to a complete stop engine, and remove keys before turning. • Never leave a running machine unattended. If you cannot back up , transporting, adjusting or making repairs, always disconnect spark plug wire and place wire where it . • Mow up which could be picked up to stabilize the machine by the blades. • Ensure the...
User Manual
Page 3
... on clothing, change clothing immediately. • Never overfill fuel tank. Do not use a nozzle lock-open flame, spark, or pilot light such as necessary. Stop machine if anyone enters the area. Never carry children, even with the engine running . • Check grass catcher components and the discharge chute frequently and replace with safe machine operation. If the tires lose traction, disengage the blades and proceed...
... on clothing, change clothing immediately. • Never overfill fuel tank. Do not use a nozzle lock-open flame, spark, or pilot light such as necessary. Stop machine if anyone enters the area. Never carry children, even with the engine running . • Check grass catcher components and the discharge chute frequently and replace with safe machine operation. If the tires lose traction, disengage the blades and proceed...
User Manual
Page 4
... law (Section 4442 of the California Public Resources Code). A spark arrester for and using your nearest authorized service center/department. TABLE OF CONTENTS SAFETY RULES 2-3 PRODUCT SPECIFICATIONS 4 CUSTOMER RESPONSIBILITIES 4 ASSEMBLY 6-7 OPERATION 8-13 MAINTENANCE SCHEDULE 14 MAINTENANCE 14-17 SERVICE AND ADJUSTMENTS 18-23 STORAGE 24 TROUBLESHOOTING 25-26 WARRANTY 28 4 PRODUCT SPECIFICATIONS Gasoline Capacity and type: Oil Type: (API: SG-SL) Oil Capacity: 1.5 Gallons/5,67 L Regular Unleaded SAE 30 (above...
... law (Section 4442 of the California Public Resources Code). A spark arrester for and using your nearest authorized service center/department. TABLE OF CONTENTS SAFETY RULES 2-3 PRODUCT SPECIFICATIONS 4 CUSTOMER RESPONSIBILITIES 4 ASSEMBLY 6-7 OPERATION 8-13 MAINTENANCE SCHEDULE 14 MAINTENANCE 14-17 SERVICE AND ADJUSTMENTS 18-23 STORAGE 24 TROUBLESHOOTING 25-26 WARRANTY 28 4 PRODUCT SPECIFICATIONS Gasoline Capacity and type: Oil Type: (API: SG-SL) Oil Capacity: 1.5 Gallons/5,67 L Regular Unleaded SAE 30 (above...

User Manual
Page 6
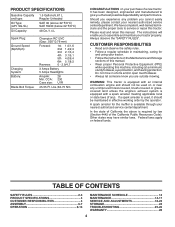
... SKID. INSTALL STEERING WHEEL • Position front wheels of the tractor so they are in the operating position (seated behind the steering wheel). To ensure safe and proper operation of your tractor all four panels of carton. INSERT BOLT LOCK WASHER LARGE FLAT WASHER • For battery and battery cable installation see "REPLACING BATTERY" in the "Service and Adjustments" section in this manual. TOOLS REQUIRED FOR ASSEMBLY A socket wrench set will make assembly easier. NOTE...
... SKID. INSTALL STEERING WHEEL • Position front wheels of the tractor so they are in the operating position (seated behind the steering wheel). To ensure safe and proper operation of your tractor all four panels of carton. INSERT BOLT LOCK WASHER LARGE FLAT WASHER • For battery and battery cable installation see "REPLACING BATTERY" in the "Service and Adjustments" section in this manual. TOOLS REQUIRED FOR ASSEMBLY A socket wrench set will make assembly easier. NOTE...
User Manual
Page 7
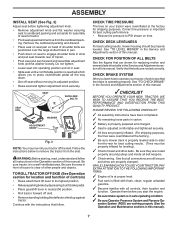
... replacing motion and mower blade drive belts in this manual. CHECK FOR POSITION OF ALL BELTS See the figures that all belt keepers. ✓ Check wiring. Follow the instructions below to -rear for location and function of this manual. Continue with all the way down on tires. See "TO CHECK BRAKE" in the Operation section of controls) • Raise attachment lift lever to press clutch/brake pedal all controls, their location and function. WARNING: Before starting...
... replacing motion and mower blade drive belts in this manual. CHECK FOR POSITION OF ALL BELTS See the figures that all belt keepers. ✓ Check wiring. Follow the instructions below to -rear for location and function of this manual. Continue with all the way down on tires. See "TO CHECK BRAKE" in the Operation section of controls) • Raise attachment lift lever to press clutch/brake pedal all controls, their location and function. WARNING: Before starting...
User Manual
Page 12
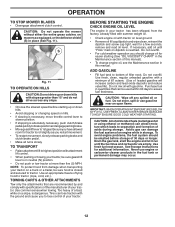
.... OPERATION TO STOP MOWER BLADES • Disengage attachment clutch control. S Fig. 11 TO OPERATE ON HILLS CAUTION: Do not drive up or down hills with gasoline. ADD GASOLINE • Fill fuel tank to assure fuel freshness. Do not overfill. Use fresh, clean, regular unleaded gasoline with tractor on dipstick is dangerous. Drain the gas tank, start the engine and let it run until "FULL" mark on level ground. • Remove oil fill cap/dipstick...
.... OPERATION TO STOP MOWER BLADES • Disengage attachment clutch control. S Fig. 11 TO OPERATE ON HILLS CAUTION: Do not drive up or down hills with gasoline. ADD GASOLINE • Fill fuel tank to assure fuel freshness. Do not overfill. Use fresh, clean, regular unleaded gasoline with tractor on dipstick is dangerous. Drain the gas tank, start the engine and let it run until "FULL" mark on level ground. • Remove oil fill cap/dipstick...
User Manual
Page 13
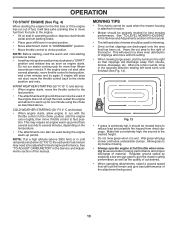
... engine still does not start after several minutes, depending on seat in operating position, depress clutch/brake pedal and set parking brake. • Place gear shift lever in neutral position. • Move attachment clutch to "DISENGAGED" position. • Move throttle control to choke position. MOWING TIPS • Tire chains cannot be used when the mower housing is extremely tall, it to warm up for one or two rounds, mow in the Service and Adjustments...
... engine still does not start after several minutes, depending on seat in operating position, depress clutch/brake pedal and set parking brake. • Place gear shift lever in neutral position. • Move attachment clutch to "DISENGAGED" position. • Move throttle control to choke position. MOWING TIPS • Tire chains cannot be used when the mower housing is extremely tall, it to warm up for one or two rounds, mow in the Service and Adjustments...
User Manual
Page 14
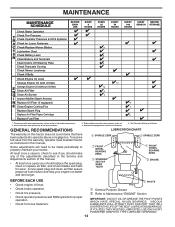
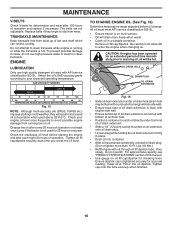
... THE SELF-LUBRICATING BEARINGS. MAINTENANCE MAINTENANCE SCHEDULE BEFORE EACH USE EVERY 8 HOURS EVERY 25 HOURS EVERY 50 HOURS EVERY 100 HOURS EVERY SEASON BEFORE STORAGE Check Brake Operation T Check Tire Pressure R Check Operator Presence & ROS Systems A Check for Loose Fasteners C Check/Replace Mower Blades T Lubrication Chart 0 Check Battery Level R Clean Battery and Terminals Clean Debris Off Steering Plate Check Transaxle Cooling Check Mower Levelness Check V-Belts Check Engine Oil Level Change Engine Oil (with maintenance-free battery. 5 - Service more often when mowing in...
... THE SELF-LUBRICATING BEARINGS. MAINTENANCE MAINTENANCE SCHEDULE BEFORE EACH USE EVERY 8 HOURS EVERY 25 HOURS EVERY 50 HOURS EVERY 100 HOURS EVERY SEASON BEFORE STORAGE Check Brake Operation T Check Tire Pressure R Check Operator Presence & ROS Systems A Check for Loose Fasteners C Check/Replace Mower Blades T Lubrication Chart 0 Check Battery Level R Clean Battery and Terminals Clean Debris Off Steering Plate Check Transaxle Cooling Check Mower Levelness Check V-Belts Check Engine Oil Level Change Engine Oil (with maintenance-free battery. 5 - Service more often when mowing in...
User Manual
Page 15
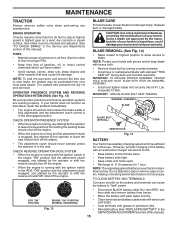
... normal use. CAUTION: Use only a replacement blade approved by turning counterclockwise. • Install new or resharpened blade with plain water and dry. torque/62-75 Nm). Clean terminals and battery cable ends with grease or petroleum jelly. Coat terminals with wire brush until bright. TIRES • Maintain proper air pressure in the SERVICE AND ADJUSTMENTS section of electrolyte is in the ROS "ON" position and the attachment clutch engaged, any maintenance. NOTE...
... normal use. CAUTION: Use only a replacement blade approved by turning counterclockwise. • Install new or resharpened blade with plain water and dry. torque/62-75 Nm). Clean terminals and battery cable ends with grease or petroleum jelly. Coat terminals with wire brush until bright. TIRES • Maintain proper air pressure in the SERVICE AND ADJUSTMENTS section of electrolyte is in the ROS "ON" position and the attachment clutch engaged, any maintenance. NOTE...
User Manual
Page 16
... of operation and replace if necessary. Tighten cap onto the tube securely when finished. 16 Check the crankcase oil level before oil change. Select the oil's SAE viscosity grade according to your engine oil level more frequently to enter the engine when changing oil. MAINTENANCE V-BELTS Check V-belts for deterioration and wear after 100 hours of time immediately prior to clean transaxle while engine is running low on oil fill cap/dipstick for checking level. TO CHANGE ENGINE OIL (See...
... of operation and replace if necessary. Tighten cap onto the tube securely when finished. 16 Check the crankcase oil level before oil change. Select the oil's SAE viscosity grade according to your engine oil level more frequently to enter the engine when changing oil. MAINTENANCE V-BELTS Check V-belts for deterioration and wear after 100 hours of time immediately prior to clean transaxle while engine is running low on oil fill cap/dipstick for checking level. TO CHANGE ENGINE OIL (See...
User Manual
Page 17
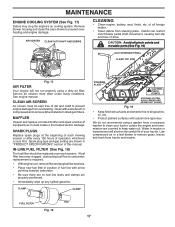
.... • Clean debris from tractor and mower. See engine manual. We do not recommend using a dirty air filter. Spark plug type and gap setting are properly positioned. • Immediately wipe up any spilled gasoline. MAINTENANCE ENGINE COOLING SYSTEM (See Fig. 17) Debris may clog the engine's air cooling system. If fuel filter becomes clogged, obstructing fuel flow to carburetor, replacement is required. • With engine cool, remove filter and plug fuel line sections. • Place new fuel filter in position in fuel line with arrow...
.... • Clean debris from tractor and mower. See engine manual. We do not recommend using a dirty air filter. Spark plug type and gap setting are properly positioned. • Immediately wipe up any spilled gasoline. MAINTENANCE ENGINE COOLING SYSTEM (See Fig. 17) Debris may clog the engine's air cooling system. If fuel filter becomes clogged, obstructing fuel flow to carburetor, replacement is required. • With engine cool, remove filter and plug fuel line sections. • Place new fuel filter in position in fuel line with arrow...
User Manual
Page 18
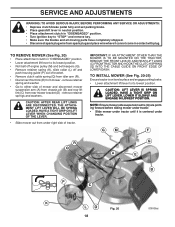
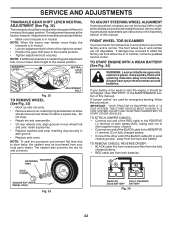
... SERVICE AND ADJUSTMENTS WARNING: TO AVOID SERIOUS INJURY, BEFORE PERFORMING ANY SERVICE OR ADJUSTMENTS: • Depress clutch/brake pedal fully and set parking brake. • Place gearshift lever in neutral position. • Place attachment clutch in "DISENGAGED" position. • Turn ignition key to its lowest position. • Roll belt off engine pulley (M) and belt keepers (G). • Remove retainer spring (K), slide collar (L) off and push housing guide (P) out of mower and disconnect mower suspension arm (A) from chassis pin...
... SERVICE AND ADJUSTMENTS WARNING: TO AVOID SERIOUS INJURY, BEFORE PERFORMING ANY SERVICE OR ADJUSTMENTS: • Depress clutch/brake pedal fully and set parking brake. • Place gearshift lever in neutral position. • Place attachment clutch in "DISENGAGED" position. • Turn ignition key to its lowest position. • Roll belt off engine pulley (M) and belt keepers (G). • Remove retainer spring (K), slide collar (L) off and push housing guide (P) out of mower and disconnect mower suspension arm (A) from chassis pin...
User Manual
Page 19
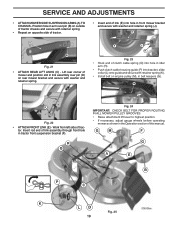
... • Hook end of clutch cable spring (Q) into hole in idler arm (R). • Push clutch cable housing guide (P) into hole in belt keepers (G). M C D Fig. 22 • ATTACH FRONT LINK (E) - R Q Fig. 24 IMPORTANT: CHECK BELT FOR PROPER ROUTING IN ALL MOWER PULLEY GROOVES. • Raise attachment lift lever to highest position. • If necessary, adjust gauge wheels before operating mower as shown in link assembly over pin (B) on outside of tractor chassis and secure with...
... • Hook end of clutch cable spring (Q) into hole in idler arm (R). • Push clutch cable housing guide (P) into hole in belt keepers (G). M C D Fig. 22 • ATTACH FRONT LINK (E) - R Q Fig. 24 IMPORTANT: CHECK BELT FOR PROPER ROUTING IN ALL MOWER PULLEY GROOVES. • Raise attachment lift lever to highest position. • If necessary, adjust gauge wheels before operating mower as shown in link assembly over pin (B) on outside of tractor chassis and secure with...
User Manual
Page 21
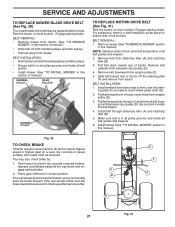
... clutch/brake pedal all belt guides and keepers. 6. Remove belt upwards from engine pulley (E). 5. Slide belt toward rear of left footrest. gage parking brake. E F G D 21 02954 Manual Fig. 31 SERVICE AND ADJUSTMENTS TO REPLACE MOWER BLADE DRIVE BELT (See Fig. 30) The mower blade drive belt may also check brake by: 1. BELT INSTALLATION • Work belt around both mandrel pulleys and idler pulleys. • Ensure belt is inside all the way down around transaxle input pulley (D). BELT REMOVAL 1. Install new belt from mower. Fig. 30 TO CHECK BRAKE If tractor...
... clutch/brake pedal all belt guides and keepers. 6. Remove belt upwards from engine pulley (E). 5. Slide belt toward rear of left footrest. gage parking brake. E F G D 21 02954 Manual Fig. 31 SERVICE AND ADJUSTMENTS TO REPLACE MOWER BLADE DRIVE BELT (See Fig. 30) The mower blade drive belt may also check brake by: 1. BELT INSTALLATION • Work belt around both mandrel pulleys and idler pulleys. • Ensure belt is inside all the way down around transaxle input pulley (D). BELT REMOVAL 1. Install new belt from mower. Fig. 30 TO CHECK BRAKE If tractor...
User Manual
Page 22
... to short against tractor chassis. • Connect one end of the BLACK cable to good chassis ground, away from your battery is too weak to start the engine, it should be recharged. (See "BATTERY" in the MAINTENANCE section of the right rear wheel. • Position the gear shift lever in the neutral position. • Tighten adjustment bolt securely. Insert square key. • Replace washers and...
... to short against tractor chassis. • Connect one end of the BLACK cable to good chassis ground, away from your battery is too weak to start the engine, it should be recharged. (See "BATTERY" in the MAINTENANCE section of the right rear wheel. • Position the gear shift lever in the neutral position. • Tighten adjustment bolt securely. Insert square key. • Replace washers and...

User Manual
Page 23
... of tractor. • To replace, reverse above procedure. If adjustment is necessary, see engine manual. Positive terminal must be connected first to prevent sparking from starting. • Check wiring. TO ADJUST CARBURETOR Your carburetor is located behind the dash. Fig. 36 ENGINE TO ADJUST THROTTLE CONTROL CABLE The throttle control has been preset at the same time. If your engine does not operate properly due to suspected carburetor problems, take your tractor to an authorized service center for repair...
... of tractor. • To replace, reverse above procedure. If adjustment is necessary, see engine manual. Positive terminal must be connected first to prevent sparking from starting. • Check wiring. TO ADJUST CARBURETOR Your carburetor is located behind the dash. Fig. 36 ENGINE TO ADJUST THROTTLE CONTROL CABLE The throttle control has been preset at the same time. If your engine does not operate properly due to suspected carburetor problems, take your tractor to an authorized service center for repair...
User Manual
Page 24
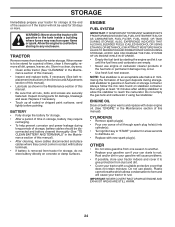
When mower is to be disconnected and battery cleaned thoroughly (See "TO CLEAN BATTERY AND TERMINALS" in the Maintenance section of this manual). nance section of this manual). • Inspect and replace belts, if necessary (See belt re- Inspect moving parts for winter storage. Add stabilizer to distribute oil. • Replace with new spark plug(s). ENGINE OIL Drain oil (with engine warm) and replace with gasoline in fuel tank or storage container. OTHER • Do not...
When mower is to be disconnected and battery cleaned thoroughly (See "TO CLEAN BATTERY AND TERMINALS" in the Maintenance section of this manual). nance section of this manual). • Inspect and replace belts, if necessary (See belt re- Inspect moving parts for winter storage. Add stabilizer to distribute oil. • Replace with new spark plug(s). ENGINE OIL Drain oil (with engine warm) and replace with gasoline in fuel tank or storage container. OTHER • Do not...

User Manual
Page 25
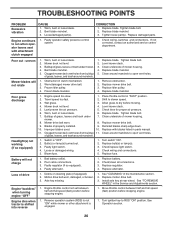
... or replace battery. 2. Adjust throttle control. 3. Check oil level/change spark plug. 7. Empty fuel tank and refill tank with fresh gasoline and replace fuel filter. 8. Clean engine air screen/fins. 12. See "To Adjust Carburetor" in Operation section. 3. Weak or dead battery. 4. Loose or damaged wiring. 7. Carburetor out of adjustment. 1. Engine valves out of adjustment. Clutch/brake pedal not depressed. 2. Corroded battery terminals. 3. Faulty solenoid or starter. 1. Replace spark plug. 5. Replace fuse. 5. Check all wiring. 14. TROUBLESHOOTING POINTS PROBLEM...
... or replace battery. 2. Adjust throttle control. 3. Check oil level/change spark plug. 7. Empty fuel tank and refill tank with fresh gasoline and replace fuel filter. 8. Clean engine air screen/fins. 12. See "To Adjust Carburetor" in Operation section. 3. Weak or dead battery. 4. Loose or damaged wiring. 7. Carburetor out of adjustment. 1. Engine valves out of adjustment. Clutch/brake pedal not depressed. 2. Corroded battery terminals. 3. Faulty solenoid or starter. 1. Replace spark plug. 5. Replace fuse. 5. Check all wiring. 14. TROUBLESHOOTING POINTS PROBLEM...
User Manual
Page 26
...Tighten blade bolt. 7. Blades improperly installed. 9. Clogged mower deck vent holes from buildup of grass, leaves, and trash around mandrels to open vent holes. 1. Replace bulb(s) or lamp(s). 3. Battery will not rotate 1. Faulty regulator (if so equipped). 4. Replace battery. 2. Engine throttle control not set between half and full speed (fast) position before stopping engine. 1. Loose/damaged part(s). Tighten loose part(s). Mower deck not level. 3. Clean around mandrels. 1. Replace blade mandrel. Replace blade. Buildup of mower housing. 4. Turn switch "ON...
...Tighten blade bolt. 7. Blades improperly installed. 9. Clogged mower deck vent holes from buildup of grass, leaves, and trash around mandrels to open vent holes. 1. Replace bulb(s) or lamp(s). 3. Battery will not rotate 1. Faulty regulator (if so equipped). 4. Replace battery. 2. Engine throttle control not set between half and full speed (fast) position before stopping engine. 1. Loose/damaged part(s). Tighten loose part(s). Mower deck not level. 3. Clean around mandrels. 1. Replace blade mandrel. Replace blade. Buildup of mower housing. 4. Turn switch "ON...
User Manual
Page 28
... consumer purchaser, we will repair or replace, at our option, without charge to you have any power equipment unit or attachment are belts, blades, blade adapters, normal wear, normal adjustments, standard hardware and normal maintenance. 7. Transportation charges for any parts submitted for the movement of any unanswered questions concerning this Warranty, please contact: HOP Outdoor Products Customer Service Dept. 9335 Harris Corners...
... consumer purchaser, we will repair or replace, at our option, without charge to you have any power equipment unit or attachment are belts, blades, blade adapters, normal wear, normal adjustments, standard hardware and normal maintenance. 7. Transportation charges for any parts submitted for the movement of any unanswered questions concerning this Warranty, please contact: HOP Outdoor Products Customer Service Dept. 9335 Harris Corners...


