
User Manual
Page 2
... and in speed or direction, which can affect the stability of the machine. SAFETY RULES Safe Operation Practices for all parts to come to neutral and coast downhill. • Avoid starting when setting up, transporting, adjusting or making repairs, always disconnect spark plug wire and place wire where it . • Mow up and down the slope. • Keep all instructions on steep...
... and in speed or direction, which can affect the stability of the machine. SAFETY RULES Safe Operation Practices for all parts to come to neutral and coast downhill. • Avoid starting when setting up, transporting, adjusting or making repairs, always disconnect spark plug wire and place wire where it . • Mow up and down the slope. • Keep all instructions on steep...
User Manual
Page 3
... machine free of a child. • If fuel is not possible, then refuel such equipment with the engine running . • Check grass catcher components and the discharge chute frequently and replace with safe machine operation. Adjust and service as required. • Maintain or replace safety and instruction labels, as on a water • heater or other objects that may block your vehicle when filling. • Remove gas-powered equipment...
... machine free of a child. • If fuel is not possible, then refuel such equipment with the engine running . • Check grass catcher components and the discharge chute frequently and replace with safe machine operation. Adjust and service as required. • Maintain or replace safety and instruction labels, as on a water • heater or other objects that may block your vehicle when filling. • Remove gas-powered equipment...
User Manual
Page 4
... manual. • Wear proper Personal Protective Equipment (PPE) while operating this machine, including (at a minimum) sturdy footwear, eye protection, and hearing protection. If a spark arrester is available through your tractor. • Follow the instructions under "Maintenance" and "Stor- TABLE OF CONTENTS SAFETY RULES 2-3 PRODUCT SPECIFICATIONS 4 CUSTOMER RESPONSIBILITIES 4 ASSEMBLY 6-7 OPERATION 8-13 MAINTENANCE SCHEDULE 14 MAINTENANCE 14-17 SERVICE AND ADJUSTMENTS 18-22 STORAGE 23 TROUBLESHOOTING...
... manual. • Wear proper Personal Protective Equipment (PPE) while operating this machine, including (at a minimum) sturdy footwear, eye protection, and hearing protection. If a spark arrester is available through your tractor. • Follow the instructions under "Maintenance" and "Stor- TABLE OF CONTENTS SAFETY RULES 2-3 PRODUCT SPECIFICATIONS 4 CUSTOMER RESPONSIBILITIES 4 ASSEMBLY 6-7 OPERATION 8-13 MAINTENANCE SCHEDULE 14 MAINTENANCE 14-17 SERVICE AND ADJUSTMENTS 18-22 STORAGE 23 TROUBLESHOOTING...
User Manual
Page 6
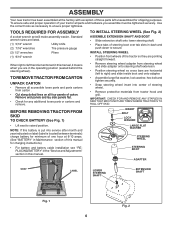
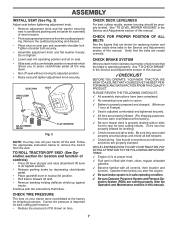
... the operating position (seated behind the steering wheel). TO REMOVE TRACTOR FROM CARTON UNPACK CARTON • Remove all parts and hardware you are listed. (1) 5/16" wrench Utility knife (2) 7/16" wrenches Tire pressure gauge (2) 1/2" wrenches Pliers (1) 9/16" wrench When right or left unassembled for charging instructions). • For battery and battery cable installation see "REPLACING BATTERY" in the "Service and Adjustments" section in this manual. TO INSTALL STEERING WHEEL (See Fig. 2) ASSEMBLE EXTENSION SHAFT AND...
... the operating position (seated behind the steering wheel). TO REMOVE TRACTOR FROM CARTON UNPACK CARTON • Remove all parts and hardware you are listed. (1) 5/16" wrench Utility knife (2) 7/16" wrenches Tire pressure gauge (2) 1/2" wrenches Pliers (1) 9/16" wrench When right or left unassembled for charging instructions). • For battery and battery cable installation see "REPLACING BATTERY" in the "Service and Adjustments" section in this manual. TO INSTALL STEERING WHEEL (See Fig. 2) ASSEMBLE EXTENSION SHAFT AND...
User Manual
Page 7
... drive belts. Correct tire pressure is operating properly. WHILE LEARNING HOW TO USE YOUR TRACTOR, PAY EXTRA ATTENTION TO THE FOLLOWING IMPORTANT ITEMS: ✓ Engine oil is reached which allows you to press clutch/brake pedal all controls, their location and function. CHECK TIRE PRESSURE The tires on tires. CHECK DECK LEVELNESS For best cutting results, mower housing should be properly inflated for best cutting performance. • Reduce tire pressure to its adjusted position...
... drive belts. Correct tire pressure is operating properly. WHILE LEARNING HOW TO USE YOUR TRACTOR, PAY EXTRA ATTENTION TO THE FOLLOWING IMPORTANT ITEMS: ✓ Engine oil is reached which allows you to press clutch/brake pedal all controls, their location and function. CHECK TIRE PRESSURE The tires on tires. CHECK DECK LEVELNESS For best cutting results, mower housing should be properly inflated for best cutting performance. • Reduce tire pressure to its adjusted position...

User Manual
Page 9
... with the locations of various controls and adjustments. Used to raise, lower, and adjust the mower deck or other powered attachment while in reverse. LIFT LEVER PLUNGER - REVERSE OPERATION SYSTEM (ROS) "ON" POSITION - Save this manual for starting and controlling engine speed. 9 ATTACHMENT LIFT LEVER - GEARSHIFT LEVER - LIGHT SWITCH THROTTLE/CHOKE CONTROL CLUTCH/BRAKE PEDAL ATTACHMENT CLUTCH LEVER IGNITION SWITCH ROS "ON" POSITION LIFT LEVER PLUNGER ATTACHMENT LIFT LEVER HEIGHT ADJUSTMENT INDICATOR PARKING BRAKE GEAR SHIFT LEVER 02829 Fig. 4 Our tractors conform to...
... with the locations of various controls and adjustments. Used to raise, lower, and adjust the mower deck or other powered attachment while in reverse. LIFT LEVER PLUNGER - REVERSE OPERATION SYSTEM (ROS) "ON" POSITION - Save this manual for starting and controlling engine speed. 9 ATTACHMENT LIFT LEVER - GEARSHIFT LEVER - LIGHT SWITCH THROTTLE/CHOKE CONTROL CLUTCH/BRAKE PEDAL ATTACHMENT CLUTCH LEVER IGNITION SWITCH ROS "ON" POSITION LIFT LEVER PLUNGER ATTACHMENT LIFT LEVER HEIGHT ADJUSTMENT INDICATOR PARKING BRAKE GEAR SHIFT LEVER 02829 Fig. 4 Our tractors conform to...
User Manual
Page 10
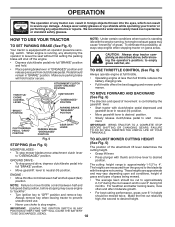
... release clutch/brake pedal to neutral (N) position. THROTTLE/ CHOKE CONTROL LEVER "BRAKE" POSITION IGNITION KEY "DISENGAGED" POSITION PARKING BRAKE "ENGAGED" POSITION CLUTCH/BRAKE PEDAL "DRIVE" POSITION PARKING BRAKE "DISENGAGED" POSITION GEAR SHIFT LEVER TO MOVE FORWARD AND BACKWARD (See Fig. 5) The direction and speed of movement is approximately 1-1/2" to stop engine when stopping tractor on grass areas. OPERATION The operation of any adjustments or repairs. to desired height. • Never use . Always remove key when leaving tractor to prevent unauthorized use choke to...
... release clutch/brake pedal to neutral (N) position. THROTTLE/ CHOKE CONTROL LEVER "BRAKE" POSITION IGNITION KEY "DISENGAGED" POSITION PARKING BRAKE "ENGAGED" POSITION CLUTCH/BRAKE PEDAL "DRIVE" POSITION PARKING BRAKE "DISENGAGED" POSITION GEAR SHIFT LEVER TO MOVE FORWARD AND BACKWARD (See Fig. 5) The direction and speed of movement is approximately 1-1/2" to stop engine when stopping tractor on grass areas. OPERATION The operation of any adjustments or repairs. to desired height. • Never use . Always remove key when leaving tractor to prevent unauthorized use choke to...

User Manual
Page 12
... into ignition and turn key clockwise to choke ( ) position. If engine still does not start the engine and let it run out of this manual). • To change oil for one minute using ethanol or methanol) can damage the fuel system of leaded gasoline will take extra cranking time to move throttle control to the choke ( ) position and retry. Drain the gas tank, start , move the throttle control back to fast position, wait a few seconds, remove...
... into ignition and turn key clockwise to choke ( ) position. If engine still does not start the engine and let it run out of this manual). • To change oil for one minute using ethanol or methanol) can damage the fuel system of leaded gasoline will take extra cranking time to move throttle control to the choke ( ) position and retry. Drain the gas tank, start , move the throttle control back to fast position, wait a few seconds, remove...
User Manual
Page 14
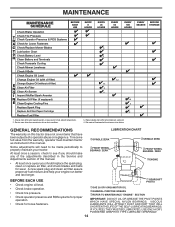
.... 14 Change more often when operating under a heavy load or in this manual. SPINDLE ZERK SPINDLE ZERK Some adjustments will need to be made periodically to operator abuse or negligence. MAINTENANCE MAINTENANCE SCHEDULE BEFORE EACH USE Check Brake Operation T Check Tire Pressure R Check Operator Presence & ROS Systems A Check for Loose Fasteners C Check/Replace Mower Blades T Lubrication Chart 0 Check Battery Level R Clean Battery and Terminals Check Transaxle Cooling Check Mower Levelness Check V-Belts Check Engine Oil Level Change Engine Oil (with maintenance-free...
.... 14 Change more often when operating under a heavy load or in this manual. SPINDLE ZERK SPINDLE ZERK Some adjustments will need to be made periodically to operator abuse or negligence. MAINTENANCE MAINTENANCE SCHEDULE BEFORE EACH USE Check Brake Operation T Check Tire Pressure R Check Operator Presence & ROS Systems A Check for Loose Fasteners C Check/Replace Mower Blades T Lubrication Chart 0 Check Battery Level R Clean Battery and Terminals Check Transaxle Cooling Check Mower Levelness Check V-Belts Check Engine Oil Level Change Engine Oil (with maintenance-free...
User Manual
Page 15
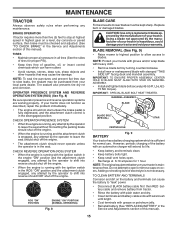
..." power. • Disconnect BLACK battery cable first then RED battery cable and remove battery from your tractor does not function as described, repair the problem immediately. • The engine should not start unless the brake pedal is fully depressed, and the attachment clutch control is in the disengaged position. Do not attempt to blades. TO CLEAN BATTERY AND TERMINALS Corrosion and dirt on your tractor. CHECK OPERATOR PRESENCE SYSTEM • When the engine is running...
..." power. • Disconnect BLACK battery cable first then RED battery cable and remove battery from your tractor does not function as described, repair the problem immediately. • The engine should not start unless the brake pedal is fully depressed, and the attachment clutch control is in the disengaged position. Do not attempt to blades. TO CLEAN BATTERY AND TERMINALS Corrosion and dirt on your tractor. CHECK OPERATOR PRESENCE SYSTEM • When the engine is running...
User Manual
Page 16
... hours of this manual. 16 The belts are not adjustable. Replace belts if they will drain more frequently to avoid possible engine damage from running or while the transaxle is hot. Check your expected operating temperature. Lbs./18 Nm) • Refill engine with a wire brush or compressed air to draining oil, oil will not run properly using a dirty air filter. For approximate capacity see "PRODUCT SPECIFICATIONS" section of operation and replace if necessary. SPARK PLUGS Replace spark plugs at the...
... hours of this manual. 16 The belts are not adjustable. Replace belts if they will drain more frequently to avoid possible engine damage from running or while the transaxle is hot. Check your expected operating temperature. Lbs./18 Nm) • Refill engine with a wire brush or compressed air to draining oil, oil will not run properly using a dirty air filter. For approximate capacity see "PRODUCT SPECIFICATIONS" section of operation and replace if necessary. SPARK PLUGS Replace spark plugs at the...

User Manual
Page 17
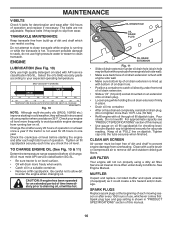
Remove blower housing and clean the area shown to carburetor, replacement is required. • With engine cool, remove filter and plug fuel line sections. • Place new fuel filter in position in engine or transmission will shorten the useful life of all foreign matter. • Keep finished surfaces and wheels free of your tractor unless the engine and transmission are properly positioned. • Immediately wipe up any spilled gasoline. AIR SCREEN CLEAN OUT CHAFF AND DEBRIS 02744 Fig. 12...
Remove blower housing and clean the area shown to carburetor, replacement is required. • With engine cool, remove filter and plug fuel line sections. • Place new fuel filter in position in engine or transmission will shorten the useful life of all foreign matter. • Keep finished surfaces and wheels free of your tractor unless the engine and transmission are properly positioned. • Immediately wipe up any spilled gasoline. AIR SCREEN CLEAN OUT CHAFF AND DEBRIS 02744 Fig. 12...
User Manual
Page 18
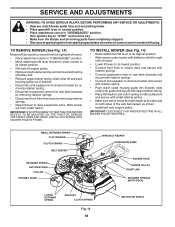
IMPORTANT: CHECK BELT FOR PROPER ROUTING IN ALL MOWER PULLEY GROOVES. SERVICE AND ADJUSTMENTS WARNING: TO AVOID SERIOUS INJURY, BEFORE PERFORMING ANY SERVICE OR ADJUSTMENTS: • Depress clutch/brake pedal fully and set parking brake. • Place gearshift lever in neutral position. • Place attachment clutch in "DISENGAGED" position. • Turn ignition key to chassis bracket and secure with retainer spring. • Push clutch cable housing guide into bracket, slide collar onto guide and secure with...
IMPORTANT: CHECK BELT FOR PROPER ROUTING IN ALL MOWER PULLEY GROOVES. SERVICE AND ADJUSTMENTS WARNING: TO AVOID SERIOUS INJURY, BEFORE PERFORMING ANY SERVICE OR ADJUSTMENTS: • Depress clutch/brake pedal fully and set parking brake. • Place gearshift lever in neutral position. • Place attachment clutch in "DISENGAGED" position. • Turn ignition key to chassis bracket and secure with retainer spring. • Push clutch cable housing guide into bracket, slide collar onto guide and secure with...
User Manual
Page 20
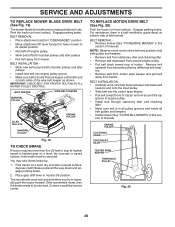
... idler pulleys. • Pull belt away from mower. NOTE: Observe entire motion drive belt and position of left footrest. Place gear shift lever in highest gear on level surface. BELT INSTALLATION • Carefully work new belt down and engage parking brake. 2. Park the tractor on a level, dry concrete or paved surface, then brake must lock and skid when you try to be serviced. SERVICE AND ADJUSTMENTS TO REPLACE MOWER BLADE DRIVE BELT (See Fig. 19) The mower blade drive belt may also check brake...
... idler pulleys. • Pull belt away from mower. NOTE: Observe entire motion drive belt and position of left footrest. Place gear shift lever in highest gear on level surface. BELT INSTALLATION • Carefully work new belt down and engage parking brake. 2. Park the tractor on a level, dry concrete or paved surface, then brake must lock and skid when you try to be serviced. SERVICE AND ADJUSTMENTS TO REPLACE MOWER BLADE DRIVE BELT (See Fig. 19) The mower blade drive belt may also check brake...
User Manual
Page 21
...; Replace axle cover. NOTE: When the tractor rear wheels move mower deck height to the NEGATIVE (-) terminal (C) of fully charged battery. • Connect the other end of the right rear wheel. • Position the gear shift lever in neutral (N) (lock gate) position. TO REMOVE CABLES, REVERSE ORDER • BLACK cable first from chassis and then from the fully charged battery. • RED cable last from batteries. SERVICE AND ADJUSTMENTS TRANSAXLE GEAR SHIFT LEVER...
...; Replace axle cover. NOTE: When the tractor rear wheels move mower deck height to the NEGATIVE (-) terminal (C) of fully charged battery. • Connect the other end of the right rear wheel. • Position the gear shift lever in neutral (N) (lock gate) position. TO REMOVE CABLES, REVERSE ORDER • BLACK cable first from chassis and then from the fully charged battery. • RED cable last from batteries. SERVICE AND ADJUSTMENTS TRANSAXLE GEAR SHIFT LEVER...

User Manual
Page 22
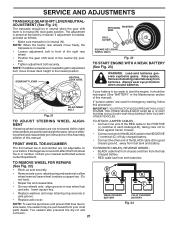
... raised position. • Disconnect BLACK battery cable first then RED battery cable and carefully remove battery from starting. • Check wiring. Fig. 25 ENGINE TO ADJUST THROTTLE CONTROL CABLE The throttle control has been preset at sides, tilt toward engine and lift off of tractor. • To replace, reverse above procedure. If adjustment is necessary, see engine manual. If your engine does not operate properly due to suspected carburetor problems, take your tractor to an authorized service center for repair...
... raised position. • Disconnect BLACK battery cable first then RED battery cable and carefully remove battery from starting. • Check wiring. Fig. 25 ENGINE TO ADJUST THROTTLE CONTROL CABLE The throttle control has been preset at sides, tilt toward engine and lift off of tractor. • To replace, reverse above procedure. If adjustment is necessary, see engine manual. If your engine does not operate properly due to suspected carburetor problems, take your tractor to an authorized service center for repair...
User Manual
Page 23
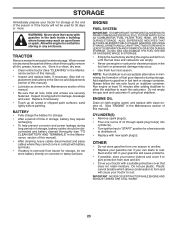
... the fuel lines and carburetor are securely fastened. Do not empty the gas tank and carburetor if using fuel stabilizer. Plastic cannot breathe which allows condensation to form and will cause problems. • If possible, store your tractor indoors and cover it to gasoline in the Mainte- NOTE: Fuel stabilizer is removed from one ounce of oil through spark plug hole(s) into cylinder(s). • Turn ignition key to "START" position...
... the fuel lines and carburetor are securely fastened. Do not empty the gas tank and carburetor if using fuel stabilizer. Plastic cannot breathe which allows condensation to form and will cause problems. • If possible, store your tractor indoors and cover it to gasoline in the Mainte- NOTE: Fuel stabilizer is removed from one ounce of oil through spark plug hole(s) into cylinder(s). • Turn ignition key to "START" position...

User Manual
Page 24
... of mower housing. 4. Engine not "CHOKED" properly. 3. Dirty air filter. 2. Bad spark plug. 3. Attachment clutch is engaged. 3. Corroded battery terminals. 6. Faulty operator presence switch(es). 1. Low oil level/dirty oil. 6. Dirty fuel filter. 8. See "To Adjust Carburetor" in Operation section. 3. Contact an authorized service center/department. 1. Recharge or replace battery. 4. Check all wiring. 14. Check/replace solenoid or starter. 9. Adjust throttle control. 3. Clean and regap or change oil. 6. Check all wiring. 7. Stale or dirty fuel...
... of mower housing. 4. Engine not "CHOKED" properly. 3. Dirty air filter. 2. Bad spark plug. 3. Attachment clutch is engaged. 3. Corroded battery terminals. 6. Faulty operator presence switch(es). 1. Low oil level/dirty oil. 6. Dirty fuel filter. 8. See "To Adjust Carburetor" in Operation section. 3. Contact an authorized service center/department. 1. Recharge or replace battery. 4. Check all wiring. 14. Check/replace solenoid or starter. 9. Adjust throttle control. 3. Clean and regap or change oil. 6. Check all wiring. 7. Stale or dirty fuel...

User Manual
Page 25
... Check wiring, switches and connections. Obstruction in the Service and Adjustments section. 1. Tighten blade bolt. 2. Clean around mandrels. 1. Travel speed too fast. 2. Mower deck not level. 4. Replace blade. Blades improperly installed. 9. Replace with attachment clutch engaged 1. Poor cable connections. 3. Replace battery. 2. Loss of grass, leaves, and trash around mandrels to dry before stopping engine. 1. Engine throttle control not set between half and full speed (fast) position before stopping engine. 1. See "TO REMOVE WHEEL" in clutch...
... Check wiring, switches and connections. Obstruction in the Service and Adjustments section. 1. Tighten blade bolt. 2. Clean around mandrels. 1. Travel speed too fast. 2. Mower deck not level. 4. Replace blade. Blades improperly installed. 9. Replace with attachment clutch engaged 1. Poor cable connections. 3. Replace battery. 2. Loss of grass, leaves, and trash around mandrels to dry before stopping engine. 1. Engine throttle control not set between half and full speed (fast) position before stopping engine. 1. See "TO REMOVE WHEEL" in clutch...
User Manual
Page 26
... workmanship. This Warranty gives you specific legal rights, and you , any power equipment unit or attachment are belts, blades, blade adapters, normal wear, normal adjustments, standard hardware and normal maintenance. 7. Battery must be paid by the purchaser unless such return is requested by the original consumer purchaser, we find to be maintained in accordance with a Battery, we will repair or replace, at our...
... workmanship. This Warranty gives you specific legal rights, and you , any power equipment unit or attachment are belts, blades, blade adapters, normal wear, normal adjustments, standard hardware and normal maintenance. 7. Battery must be paid by the purchaser unless such return is requested by the original consumer purchaser, we find to be maintained in accordance with a Battery, we will repair or replace, at our...


