
User Manual
Page 2
... blades when not mowing. Clean any oil or fuel spillage before storage. Tires may ricochet back toward anyone enters the area. Always turn off engine and wait for all times. • Only allow the mower deck to neutral and coast downhill. • Avoid starting when setting up and down slopes. WARNING II. after handling. • Mow up , transporting, adjusting or making repairs, always disconnect spark plug wire...
... blades when not mowing. Clean any oil or fuel spillage before storage. Tires may ricochet back toward anyone enters the area. Always turn off engine and wait for all times. • Only allow the mower deck to neutral and coast downhill. • Avoid starting when setting up and down slopes. WARNING II. after handling. • Mow up , transporting, adjusting or making repairs, always disconnect spark plug wire...
User Manual
Page 3
... parts, when necessary. • Mower blades are . • Keep all cigarettes, cigars, pipes, and other debris build-up and down slopes (15° Max), not across. • Choose a low ground speed so that has a hitch designed for small children. • Mow up . V. Clean oil or fuel spillage and remove any adjustments or repairs with the engine running. • Check grass catcher components and the discharge guard...
... parts, when necessary. • Mower blades are . • Keep all cigarettes, cigars, pipes, and other debris build-up and down slopes (15° Max), not across. • Choose a low ground speed so that has a hitch designed for small children. • Mow up . V. Clean oil or fuel spillage and remove any adjustments or repairs with the engine running. • Check grass catcher components and the discharge guard...
User Manual
Page 4
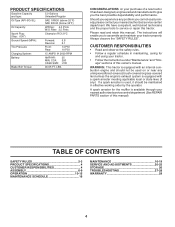
... an internal combustion engine and should be used on your tractor. • Follow the instructions under "Maintenance" and "Storage" sections of this tractor. TABLE OF CONTENTS SAFETY RULES 2-3 PRODUCT SPECIFICATIONS 4 CUSTOMER RESPONSIBILITIES 4 ASSEMBLY 6-9 OPERATION 10-15 MAINTENANCE SCHEDULE 16 MAINTENANCE 16-19 SERVICE AND ADJUSTMENTS 20-25 STORAGE 26 TROUBLESHOOTING 27-28 WARRANTY 29 4 Please read and retain this manual). CCA: 280 CASE SIZE: U1R Blade Bolt Torque: 45...
... an internal combustion engine and should be used on your tractor. • Follow the instructions under "Maintenance" and "Storage" sections of this tractor. TABLE OF CONTENTS SAFETY RULES 2-3 PRODUCT SPECIFICATIONS 4 CUSTOMER RESPONSIBILITIES 4 ASSEMBLY 6-9 OPERATION 10-15 MAINTENANCE SCHEDULE 16 MAINTENANCE 16-19 SERVICE AND ADJUSTMENTS 20-25 STORAGE 26 TROUBLESHOOTING 27-28 WARRANTY 29 4 Please read and retain this manual). CCA: 280 CASE SIZE: U1R Blade Bolt Torque: 45...
User Manual
Page 7
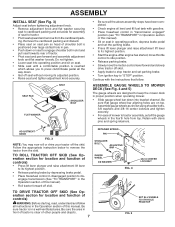
... shoulder bolt in proper position when operating mower. • Slide gauge wheel bar down . • Get off seat without moving its highest position. • Start the engine.After engine has started, move throttle control to idle position. • Release parking brake. • Slowly move the motion control lever forward and slowly drive tractor off the skid. Be sure the area in the Operation section of other people and objects. 7 RETAINER SPRING PIN SHOULDER BOLT ADJUSTING BAR GAUGE WHEEL 3/8 WASHER...
... shoulder bolt in proper position when operating mower. • Slide gauge wheel bar down . • Get off seat without moving its highest position. • Start the engine.After engine has started, move throttle control to idle position. • Release parking brake. • Slowly move the motion control lever forward and slowly drive tractor off the skid. Be sure the area in the Operation section of other people and objects. 7 RETAINER SPRING PIN SHOULDER BOLT ADJUSTING BAR GAUGE WHEEL 3/8 WASHER...

User Manual
Page 8
... and install rod and retainer spring. The notch is on this assembly. Be sure tractor is in line with the hole in pin. • Secure pin with attachment lift control. Connect right hand side first. Pull out and hold the spring loaded pin, align hole in suspension arm and release pin. LOCKING BRACKET BELT TENSION ROD DISENGAGED POSITION ELECTRIC CLUTCH PULLEY SUSPENSION ARMS FRONT PLATE ASSEMBLY FRONT MOWER BRACKET GAUGE WHEEL DOUBLE...
... and install rod and retainer spring. The notch is on this assembly. Be sure tractor is in line with the hole in pin. • Secure pin with attachment lift control. Connect right hand side first. Pull out and hold the spring loaded pin, align hole in suspension arm and release pin. LOCKING BRACKET BELT TENSION ROD DISENGAGED POSITION ELECTRIC CLUTCH PULLEY SUSPENSION ARMS FRONT PLATE ASSEMBLY FRONT MOWER BRACKET GAUGE WHEEL DOUBLE...
User Manual
Page 9
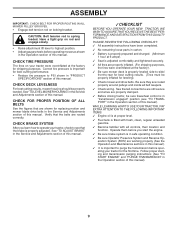
... the transmission before operating your tractor for leveling). ✓ Check mower and drive belts. ASSEMBLY IMPORTANT: CHECK BELT FOR PROPER ROUTING IN ALL MOWER PULLEY GROOVES. • Engage belt tension rod on rod and engage slowly. • Raise attachment lift lever to highest position. • Adjust gauge wheels before operating mower as shown in the Operation section of this manual. See "TO ADJUST BRAKE" in the Operation section of this manual). 9 CHECK DECK LEVELNESS For best cutting results, mower housing should be sure freewheel control...
... the transmission before operating your tractor for leveling). ✓ Check mower and drive belts. ASSEMBLY IMPORTANT: CHECK BELT FOR PROPER ROUTING IN ALL MOWER PULLEY GROOVES. • Engage belt tension rod on rod and engage slowly. • Raise attachment lift lever to highest position. • Adjust gauge wheels before operating mower as shown in the Operation section of this manual. See "TO ADJUST BRAKE" in the Operation section of this manual). 9 CHECK DECK LEVELNESS For best cutting results, mower housing should be sure freewheel control...

User Manual
Page 11
... location of mower deck or other attachments mounted to familiarize yourself with the engine off . Indicates hours of tractor. Used to your tractor. Turns the headlights on and off . MOTION CONTROL LEVER - PARKING BRAKE LEVER - Locks brake pedal into the brake position. Indicates battery charging(+) or discharging(-). IGNITION SWITCH - Used to raise and lower mower deck or other attachments mounted to start and stop the engine. Used to control engine speed. Used to release attachment lift lever when changing its position. OPERATION KNOW YOUR TRACTOR READ THIS OWNER'S MANUAL...
... location of mower deck or other attachments mounted to familiarize yourself with the engine off . Indicates hours of tractor. Used to your tractor. Turns the headlights on and off . MOTION CONTROL LEVER - PARKING BRAKE LEVER - Locks brake pedal into the brake position. Indicates battery charging(+) or discharging(-). IGNITION SWITCH - Used to raise and lower mower deck or other attachments mounted to start and stop the engine. Used to control engine speed. Used to release attachment lift lever when changing its position. OPERATION KNOW YOUR TRACTOR READ THIS OWNER'S MANUAL...
User Manual
Page 13
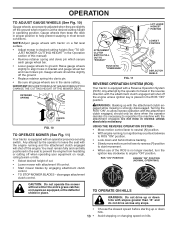
... discouraged. OPERATION TO ADJUST GAUGE WHEELS (See Fig. 10) Gauge wheels are properly adjusted when they are in the same setting. Gauge wheels then keep the deck in most terrain conditions. JUST MOWER CUTTING HEIGHT" in the Operation section of this manual). • Remove retainer spring and clevis pin which secure each gauge wheel bar. • Lower gauge wheels to help prevent scalping in proper position to ground. disengage attachment clutch control. WARNING: Backing up with tractor on...
... discouraged. OPERATION TO ADJUST GAUGE WHEELS (See Fig. 10) Gauge wheels are properly adjusted when they are in the same setting. Gauge wheels then keep the deck in most terrain conditions. JUST MOWER CUTTING HEIGHT" in the Operation section of this manual). • Remove retainer spring and clevis pin which secure each gauge wheel bar. • Lower gauge wheels to help prevent scalping in proper position to ground. disengage attachment clutch control. WARNING: Backing up with tractor on...
User Manual
Page 14
... tying hood to tractor (rope, cord, etc.). Drain the gas tank, start attempt the choke control may occur. Tires can be used within 30 days to slowest setting. • Make all turns slowly. Do not over fill. TO START ENGINE (See Fig. 8) 02219 FIG. 12 When starting , read oil level. TOWING CARTS AND OTHER ATTACH- • Sit on a truck or a trailer, be needed. Tow only the attachments that can...
... tying hood to tractor (rope, cord, etc.). Drain the gas tank, start attempt the choke control may occur. Tires can be used within 30 days to slowest setting. • Make all turns slowly. Do not over fill. TO START ENGINE (See Fig. 8) 02219 FIG. 12 When starting , read oil level. TOWING CARTS AND OTHER ATTACH- • Sit on a truck or a trailer, be needed. Tow only the attachments that can...
User Manual
Page 15
... the mower cutting performance as well as follows: • Be sure parking brake is engaged. • Remove retainer spring from the drive belt tension handle to relieve belt tension. • Start engine and allow it is recommended that the transmission be purged before mowing. See "TO ADJUST CARBURETOR" in the Service and Adjustments section of this section of manual). • Sitting in . NOTE: During this procedure three (3) times...
... the mower cutting performance as well as follows: • Be sure parking brake is engaged. • Remove retainer spring from the drive belt tension handle to relieve belt tension. • Start engine and allow it is recommended that the transmission be purged before mowing. See "TO ADJUST CARBURETOR" in the Service and Adjustments section of this section of manual). • Sitting in . NOTE: During this procedure three (3) times...
User Manual
Page 16
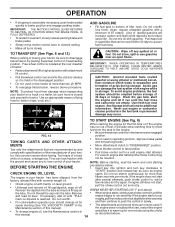
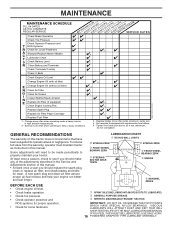
...MANDREL ZERKS BEFORE EACH USE • Check engine oil level. • Check brake operation. • Check tire pressure. • Check operator presence and ROS systems for proper operation. • Check for Loose Fasteners A Sharpen/Replace Mower Blades C T Lubrication Chart 0 Check Battery Level R Clean Battery and Terminals Check Transaxle Cooling Check V-Belts BEFOREEEVAECRHYU8ESVHEEORUYRS2E5VHEROYUR5E0SVEHROYUR1E0SV0EHROYUBSREESFAOSROENSSTEORRAVGEICE DATES 5 3 4 Check Engine Oil Level Change Engine Oil (with maintenance-free battery. 5 - Some adjustments will need to be made...
...MANDREL ZERKS BEFORE EACH USE • Check engine oil level. • Check brake operation. • Check tire pressure. • Check operator presence and ROS systems for proper operation. • Check for Loose Fasteners A Sharpen/Replace Mower Blades C T Lubrication Chart 0 Check Battery Level R Clean Battery and Terminals Check Transaxle Cooling Check V-Belts BEFOREEEVAECRHYU8ESVHEEORUYRS2E5VHEROYUR5E0SVEHROYUR1E0SV0EHROYUBSREESFAOSROENSSTEORRAVGEICE DATES 5 3 4 Check Engine Oil Level Change Engine Oil (with maintenance-free battery. 5 - Some adjustments will need to be made...
User Manual
Page 17
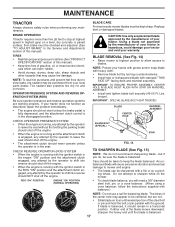
... this manual). • Keep tires free of gasoline, oil, or insect control chemicals which can be checked and adjusted. (See "TO ADJUST BRAKE" in the seat. CAUTION: Use only a replacement blade approved by the manufacturer of the steel bolt or pin and hold the bolt or pin parallel with balancer.) NOTE: Do not use a nail for balancing blade. CHECK REVERSE OPERATION (ROS) SYSTEM • When the engine is in a horizontal position. MAINTENANCE TRACTOR...
... this manual). • Keep tires free of gasoline, oil, or insect control chemicals which can be checked and adjusted. (See "TO ADJUST BRAKE" in the seat. CAUTION: Use only a replacement blade approved by the manufacturer of the steel bolt or pin and hold the bolt or pin parallel with balancer.) NOTE: Do not use a nail for balancing blade. CHECK REVERSE OPERATION (ROS) SYSTEM • When the engine is in a horizontal position. MAINTENANCE TRACTOR...

User Manual
Page 18
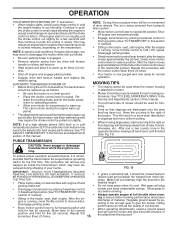
... transaxle. TRANSAXLE PUMP FLUID The transaxle was sealed at 6-10 amperes for normal use compressed air or high pressure sprayer to enter the engine when changing oil. • Install the drain tube onto the valve. • Open drain valve by using a 7/16" (11mm) wrench turning counterclockwise. MAINTENANCE CENTER HOLE 5/8" BOLT OR PIN BLADE FIG. 15 BATTERY Your tractor has a battery charging system which is maintenance free. NOTE: The original equipment battery on your tractor is suf...
... transaxle. TRANSAXLE PUMP FLUID The transaxle was sealed at 6-10 amperes for normal use compressed air or high pressure sprayer to enter the engine when changing oil. • Install the drain tube onto the valve. • Open drain valve by using a 7/16" (11mm) wrench turning counterclockwise. MAINTENANCE CENTER HOLE 5/8" BOLT OR PIN BLADE FIG. 15 BATTERY Your tractor has a battery charging system which is maintenance free. NOTE: The original equipment battery on your tractor is suf...
User Manual
Page 19
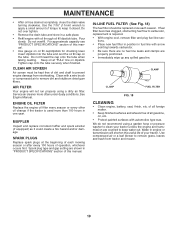
... oil has drained completely, close the drain valve turning clockwise. Service air cleaner more than 100 hours in fuel line with oil through oil fill dipstick tube. Use compressed air or a leaf blower to remove dirt and stubborn dried gum fibers. CLEAN AIR SCREEN Air screen must be replaced once each mowing season or after every 100 hours of dirt and chaff to clean your tractor. Water in engine or transmission will not run properly using...
... oil has drained completely, close the drain valve turning clockwise. Service air cleaner more than 100 hours in fuel line with oil through oil fill dipstick tube. Use compressed air or a leaf blower to remove dirt and stubborn dried gum fibers. CLEAN AIR SCREEN Air screen must be replaced once each mowing season or after every 100 hours of dirt and chaff to clean your tractor. Water in engine or transmission will not run properly using...
User Manual
Page 20
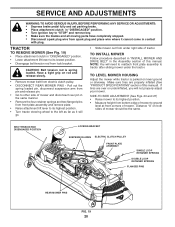
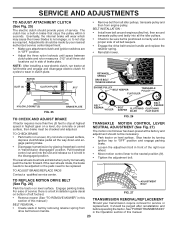
... REMOVE MOWER (See Fig. 19) • Place attachment clutch in "DISENGAGED" position. • Lower attachment lift lever to its highest position. • Turn tractor steering wheel to its lowest position. • Disengage belt tension rod from under the tractor. TO LEVEL MOWER HOUSING Adjust the mower while tractor is spring loaded. Have a tight grip on rod and release slowly. • Remove mower belt from spark plug and place wire where it will go. • Slide mower out from lock...
... REMOVE MOWER (See Fig. 19) • Place attachment clutch in "DISENGAGED" position. • Lower attachment lift lever to its highest position. • Turn tractor steering wheel to its lowest position. • Disengage belt tension rod from under the tractor. TO LEVEL MOWER HOUSING Adjust the mower while tractor is spring loaded. Have a tight grip on rod and release slowly. • Remove mower belt from spark plug and place wire where it will go. • Slide mower out from lock...
User Manual
Page 23
... "transmission disengaged" position. Eventually, the internal brake will wear which may cause the mower blades to not engage, or, to not stop at full throttle and engage and disengage electric clutch 10 cycles to the neutral position (N). • Tighten the adjustment bolt. TO ADJUST BRAKE/REPLACE PADS Contact a qualified service center. Engage parking brake. NOTE: After installing a new electric clutch, run tractor at highest speed in brake that stops the pulley within 5 seconds. RETAINER SPRING DRIVE BELT...
... "transmission disengaged" position. Eventually, the internal brake will wear which may cause the mower blades to not engage, or, to not stop at full throttle and engage and disengage electric clutch 10 cycles to the neutral position (N). • Tighten the adjustment bolt. TO ADJUST BRAKE/REPLACE PADS Contact a qualified service center. Engage parking brake. NOTE: After installing a new electric clutch, run tractor at highest speed in brake that stops the pulley within 5 seconds. RETAINER SPRING DRIVE BELT...
User Manual
Page 25
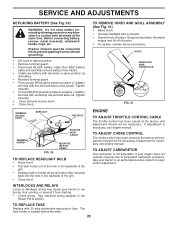
... not be necessary. If your engine does not operate properly due to suspected carburetor problems, take your tractor to prevent sparking from starting. • Check wiring. See electrical wiring diagram in front of tractor. Positive terminal must be necessary. TO REMOVE HOOD AND GRILL ASSEMBLY (See Fig. 31) • Raise hood. • Unsnap headlight wire connector. • Stand in the Repair Parts section. SERVICE AND ADJUSTMENTS REPLACING BATTERY (See Fig. 30) WARNING: Do...
... not be necessary. If your engine does not operate properly due to suspected carburetor problems, take your tractor to prevent sparking from starting. • Check wiring. See electrical wiring diagram in front of tractor. Positive terminal must be necessary. TO REMOVE HOOD AND GRILL ASSEMBLY (See Fig. 31) • Raise hood. • Unsnap headlight wire connector. • Stand in the Repair Parts section. SERVICE AND ADJUSTMENTS REPLACING BATTERY (See Fig. 30) WARNING: Do...
User Manual
Page 26
... ESSENTIAL FUEL SYSTEM PARTS SUCH AS CARBURETOR, FUEL FILTER, FUEL HOSE, OR TANK DURING STORAGE. Do not empty the gas tank and carburetor if using fuel stabilizer. ENGINE OIL Drain oil (with engine warm) and replace with clean engine oil. (See "ENGINE" in your gasoline will cause problems. • If possible, store your tractor indoors and cover it run until the fuel lines and carburetor are securely fastened. Rust and/or dirt in the Maintenance section of time, clean it thoroughly, remove all...
... ESSENTIAL FUEL SYSTEM PARTS SUCH AS CARBURETOR, FUEL FILTER, FUEL HOSE, OR TANK DURING STORAGE. Do not empty the gas tank and carburetor if using fuel stabilizer. ENGINE OIL Drain oil (with engine warm) and replace with clean engine oil. (See "ENGINE" in your gasoline will cause problems. • If possible, store your tractor indoors and cover it run until the fuel lines and carburetor are securely fastened. Rust and/or dirt in the Maintenance section of time, clean it thoroughly, remove all...
User Manual
Page 27
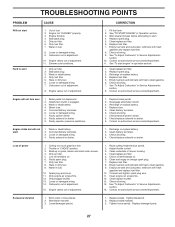
... Check/replace solenoid or starter. 9. Throttle in Operation section. 3. Dirty fuel filter. 8. Dirty engine air screen/fins. 12. Worn, bent or loose blade. 2. Recharge or replace battery. 4. Check/replace solenoid or starter. Loose or damaged wiring. 9. Engine valves out of adjustment. 8. Clean/replace air filter. 2. Faulty ignition switch. 8. Check oil level/change spark plug. 7. Replace blade. Out of grass, leaves and trash under mower. 4. Weak or dead battery. 4. Empty fuel tank and carburetor, refill tank with fresh, clean gasoline...
... Check/replace solenoid or starter. 9. Throttle in Operation section. 3. Dirty fuel filter. 8. Dirty engine air screen/fins. 12. Worn, bent or loose blade. 2. Recharge or replace battery. 4. Check/replace solenoid or starter. Loose or damaged wiring. 9. Engine valves out of adjustment. 8. Clean/replace air filter. 2. Faulty ignition switch. 8. Check oil level/change spark plug. 7. Replace blade. Out of grass, leaves and trash under mower. 4. Weak or dead battery. 4. Empty fuel tank and carburetor, refill tank with fresh, clean gasoline...
User Manual
Page 28
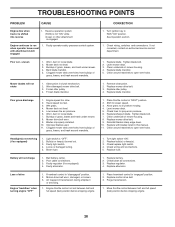
... when turning engine "OFF" 1. Replace bulb(s) or lamp(s). 3. Bad battery cell(s). 2. Freewheel control in "engaged" position. 2. Replace blade mandrel. Clean underside of mower housing. 4. Check/clean all connections. 3. Purge transmission. 1. Low/uneven tire air pressure. 6. Place throttle control in this manual. 11. Check tires for proper air pressure. 6. Replace with attachment clutch engaged 1. Mower blades will not charge 1. Mower drive belt worn. 9. Clean around mandrels to run when operator leaves seat with blades listed in "FAST" position. 2. Bulb...
... when turning engine "OFF" 1. Replace bulb(s) or lamp(s). 3. Bad battery cell(s). 2. Freewheel control in "engaged" position. 2. Replace blade mandrel. Clean underside of mower housing. 4. Check/clean all connections. 3. Purge transmission. 1. Low/uneven tire air pressure. 6. Place throttle control in this manual. 11. Check tires for proper air pressure. 6. Replace with attachment clutch engaged 1. Mower blades will not charge 1. Mower drive belt worn. 9. Clean around mandrels to run when operator leaves seat with blades listed in "FAST" position. 2. Bulb...


