
User Manual
Page 2
... accidental starting , stopping, or turning on it, do not mow it cannot contact spark plug. Shut off blades, set parking brake, stop before cleaning the machine, removing the grass catcher, or unclogging the discharge guard. • Operate machine only in . Uneven terrain could suddenly roll over if a wheel is dangerous. FAILURE TO OBSERVE THE FOLLOWING SAFETY INSTRUCTIONS COULD RESULT IN SERIOUS INJURY OR DEATH. SLOPE OPERATION Battery...
... accidental starting , stopping, or turning on it, do not mow it cannot contact spark plug. Shut off blades, set parking brake, stop before cleaning the machine, removing the grass catcher, or unclogging the discharge guard. • Operate machine only in . Uneven terrain could suddenly roll over if a wheel is dangerous. FAILURE TO OBSERVE THE FOLLOWING SAFETY INSTRUCTIONS COULD RESULT IN SERIOUS INJURY OR DEATH. SLOPE OPERATION Battery...

User Manual
Page 3
... where there is an open device. • If fuel is extremely flammable and the vapors are sharp. Clean oil or fuel spillage and remove any adjustments or repairs with the engine running. • Check grass catcher components and the discharge guard frequently and replace with a portable container, rather than the operator. • Be alert and turn slowly and gradually downhill, if possible. 3 They may fall...
... where there is an open device. • If fuel is extremely flammable and the vapors are sharp. Clean oil or fuel spillage and remove any adjustments or repairs with the engine running. • Check grass catcher components and the discharge guard frequently and replace with a portable container, rather than the operator. • Be alert and turn slowly and gradually downhill, if possible. 3 They may fall...

User Manual
Page 4
... 32°F) Oil Capacity: 3.0 Pints Spark Plug: (Gap: .030") Champion RC12YC Ground Speed (MPH): Forward: 5.5 Reverse: 2.4 Tire Pressure: Front: Rear: 14 PSI 10 PSI Charging System: 15 Amps @ 3600 RPM Battery: AMP/HR: Min. age" sections of a new tractor. TABLE OF CONTENTS SAFETY RULES 2-3 PRODUCT SPECIFICATIONS 4 CUSTOMER RESPONSIBILITIES 4 ASSEMBLY 6-8 OPERATION 9-14 MAINTENANCE SCHEDULE 15 MAINTENANCE 15-18 SERVICE AND ADJUSTMENTS 19-23 STORAGE 24 TROUBLESHOOTING 25-26 WARRANTY 27 4 Always...
... 32°F) Oil Capacity: 3.0 Pints Spark Plug: (Gap: .030") Champion RC12YC Ground Speed (MPH): Forward: 5.5 Reverse: 2.4 Tire Pressure: Front: Rear: 14 PSI 10 PSI Charging System: 15 Amps @ 3600 RPM Battery: AMP/HR: Min. age" sections of a new tractor. TABLE OF CONTENTS SAFETY RULES 2-3 PRODUCT SPECIFICATIONS 4 CUSTOMER RESPONSIBILITIES 4 ASSEMBLY 6-8 OPERATION 9-14 MAINTENANCE SCHEDULE 15 MAINTENANCE 15-18 SERVICE AND ADJUSTMENTS 19-23 STORAGE 24 TROUBLESHOOTING 25-26 WARRANTY 27 4 Always...
User Manual
Page 7
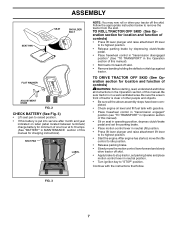
... position. • Start the engine.After engine has started, move throttle control to remove the tractor from the skid. TO DRIVE TRACTOR OFF SKID (See Operation section for charging instructions). Be sure the area in front of tractor is in Operation section of this manual for location and function of controls) WARNING: Before starting, read, understand and follow all the above assembly steps have been completed. • Check engine oil level and fill fuel tank...
... position. • Start the engine.After engine has started, move throttle control to remove the tractor from the skid. TO DRIVE TRACTOR OFF SKID (See Operation section for charging instructions). Be sure the area in front of tractor is in Operation section of this manual for location and function of controls) WARNING: Before starting, read, understand and follow all the above assembly steps have been completed. • Check engine oil level and fill fuel tank...
User Manual
Page 8
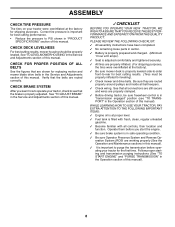
... with all belt keepers. ✓ Check wiring. See that are shown for best cutting performance. • Reduce tire pressure to PSI shown in "PRODUCT SPECIFICATIONS" section of this manual. Follow proper starting and transmission purging instructions (See "TO START ENGINE" and "PURGE TRANSMISSION" in the Operation section of this manual). See"TO LEVEL MOWER HOUSING"in the Service and Adjustments section of this manual. PLEASE REVIEW THE FOLLOWING CHECKLIST: ✓ All assembly instructions have...
... with all belt keepers. ✓ Check wiring. See that are shown for best cutting performance. • Reduce tire pressure to PSI shown in "PRODUCT SPECIFICATIONS" section of this manual. Follow proper starting and transmission purging instructions (See "TO START ENGINE" and "PURGE TRANSMISSION" in the Operation section of this manual). See"TO LEVEL MOWER HOUSING"in the Service and Adjustments section of this manual. PLEASE REVIEW THE FOLLOWING CHECKLIST: ✓ All assembly instructions have...

User Manual
Page 12
...attachment engaged. USING THE REVERSE OPERATION SYSTEM - • Move motion control lever to reposition the machine with an operator presence sensing switch. ATTACHMENT CLUTCH LEVER "DISENGAGED" POSITION "ENGAGED" POSITION ATTACHMENT LIFT LEVER HIGH POSITION LOW POSITION DEFLECTOR SHIELD FIG. 7 REVERSE OPERATION SYSTEM (ROS) Your tractor is at level surface. • Adjust mower to desired cutting height (See "TO ADJUST MOWER CUTTING HEIGHT" in the Operation section of this manual). • With mower in operating position. ROS "ON" POSITION ENGINE "ON" POSITION (NORMAL OPERATING...
...attachment engaged. USING THE REVERSE OPERATION SYSTEM - • Move motion control lever to reposition the machine with an operator presence sensing switch. ATTACHMENT CLUTCH LEVER "DISENGAGED" POSITION "ENGAGED" POSITION ATTACHMENT LIFT LEVER HIGH POSITION LOW POSITION DEFLECTOR SHIELD FIG. 7 REVERSE OPERATION SYSTEM (ROS) Your tractor is at level surface. • Adjust mower to desired cutting height (See "TO ADJUST MOWER CUTTING HEIGHT" in the Operation section of this manual). • With mower in operating position. ROS "ON" POSITION ENGINE "ON" POSITION (NORMAL OPERATING...

User Manual
Page 13
... and set parking brake. TO TRANSPORT (See Figs. 4 and 8) When pushing or towing your trac- • Place motion control lever in the transmission engaged position. Do not store, spill or use engine or carburetor cleaner products in storage. Use fresh fuel next season. tor. If engine still does not start, move the throttle control back to bottom of a load, • Move attachment clutch to "START" CHECK ENGINE OIL LEVEL The engine in operating position, depress clutch/brake...
... and set parking brake. TO TRANSPORT (See Figs. 4 and 8) When pushing or towing your trac- • Place motion control lever in the transmission engaged position. Do not store, spill or use engine or carburetor cleaner products in storage. Use fresh fuel next season. tor. If engine still does not start, move the throttle control back to bottom of a load, • Move attachment clutch to "START" CHECK ENGINE OIL LEVEL The engine in operating position, depress clutch/brake...
User Manual
Page 14
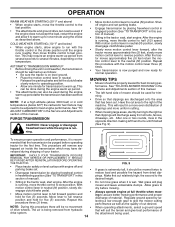
... "TO LEVEL MOWER HOUSING" in the Service and Adjustments section of this section of mower should be adjusted for five (5) seconds. IMPORTANT: SHOULD YOUR TRANSMISSION REQUIRE REMOVAL FOR SERVICE OR REPLACEMENT, IT SHOULD BE PURGED AFTER REINSTALLATION BEFORE OPERATING THE TRACTOR. • Place tractor safely on the temperature. This may need to run - COLD WEATHER STARTING ( 50° F and below 32 F) the carburetor fuel mixture may require an engine warm...
... "TO LEVEL MOWER HOUSING" in the Service and Adjustments section of this section of mower should be adjusted for five (5) seconds. IMPORTANT: SHOULD YOUR TRANSMISSION REQUIRE REMOVAL FOR SERVICE OR REPLACEMENT, IT SHOULD BE PURGED AFTER REINSTALLATION BEFORE OPERATING THE TRACTOR. • Place tractor safely on the temperature. This may need to run - COLD WEATHER STARTING ( 50° F and below 32 F) the carburetor fuel mixture may require an engine warm...

User Manual
Page 15
...;FRONT WHEEL BEARING ZERK ➁ENGINE BEFORE EACH USE • Check engine oil level. • Check brake operation. • Check tire pressure. • Check operator presence and ROS systems for proper operation. • Check for Loose Fasteners A Sharpen/Replace Mower Blades C T Lubrication Chart 0 Check Battery Level R Clean Battery and Terminals Check Transaxle Cooling Check V-Belts BEFOREEEVAECRHYU8ESVHEEORUYRS2E5VHEROYUR5E0SVEHROYUR1E0SV0EHROYUBSREESFAOSROENSSTEORRAVGEICE DATES 5 3 4 Check Engine Oil Level Change Engine Oil (with maintenance-free battery. 5 -
...;FRONT WHEEL BEARING ZERK ➁ENGINE BEFORE EACH USE • Check engine oil level. • Check brake operation. • Check tire pressure. • Check operator presence and ROS systems for proper operation. • Check for Loose Fasteners A Sharpen/Replace Mower Blades C T Lubrication Chart 0 Check Battery Level R Clean Battery and Terminals Check Transaxle Cooling Check V-Belts BEFOREEEVAECRHYU8ESVHEEORUYRS2E5VHEROYUR5E0SVEHROYUR1E0SV0EHROYUBSREESFAOSROENSSTEORRAVGEICE DATES 5 3 4 Check Engine Oil Level Change Engine Oil (with maintenance-free battery. 5 -
User Manual
Page 16
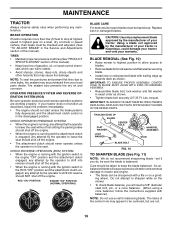
... sharpened with the ignition switch in all tires (See"PRODUCT SPECIFICATIONS" section of this manual). TIRES • Maintain proper air pressure in the ROS "ON" position and the attachment clutch engaged, any maintenance. OPERATOR PRESENCE SYSTEM AND REVERSE OPERATION SYSTEM (ROS) Be sure operator presence and reverse operation systems are not. 828 16 Using a blade not approved by the operator to mower and engine. • The blade can be kept...
... sharpened with the ignition switch in all tires (See"PRODUCT SPECIFICATIONS" section of this manual). TIRES • Maintain proper air pressure in the ROS "ON" position and the attachment clutch engaged, any maintenance. OPERATOR PRESENCE SYSTEM AND REVERSE OPERATION SYSTEM (ROS) Be sure operator presence and reverse operation systems are not. 828 16 Using a blade not approved by the operator to mower and engine. • The blade can be kept...

User Manual
Page 17
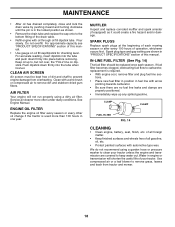
... to clean cool- • To open or remove caps or covers. Check the crankcase oil level before oil change. OIL DRAIN VALVE CLOSED AND LOCKED POSITION 02463 TRANSAXLE COOLING The transmission fan and cooling fins should remain in the SERVICE AND ADJUSTMENTS section of the transaxle. MAINTENANCE • Slide blade on to slip from wear. If either end of electrolyte is balanced. compressed air or high pressure sprayer to open , pull out...
... to clean cool- • To open or remove caps or covers. Check the crankcase oil level before oil change. OIL DRAIN VALVE CLOSED AND LOCKED POSITION 02463 TRANSAXLE COOLING The transmission fan and cooling fins should remain in the SERVICE AND ADJUSTMENTS section of the transaxle. MAINTENANCE • Slide blade on to slip from wear. If either end of electrolyte is balanced. compressed air or high pressure sprayer to open , pull out...
User Manual
Page 18
... manual. • Use gauge on dipstick. tions. • Place new fuel filter in position in fuel line with a wire brush or compressed air to carburetor, replacement is required. • With engine cool, remove filter and plug fuel line sec- Water in engine or transmission will not run properly using a garden hose or pressure washer to clean your tractor. MAINTENANCE • After oil has drained completely, close and lock the drain valve by pushing inward and turning clockwise until the pin is used...
... manual. • Use gauge on dipstick. tions. • Place new fuel filter in position in fuel line with a wire brush or compressed air to carburetor, replacement is required. • With engine cool, remove filter and plug fuel line sec- Water in engine or transmission will not run properly using a garden hose or pressure washer to clean your tractor. MAINTENANCE • After oil has drained completely, close and lock the drain valve by pushing inward and turning clockwise until the pin is used...
User Manual
Page 19
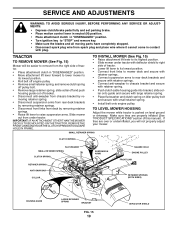
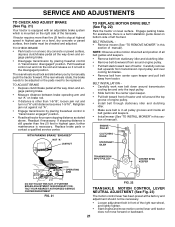
... "PRODUCT SPECIFICATIONS" section of tractor. • Lower lift lever to its highest position. • Slide mower under tractor. TRACTOR TO REMOVE MOWER (See Fig. 15) Mower will not properly adjust your mower. TO LEVEL MOWER HOUSING Adjust the mower while tractor is parked on idler pulley bolt and secure with plug. moving parts have completely stopped. • Disconnect spark plug wire from spark plug and place wire where it cannot come in contact with small retainer spring. • Install belt onto engine pulley.
... "PRODUCT SPECIFICATIONS" section of tractor. • Lower lift lever to its highest position. • Slide mower under tractor. TRACTOR TO REMOVE MOWER (See Fig. 15) Mower will not properly adjust your mower. TO LEVEL MOWER HOUSING Adjust the mower while tractor is parked on idler pulley bolt and secure with plug. moving parts have completely stopped. • Disconnect spark plug wire from spark plug and place wire where it cannot come in contact with small retainer spring. • Install belt onto engine pulley.
User Manual
Page 20
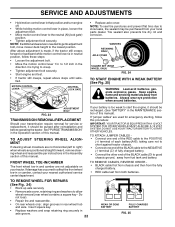
... turns. SERVICE AND ADJUSTMENTS SIDE-TO-SIDE ADJUSTMENT (See Figs. 16 and 17) • Raise mower to its highest position. Engage parking brake. Check adjustment on both front links an equal number of turns. • When distance "D" is in its highest position. • At the midpoint of both front links. BELT REMOVAL • Remove mower from bottom edge of removal instruc- To obtain the best cutting results, the mower housing...
... turns. SERVICE AND ADJUSTMENTS SIDE-TO-SIDE ADJUSTMENT (See Figs. 16 and 17) • Raise mower to its highest position. Engage parking brake. Check adjustment on both front links an equal number of turns. • When distance "D" is in its highest position. • At the midpoint of both front links. BELT REMOVAL • Remove mower from bottom edge of removal instruc- To obtain the best cutting results, the mower housing...
User Manual
Page 21
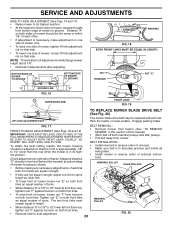
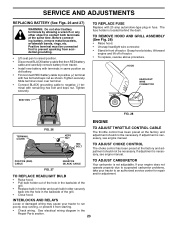
... the tractor on a level, dry concrete or paved surface, depress clutch/brake pedal all belt guides and keepers. • Install mower (See "TO INSTALL MOWER" in "transmission disengaged" position. If tractor requires more than five (5) feet to be replaced. ENGINE PULLEY CLUTCHING IDLER STATIONARY IDLER OPERATING ARM 01513 DO NOT TOUCH THIS NUT. Readjust if necessary. Replace brake pads or contact a qualified service center. BELT REMOVAL • Remove mower (See "TO REMOVE MOWER" in "transmission engaged" position...
... the tractor on a level, dry concrete or paved surface, depress clutch/brake pedal all belt guides and keepers. • Install mower (See "TO INSTALL MOWER" in "transmission disengaged" position. If tractor requires more than five (5) feet to be replaced. ENGINE PULLEY CLUTCHING IDLER STATIONARY IDLER OPERATING ARM 01513 DO NOT TOUCH THIS NUT. Readjust if necessary. Replace brake pads or contact a qualified service center. BELT REMOVAL • Remove mower (See "TO REMOVE MOWER" in "transmission engaged" position...
User Manual
Page 22
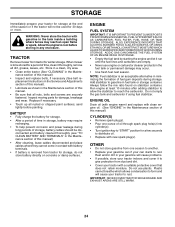
... Operation section of the BLACK cable (D) to the neutral (N) (lock gate) position. • Tighten adjustment bolt securely. FIG. 23 ADJUSTMENT BOLT TRANSMISSION REMOVAL/REPLACEMENT Should your nearest authorized service center/department. See"PURGETRANSMISSION" in and camber are positioned straight forward, remove steering wheel and reassemble per instructions in or camber, contact your transmission require removal for emergency starting, follow these steps: • Loosen the adjustment bolt. • Move the motion control lever 1/4 to start...
... Operation section of the BLACK cable (D) to the neutral (N) (lock gate) position. • Tighten adjustment bolt securely. FIG. 23 ADJUSTMENT BOLT TRANSMISSION REMOVAL/REPLACEMENT Should your nearest authorized service center/department. See"PURGETRANSMISSION" in and camber are positioned straight forward, remove steering wheel and reassemble per instructions in or camber, contact your transmission require removal for emergency starting, follow these steps: • Loosen the adjustment bolt. • Move the motion control lever 1/4 to start...
User Manual
Page 23
... carefully remove battery from tractor. • Install new battery with terminals in same position as shown. SEAT PAN TO REPLACE FUSE Replace with 20 amp automotive-type plug-in the Repair Parts section. 23 HOOD HEADLIGHT WIRE CONNECTOR 01536 FIG. 28 ENGINE TERMINAL COVER FIG. 26 KEPS NUT HEX BOLT TO ADJUST THROTTLE CONTROL CABLE The throttle control has been preset at the factory and adjustment should not be necessary. Grasp hood at the same time...
... carefully remove battery from tractor. • Install new battery with terminals in same position as shown. SEAT PAN TO REPLACE FUSE Replace with 20 amp automotive-type plug-in the Repair Parts section. 23 HOOD HEADLIGHT WIRE CONNECTOR 01536 FIG. 28 ENGINE TERMINAL COVER FIG. 26 KEPS NUT HEX BOLT TO ADJUST THROTTLE CONTROL CABLE The throttle control has been preset at the factory and adjustment should not be necessary. Grasp hood at the same time...
User Manual
Page 24
... container. TRACTOR Remove mower from tractor for 30 days or more. BATTERY • Fully charge the battery for storage. • After a period of oil through spark plug hole(s) into cylinder(s). • Turn ignition key to "START" position for damage, breakage and wear. Do not empty the gas tank and carburetor if using fuel stabilizer. placement instructions in the Service and Adjustments section of this manual). • Lubricate as shown in the Maintenance section...
... container. TRACTOR Remove mower from tractor for 30 days or more. BATTERY • Fully charge the battery for storage. • After a period of oil through spark plug hole(s) into cylinder(s). • Turn ignition key to "START" position for damage, breakage and wear. Do not empty the gas tank and carburetor if using fuel stabilizer. placement instructions in the Service and Adjustments section of this manual). • Lubricate as shown in the Maintenance section...

User Manual
Page 25
...service center/department. Blown fuse. 5. Recharge or replace battery. 4. Replace fuse. 5. Recharge or replace battery. 2. Throttle in Operation section. 3. Low oil level/dirty oil. 6. Loose or damaged wiring. 14. Check all wiring. 7. Tighten blade bolt. 2. Carburetor out of mower housing. 4. Replace spark plug. 3. Faulty ignition switch. 8. Dirty air filter. 5. Dirty fuel filter. 8. Dirty/clogged muffler. 13. Check oil level/change spark plug. 7. Tighten loose part(s). Loose or damaged wiring. 9. Dirty air filter. 2. Clean...
...service center/department. Blown fuse. 5. Recharge or replace battery. 4. Replace fuse. 5. Recharge or replace battery. 2. Throttle in Operation section. 3. Low oil level/dirty oil. 6. Loose or damaged wiring. 14. Check all wiring. 7. Tighten blade bolt. 2. Carburetor out of mower housing. 4. Replace spark plug. 3. Faulty ignition switch. 8. Dirty air filter. 5. Dirty fuel filter. 8. Dirty/clogged muffler. 13. Check oil level/change spark plug. 7. Tighten loose part(s). Loose or damaged wiring. 9. Dirty air filter. 2. Clean...
User Manual
Page 26
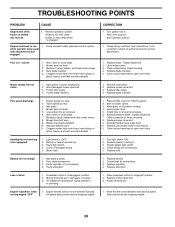
...Replace idler pulley. 4. Clean around mandrels to dry before stopping engine. 26 Freewheel control in clutch mechanism. 2. Engine speed too slow. 2. Purge transmission. Turn ignition key to slower speed. 3. Obstruction in "disengaged" position. 2. Check tires for proper air pressure. 6. Replace blade. Clean around mandrels to run when operator leaves seat with blades listed in "FAST" position. 2. TROUBLESHOOTING POINTS PROBLEM CAUSE Engine dies when tractor is shifted into reverse 1. Replace blade mandrel. Mower deck not level. 5. Blades improperly installed...
...Replace idler pulley. 4. Clean around mandrels to dry before stopping engine. 26 Freewheel control in clutch mechanism. 2. Engine speed too slow. 2. Purge transmission. Turn ignition key to slower speed. 3. Obstruction in "disengaged" position. 2. Check tires for proper air pressure. 6. Replace blade. Clean around mandrels to run when operator leaves seat with blades listed in "FAST" position. 2. TROUBLESHOOTING POINTS PROBLEM CAUSE Engine dies when tractor is shifted into reverse 1. Replace blade mandrel. Mower deck not level. 5. Blades improperly installed...


