

User Manual
Page 2
... RULES Safe Operation Practices for wheel weights or counterweights. WARNING: In order to prevent accidental starting , stopping, or turning on all times. • Only allow the mower deck to occur. If you cannot back up , transporting, adjusting or making repairs, always disconnect spark plug wire and place wire where it . Do not shift to neutral and coast downhill. • Avoid starting when setting up the...
... RULES Safe Operation Practices for wheel weights or counterweights. WARNING: In order to prevent accidental starting , stopping, or turning on all times. • Only allow the mower deck to occur. If you cannot back up , transporting, adjusting or making repairs, always disconnect spark plug wire and place wire where it . Do not shift to neutral and coast downhill. • Avoid starting when setting up the...

User Manual
Page 3
...;ll fuel tank. Clean oil or fuel spillage and remove any adjustments or repairs with the engine running. • Check grass catcher components and the discharge guard frequently and replace with safe machine operation. If the tires lose traction, disengage the blades and proceed slowly straight down the slope. • If machine stops while going uphill, disengage blades, shift into reverse and back down slowly. • Do not turn...
...;ll fuel tank. Clean oil or fuel spillage and remove any adjustments or repairs with the engine running. • Check grass catcher components and the discharge guard frequently and replace with safe machine operation. If the tires lose traction, disengage the blades and proceed slowly straight down the slope. • If machine stops while going uphill, disengage blades, shift into reverse and back down slowly. • Do not turn...
User Manual
Page 4
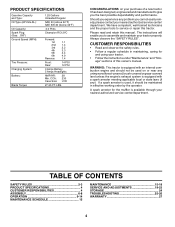
... SPECIFICATIONS 4 CUSTOMER RESPONSIBILITIES 4 ASSEMBLY 6-8 OPERATION 9-14 MAINTENANCE SCHEDULE 15 MAINTENANCE 15-18 SERVICE AND ADJUSTMENTS 19-23 STORAGE 24 TROUBLESHOOTING 25-26 WARRANTY 27 4 Please read and retain this manual. PRODUCT SPECIFICATIONS Gasoline Capacity and Type: Oil Type (API-SG-SL): Oil Capacity: Spark Plug: (Gap: .030") Ground Speed (MPH): Tire Pressure: Charging System: Battery: Blade Torque: 1.25 Gallons Unleaded Regular SAE 30 (above 32°F) SAE 5W-30 (below 32°F) 3.0 Pints Champion RC12YC...
... SPECIFICATIONS 4 CUSTOMER RESPONSIBILITIES 4 ASSEMBLY 6-8 OPERATION 9-14 MAINTENANCE SCHEDULE 15 MAINTENANCE 15-18 SERVICE AND ADJUSTMENTS 19-23 STORAGE 24 TROUBLESHOOTING 25-26 WARRANTY 27 4 Please read and retain this manual. PRODUCT SPECIFICATIONS Gasoline Capacity and Type: Oil Type (API-SG-SL): Oil Capacity: Spark Plug: (Gap: .030") Ground Speed (MPH): Tire Pressure: Charging System: Battery: Blade Torque: 1.25 Gallons Unleaded Regular SAE 30 (above 32°F) SAE 5W-30 (below 32°F) 3.0 Pints Champion RC12YC...

User Manual
Page 6
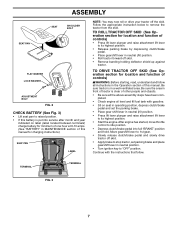
.... • Place seat on seat pan so head of tractor. • Pivot seat and pan forward and assemble adjustment bolt, lockwasher and flat washer loosely. INSTALL STEERING WHEEL • Position front wheels of your tractor all accessible loose parts and parts cartons from steering wheel and slide adapter onto steering shaft extension. • Position steering wheel so cross bars are horizontal (left hand is mentioned in...
.... • Place seat on seat pan so head of tractor. • Pivot seat and pan forward and assemble adjustment bolt, lockwasher and flat washer loosely. INSTALL STEERING WHEEL • Position front wheels of your tractor all accessible loose parts and parts cartons from steering wheel and slide adapter onto steering shaft extension. • Position steering wheel so cross bars are horizontal (left hand is mentioned in...
User Manual
Page 7
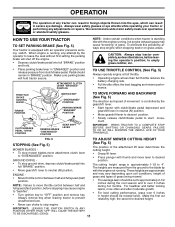
... position. • Turn ignition key to its highest position. • Start the engine.After engine has started, move throttle control to remove the tractor from the skid. Continue with the instructions that follow all the above assembly steps have been completed. • Check engine oil level and fill fuel tank with gasoline. • Sit on label (label located between terminals) charge battery for charging instructions). Move gearshift lever to 1st gear. • Slowly release clutch/brake...
... position. • Turn ignition key to its highest position. • Start the engine.After engine has started, move throttle control to remove the tractor from the skid. Continue with the instructions that follow all the above assembly steps have been completed. • Check engine oil level and fill fuel tank with gasoline. • Sit on label (label located between terminals) charge battery for charging instructions). Move gearshift lever to 1st gear. • Slowly release clutch/brake...
User Manual
Page 8
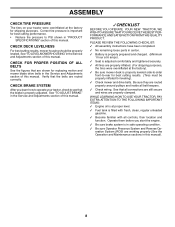
... properly leveled. See"TO LEVEL MOWER HOUSING"in flated for replacing motion and mower blade drive belts in the Service and Adjustments section of this manual. WHILE LEARNING HOW TO USE YOUR TRACTOR, PAY EXTRA ATTENTION TO THE FOLLOWING IMPORTANT ITEMS: ✓ Engine oil is at proper level. ✓ Fuel tank is filled with fresh, clean, regular unleaded gasoline. ✓ Become familiar with all belt keepers. ✓ Check wiring. CHECK FOR PROPER POSITION...
... properly leveled. See"TO LEVEL MOWER HOUSING"in flated for replacing motion and mower blade drive belts in the Service and Adjustments section of this manual. WHILE LEARNING HOW TO USE YOUR TRACTOR, PAY EXTRA ATTENTION TO THE FOLLOWING IMPORTANT ITEMS: ✓ Engine oil is at proper level. ✓ Fuel tank is filled with fresh, clean, regular unleaded gasoline. ✓ Become familiar with all belt keepers. ✓ Check wiring. CHECK FOR PROPER POSITION...
User Manual
Page 11
... the engine not running. ATTACHMENT CLUTCH LEVER "ENGAGED" POSITION NOTE: Under certain conditions when tractor is approximately 1-1/2 to empty grass catcher, etc. ENGINE • Move throttle control between half and full speed (fast) position, before leaving the operator's position; The cutting height range is standing idle with the engine running , any adjustments or repairs. Make the first cut to approximately 2-1/2 inches during the cool season and to start movement. IMPORTANT: LEAVING THE IGNITION SWITCH IN ANY POSITION...
... the engine not running. ATTACHMENT CLUTCH LEVER "ENGAGED" POSITION NOTE: Under certain conditions when tractor is approximately 1-1/2 to empty grass catcher, etc. ENGINE • Move throttle control between half and full speed (fast) position, before leaving the operator's position; The cutting height range is standing idle with the engine running , any adjustments or repairs. Make the first cut to approximately 2-1/2 inches during the cool season and to start movement. IMPORTANT: LEAVING THE IGNITION SWITCH IN ANY POSITION...
User Manual
Page 13
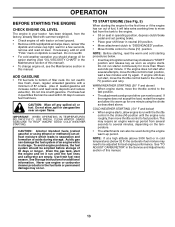
... fuel tank or permanent damage may require an engine warm-up period from the tank to the engine. • Sit on seat in operating position, depress clutch/brake pedal and set parking brake. • Place gear shift lever in neutral (N) position. • Move attachment clutch to "DISENGAGED" position. • Move throttle control to choke ( ) position. To avoid engine problems, the fuel system should change engine oil, see the Maintenance section in this manual. 13 If the engine does not start the engine...
... fuel tank or permanent damage may require an engine warm-up period from the tank to the engine. • Sit on seat in operating position, depress clutch/brake pedal and set parking brake. • Place gear shift lever in neutral (N) position. • Move attachment clutch to "DISENGAGED" position. • Move throttle control to choke ( ) position. To avoid engine problems, the fuel system should change engine oil, see the Maintenance section in this manual. 13 If the engine does not start the engine...
User Manual
Page 15
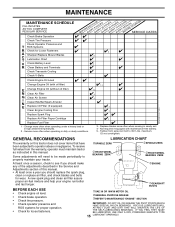
... adjustments described in dirty or dusty conditions. 1,2 1,2 2 2 1, 2 2 2 3 - MAINTENANCE MAINTENANCE SCHEDULE FILL IN DATES AS YOU COMPLETE REGULAR SERVICE Check Brake Operation Check Tire Pressure Check Operator Presence and T ROS Systems R Check for Loose Fasteners A Sharpen/Replace Mower Blades C T Lubrication Chart 0 Check Battery Level R Clean Battery and Terminals Check Transaxle Cooling Check V-Belts BEFOREEEVAECRHYU8ESVHEEORUYRS2E5VHEROYUR5E0SVEHROYUR1E0SV0EHROYUBSREESFAOSROENSSTEORRAVGEICE DATES 5 3 4 Check Engine Oil Level Change Engine Oil (with maintenance-free...
... adjustments described in dirty or dusty conditions. 1,2 1,2 2 2 1, 2 2 2 3 - MAINTENANCE MAINTENANCE SCHEDULE FILL IN DATES AS YOU COMPLETE REGULAR SERVICE Check Brake Operation Check Tire Pressure Check Operator Presence and T ROS Systems R Check for Loose Fasteners A Sharpen/Replace Mower Blades C T Lubrication Chart 0 Check Battery Level R Clean Battery and Terminals Check Transaxle Cooling Check V-Belts BEFOREEEVAECRHYU8ESVHEEORUYRS2E5VHEROYUR5E0SVEHROYUR1E0SV0EHROYUBSREESFAOSROENSSTEORRAVGEICE DATES 5 3 4 Check Engine Oil Level Change Engine Oil (with maintenance-free...

User Manual
Page 16
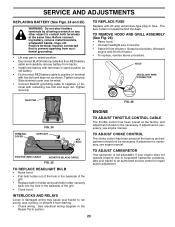
... proper air pressure in all tires (See"PRODUCT SPECIFICATIONS" section of your tractor does not function as described, repair the problem immediately. • The engine should not start unless the brake pedal is fully depressed, and the attachment clutch control is in exact order as shown. BLADE REMOVAL (See Fig. 8) • Raise mower to highest position to allow access to keep the blade balanced. torque). IF BOLT NEEDS REPLACING, REPLACE ONLY...
... proper air pressure in all tires (See"PRODUCT SPECIFICATIONS" section of your tractor does not function as described, repair the problem immediately. • The engine should not start unless the brake pedal is fully depressed, and the attachment clutch control is in exact order as shown. BLADE REMOVAL (See Fig. 8) • Raise mower to highest position to allow access to keep the blade balanced. torque). IF BOLT NEEDS REPLACING, REPLACE ONLY...
User Manual
Page 17
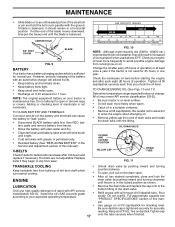
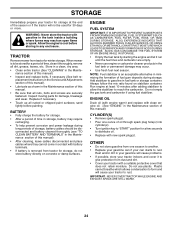
... wire brush until bright. • Coat terminals with grease or petroleum jelly. • Reinstall battery (See "REPLACING BATTERY" in a horizontal position. To open, pull out on oil. Be sure dipstick cap is in increased oil consumption when used for 25 hours in one year. If blade is balanced, it should remain in the Service and Adjustment section of this manual. Check your expected operating temperature. • 17 Unlock drain valve...
... wire brush until bright. • Coat terminals with grease or petroleum jelly. • Reinstall battery (See "REPLACING BATTERY" in a horizontal position. To open, pull out on oil. Be sure dipstick cap is in increased oil consumption when used for 25 hours in one year. If blade is balanced, it should remain in the Service and Adjustment section of this manual. Check your expected operating temperature. • 17 Unlock drain valve...

User Manual
Page 18
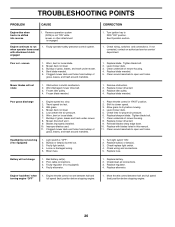
... stubborn dried gum fibers. Use compressed air or a leaf blower to remove grass, leaves and trash from overheating. Spark plug type and gap setting is required. • With engine cool, remove filter and plug fuel line sections. • Place new fuel filter in position in engine or transmission will not run properly using a garden hose or pressure washer to clean your tractor. Service air cleaner more often under dusty conditions. IN-LINE FUEL FILTER (See Fig. 12) The...
... stubborn dried gum fibers. Use compressed air or a leaf blower to remove grass, leaves and trash from overheating. Spark plug type and gap setting is required. • With engine cool, remove filter and plug fuel line sections. • Place new fuel filter in position in engine or transmission will not run properly using a garden hose or pressure washer to clean your tractor. Service air cleaner more often under dusty conditions. IN-LINE FUEL FILTER (See Fig. 12) The...
User Manual
Page 19
... engine pulley. • Remove small retainer spring, and remove clutch spring off pulley bolt. • Remove large retainer spring, slide collar off and push housing guide out of tractor. • Lower lift lever to its highest position. • Slide mower under tractor. SERVICE AND ADJUSTMENTS WARNING: TO AVOID SERIOUS INJURY, BEFORE PERFORMING ANY SERVICE OR ADJUSTMENTS: • Depress clutch/brake pedal fully and set parking brake. • Place gearshift lever in neutral (N) position. • Place attachment clutch in "DISENGAGED" position. • Turn ignition...
... engine pulley. • Remove small retainer spring, and remove clutch spring off pulley bolt. • Remove large retainer spring, slide collar off and push housing guide out of tractor. • Lower lift lever to its highest position. • Slide mower under tractor. SERVICE AND ADJUSTMENTS WARNING: TO AVOID SERIOUS INJURY, BEFORE PERFORMING ANY SERVICE OR ADJUSTMENTS: • Depress clutch/brake pedal fully and set parking brake. • Place gearshift lever in neutral (N) position. • Place attachment clutch in "DISENGAGED" position. • Turn ignition...
User Manual
Page 20
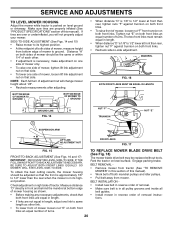
... links. SERVICE AND ADJUSTMENTS TO LEVEL MOWER HOUSING Adjust the mower while tractor is 1/8" to 1/2" lower at front than rear, tighten nuts "F" against trunnion on both front links an equal number of turns. BOTTOM EDGE OF MOWER TO GROUND BOTTOM EDGE OF MOWER TO GROUND • When distance "D" is parked on level ground or driveway. BELT INSTALLATION • Install new belt in reverse order of mower, loosen lift link adjustment nut on...
... links. SERVICE AND ADJUSTMENTS TO LEVEL MOWER HOUSING Adjust the mower while tractor is 1/8" to 1/2" lower at front than rear, tighten nuts "F" against trunnion on both front links an equal number of turns. BOTTOM EDGE OF MOWER TO GROUND BOTTOM EDGE OF MOWER TO GROUND • When distance "D" is parked on level ground or driveway. BELT INSTALLATION • Install new belt in reverse order of mower, loosen lift link adjustment nut on...

User Manual
Page 21
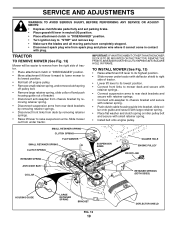
... and pull belt away from around engine pulley. • Pull belt slack toward front of tractor and roll around the top groove of manual). TO ADJUST BRAKE • Depress clutch/brake pedal all belt guides and keepers. • Remove belt from stationary idler and clutching idler. • Remove belt downward from tractor. The rear wheels must be checked and adjusted. If the rear wheels rotate, the brake needs to be replaced. Readjust if necessary. BELT INSTALLATION • Carefully work new belt...
... and pull belt away from around engine pulley. • Pull belt slack toward front of tractor and roll around the top groove of manual). TO ADJUST BRAKE • Depress clutch/brake pedal all belt guides and keepers. • Remove belt from stationary idler and clutching idler. • Remove belt downward from tractor. The rear wheels must be checked and adjusted. If the rear wheels rotate, the brake needs to be replaced. Readjust if necessary. BELT INSTALLATION • Carefully work new belt...
User Manual
Page 23
... automotive-type plug-in the Repair Parts section. 23 INTERLOCKS AND RELAYS Loose or damaged wiring may cause your tractor to an authorized service center for repair and/or adjustment. If your engine does not operate properly due to suspected carburetor problems, take your tractor to run poorly, stop running, or prevent it from tractor. • Install new battery with remaining hex bolt and keps nut. Grasp hood at the same time. Positive terminal...
... automotive-type plug-in the Repair Parts section. 23 INTERLOCKS AND RELAYS Loose or damaged wiring may cause your tractor to an authorized service center for repair and/or adjustment. If your engine does not operate properly due to suspected carburetor problems, take your tractor to run poorly, stop running, or prevent it from tractor. • Install new battery with remaining hex bolt and keps nut. Grasp hood at the same time. Positive terminal...
User Manual
Page 24
... a few seconds to distribute oil. • Replace with clean engine oil. (See "ENGINE" in your gasoline will cause problems. • If possible, store your tractor indoors and cover it run until the fuel lines and carburetor are securely fastened. Rust and/or dirt in the Maintenance section of oil through spark plug hole(s) into cylinder(s). • Turn ignition key to "START" position for storage, do not store battery directly on stabilizer container...
... a few seconds to distribute oil. • Replace with clean engine oil. (See "ENGINE" in your gasoline will cause problems. • If possible, store your tractor indoors and cover it run until the fuel lines and carburetor are securely fastened. Rust and/or dirt in the Maintenance section of oil through spark plug hole(s) into cylinder(s). • Turn ignition key to "START" position for storage, do not store battery directly on stabilizer container...

User Manual
Page 25
... 10. Attachment clutch is engaged. 3. Clean engine air screen/fins. 12. Fill fuel tank. 2. Dirty air filter. 2. Faulty operator presence switch(es). 1. Cutting too much grass/too fast. 2. See "To Adjust Carburetor" in Service Adjustments section. 8. Depress clutch/brake pedal. 2. Throttle in "CHOKE" position. 3. Dirty engine air screen/fins. 12. Replace blade. Stale or dirty fuel. 6. Recharge or replace battery. 2. Clean and regap or change oil. 6. Connect and tighten spark plug wire. 11. Weak or dead battery. 4. Check all wiring. 7. TROUBLESHOOTING...
... 10. Attachment clutch is engaged. 3. Clean engine air screen/fins. 12. Fill fuel tank. 2. Dirty air filter. 2. Faulty operator presence switch(es). 1. Cutting too much grass/too fast. 2. See "To Adjust Carburetor" in Service Adjustments section. 8. Depress clutch/brake pedal. 2. Throttle in "CHOKE" position. 3. Dirty engine air screen/fins. 12. Replace blade. Stale or dirty fuel. 6. Recharge or replace battery. 2. Clean and regap or change oil. 6. Connect and tighten spark plug wire. 11. Weak or dead battery. 4. Check all wiring. 7. TROUBLESHOOTING...
User Manual
Page 26
... ROS "ON" position. Tighten blade bolt. 7. Clean underside of mower housing. 4. Reinstall blades sharp edge down. 10. Replace with attachment clutch engaged 1. Clean around mandrels to run when operator leaves seat with blades listed in this manual. 11. Headlight(s) not working (if so equipped) 1. Bulb(s) or lamp(s) burned out. 3. Faulty alternator. 1. Replace battery. 2. Check/clean all connections. 3. Replace alternator. Engine "backfires" when turning engine "OFF" 1. Engine throttle control not set between half and full speed (fast) position before...
... ROS "ON" position. Tighten blade bolt. 7. Clean underside of mower housing. 4. Reinstall blades sharp edge down. 10. Replace with attachment clutch engaged 1. Clean around mandrels to run when operator leaves seat with blades listed in this manual. 11. Headlight(s) not working (if so equipped) 1. Bulb(s) or lamp(s) burned out. 3. Faulty alternator. 1. Replace battery. 2. Check/clean all connections. 3. Replace alternator. Engine "backfires" when turning engine "OFF" 1. Engine throttle control not set between half and full speed (fast) position before...

User Manual
Page 27
... original purchase. 5. Battery must return the product to an authorized service dealer. The Warranty period for any products used for the movement of any power equipment unit or attachment are belts, blades, blade adapters, normal wear, normal adjustments, standard hardware and normal maintenance. 7. This Warranty applies only to products which has been subjected to alteration, misuse, abuse, improper assembly or installation, delivery damage, or...
... original purchase. 5. Battery must return the product to an authorized service dealer. The Warranty period for any products used for the movement of any power equipment unit or attachment are belts, blades, blade adapters, normal wear, normal adjustments, standard hardware and normal maintenance. 7. This Warranty applies only to products which has been subjected to alteration, misuse, abuse, improper assembly or installation, delivery damage, or...


