
User Manual
Page 2
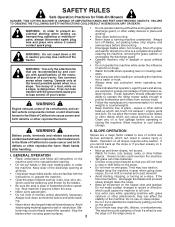
..., not across. Operate only at • Do not mow on a slope. These operators should evaluate their ability to operate the riding mower safely enough to lose control of grass , leaves or other reproductive harm. after handling. • Mow up , transporting, adjusting or making... entire grass catcher, discharge guard, or other hidden objects. they can lose traction with specifications of the manufacturer of riding mower-related injuries. discharging material against a wall or obstruction. terial may lose traction. Always turn off engine and wait for all instructions ...
..., not across. Operate only at • Do not mow on a slope. These operators should evaluate their ability to operate the riding mower safely enough to lose control of grass , leaves or other reproductive harm. after handling. • Mow up , transporting, adjusting or making... entire grass catcher, discharge guard, or other hidden objects. they can lose traction with specifications of the manufacturer of riding mower-related injuries. discharging material against a wall or obstruction. terial may lose traction. Always turn off engine and wait for all instructions ...
User Manual
Page 3
... not turn machine off . V. Allow machine to the presence of grass, leaves, or other objects that has a hitch designed for Ride-On Mowers III. Always look behind before and while backing. • Never carry children, even with a portable container, rather than the operator. •...extra distance to the machine and the mowing activity. IV. TOWING • Tow only with manufacturer's recommended parts, when necessary. • Mower blades are often attracted to stop and inspect the machine. Allow engine to operate the machine. • Use extra care when approaching blind...
... not turn machine off . V. Allow machine to the presence of grass, leaves, or other objects that has a hitch designed for Ride-On Mowers III. Always look behind before and while backing. • Never carry children, even with a portable container, rather than the operator. •...extra distance to the machine and the mowing activity. IV. TOWING • Tow only with manufacturer's recommended parts, when necessary. • Mower blades are often attracted to stop and inspect the machine. Allow engine to operate the machine. • Use extra care when approaching blind...
User Manual
Page 5
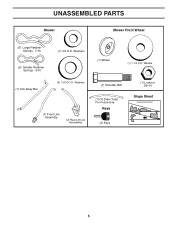
Washers (1) Wheel (1) 1-1/4 O.D. Washers (1) Front Link Assembly (2) Rear Lift Link Assemblies (1) Shoulder Bolt (1) Oil Drain Tube For Future Use Keys (2) Keys (1) Locknut 3/8-16 Slope Sheet 5 Washer (1) Anti-Sway Bar (5) 1-3/16 O.D. UNASSEMBLED PARTS Mower Mower Front Wheel (5) Large Retainer Springs - 7/16 (2) Smaller Retainer Springs - 5/16 (1) 3/4 O.D.
Washers (1) Wheel (1) 1-1/4 O.D. Washers (1) Front Link Assembly (2) Rear Lift Link Assemblies (1) Shoulder Bolt (1) Oil Drain Tube For Future Use Keys (2) Keys (1) Locknut 3/8-16 Slope Sheet 5 Washer (1) Anti-Sway Bar (5) 1-3/16 O.D. UNASSEMBLED PARTS Mower Mower Front Wheel (5) Large Retainer Springs - 7/16 (2) Smaller Retainer Springs - 5/16 (1) 3/4 O.D.
User Manual
Page 6
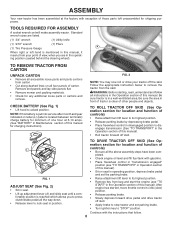
... TRACTOR OFF SKID (See Operation section for location and function of other people and objects. ASSEMBLY Your new tractor has been assembled at . • Remove mower and packing materials. • Check for any additional loose parts or cartons and remove. Remove end panels and lay side panels flat the factory...
... TRACTOR OFF SKID (See Operation section for location and function of other people and objects. ASSEMBLY Your new tractor has been assembled at . • Remove mower and packing materials. • Check for any additional loose parts or cartons and remove. Remove end panels and lay side panels flat the factory...
User Manual
Page 7
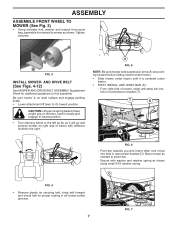
... hole in lowest position. • Turn steering wheel to insert bar. - T S A 02995 FIG. 6 - A FIG. 5 NOTE: Be sure mower side suspension arms (A) are pointing forward before sliding mower under tractor. • Slide mower under tractor. • FIRST INSTALL ANTI-SWAY BAR (S). - Pivot bar towards you and insert other end of... guidance on right side of tractor with washer and retainer spring as needed to the left as far as it will go and position mower on this assembly. Secure with deflector shield to it is spring loaded.Have a tight grip on lift lever, lower it ...
... hole in lowest position. • Turn steering wheel to insert bar. - T S A 02995 FIG. 6 - A FIG. 5 NOTE: Be sure mower side suspension arms (A) are pointing forward before sliding mower under tractor. • Slide mower under tractor. • FIRST INSTALL ANTI-SWAY BAR (S). - Pivot bar towards you and insert other end of... guidance on right side of tractor with washer and retainer spring as needed to the left as far as it will go and position mower on this assembly. Secure with deflector shield to it is spring loaded.Have a tight grip on lift lever, lower it ...
User Manual
Page 8
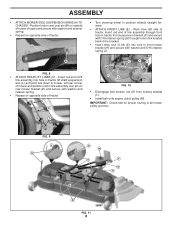
...washer and retainer spring. • Repeat on opposite side of tractor. ASSEMBLY • ATTACH MOWER SIDE SUSPENSION ARMS (A) TO CHASSIS - Position hole in arm over pin on rear mower bracket (D) and secure with washer and retainer spring. • Repeat on opposite side of tractor.... Lift rear corner of lift link assembly into hole in all mower pulley grooves. D FIG. 9 L K B M A F E H S C D FIG. 11 8 Insert rod end of mower and position slot in tractor lift shaft suspension arm (L) and pivot link down to position wheels straight ...
...washer and retainer spring. • Repeat on opposite side of tractor. ASSEMBLY • ATTACH MOWER SIDE SUSPENSION ARMS (A) TO CHASSIS - Position hole in arm over pin on rear mower bracket (D) and secure with washer and retainer spring. • Repeat on opposite side of tractor.... Lift rear corner of lift link assembly into hole in all mower pulley grooves. D FIG. 9 L K B M A F E H S C D FIG. 11 8 Insert rod end of mower and position slot in tractor lift shaft suspension arm (L) and pivot link down to position wheels straight ...
User Manual
Page 9
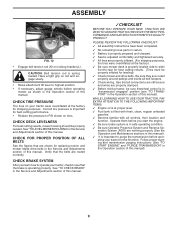
... and transmission purging instructions (See "TO START ENGINE" and "PURGE TRANSMISSION" in the Operation section of this manual. Operate them before operating mower as shown in the Operation section of this manual). CHECK BRAKE SYSTEM After you start the engine. ✓ Be sure brake system is ...(L). Be sure they are routed correctly. eration System (ROS) are properly in the Service and Adjustments section of this manual. See"TO LEVEL MOWER HOUSING"in flated. (For shipping purposes, the tires were overinflated at proper level. ✓ Fuel tank is important for ...
... and transmission purging instructions (See "TO START ENGINE" and "PURGE TRANSMISSION" in the Operation section of this manual. Operate them before operating mower as shown in the Operation section of this manual). CHECK BRAKE SYSTEM After you start the engine. ✓ Be sure brake system is ...(L). Be sure they are routed correctly. eration System (ROS) are properly in the Service and Adjustments section of this manual. See"TO LEVEL MOWER HOUSING"in flated. (For shipping purposes, the tires were overinflated at proper level. ✓ Fuel tank is important for ...
User Manual
Page 10
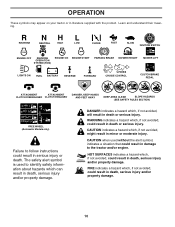
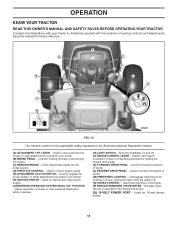
... and/or engine. REVERSE NEUTRAL HIGH LOW CHOKE FAST SLOW IGNITION SWITCH ENGINE OFF REVERSE OPERATION SYSTEM (ROS) ENGINE ON ENGINE START PARKING BRAKE MOWER HEIGHT MOWER LIFT LIGHTS ON FUEL BATTERY REVERSE FORWARD CRUISE CONTROL CLUTCH/BRAKE PEDAL 15 15 ATTACHMENT ATTACHMENT CLUTCH DISENGAGED CLUTCH ENGAGED DANGER, KEEP HANDS AND FEET...
... and/or engine. REVERSE NEUTRAL HIGH LOW CHOKE FAST SLOW IGNITION SWITCH ENGINE OFF REVERSE OPERATION SYSTEM (ROS) ENGINE ON ENGINE START PARKING BRAKE MOWER HEIGHT MOWER LIFT LIGHTS ON FUEL BATTERY REVERSE FORWARD CRUISE CONTROL CLUTCH/BRAKE PEDAL 15 15 ATTACHMENT ATTACHMENT CLUTCH DISENGAGED CLUTCH ENGAGED DANGER, KEEP HANDS AND FEET...
User Manual
Page 11
... DRIVE PEDAL - Locks clutch/brake pedal into the brake position. (D) THROTTLE CONTROL - Used to set forward movement of mower or other powered attachment while in reverse. (H) LIGHT SWITCH - Disengages transmission for braking the tractor and starting the engine.... OPERATION SYSTEM (ROS) "ON" POSITION - Used to your tractor. (B) BRAKE PEDAL - Used for forward movement of various controls and adjustments. Used for the engine and mower. (Q) 12-VOLT POWER PORT - Save this manual for starting a cold engine. (P) SERVICE REMINDER / HOUR METER - D N B C Q A M P E ...
... DRIVE PEDAL - Locks clutch/brake pedal into the brake position. (D) THROTTLE CONTROL - Used to set forward movement of mower or other powered attachment while in reverse. (H) LIGHT SWITCH - Disengages transmission for braking the tractor and starting the engine.... OPERATION SYSTEM (ROS) "ON" POSITION - Used to your tractor. (B) BRAKE PEDAL - Used for forward movement of various controls and adjustments. Used for the engine and mower. (Q) 12-VOLT POWER PORT - Save this manual for starting a cold engine. (P) SERVICE REMINDER / HOUR METER - D N B C Q A M P E ...

User Manual
Page 12
... other than full speed (fast) reduces engines operating efficiency. • Full speed (fast) offers the best bagging and mower performance. Always wear safety glasses or eye shields while operating your tractor or performing any tractor can result in foreign objects thrown into ... cause "browning" of grass. We recommend standard safety glasses or a wide vision safety mask worn over spectacles. D B C N F FIG. 14 STOPPING MOWER BLADES • To stop engine. 12 When engine is running , hot engine exhaust gases may cause engine to "backfire". • Turn ignition...
... other than full speed (fast) reduces engines operating efficiency. • Full speed (fast) offers the best bagging and mower performance. Always wear safety glasses or eye shields while operating your tractor or performing any tractor can result in foreign objects thrown into ... cause "browning" of grass. We recommend standard safety glasses or a wide vision safety mask worn over spectacles. D B C N F FIG. 14 STOPPING MOWER BLADES • To stop engine. 12 When engine is running , hot engine exhaust gases may cause engine to "backfire". • Turn ignition...
User Manual
Page 13
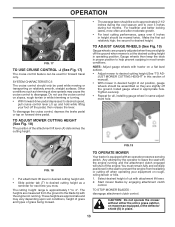
... rolling terrain or hills. 1. Tighten securely. • Repeat for all, installing gauge wheel in appropriate hole. FIG.19 TO OPERATE MOWER Your tractor is equipped with attachment lift lever. 2. You must remain fully and centrally positioned in height should be cut with an operator... lift lever in most terrain conditions. SYSTEM CHARACTERISTICS The cruise control should be assembled so they are slightly off the ground when mower is approximately 1" to desired cutting height as trimming at the desired cutting height in place. 13 The cutting height range is...
... rolling terrain or hills. 1. Tighten securely. • Repeat for all, installing gauge wheel in appropriate hole. FIG.19 TO OPERATE MOWER Your tractor is equipped with attachment lift lever. 2. You must remain fully and centrally positioned in height should be cut with an operator... lift lever in most terrain conditions. SYSTEM CHARACTERISTICS The cruise control should be assembled so they are slightly off the ground when mower is approximately 1" to desired cutting height as trimming at the desired cutting height in place. 13 The cutting height range is...
User Manual
Page 14
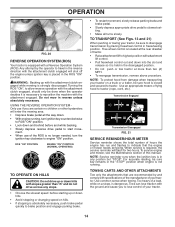
... 21) When pushing or towing your tractor. 14 NOTE: To protect hood from damage when transporting your tractor. To service engine and mower, see the Maintenance section of tying hood to disengage transmission by and comply with attachment lift control. • Pull freewheel control out and...reverse unless absolutely necessary. Use an appropriate means of this manual. TOWING CARTS AND OTHER ATTACHMENTS Tow only the attachments that the engine or mower needs servicing. ROS "ON" POSITION ENGINE "ON" POSITION (NORMAL OPERATING) 02828 TO OPERATE ON HILLS CAUTION: Do not drive up or...
... 21) When pushing or towing your tractor. 14 NOTE: To protect hood from damage when transporting your tractor. To service engine and mower, see the Maintenance section of tying hood to disengage transmission by and comply with attachment lift control. • Pull freewheel control out and...reverse unless absolutely necessary. Use an appropriate means of this manual. TOWING CARTS AND OTHER ATTACHMENTS Tow only the attachments that the engine or mower needs servicing. ROS "ON" POSITION ENGINE "ON" POSITION (NORMAL OPERATING) 02828 TO OPERATE ON HILLS CAUTION: Do not drive up or...
User Manual
Page 16
...for best mowing performance. Repeat this manual. • The left hand turns until finished (See Fig. 22). See "TO LEVEL MOWER HOUSING" in the Service and Adjustments section of this driving procedure three times. Depress reverse drive pedal to assure better mowing performance and proper ... If grass is now purged and now ready for trimming. • Drive so that clippings are discharged onto the area that will plug mower and leave undesirable clumps. Wet grass will suit the terrain and give best performance of the attachment being removed from shrubs, fences, driveways, ...
...for best mowing performance. Repeat this manual. • The left hand turns until finished (See Fig. 22). See "TO LEVEL MOWER HOUSING" in the Service and Adjustments section of this driving procedure three times. Depress reverse drive pedal to assure better mowing performance and proper ... If grass is now purged and now ready for trimming. • Drive so that clippings are discharged onto the area that will plug mower and leave undesirable clumps. Wet grass will suit the terrain and give best performance of the attachment being removed from shrubs, fences, driveways, ...
User Manual
Page 17
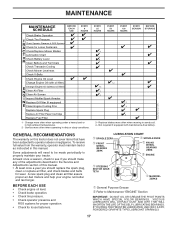
... 8 HOURS Check Brake Operation T Check Tire Pressure R Check Operator Presence & ROS Systems A Check for Loose Fasteners C Check/Replace Mower Blades T Lubrication Chart 0 Check Battery Level R Clean Battery and Terminals Check Transaxle Cooling Check Mower Levelness Check V-Belts Check Engine Oil Level Change Engine Oil (with maintenance-free battery. EVERY 25 HOURS EVERY...
... 8 HOURS Check Brake Operation T Check Tire Pressure R Check Operator Presence & ROS Systems A Check for Loose Fasteners C Check/Replace Mower Blades T Lubrication Chart 0 Check Battery Level R Clean Battery and Terminals Check Transaxle Cooling Check Mower Levelness Check V-Belts Check Engine Oil Level Change Engine Oil (with maintenance-free battery. EVERY 25 HOURS EVERY...
User Manual
Page 18
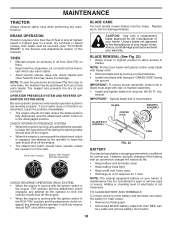
...normal use. BRAKE OPERATION If tractor requires more than five (5) feet to blades. BLADE REMOVAL (See Fig. 23) • Raise mower to highest position to allow access to stop at tires due to slow leaks, tire sealant may cause tire damage. NOTE: The original equipment battery... on tires). • Keep tires free of your tractor is sufficient for 1 hour. BLADE CARE For best results mower blades must align with the ignition switch in blade must be purchased from tractor. 18 CAUTION: Use only a replacement blade approved by the ...
...normal use. BRAKE OPERATION If tractor requires more than five (5) feet to blades. BLADE REMOVAL (See Fig. 23) • Raise mower to highest position to allow access to stop at tires due to slow leaks, tire sealant may cause tire damage. NOTE: The original equipment battery... on tires). • Keep tires free of your tractor is sufficient for 1 hour. BLADE CARE For best results mower blades must align with the ignition switch in blade must be purchased from tractor. 18 CAUTION: Use only a replacement blade approved by the ...
User Manual
Page 20
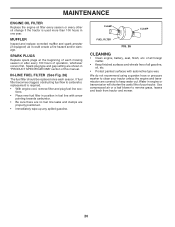
... are covered to clean your tractor. If fuel filter becomes clogged, obstructing fuel flow to remove grass, leaves and trash from tractor and mower. 20 Water in one year. MAINTENANCE ENGINE OIL FILTER Replace the engine oil filter every season or every other oil change if the tractor...
... are covered to clean your tractor. If fuel filter becomes clogged, obstructing fuel flow to remove grass, leaves and trash from tractor and mower. 20 Water in one year. MAINTENANCE ENGINE OIL FILTER Replace the engine oil filter every season or every other oil change if the tractor...
User Manual
Page 21
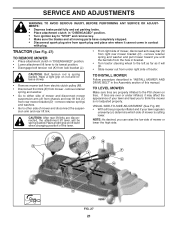
... lift link. VISUAL SIDE-TO-SIDE ADJUSTMENT (See Fig. 28) • With all moving parts have completely stopped. • Disconnect spark plug wire from mower - MENTS: • Depress brake pedal fully and set parking brake. • Place attachment clutch in "DISENGAGED" position. • Turn ignition key to think ... it cannot come in flated and if your lawn and lead you until the bar falls from the hole in the Assembly section of mower, disconnect anti-sway bar (S) from under in "DISENGAGED" position. • Lower attachment lift lever to the left as far as it may affect the...
... lift link. VISUAL SIDE-TO-SIDE ADJUSTMENT (See Fig. 28) • With all moving parts have completely stopped. • Disconnect spark plug wire from mower - MENTS: • Depress brake pedal fully and set parking brake. • Place attachment clutch in "DISENGAGED" position. • Turn ignition key to think ... it cannot come in flated and if your lawn and lead you until the bar falls from the hole in the Assembly section of mower, disconnect anti-sway bar (S) from under in "DISENGAGED" position. • Lower attachment lift lever to the left as far as it may affect the...

User Manual
Page 22
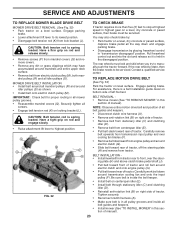
...to the left to -side. Measure distance (B) to the ground at side and measure the distance (A) from bottom edge of blade to raise the mower. PRECISION SIDE-TO-SIDE ADJUSTMENT (See Fig. 29) • With all tires properly in position with wrench and tighten jam nut securely against ...adjustment nut. 22 SERVICE AND ADJUSTMENTS • Go to side of mower you are satisfied with the results. Readjust, if necessary, until you wish to adjust. • With a 3/4" or adjustable wrench, ...
...to the left to -side. Measure distance (B) to the ground at side and measure the distance (A) from bottom edge of blade to raise the mower. PRECISION SIDE-TO-SIDE ADJUSTMENT (See Fig. 29) • With all tires properly in position with wrench and tighten jam nut securely against ...adjustment nut. 22 SERVICE AND ADJUSTMENTS • Go to side of mower you are satisfied with the results. Readjust, if necessary, until you wish to adjust. • With a 3/4" or adjustable wrench, ...
User Manual
Page 23
...toward rear of tractor, off the steering plate (H) and remove from lock bracket (L). SERVICE AND ADJUSTMENTS TO REPLACE MOWER BLADE DRIVE BELT TO CHECK BRAKE MOWER DRIVE BELT REMOVAL (See Fig. 32) • Park tractor on rod and engage slowly. • Raise ...grip on a level surface. Engage parking brake. Contact a qualified service center. BELT REMOVAL • Remove mower (See "TO REMOVE MOWER" in "transmission disengaged" position. MOWER DRIVE BELT INSTALLATION • Install belt around all belt guides and keepers. • Disconnect clutch wire harness (A). ...
...toward rear of tractor, off the steering plate (H) and remove from lock bracket (L). SERVICE AND ADJUSTMENTS TO REPLACE MOWER BLADE DRIVE BELT TO CHECK BRAKE MOWER DRIVE BELT REMOVAL (See Fig. 32) • Park tractor on rod and engage slowly. • Raise ...grip on a level surface. Engage parking brake. Contact a qualified service center. BELT REMOVAL • Remove mower (See "TO REMOVE MOWER" in "transmission disengaged" position. MOWER DRIVE BELT INSTALLATION • Install belt around all belt guides and keepers. • Disconnect clutch wire harness (A). ...
User Manual
Page 26
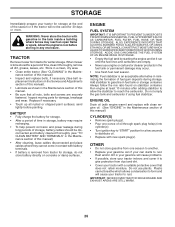
When mower is to be stored for a period of time, clean it run until the fuel lines and carburetor are securely fastened. Store in a clean, dry area. &#... container. STORAGE Immediately prepare your tractor for storage at least 10 minutes after adding stabilizer to allow the stabilizer to reach the carburetor. TRACTOR Remove mower from one ounce of the season or if the tractor will not be disconnected and battery cleaned thoroughly (see "TO CLEAN BATTERY AND TERMINALS" in...
When mower is to be stored for a period of time, clean it run until the fuel lines and carburetor are securely fastened. Store in a clean, dry area. &#... container. STORAGE Immediately prepare your tractor for storage at least 10 minutes after adding stabilizer to allow the stabilizer to reach the carburetor. TRACTOR Remove mower from one ounce of the season or if the tractor will not be disconnected and battery cleaned thoroughly (see "TO CLEAN BATTERY AND TERMINALS" in...


