
User Manual
Page 2
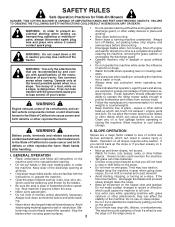
... contact spark plug. discharging material against a wall or obstruction. Operation on all movement on the slope. all parts to come to occur. ing. WARNING: Do not coast down the slope. • Keep all slopes requires extra caution. Avoid on wet grass. Use common sense when towing. Shut off blades, set parking brake, stop engine, and remove keys before cleaning the machine, removing the grass catcher...
... contact spark plug. discharging material against a wall or obstruction. Operation on all movement on the slope. all parts to come to occur. ing. WARNING: Do not coast down the slope. • Keep all slopes requires extra caution. Avoid on wet grass. Use common sense when towing. Shut off blades, set parking brake, stop engine, and remove keys before cleaning the machine, removing the grass catcher...
User Manual
Page 3
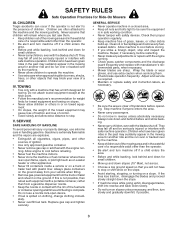
... the operator. • Be alert and turn on clothing, change clothing immediately. • Never over by the machine. • Keep children out of a responsible adult other than the operator. • Be alert and turn slowly and gradually downhill, if possible. 3 Clean oil or fuel spillage and remove any adjustments or repairs with the engine running. • Check grass catcher components and the discharge guard frequently and replace with...
... the operator. • Be alert and turn on clothing, change clothing immediately. • Never over by the machine. • Keep children out of a responsible adult other than the operator. • Be alert and turn slowly and gradually downhill, if possible. 3 Clean oil or fuel spillage and remove any adjustments or repairs with the engine running. • Check grass catcher components and the discharge guard frequently and replace with...

User Manual
Page 4
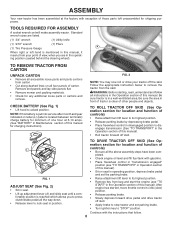
... 32°F) Oil Capacity: W/ Filter: 4.0 Pints W/O Filter: 3.75 Pints Spark Plug: (Gap: .040") Champion QC12YC Ground Speed (MPH): Forward: Reverse: 0 - 5.8 0 - 2.1 Charging System: 16 AMPS @ 3600 RPM Battery: AMP/HR: MIN. A spark arrester for and using your purchase of this manual. Federal laws apply on your tractor. • Follow the instructions under "Maintenance" and "Stor- Always observe the "SAFETY RULES". CCA: Case Size: 35 280 U1R Blade Bolt Torque: 45...
... 32°F) Oil Capacity: W/ Filter: 4.0 Pints W/O Filter: 3.75 Pints Spark Plug: (Gap: .040") Champion QC12YC Ground Speed (MPH): Forward: Reverse: 0 - 5.8 0 - 2.1 Charging System: 16 AMPS @ 3600 RPM Battery: AMP/HR: MIN. A spark arrester for and using your purchase of this manual. Federal laws apply on your tractor. • Follow the instructions under "Maintenance" and "Stor- Always observe the "SAFETY RULES". CCA: Case Size: 35 280 U1R Blade Bolt Torque: 45...
User Manual
Page 6
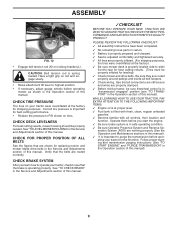
.... • Check engine oil level and fill fuel tank with gasoline. • Place freewheel control in "transmission engaged" position (see "TO TRANSPORT" in Operation section of this manual). • Sit on seat in operating position, depress brake pedal and set the parking brake. • Raise attachment lift lever to "STOP" position. TOOLS REQUIRED FOR ASSEMBLY A socket wrench set parking brake. • Turn ignition key to its highest position. • Release parking brake by depressing brake pedal. •...
.... • Check engine oil level and fill fuel tank with gasoline. • Place freewheel control in "transmission engaged" position (see "TO TRANSPORT" in Operation section of this manual). • Sit on seat in operating position, depress brake pedal and set the parking brake. • Raise attachment lift lever to "STOP" position. TOOLS REQUIRED FOR ASSEMBLY A socket wrench set parking brake. • Turn ignition key to its highest position. • Release parking brake by depressing brake pedal. •...
User Manual
Page 9
... familiar with all controls, their location and function. Follow proper starting and transmission purging instructions (See "TO START ENGINE" and "PURGE TRANSMISSION" in flated for shipping purposes. CHECK TIRE PRESSURE The tires on locking bracket (L). ASSEMBLY M FIG. 12 • Engage belt tension rod (K) on your tractor for replacing motion and mower blade drive belts in the Service and Adjustments section of this manual. ✓CHECKLIST BEFORE YOU OPERATE YOUR NEW TRACTOR, WE WISH TO...
... familiar with all controls, their location and function. Follow proper starting and transmission purging instructions (See "TO START ENGINE" and "PURGE TRANSMISSION" in flated for shipping purposes. CHECK TIRE PRESSURE The tires on locking bracket (L). ASSEMBLY M FIG. 12 • Engage belt tension rod (K) on your tractor for replacing motion and mower blade drive belts in the Service and Adjustments section of this manual. ✓CHECKLIST BEFORE YOU OPERATE YOUR NEW TRACTOR, WE WISH TO...
User Manual
Page 13
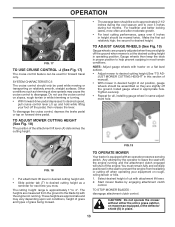
...; With forward drive pedal depressed to desired speed, pull cruise control lever (J) up and hold while lifting your equipment on a flat level surface. • Adjust mower to the blade tip with the engine not running and the attachment clutch engaged will shut off the ground when mower is at slow speeds may vary depending upon soil conditions, height of grass and types of cut relatively high; Tighten securely...
...; With forward drive pedal depressed to desired speed, pull cruise control lever (J) up and hold while lifting your equipment on a flat level surface. • Adjust mower to the blade tip with the engine not running and the attachment clutch engaged will shut off the ground when mower is at slow speeds may vary depending upon soil conditions, height of grass and types of cut relatively high; Tighten securely...
User Manual
Page 14
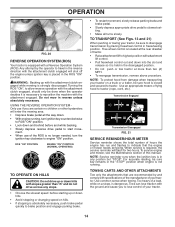
... in the disengaged position. • Do not push or tow tractor at the rear drawbar of hours the engine has run and flashes to indicate that are certain no longer needed, turn ignition key counterclockwise to tractor (rope, cord, etc.). Transmission Engaged Transmission Disengaged FIG. 21 SERVICE REMINDER/HOUR METER Service reminder shows the total number of tractor. • Raise attachment lift to tractor. Use common sense when...
... in the disengaged position. • Do not push or tow tractor at the rear drawbar of hours the engine has run and flashes to indicate that are certain no longer needed, turn ignition key counterclockwise to tractor (rope, cord, etc.). Transmission Engaged Transmission Disengaged FIG. 21 SERVICE REMINDER/HOUR METER Service reminder shows the total number of tractor. • Raise attachment lift to tractor. Use common sense when...
User Manual
Page 15
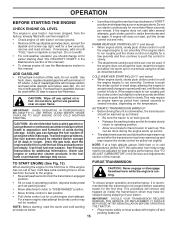
...; Check engine oil with tractor on level ground. • Remove oil fill cap/dipstick and wipe clean, reinsert the dipstick and screw cap tight, wait for a few seconds and then continue to run until the fuel lines and carburetor are empty. If the engine starts to assure fuel freshness. Use fresh fuel next season. TO START ENGINE (See Fig. 13) PURGE TRANSMISSION When starting (See "OIL VISCOSITY CHART" in slowly. • The attachments and ground drive...
...; Check engine oil with tractor on level ground. • Remove oil fill cap/dipstick and wipe clean, reinsert the dipstick and screw cap tight, wait for a few seconds and then continue to run until the fuel lines and carburetor are empty. If the engine starts to assure fuel freshness. Use fresh fuel next season. TO START ENGINE (See Fig. 13) PURGE TRANSMISSION When starting (See "OIL VISCOSITY CHART" in slowly. • The attachments and ground drive...
User Manual
Page 16
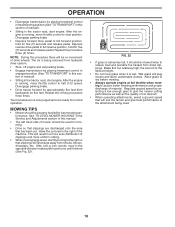
... mowing performance. This will plug mower and leave undesirable clumps. off engine and set parking brake. • Engage transmission by placing freewheel control in engaged position (See "TO TRANSPORT" in this manual. • The left hand turns until finished (See Fig. 22). Wet grass will result in a more uniform cutting. • When mowing large areas, start engine. See "TO LEVEL MOWER HOUSING" in the opposite direction...
... mowing performance. This will plug mower and leave undesirable clumps. off engine and set parking brake. • Engage transmission by placing freewheel control in engaged position (See "TO TRANSPORT" in this manual. • The left hand turns until finished (See Fig. 22). Wet grass will result in a more uniform cutting. • When mowing large areas, start engine. See "TO LEVEL MOWER HOUSING" in the opposite direction...
User Manual
Page 17
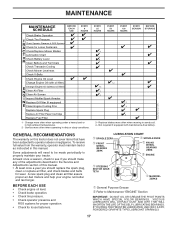
... load or in high ambient temperatures. 2 - MAINTENANCE MAINTENANCE SCHEDULE BEFORE EACH USE EVERY 8 HOURS Check Brake Operation T Check Tire Pressure R Check Operator Presence & ROS Systems A Check for Loose Fasteners C Check/Replace Mower Blades T Lubrication Chart 0 Check Battery Level R Clean Battery and Terminals Check Transaxle Cooling Check Mower Levelness Check V-Belts Check Engine Oil Level Change Engine Oil (with maintenance-free battery. Some adjustments will need to be made periodically to see if you should make any of this tractor does not cover items that have been...
... load or in high ambient temperatures. 2 - MAINTENANCE MAINTENANCE SCHEDULE BEFORE EACH USE EVERY 8 HOURS Check Brake Operation T Check Tire Pressure R Check Operator Presence & ROS Systems A Check for Loose Fasteners C Check/Replace Mower Blades T Lubrication Chart 0 Check Battery Level R Clean Battery and Terminals Check Transaxle Cooling Check Mower Levelness Check V-Belts Check Engine Oil Level Change Engine Oil (with maintenance-free battery. Some adjustments will need to be made periodically to see if you should make any of this tractor does not cover items that have been...
User Manual
Page 18
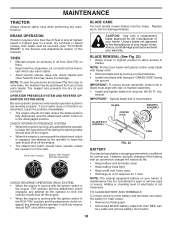
.... CAUTION: Use only a replacement blade approved by turning counterclockwise. • Install new blade with an automotive charger will extend its life. • Keep battery and terminals clean. • Keep battery bolts tight. • Keep small vent holes open or remove caps or covers. MAINTENANCE TRACTOR Always observe safety rules when performing any maintenance. IMPORTANT: Special blade bolt is maintenance free. TIRES • Maintain proper air pressure in the ROS "ON" position and the attachment clutch engaged...
.... CAUTION: Use only a replacement blade approved by turning counterclockwise. • Install new blade with an automotive charger will extend its life. • Keep battery and terminals clean. • Keep battery bolts tight. • Keep small vent holes open or remove caps or covers. MAINTENANCE TRACTOR Always observe safety rules when performing any maintenance. IMPORTANT: Special blade bolt is maintenance free. TIRES • Maintain proper air pressure in the ROS "ON" position and the attachment clutch engaged...
User Manual
Page 19
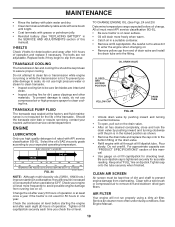
...; Clean terminals and battery cable ends with wire brush until bright. • Coat terminals with grease or petroleum jelly. • Reinstall battery (See "REPLACING BATTERY" in the SERVICE AND ADJUSTMENTS section of this manual. • Use gauge on the drain valve. • After oil has drained completely, close and lock the drain valve by pushing inward and turning clockwise until the pin is in the locked position as shown. • Remove the drain tube and replace the cap onto...
...; Clean terminals and battery cable ends with wire brush until bright. • Coat terminals with grease or petroleum jelly. • Reinstall battery (See "REPLACING BATTERY" in the SERVICE AND ADJUSTMENTS section of this manual. • Use gauge on the drain valve. • After oil has drained completely, close and lock the drain valve by pushing inward and turning clockwise until the pin is in the locked position as shown. • Remove the drain tube and replace the cap onto...
User Manual
Page 20
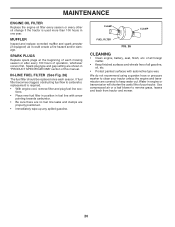
... of this manual. Spark plug type and gap setting are covered to remove grass, leaves and trash from tractor and mower. 20 tions. • Place new fuel filter in position in "PRODUCT SPECIFICATIONS" section of each season. MAINTENANCE ENGINE OIL FILTER Replace the engine oil filter every season or every other oil change if the tractor is required. • With engine cool, remove filter and plug fuel line sec- Water in engine or transmission will shorten the useful life of...
... of this manual. Spark plug type and gap setting are covered to remove grass, leaves and trash from tractor and mower. 20 tions. • Place new fuel filter in position in "PRODUCT SPECIFICATIONS" section of each season. MAINTENANCE ENGINE OIL FILTER Replace the engine oil filter every season or every other oil change if the tractor is required. • With engine cool, remove filter and plug fuel line sec- Water in engine or transmission will shorten the useful life of...
User Manual
Page 21
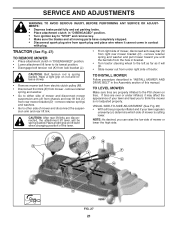
... and set parking brake. • Place attachment clutch in "DISENGAGED" position. • Turn ignition key to the left as far as it will be spring loaded. remove retainer spring and washer and pull mower toward you until the bar falls from the hole in bracket. • Turn tractor steering wheel to "STOP" and remove key. • Make sure the blades and all tires properly in the Assembly section of tractor...
... and set parking brake. • Place attachment clutch in "DISENGAGED" position. • Turn ignition key to the left as far as it will be spring loaded. remove retainer spring and washer and pull mower toward you until the bar falls from the hole in bracket. • Turn tractor steering wheel to "STOP" and remove key. • Make sure the blades and all tires properly in the Assembly section of tractor...
User Manual
Page 23
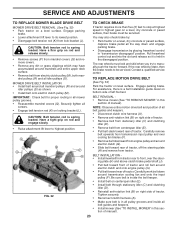
...; Remove belt from electric clutch pulley (M), both mandrel pulleys (R) and all idler pulleys (S). SERVICE AND ADJUSTMENTS TO REPLACE MOWER BLADE DRIVE BELT TO CHECK BRAKE MOWER DRIVE BELT REMOVAL (See Fig. 32) • Park tractor on rod and release slowly. • Remove screws (P) from mandrel covers (Q) and remove covers. • Remove any dirt or grass clippings which may also check brake by placing freewheel control in "transmission disengaged" position. You may have accumulated around transmission cooling fan and onto the input pulley (F). If the rear wheels...
...; Remove belt from electric clutch pulley (M), both mandrel pulleys (R) and all idler pulleys (S). SERVICE AND ADJUSTMENTS TO REPLACE MOWER BLADE DRIVE BELT TO CHECK BRAKE MOWER DRIVE BELT REMOVAL (See Fig. 32) • Park tractor on rod and release slowly. • Remove screws (P) from mandrel covers (Q) and remove covers. • Remove any dirt or grass clippings which may also check brake by placing freewheel control in "transmission disengaged" position. You may have accumulated around transmission cooling fan and onto the input pulley (F). If the rear wheels...
User Manual
Page 25
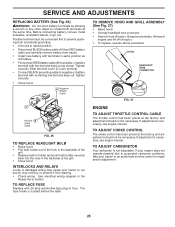
... it from tractor. • Install new battery with hex bolt and keps nut as old battery. • First connect RED battery cable (B) to an authorized service center for repair and/or adjustment. 25 Grasp hood at the factory and adjustment should not be necessary. ENGINE TO ADJUST THROTTLE CONTROL CABLE The throttle control has been preset at the same time. TO ADJUST CARBURETOR Your carburetor is located behind the dash. If your engine does not operate properly...
... it from tractor. • Install new battery with hex bolt and keps nut as old battery. • First connect RED battery cable (B) to an authorized service center for repair and/or adjustment. 25 Grasp hood at the factory and adjustment should not be necessary. ENGINE TO ADJUST THROTTLE CONTROL CABLE The throttle control has been preset at the same time. TO ADJUST CARBURETOR Your carburetor is located behind the dash. If your engine does not operate properly...
User Manual
Page 26
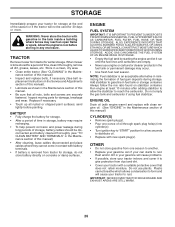
... all nuts, bolts and screws are empty. • Never use plastic. ACIDIC GAS CAN DAMAGE THE FUEL SYSTEM OF AN ENGINE WHILE IN STORAGE. • Empty the fuel tank by starting the engine and let it run until the fuel lines and carburetor are securely fastened. NOTE: Fuel stabilizer is removed from tractor for a few seconds to distribute oil. • Replace with new spark plug(s). nance section of this manual). • Inspect and replace belts, if...
... all nuts, bolts and screws are empty. • Never use plastic. ACIDIC GAS CAN DAMAGE THE FUEL SYSTEM OF AN ENGINE WHILE IN STORAGE. • Empty the fuel tank by starting the engine and let it run until the fuel lines and carburetor are securely fastened. NOTE: Fuel stabilizer is removed from tractor for a few seconds to distribute oil. • Replace with new spark plug(s). nance section of this manual). • Inspect and replace belts, if...
User Manual
Page 27
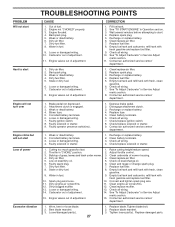
.../damaged part(s). 27 1. See "To Adjust Carburetor" in Service Adjust ments section. 11. Stale or dirty fuel. 6. Clean underside of adjustment. 14. Engine not "CHOKED" properly. 3. Weak or dead battery. 6. Check all wiring. 7. Clean/replace air filter. 2. Clean battery terminals. 6. Tighten blade bolt. 2. Depress brake pedal. 2. Check/replace solenoid or starter. 1. Check oil level/change spark plug. 7. Engine valves out of power Excessive vibration CAUSE 1. Weak or dead battery. 4. Check/replace ignition switch. 8. Low oil level/dirty oil...
.../damaged part(s). 27 1. See "To Adjust Carburetor" in Service Adjust ments section. 11. Stale or dirty fuel. 6. Clean underside of adjustment. 14. Engine not "CHOKED" properly. 3. Weak or dead battery. 6. Check all wiring. 7. Clean/replace air filter. 2. Clean battery terminals. 6. Tighten blade bolt. 2. Depress brake pedal. 2. Check/replace solenoid or starter. 1. Check oil level/change spark plug. 7. Engine valves out of power Excessive vibration CAUSE 1. Weak or dead battery. 4. Check/replace ignition switch. 8. Low oil level/dirty oil...
User Manual
Page 28
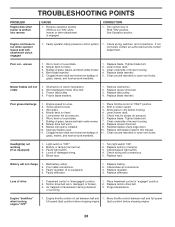
... air pressure. 6. Buildup of drive 1. Bulb(s) or lamp(s) burned out. 3. Turn light switch "ON". 2. Poor cable connections. 3. TROUBLESHOOTING POINTS PROBLEM Engine dies when tractor is "OFF". 2. Faulty operator-safety presence control system. 1. Clean underside of mower housing. 4. Faulty alternator. 1. Engine continues to open vent holes. uneven 1. Wet grass. 3. Blades improperly installed. 9. Check/clean all connections. 3. Replace alternator. Clean around mandrels. 1. Obstruction in "engaged" position. 2. Place throttle control in this manual...
... air pressure. 6. Buildup of drive 1. Bulb(s) or lamp(s) burned out. 3. Turn light switch "ON". 2. Poor cable connections. 3. TROUBLESHOOTING POINTS PROBLEM Engine dies when tractor is "OFF". 2. Faulty operator-safety presence control system. 1. Clean underside of mower housing. 4. Faulty alternator. 1. Engine continues to open vent holes. uneven 1. Wet grass. 3. Blades improperly installed. 9. Check/clean all connections. 3. Replace alternator. Clean around mandrels. 1. Obstruction in "engaged" position. 2. Place throttle control in this manual...
User Manual
Page 30
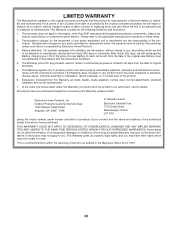
... will replace, without charge for rental or commercial purposes is requested by the purchaser unless such return is limited to you , any power equipment unit or attachment are belts, blades, blade adapters, normal wear, normal adjustments, standard hardware and normal maintenance. 7. This Warranty does not apply to any part which has been subjected to alteration, misuse, abuse, improper assembly or installation, delivery...
... will replace, without charge for rental or commercial purposes is requested by the purchaser unless such return is limited to you , any power equipment unit or attachment are belts, blades, blade adapters, normal wear, normal adjustments, standard hardware and normal maintenance. 7. This Warranty does not apply to any part which has been subjected to alteration, misuse, abuse, improper assembly or installation, delivery...


