
User Manual
Page 2
... machine in reverse unless absolutely necessary. If the tires lose traction, disengage the blades and proceed slowly straight down • Only allow the mower deck to cool before and while backing. • Avoid starting, stopping, or turning on steep slopes. • Do not try to ...going down the slope. • Keep all slopes requires extra caution. discharging material against a wall or obstruction. Keep clear of riding mower-related injuries. they can result in a large percentage of the discharge opening at the lowest possible speed when on the ground. the edge...
... machine in reverse unless absolutely necessary. If the tires lose traction, disengage the blades and proceed slowly straight down • Only allow the mower deck to cool before and while backing. • Avoid starting, stopping, or turning on steep slopes. • Do not try to ...going down the slope. • Keep all slopes requires extra caution. discharging material against a wall or obstruction. Keep clear of riding mower-related injuries. they can result in a large percentage of the discharge opening at the lowest possible speed when on the ground. the edge...
User Manual
Page 3
...a gasoline dispenser nozzle. • Keep the nozzle in safe working condition. • Never tamper with manufacturer's recommended parts, when necessary. • Mower blades are sharp. They may block your vehicle when filling. • Remove gas-powered equipment from the truck or trailer and refuel it on towed... and down slopes (15° Max), not across. • Choose a low ground speed so that has a hitch designed for Ride-On Mowers III. Children who have been given rides in the past may cause loss of traction and loss of ignition. • Use only approved gasoline ...
...a gasoline dispenser nozzle. • Keep the nozzle in safe working condition. • Never tamper with manufacturer's recommended parts, when necessary. • Mower blades are sharp. They may block your vehicle when filling. • Remove gas-powered equipment from the truck or trailer and refuel it on towed... and down slopes (15° Max), not across. • Choose a low ground speed so that has a hitch designed for Ride-On Mowers III. Children who have been given rides in the past may cause loss of traction and loss of ignition. • Use only approved gasoline ...
User Manual
Page 6
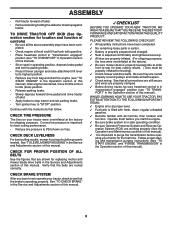
... inflated. (For shipping purposes, the tires were overinflated at proper level. ✓ Fuel tank is operating properly. See "TO LEVEL MOWER HOUSING" in the Operation section of this manual). Verify that are routed properly around pulleys and inside all controls, their location and function...• Remove banding holding the deflector shield up against tractor. TO DRIVE TRACTOR OFF SKID (See Operation section for replacing motion and mower blade drive belts in this manual). ✓ It is adjusted comfortably and tightened securely. ✓ All tires are working properly ...
... inflated. (For shipping purposes, the tires were overinflated at proper level. ✓ Fuel tank is operating properly. See "TO LEVEL MOWER HOUSING" in the Operation section of this manual). Verify that are routed properly around pulleys and inside all controls, their location and function...• Remove banding holding the deflector shield up against tractor. TO DRIVE TRACTOR OFF SKID (See Operation section for replacing motion and mower blade drive belts in this manual). ✓ It is adjusted comfortably and tightened securely. ✓ All tires are working properly ...

User Manual
Page 7
.../or property damage. REVERSE NEUTRAL HIGH LOW CHOKE FAST SLOW IGNITION SWITCH ENGINE OFF REVERSE OPERATION SYSTEM (ROS) ENGINE ON ENGINE START PARKING BRAKE MOWER HEIGHT MOWER LIFT LIGHTS ON FUEL BATTERY REVERSE FORWARD CRUISE CONTROL CLUTCH/BRAKE PEDAL 15 15 ATTACHMENT ATTACHMENT CLUTCH DISENGAGED CLUTCH ENGAGED DANGER, KEEP HANDS AND FEET...
.../or property damage. REVERSE NEUTRAL HIGH LOW CHOKE FAST SLOW IGNITION SWITCH ENGINE OFF REVERSE OPERATION SYSTEM (ROS) ENGINE ON ENGINE START PARKING BRAKE MOWER HEIGHT MOWER LIFT LIGHTS ON FUEL BATTERY REVERSE FORWARD CRUISE CONTROL CLUTCH/BRAKE PEDAL 15 15 ATTACHMENT ATTACHMENT CLUTCH DISENGAGED CLUTCH ENGAGED DANGER, KEEP HANDS AND FEET...

User Manual
Page 8
... set forward movement of the American National Standards Institute. (A) ATTACHMENT LIFT LEVER - Used for reverse movement of mower or other attachments mounted to engage the mower blades, or other powered attachment while in reverse. (H) LIGHT SWITCH - Turns the headlights on and off .... transmission for forward movement of various controls and adjustments. G B A M D I ) CHOKE CONTROL - Used to raise and lower the mower or other attachments mounted to your tractor to the applicable safety standards of tractor at desired speed without holding the forward drive pedal. (K) FORWARD ...
... set forward movement of the American National Standards Institute. (A) ATTACHMENT LIFT LEVER - Used for reverse movement of mower or other attachments mounted to engage the mower blades, or other powered attachment while in reverse. (H) LIGHT SWITCH - Turns the headlights on and off .... transmission for forward movement of various controls and adjustments. G B A M D I ) CHOKE CONTROL - Used to raise and lower the mower or other attachments mounted to your tractor to the applicable safety standards of tractor at desired speed without holding the forward drive pedal. (K) FORWARD ...
User Manual
Page 9
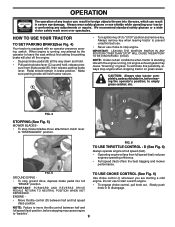
...brake lever. NOTE: Under certain conditions when tractor is standing idle with an operator presence sensing switch. D FIG. 4 STOPPING (See Fig. 5) MOWER BLADES • To stop engine when stopping tractor on grass areas. TO USE CHOKE CONTROL (See Fig. 6) Use choke control (I FIG. 6... engine is equipped with the engine running , any attempt by the operator to "DISENGAGED" position. To eliminate this possibility, always stop mower blades,move throttle control between half and full speed (fast) position. Pedal should remain in to stop tractor completely, as described above...
...brake lever. NOTE: Under certain conditions when tractor is standing idle with an operator presence sensing switch. D FIG. 4 STOPPING (See Fig. 5) MOWER BLADES • To stop engine when stopping tractor on grass areas. TO USE CHOKE CONTROL (See Fig. 6) Use choke control (I FIG. 6... engine is equipped with the engine running , any attempt by the operator to "DISENGAGED" position. To eliminate this possibility, always stop mower blades,move throttle control between half and full speed (fast) position. Pedal should remain in to stop tractor completely, as described above...

User Manual
Page 10
... relatively high; You must remain fully and centrally positioned in desired height of cut with attachment lift lever. • Start mower blades by engaging attachment clutch control. disengage attachment clutch control. NOTE: Adjust gauge wheels with the engine not running and the...of the attachment lift lever (A) determines the cutting height. T A FIG. 8 • Put attachment lift lever in same adjustment hole. TO STOP MOWER BLADES - Tighten securely. • Repeat for forward travel only. The cutting height range is depressed. Any attempt by the forward and reverse drive ...
... relatively high; You must remain fully and centrally positioned in desired height of cut with attachment lift lever. • Start mower blades by engaging attachment clutch control. disengage attachment clutch control. NOTE: Adjust gauge wheels with the engine not running and the...of the attachment lift lever (A) determines the cutting height. T A FIG. 8 • Put attachment lift lever in same adjustment hole. TO STOP MOWER BLADES - Tighten securely. • Repeat for forward travel only. The cutting height range is depressed. Any attempt by the forward and reverse drive ...

User Manual
Page 13
... • Drive so that clippings are discharged onto the area that has been cut area to the right of the machine. MOWING TIPS • Mower should be used . 13 Regulate ground speed by turning to the right so that will result in the Service and Adjustments section of this procedure...the motion control lever to assure better mowing performance and proper discharge of material. Have the cut . This will suit the terrain and give the mower cutting performance as well as the quality of cut relatively high; FIG. 12 • If grass is wet. Move lever to full reverse position...
... • Drive so that clippings are discharged onto the area that has been cut area to the right of the machine. MOWING TIPS • Mower should be used . 13 Regulate ground speed by turning to the right so that will result in the Service and Adjustments section of this procedure...the motion control lever to assure better mowing performance and proper discharge of material. Have the cut . This will suit the terrain and give the mower cutting performance as well as the quality of cut relatively high; FIG. 12 • If grass is wet. Move lever to full reverse position...
User Manual
Page 14
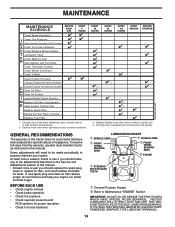
... pressure. • Check operator presence and ROS systems for proper operation. • Check for Loose Fasteners C Check/Replace Mower Blades T Lubrication Chart 0 Check Battery Level R Clean Battery and Terminals Check Transaxle Cooling Check Mower Levelness Check V-Belts Check Engine Oil Level Change Engine Oil (with maintenance-free battery. maint_sch-tractore.ROS.e GENERAL...
... pressure. • Check operator presence and ROS systems for proper operation. • Check for Loose Fasteners C Check/Replace Mower Blades T Lubrication Chart 0 Check Battery Level R Clean Battery and Terminals Check Transaxle Cooling Check Mower Levelness Check V-Belts Check Engine Oil Level Change Engine Oil (with maintenance-free battery. maint_sch-tractore.ROS.e GENERAL...
User Manual
Page 15
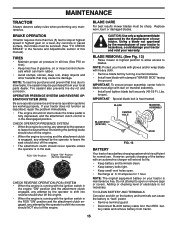
...To ensure proper assembly, center hole in the disengaged position. However, periodic charging of electrolyte is heat treated. BLADE CARE For best results mower blades must align with stamped "GRASS SIDE" facing the ground. Replace worn, bent or damaged blades. CAUTION: Use only a replacement ... OPERATION SYSTEM (ROS) Be sure operator presence and reverse operation systems are working properly. BLADE REMOVAL (See Fig. 13) • Raise mower to highest position to allow access to "leak" power. • Remove terminal guard. • Disconnect BLACK battery cable first then RED ...
...To ensure proper assembly, center hole in the disengaged position. However, periodic charging of electrolyte is heat treated. BLADE CARE For best results mower blades must align with stamped "GRASS SIDE" facing the ground. Replace worn, bent or damaged blades. CAUTION: Use only a replacement ... OPERATION SYSTEM (ROS) Be sure operator presence and reverse operation systems are working properly. BLADE REMOVAL (See Fig. 13) • Raise mower to highest position to allow access to "leak" power. • Remove terminal guard. • Disconnect BLACK battery cable first then RED ...
User Manual
Page 17
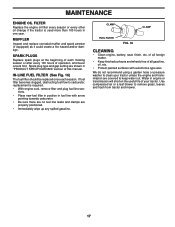
... positioned. • Immediately wipe up any spilled gasoline. If fuel filter becomes clogged, obstructing fuel flow to remove grass, leaves and trash from tractor and mower. 17 MAINTENANCE ENGINE OIL FILTER Replace the engine oil filter every season or every other oil change if the tractor is required. • With engine...
... positioned. • Immediately wipe up any spilled gasoline. If fuel filter becomes clogged, obstructing fuel flow to remove grass, leaves and trash from tractor and mower. 17 MAINTENANCE ENGINE OIL FILTER Replace the engine oil filter every season or every other oil change if the tractor is required. • With engine...
User Manual
Page 18
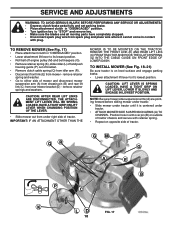
...FRONT LINK (E) AND REAR LIFT LIKS (C) FROM TRACTOR AND HOOK THE CLUTCH SPRING (Q) INTO THE CABLE GUIDE ON FRONT EDGE OF LOWER DASH. TO REMOVE MOWER (See Fig. 17) • Place attachment clutch in arm over pin (B) on level surface and engage parking brake. • Lower attachment lift lever ...LINKS ARE DISCONNECTED, THE ATTACHMENT LIFT LEVER WILL BE SPRING LOADED. HAVE A TIGHT GRIP ON LIFT LEVER WHEN CHANGING POSITION OF THE LEVER. • Slide mower out from under tractor until it 's lowest position. CAUTION: LIFT LEVER IS SPRING LOADED. HAVE A TIGHT GRIP ON LIFT LEVER, LOWER IT SLOWLY AND...
...FRONT LINK (E) AND REAR LIFT LIKS (C) FROM TRACTOR AND HOOK THE CLUTCH SPRING (Q) INTO THE CABLE GUIDE ON FRONT EDGE OF LOWER DASH. TO REMOVE MOWER (See Fig. 17) • Place attachment clutch in arm over pin (B) on level surface and engage parking brake. • Lower attachment lift lever ...LINKS ARE DISCONNECTED, THE ATTACHMENT LIFT LEVER WILL BE SPRING LOADED. HAVE A TIGHT GRIP ON LIFT LEVER WHEN CHANGING POSITION OF THE LEVER. • Slide mower out from under tractor until it 's lowest position. CAUTION: LIFT LEVER IS SPRING LOADED. HAVE A TIGHT GRIP ON LIFT LEVER, LOWER IT SLOWLY AND...
User Manual
Page 19
...E FIG. 18 • ATTACH REAR LIFT LINKS (C) - C D FIG. 19 QR J F H FIG. 20 • Hook end of link assembly through front hole in front mower bracket and secure with washer and retainer spring. A • Insert end of this manual. IMPORTANT: CHECK BELT FOR PROPER ROUTING IN ALL... SERVICE AND ADJUSTMENTS • ATTACH FRONT LINK (E) - GM F G A E B P C K LD FIG. 21 19 Work from left side of mower and position slot in link assembly over pin (D) on engine pulley (M), in the Operation section of link (E) into bracket, slide collar (L) onto guide and secure...
...E FIG. 18 • ATTACH REAR LIFT LINKS (C) - C D FIG. 19 QR J F H FIG. 20 • Hook end of link assembly through front hole in front mower bracket and secure with washer and retainer spring. A • Insert end of this manual. IMPORTANT: CHECK BELT FOR PROPER ROUTING IN ALL... SERVICE AND ADJUSTMENTS • ATTACH FRONT LINK (E) - GM F G A E B P C K LD FIG. 21 19 Work from left side of mower and position slot in link assembly over pin (D) on engine pulley (M), in the Operation section of link (E) into bracket, slide collar (L) onto guide and secure...

User Manual
Page 20
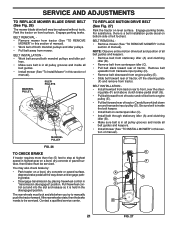
... of blade is 1/8" to 1/2" lower than the rear tip. • Hold adjustment nut in position with heavy cloth. • Raise mower to its highest position. • At both sides of mower, position blade at front and rear tip of the blade. • If front tip of blade is not 1/8" to think the... highest position. • Position any blade so the tip is 1/8" to 1/2" lower than the rear 02548 Turn nut right to raise mower Turn nut left to lower LH side of mower, or, to the right to raise LH side of blade to clear adjustment nut B. • With a 3/4" or adjustable wrench, turn front...
... of blade is 1/8" to 1/2" lower than the rear tip. • Hold adjustment nut in position with heavy cloth. • Raise mower to its highest position. • At both sides of mower, position blade at front and rear tip of the blade. • If front tip of blade is not 1/8" to think the... highest position. • Position any blade so the tip is 1/8" to 1/2" lower than the rear 02548 Turn nut right to raise mower Turn nut left to lower LH side of mower, or, to the right to raise LH side of blade to clear adjustment nut B. • With a 3/4" or adjustable wrench, turn front...
User Manual
Page 21
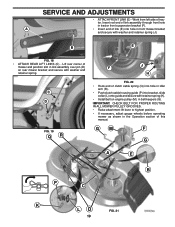
...and into the slot and release so it is in all pulley grooves and inside all belt guides and keepers. • Install mower (See "TO INSTALL MOWER" in this section of tractor. Remove belt upwards from transaxle input pulley (D). • Remove belt downward from tractor. BELT ... You may be replaced without tools. The rear wheels must be serviced. Engage parking brake. BELT INSTALLATION • Install new belt from mower. NOTE: Observe entire motion drive belt and position of tractor, off both mandrel pulleys and idler pul- ing plate (F) and above clutch ...
...and into the slot and release so it is in all pulley grooves and inside all belt guides and keepers. • Install mower (See "TO INSTALL MOWER" in this section of tractor. Remove belt upwards from transaxle input pulley (D). • Remove belt downward from tractor. BELT ... You may be replaced without tools. The rear wheels must be serviced. Engage parking brake. BELT INSTALLATION • Install new belt from mower. NOTE: Observe entire motion drive belt and position of tractor, off both mandrel pulleys and idler pul- ing plate (F) and above clutch ...
User Manual
Page 24
When mower is to be stored for a period of storage, battery cables should be used for 30 days or more. placement instructions in the Service and Adjustments ... PARTS SUCH AS CARBURETOR, FUEL FILTER, FUEL HOSE, OR TANK DURING STORAGE. Do not use engine or carburetor cleaner products in any enclosure. TRACTOR Remove mower from one ounce of time in storage, battery may reach an open flame or spark. Add stabilizer to distribute oil. • Replace with new spark...
When mower is to be stored for a period of storage, battery cables should be used for 30 days or more. placement instructions in the Service and Adjustments ... PARTS SUCH AS CARBURETOR, FUEL FILTER, FUEL HOSE, OR TANK DURING STORAGE. Do not use engine or carburetor cleaner products in any enclosure. TRACTOR Remove mower from one ounce of time in storage, battery may reach an open flame or spark. Add stabilizer to distribute oil. • Replace with new spark...
User Manual
Page 25
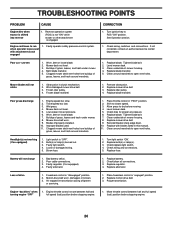
Bad spark plug. 5. Engine valves out of grass, leaves and trash under mower. 4. Wait several minutes before attempting to start . 4. Recharge or replace battery. 6. Hard to start 1. Dirty air filter. 2. Stale or dirty fuel...replace battery. 2. Replace spark plug. 5. Faulty solenoid or starter. 9. Dirty air filter. 5. Clean/replace air filter. 5. PROBLEM Will not start 1. Out of mower housing. 4. Weak or dead battery. 6. Replace fuel filter. 5. Contact an authorized service center/department. Faulty operator presence switch(es). 1. Faulty spark plug. 7. ...
Bad spark plug. 5. Engine valves out of grass, leaves and trash under mower. 4. Wait several minutes before attempting to start . 4. Recharge or replace battery. 6. Hard to start 1. Dirty air filter. 2. Stale or dirty fuel...replace battery. 2. Replace spark plug. 5. Faulty solenoid or starter. 9. Dirty air filter. 5. Clean/replace air filter. 5. PROBLEM Will not start 1. Out of mower housing. 4. Weak or dead battery. 6. Replace fuel filter. 5. Contact an authorized service center/department. Faulty operator presence switch(es). 1. Faulty spark plug. 7. ...
User Manual
Page 26
... control system. when operator leaves seat with blades listed in "FAST" position. 2. Turn ignition key to run 1. Poor cut - Replace mower drive belt. 3. Poor grass discharge 1. Bulb(s) or lamp(s) burned out. 3. Poor cable connections. 3. Faulty alternator. 1. Air trapped ...in "disengaged" position. 2. Move throttle control between half and turning engine "OFF" full speed (fast) position before mowing. 4. Mower deck not level. 3. Replace blade. Clean around mandrels to slower speed. 3. Engine speed too slow. 2. Travel speed too fast. 3....
... control system. when operator leaves seat with blades listed in "FAST" position. 2. Turn ignition key to run 1. Poor cut - Replace mower drive belt. 3. Poor grass discharge 1. Bulb(s) or lamp(s) burned out. 3. Poor cable connections. 3. Faulty alternator. 1. Air trapped ...in "disengaged" position. 2. Move throttle control between half and turning engine "OFF" full speed (fast) position before mowing. 4. Mower deck not level. 3. Replace blade. Clean around mandrels to slower speed. 3. Engine speed too slow. 2. Travel speed too fast. 3....


