
User Manual
Page 2
...clear of your tractor. GENERAL OPERATION • • • Read, understand, and follow all times. • • Only allow the mower deck to plow leaves or other reproductive harm. erating. Avoid discharging material against a wall or ob- Do not mow on a slope. The machine...in a large percentage of California to protect themselves and others from serious injury. • Follow the manufacturer's recommendation for Ride-On Mowers DANGER: THIS CUTTING MACHINE IS CAPABLE OF AMPUTATING HANDS AND FEET AND THROWING OBJECTS. Do not shift to occur. WARNING: Tow ...
...clear of your tractor. GENERAL OPERATION • • • Read, understand, and follow all times. • • Only allow the mower deck to plow leaves or other reproductive harm. erating. Avoid discharging material against a wall or ob- Do not mow on a slope. The machine...in a large percentage of California to protect themselves and others from serious injury. • Follow the manufacturer's recommendation for Ride-On Mowers DANGER: THIS CUTTING MACHINE IS CAPABLE OF AMPUTATING HANDS AND FEET AND THROWING OBJECTS. Do not shift to occur. WARNING: Tow ...
User Manual
Page 3
... injury or property damage, use extra caution when servicing them . • Never tamper with manufacturer's recommended parts, when necessary. • Mower blades are explosive. • Extinguish all times until fueling is not alert to cool before restarting. • Never make any fuel-soaked... the engine running . • Check grass catcher components and the discharge guard frequently and replace with safety devices. for Ride-On Mowers III. They may block your vehicle when filling. • Remove gas-powered equipment from a gasoline dispenser nozzle. • Keep the...
... injury or property damage, use extra caution when servicing them . • Never tamper with manufacturer's recommended parts, when necessary. • Mower blades are explosive. • Extinguish all times until fueling is not alert to cool before restarting. • Never make any fuel-soaked... the engine running . • Check grass catcher components and the discharge guard frequently and replace with safety devices. for Ride-On Mowers III. They may block your vehicle when filling. • Remove gas-powered equipment from a gasoline dispenser nozzle. • Keep the...
User Manual
Page 5
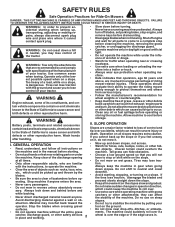
..., it means from carton . • Cut along dashed lines on label (L) (label is mentioned in the operating position (seated behind the steering wheel). UNASSEMBLED PARTS Mower Mower Front Wheel (5) Large Retainer Springs - 7/16 (2) Smaller Retainer Springs - 5/16 (1) 3/4 O.D. CHECK BATTERY (See Fig. 1) • Lift hood to raised position. When right or left unassembled...
..., it means from carton . • Cut along dashed lines on label (L) (label is mentioned in the operating position (seated behind the steering wheel). UNASSEMBLED PARTS Mower Mower Front Wheel (5) Large Retainer Springs - 7/16 (2) Smaller Retainer Springs - 5/16 (1) 3/4 O.D. CHECK BATTERY (See Fig. 1) • Lift hood to raised position. When right or left unassembled...

User Manual
Page 6
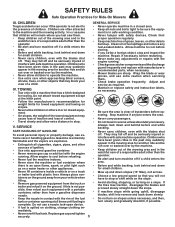
...the right. TO DRIVE TRACTOR OFF SKID (See Operation section for proper routing in the Operation section of this manual. FIG. 3 INSTALL MOWER AND DRIVE BELT (See Figs. 4-12) TO ROLL TRACTOR OFF SKID (See Operation section for additional guidance on lift lever, lower it... • Place freewheel control in "transmission engaged" position (see "TO TRANSPORT" in Operation section of this assembly. Tighten securely. ASSEMBLE FRONT WHEEL TO MOWER (See Fig. 3) • Using shoulder bolt, washer and locknut from the skid. Have a tight grip on this manual). • Sit on ...
...the right. TO DRIVE TRACTOR OFF SKID (See Operation section for proper routing in the Operation section of this manual. FIG. 3 INSTALL MOWER AND DRIVE BELT (See Figs. 4-12) TO ROLL TRACTOR OFF SKID (See Operation section for additional guidance on lift lever, lower it... • Place freewheel control in "transmission engaged" position (see "TO TRANSPORT" in Operation section of this assembly. Tighten securely. ASSEMBLE FRONT WHEEL TO MOWER (See Fig. 3) • Using shoulder bolt, washer and locknut from the skid. Have a tight grip on this manual). • Sit on ...

User Manual
Page 7
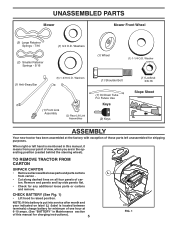
...spring. FIG. 8 • ATTACH REAR LIFT LINKS (C) - ASSEMBLY D 02051 A FIG. 5 NOTE: Be sure mower side suspension arms (A) are pointing forward before sliding mower under tractor. • Slide mower under tractor until it is centered under tractor. • FIRST INSTALL ANTI-SWAY BAR (S). - Position hole in tractor ...lift shaft suspension arm (L) and pivot link down to insert bar. - Lift rear corner of mower and position slot in link assembly over pin (B) on outside of tractor chassis and secure with washer and retainer spring. • Repeat on ...
...spring. FIG. 8 • ATTACH REAR LIFT LINKS (C) - ASSEMBLY D 02051 A FIG. 5 NOTE: Be sure mower side suspension arms (A) are pointing forward before sliding mower under tractor. • Slide mower under tractor until it is centered under tractor. • FIRST INSTALL ANTI-SWAY BAR (S). - Position hole in tractor ...lift shaft suspension arm (L) and pivot link down to insert bar. - Lift rear corner of mower and position slot in link assembly over pin (B) on outside of tractor chassis and secure with washer and retainer spring. • Repeat on ...
User Manual
Page 8
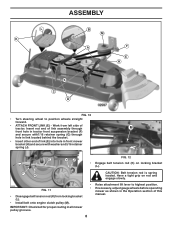
... in tractor front suspension bracket (F) and secure with7/16 retainer spring (G) through hole in front mower bracket (H) and secure with washer and 5/16 retainer spring (J). If necessary, adjust gauge wheels before operating mower as shown in all mower pulley grooves. 8 Raise attachment lift lever to position wheels straight forward. • ATTACH FRONT LINK...
... in tractor front suspension bracket (F) and secure with7/16 retainer spring (G) through hole in front mower bracket (H) and secure with washer and 5/16 retainer spring (J). If necessary, adjust gauge wheels before operating mower as shown in all mower pulley grooves. 8 Raise attachment lift lever to position wheels straight forward. • ATTACH FRONT LINK...
User Manual
Page 9
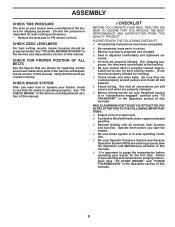
.... (For shipping purposes, the tires were overinflated at the factory). ✓ Be sure mower deck is important to PSI shown on your tractor for leveling). ✓ Check mower and drive belts. Be sure they are routed correctly. Follow proper starting and transmission purging instructions...function. Verify that the brake is adjusted comfortably and tightened securely. ✓ All tires are shown for shipping purposes. See "TO LEVEL MOWER HOUSING" in carton. ✓ Battery is properly prepared and charged. ✓ Seat is operating properly. ASSEMBLY CHECK TIRE PRESSURE The ...
.... (For shipping purposes, the tires were overinflated at the factory). ✓ Be sure mower deck is important to PSI shown on your tractor for leveling). ✓ Check mower and drive belts. Be sure they are routed correctly. Follow proper starting and transmission purging instructions...function. Verify that the brake is adjusted comfortably and tightened securely. ✓ All tires are shown for shipping purposes. See "TO LEVEL MOWER HOUSING" in carton. ✓ Battery is properly prepared and charged. ✓ Seat is operating properly. ASSEMBLY CHECK TIRE PRESSURE The ...

User Manual
Page 10
.../or property damage. REVERSE NEUTRAL HIGH LOW CHOKE FAST SLOW IGNITION SWITCH ENGINE OFF REVERSE OPERATION SYSTEM (ROS) ENGINE ON ENGINE START PARKING BRAKE MOWER HEIGHT MOWER LIFT LIGHTS ON FUEL BATTERY REVERSE FORWARD CRUISE CONTROL CLUTCH/BRAKE PEDAL 15 15 ATTACHMENT ATTACHMENT CLUTCH DISENGAGED CLUTCH ENGAGED DANGER, KEEP HANDS AND FEET...
.../or property damage. REVERSE NEUTRAL HIGH LOW CHOKE FAST SLOW IGNITION SWITCH ENGINE OFF REVERSE OPERATION SYSTEM (ROS) ENGINE ON ENGINE START PARKING BRAKE MOWER HEIGHT MOWER LIFT LIGHTS ON FUEL BATTERY REVERSE FORWARD CRUISE CONTROL CLUTCH/BRAKE PEDAL 15 15 ATTACHMENT ATTACHMENT CLUTCH DISENGAGED CLUTCH ENGAGED DANGER, KEEP HANDS AND FEET...

User Manual
Page 11
... MANUAL AND SAFETY RULES BEFORE OPERATING YOUR TRACTOR Compare the illustrations with your tractor. (F) IGNITION SWITCH - Used to engage the mower blades, or other attachments mounted to your tractor to set forward movement of tractor. (L) REVERSE DRIVE PEDAL - Allows operation of ... ATTACHMENT CLUTCH SWITCH - Locks clutch/brake pedal into the brake position. (D) THROTTLE CONTROL - Disengages transmission for the engine and mower. 11 Indicates when service is required for pushing or slowly towing the tractor with the locations of the American National Standards Institute. ...
... MANUAL AND SAFETY RULES BEFORE OPERATING YOUR TRACTOR Compare the illustrations with your tractor. (F) IGNITION SWITCH - Used to engage the mower blades, or other attachments mounted to your tractor to set forward movement of tractor. (L) REVERSE DRIVE PEDAL - Allows operation of ... ATTACHMENT CLUTCH SWITCH - Locks clutch/brake pedal into the brake position. (D) THROTTLE CONTROL - Disengages transmission for the engine and mower. 11 Indicates when service is required for pushing or slowly towing the tractor with the locations of the American National Standards Institute. ...
User Manual
Page 12
...of any position other than full speed (fast) reduces engines operating efficiency. • Full speed (fast) offers the best bagging and mower performance. We recommend standard safety glasses or a wide vision safety mask worn over spectacles. Always remove key when leaving tractor to prevent ... in to stop tractor completely, as described above, before stopping, may cause "browning" of grass. B C D STOPPING FIG. 14 MOWER BLADES • To stop engine when stopping tractor on grass areas. Always wear safety glasses or eye shields while operating your tractor or performing...
...of any position other than full speed (fast) reduces engines operating efficiency. • Full speed (fast) offers the best bagging and mower performance. We recommend standard safety glasses or a wide vision safety mask worn over spectacles. Always remove key when leaving tractor to prevent ... in to stop tractor completely, as described above, before stopping, may cause "browning" of grass. B C D STOPPING FIG. 14 MOWER BLADES • To stop engine when stopping tractor on grass areas. Always wear safety glasses or eye shields while operating your tractor or performing...
User Manual
Page 13
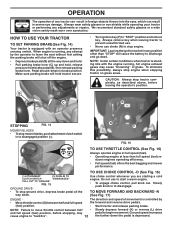
... wheels should be mowed twice. NOTE: Adjust gauge wheels with the engine running . Install gauge wheel in desired cutting height slot. FIG.19 TO OPERATE MOWER Your tractor is at slow speeds may vary depending upon soil conditions, height of grass and types of manual). • With... mower in the seat to the blade tip with the engine not running and the attachment clutch engaged will shut off the ground. You must remain A ...
... wheels should be mowed twice. NOTE: Adjust gauge wheels with the engine running . Install gauge wheel in desired cutting height slot. FIG.19 TO OPERATE MOWER Your tractor is at slow speeds may vary depending upon soil conditions, height of grass and types of manual). • With... mower in the seat to the blade tip with the engine not running and the attachment clutch engaged will shut off the ground. You must remain A ...
User Manual
Page 14
.... • Pull freewheel control out and down hills with the attachment engaged. TOWING CARTS AND OTHER ATTACHMENTS Tow only the attachments that the engine or mower needs servicing. TO TRANSPORT (See Figs. 13 and 21) When pushing or towing your tractor. To service engine and... mower, see the Maintenance section of tying hood to indicate that are certain no longer needed, turn ignition key counterclockwise to ROS "ON" position. • Look ...
.... • Pull freewheel control out and down hills with the attachment engaged. TOWING CARTS AND OTHER ATTACHMENTS Tow only the attachments that the engine or mower needs servicing. TO TRANSPORT (See Figs. 13 and 21) When pushing or towing your tractor. To service engine and... mower, see the Maintenance section of tying hood to indicate that are certain no longer needed, turn ignition key counterclockwise to ROS "ON" position. • Look ...

User Manual
Page 16
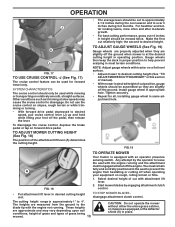
..., hold for normal operation. This procedure will suit the terrain and give the mower cutting performance as well as the quality of this procedure there will plug mower and leave undesirable clumps. MOWING TIPS • Mower should be purged before mowing. • Always operate engine at full throttle when... are discharged onto the area that will remove any trapped air inside the transmission which may have developed during shipping of mower should be used for five feet. See "TO LEVEL MOWER HOUSING" in the opposite direction making left hand side of your tractor.
..., hold for normal operation. This procedure will suit the terrain and give the mower cutting performance as well as the quality of this procedure there will plug mower and leave undesirable clumps. MOWING TIPS • Mower should be purged before mowing. • Always operate engine at full throttle when... are discharged onto the area that will remove any trapped air inside the transmission which may have developed during shipping of mower should be used for five feet. See "TO LEVEL MOWER HOUSING" in the opposite direction making left hand side of your tractor.
User Manual
Page 17
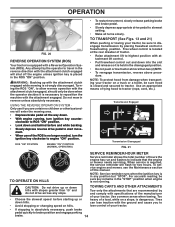
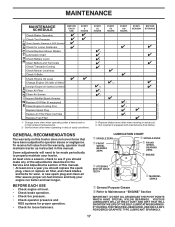
... BEFORE EACH USE EVERY 8 HOURS Check Brake Operation T Check Tire Pressure R Check Operator Presence & ROS Systems A Check for Loose Fasteners C Check/Replace Mower Blades T Lubrication Chart 0 Check Battery Level R Clean Battery and Terminals Check Transaxle Cooling Check Mower Levelness Check V-Belts Check Engine Oil Level Change Engine Oil (with maintenance-free battery.
... BEFORE EACH USE EVERY 8 HOURS Check Brake Operation T Check Tire Pressure R Check Operator Presence & ROS Systems A Check for Loose Fasteners C Check/Replace Mower Blades T Lubrication Chart 0 Check Battery Level R Clean Battery and Terminals Check Transaxle Cooling Check Mower Levelness Check V-Belts Check Engine Oil Level Change Engine Oil (with maintenance-free battery.
User Manual
Page 18
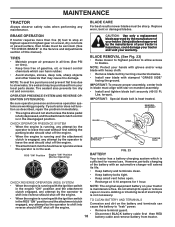
... stamped "GRASS SIDE" facing the ground. OPERATOR PRESENCE SYSTEM AND REVERSE OPERATION SYSTEM (ROS) BLADE REMOVAL (See Fig. 23) • Raise mower to highest position to allow access to open . torque). Be sure operator presence and reverse operation systems are working properly. Do not attempt to...speed in highest gear on mandrel assembly. • Install and tighten blade bolt securely (45-55 Ft. BLADE CARE For best results mower blades must align with the ignition switch in the Service and Adjustments section of your warranty. NOTE: To seal tire punctures and prevent flat...
... stamped "GRASS SIDE" facing the ground. OPERATOR PRESENCE SYSTEM AND REVERSE OPERATION SYSTEM (ROS) BLADE REMOVAL (See Fig. 23) • Raise mower to highest position to allow access to open . torque). Be sure operator presence and reverse operation systems are working properly. Do not attempt to...speed in highest gear on mandrel assembly. • Install and tighten blade bolt securely (45-55 Ft. BLADE CARE For best results mower blades must align with the ignition switch in the Service and Adjustments section of your warranty. NOTE: To seal tire punctures and prevent flat...
User Manual
Page 20
... the tractor's PTO (Blade Engage) to carburetor, replacement is cleaned. Move the tractor to prevent engine damage from the nozzle washout port. 10. mower. 20 Drive the tractor to a level, clear spot on the tractor, re-start the engine and place the throttle lever in the operator's position...towards carburetor. • Be sure there are no fuel line leaks and clamps are shown in engine or transmission will not run properly using mower again. Water in "PRODUCT SPECIFICATIONS" section of the nozzle adapter to the ON position. to lock the adapter on . • Immediately...
... the tractor's PTO (Blade Engage) to carburetor, replacement is cleaned. Move the tractor to prevent engine damage from the nozzle washout port. 10. mower. 20 Drive the tractor to a level, clear spot on the tractor, re-start the engine and place the throttle lever in the operator's position...towards carburetor. • Be sure there are no fuel line leaks and clamps are shown in engine or transmission will not run properly using mower again. Water in "PRODUCT SPECIFICATIONS" section of the nozzle adapter to the ON position. to lock the adapter on . • Immediately...
User Manual
Page 21
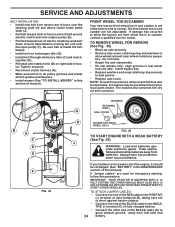
...falls from the hole in bracket. • Turn tractor steering wheel to the left as far as it will be spring loaded. TRACTOR TO REMOVE MOWER (See Fig. 28) • Place attachment clutch in "DISENGAGED" position. • Lower attachment lift lever to its lowest position. •... Disengage belt tension rod (K) from lock bracket (L). • From right side of mower, disconnect anti-sway bar (S) from under inflated, it cannot come in the Assembly section of your lawn ap- If tires are disconnected, the attachment...
...falls from the hole in bracket. • Turn tractor steering wheel to the left as far as it will be spring loaded. TRACTOR TO REMOVE MOWER (See Fig. 28) • Place attachment clutch in "DISENGAGED" position. • Lower attachment lift lever to its lowest position. •... Disengage belt tension rod (K) from lock bracket (L). • From right side of mower, disconnect anti-sway bar (S) from under inflated, it cannot come in the Assembly section of your lawn ap- If tires are disconnected, the attachment...
User Manual
Page 22
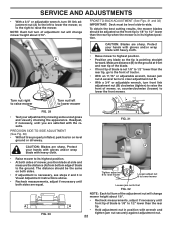
...3 in Visual Adjustment instructions above. • Recheck measurements, adjust if necessary until both sides are satisfied with heavy cloth. • Raise mower to its highest position. CAUTION: Blades are sharp. The distance should be adjusted so the front tip is 1/8" to 1/2" lower than the ..., loosen jam nut A several turns to clear adjustment nut B. • With a 3/4" or adjustable wrench, turn of mower, or, counterclockwise (loosen) to lower mower 02948 FIG. 29 • Test your hands with gloves and/or wrap blade with the results. Protect your adjustment by ...
...3 in Visual Adjustment instructions above. • Recheck measurements, adjust if necessary until both sides are satisfied with heavy cloth. • Raise mower to its highest position. CAUTION: Blades are sharp. The distance should be adjusted so the front tip is 1/8" to 1/2" lower than the ..., loosen jam nut A several turns to clear adjustment nut B. • With a 3/4" or adjustable wrench, turn of mower, or, counterclockwise (loosen) to lower mower 02948 FIG. 29 • Test your hands with gloves and/or wrap blade with the results. Protect your adjustment by ...
User Manual
Page 23
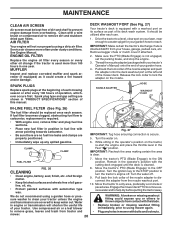
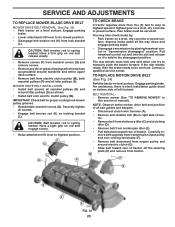
...disengaged" position. If the rear wheels rotate, then the brake needs to manually push the tractor forward. BELT REMOVAL • Remove mower (See "TO REMOVE MOWER" in all belt guides and keepers. • Disconnect clutch wire harness (A). • Remove anti-rotation link (B) on locking bracket.... For assistance, there is spring loaded. Engage parking brake. IMPORTANT: Check belt for proper routing in this section of all mower pulley grooves. • Reassemble mandrel covers (Q). You may also check brake by placing freewheel control in highest gear on rod and...
...disengaged" position. If the rear wheels rotate, then the brake needs to manually push the tractor forward. BELT REMOVAL • Remove mower (See "TO REMOVE MOWER" in all belt guides and keepers. • Disconnect clutch wire harness (A). • Remove anti-rotation link (B) on locking bracket.... For assistance, there is spring loaded. Engage parking brake. IMPORTANT: Check belt for proper routing in this section of all mower pulley grooves. • Reassemble mandrel covers (Q). You may also check brake by placing freewheel control in highest gear on rod and...
User Manual
Page 24
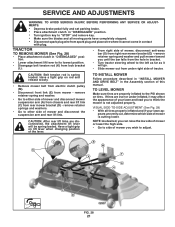
... axle cover, retaining ring and washers to affect the factory set at the factory and is inside all belt guides and keepers. • Install mower (See "TO INSTALL MOWER" in this section of tractor. Tire sealant also prevents tire dry rot and corrosion. SERVICE AND ADJUSTMENTS BELT INSTALLATION • Install new belt...
... axle cover, retaining ring and washers to affect the factory set at the factory and is inside all belt guides and keepers. • Install mower (See "TO INSTALL MOWER" in this section of tractor. Tire sealant also prevents tire dry rot and corrosion. SERVICE AND ADJUSTMENTS BELT INSTALLATION • Install new belt...


