
User Manual
Page 2
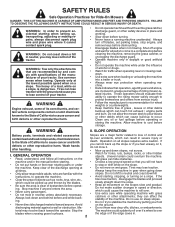
...is dangerous. terial may lose traction. SAFETY RULES Safe Operation Practices for traffic when operating near drop-offs, ditches, or embankments. Shut off blades, set parking brake, stop or shift while on the slope. Tires may ricochet back toward anyone enters the area. • Never carry ... Operate only at • Do not mow on a slope. SLOPE OPERATION Battery posts, terminals and related accessories Slopes are recommended by the blades. • Be sure the area is over . • Use extra care while operating machine with the slopes. Wash hands tip-over...
...is dangerous. terial may lose traction. SAFETY RULES Safe Operation Practices for traffic when operating near drop-offs, ditches, or embankments. Shut off blades, set parking brake, stop or shift while on the slope. Tires may ricochet back toward anyone enters the area. • Never carry ... Operate only at • Do not mow on a slope. SLOPE OPERATION Battery posts, terminals and related accessories Slopes are recommended by the blades. • Be sure the area is over . • Use extra care while operating machine with the slopes. Wash hands tip-over...
User Manual
Page 3
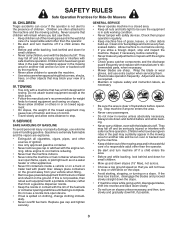
...8226; Never operate machine in a closed area. • Keep all times until fueling is in safe working condition. • Never tamper with the blades shut off if a child enters the area. • Before and while backing, look down and behind and down for small children. • ... alert to be seriously injured or interfere with plastic liner. TOWING • Tow only with manufacturer's recommended parts, when necessary. • Mower blades are often attracted to cool before storing. • If you last saw them . • Check brake operation frequently. Do not use extreme...
...8226; Never operate machine in a closed area. • Keep all times until fueling is in safe working condition. • Never tamper with the blades shut off if a child enters the area. • Before and while backing, look down and behind and down for small children. • ... alert to be seriously injured or interfere with plastic liner. TOWING • Tow only with manufacturer's recommended parts, when necessary. • Mower blades are often attracted to cool before storing. • If you last saw them . • Check brake operation frequently. Do not use extreme...
User Manual
Page 4
...: MIN. Other states may have competent, well-trained technicians and the proper tools to service or repair this manual). CCA: Case Size: 28 230 U1R Blade Bolt Torque: 45-55FT.
...: MIN. Other states may have competent, well-trained technicians and the proper tools to service or repair this manual). CCA: Case Size: 28 230 U1R Blade Bolt Torque: 45-55FT.
User Manual
Page 6
.... WHILE LEARNING HOW TO USE YOUR TRACTOR, PAY EXTRA ATTENTION TO THE FOLLOWING IMPORTANT ITEMS: ✓ Engine oil is important for replacing motion and mower blade drive belts in the Operation section of this manual). 6 Raise attachment lift lever to PSI shown on seat in Operation section of this manual). Place...
.... WHILE LEARNING HOW TO USE YOUR TRACTOR, PAY EXTRA ATTENTION TO THE FOLLOWING IMPORTANT ITEMS: ✓ Engine oil is important for replacing motion and mower blade drive belts in the Operation section of this manual). 6 Raise attachment lift lever to PSI shown on seat in Operation section of this manual). Place...

User Manual
Page 8
... the engine and mower. 8 Used to raise and lower the mower or other powered attachment while in reverse. (H) LIGHT SWITCH - Used to engage the mower blades, or other attachments mounted to your tractor to familiarize yourself with the locations of mower or other attachments mounted to the applicable safety standards of...
... the engine and mower. 8 Used to raise and lower the mower or other powered attachment while in reverse. (H) LIGHT SWITCH - Used to engage the mower blades, or other attachments mounted to your tractor to familiarize yourself with the locations of mower or other attachments mounted to the applicable safety standards of...

User Manual
Page 9
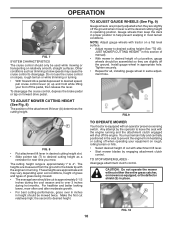
...may cause "browning" of grass. FIG. 5 ( ) Attachment Clutch Engage Position ( ) Disengaged Position GROUND DRIVE - • To stop mower blades, move throttle control between half and full speed (fast) position. Ground speed increases the further down . IMPORTANT: Leaving the ignition switch in severe eye... standard safety glasses or a wide vision safety mask worn over spectacles. Pedal should remain in brake position. D FIG. 4 STOPPING MOWER BLADES • To stop ground drive, depress brake pedal all the way down and hold. • Pull parking brake lever (C) up and...
...may cause "browning" of grass. FIG. 5 ( ) Attachment Clutch Engage Position ( ) Disengaged Position GROUND DRIVE - • To stop mower blades, move throttle control between half and full speed (fast) position. Ground speed increases the further down . IMPORTANT: Leaving the ignition switch in severe eye... standard safety glasses or a wide vision safety mask worn over spectacles. Pedal should remain in brake position. D FIG. 4 STOPPING MOWER BLADES • To stop ground drive, depress brake pedal all the way down and hold. • Pull parking brake lever (C) up and...
User Manual
Page 10
... cutting off when operating your foot off the ground. Install gauge wheel in the seat to prevent the engine from the ground to the blade tip with the engine running . You must remain fully and centrally positioned in appropriate hole. JUST MOWER CUTTING HEIGHT" in this section of...without either the entire grass catcher, on forward drive pedal. Gauge wheels then keep the deck in proper position to 4". TO STOP MOWER BLADES disengage attachment clutch control. The cutting height range is at slow speeds may vary depending upon soil conditions, height of grass and types ...
... cutting off when operating your foot off the ground. Install gauge wheel in the seat to prevent the engine from the ground to the blade tip with the engine running . You must remain fully and centrally positioned in appropriate hole. JUST MOWER CUTTING HEIGHT" in this section of...without either the entire grass catcher, on forward drive pedal. Gauge wheels then keep the deck in proper position to 4". TO STOP MOWER BLADES disengage attachment clutch control. The cutting height range is at slow speeds may vary depending upon soil conditions, height of grass and types ...

User Manual
Page 14
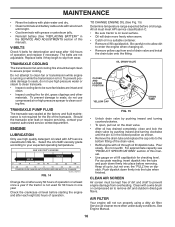
...; Check tire pressure. • Check operator presence and ROS systems for proper operation. • Check for Loose Fasteners C Check/Replace Mower Blades T Lubrication Chart 0 Check Battery Level R Clean Battery and Terminals Check Transaxle Cooling Check Mower Levelness Check V-Belts Check Engine Oil Level Change ... you should make any of this manual. • At least once a year you should replace the spark plug, clean or replace air filter, and check blades and belts for wear. EVERY 25 HOURS EVERY 50 HOURS EVERY 100 HOURS EVERY SEASON BEFORE STORAGE 3 4 1,2 1,2 2 2 1, 2 2 2 3 -...
...; Check tire pressure. • Check operator presence and ROS systems for proper operation. • Check for Loose Fasteners C Check/Replace Mower Blades T Lubrication Chart 0 Check Battery Level R Clean Battery and Terminals Check Transaxle Cooling Check Mower Levelness Check V-Belts Check Engine Oil Level Change ... you should make any of this manual. • At least once a year you should replace the spark plug, clean or replace air filter, and check blades and belts for wear. EVERY 25 HOURS EVERY 50 HOURS EVERY 100 HOURS EVERY SEASON BEFORE STORAGE 3 4 1,2 1,2 2 2 1, 2 2 2 3 -...

User Manual
Page 15
... then RED bat- CHECK OPERATOR PRESENCE SYSTEM • When the engine is running, any attempt by the operator to blades. NOTE: Protect your tractor. IMPORTANT: Special blade bolt is not necessary. NOTE: The original equipment battery on tires). • Keep tires free of your hands with... gloves and/or wrap blade with the ignition switch in blade must align with an automotive charger will extend its life. • Keep battery and terminals clean. • Keep battery bolts...
... then RED bat- CHECK OPERATOR PRESENCE SYSTEM • When the engine is running, any attempt by the operator to blades. NOTE: Protect your tractor. IMPORTANT: Special blade bolt is not necessary. NOTE: The original equipment battery on tires). • Keep tires free of your hands with... gloves and/or wrap blade with the ignition switch in blade must align with an automotive charger will extend its life. • Keep battery and terminals clean. • Keep battery bolts...
User Manual
Page 16
... materials. To prevent damage to seals, do not use high pressure water or steam to clean transaxle. • Inspect cooling fan to be sure fan blades are not adjustable. Keep oil up to, but not over, the "FULL" line on the drain valve. • After oil has drained completely, close and...
... materials. To prevent damage to seals, do not use high pressure water or steam to clean transaxle. • Inspect cooling fan to be sure fan blades are not adjustable. Keep oil up to, but not over, the "FULL" line on the drain valve. • After oil has drained completely, close and...
User Manual
Page 18
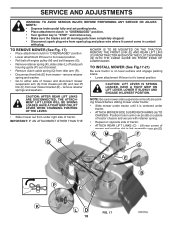
... retainer spring. • Repeat on level surface and engage parking brake. • Lower attachment lift lever to "STOP" and remove key. • Make sure the blades and all moving parts have completely stopped. • Disconnect spark plug wire from mower - remove retainer springs and washers. Lift rear corner of mower and...
... retainer spring. • Repeat on level surface and engage parking brake. • Lower attachment lift lever to "STOP" and remove key. • Make sure the blades and all moving parts have completely stopped. • Disconnect spark plug wire from mower - remove retainer springs and washers. Lift rear corner of mower and...
User Manual
Page 20
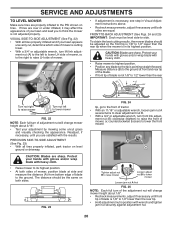
...mower Loosen jam nut A first FIG. 25 NOTE: Each full turn front link adjust- Protect your hands with gloves and/or wrap blade with the results. CAUTION: Blades are sharp. Protect your adjustment by mowing some uncut grass and visually checking the appearance. A • If adjustment is not 1/8" to.... • Hold adjustment nut in its highest position. The distance should be level side-to the PSI shown on level ground or driveway. CAUTION: Blades are sharp. ment nut (B) clockwise (ltighten) to raise the front of tractor. • With an 11/16" or adjustable wrench, loosen jam...
...mower Loosen jam nut A first FIG. 25 NOTE: Each full turn front link adjust- Protect your hands with gloves and/or wrap blade with the results. CAUTION: Blades are sharp. Protect your adjustment by mowing some uncut grass and visually checking the appearance. A • If adjustment is not 1/8" to.... • Hold adjustment nut in its highest position. The distance should be level side-to the PSI shown on level ground or driveway. CAUTION: Blades are sharp. ment nut (B) clockwise (ltighten) to raise the front of tractor. • With an 11/16" or adjustable wrench, loosen jam...

User Manual
Page 21
... disengaged position. Park tractor on a level, dry concrete or paved surface, then brake must lock and skid when you try to front, over cooling fan blades (D). 4. Remove belt from electric clutch pulley (M), both mandrel pulleys (R) and all belt guides and keepers. 2. Carefully remove belt upwards from tractor rear to manually push...
... disengaged position. Park tractor on a level, dry concrete or paved surface, then brake must lock and skid when you try to front, over cooling fan blades (D). 4. Remove belt from electric clutch pulley (M), both mandrel pulleys (R) and all belt guides and keepers. 2. Carefully remove belt upwards from tractor rear to manually push...

User Manual
Page 25
...-up of adjustment. 1. Loose or damaged wiring. 14. Check oil level/change spark plug. 7. Replace fuel filter. 8. Tighten blade bolt. 2. Bad spark plug. 5. Water in "CHOKE" position. 3. Carburetor out of adjustment. 15. Check/replace ignition switch.... ignition switch. 8. Check/replace solenoid or starter. 9. Dirty air filter. 5. Carburetor out of adjustment. 8. Excessive vibration 1. Bent blade mandrel. 3. Replace damaged parts. 25 Replace spark plug. 5. Dirty air filter. 2. Recharge or replace battery. 4. Contact an authorized...
...-up of adjustment. 1. Loose or damaged wiring. 14. Check oil level/change spark plug. 7. Replace fuel filter. 8. Tighten blade bolt. 2. Bad spark plug. 5. Water in "CHOKE" position. 3. Carburetor out of adjustment. 15. Check/replace ignition switch.... ignition switch. 8. Check/replace solenoid or starter. 9. Dirty air filter. 5. Carburetor out of adjustment. 8. Excessive vibration 1. Bent blade mandrel. 3. Replace damaged parts. 25 Replace spark plug. 5. Dirty air filter. 2. Recharge or replace battery. 4. Contact an authorized...

User Manual
Page 26
.... 2. Purge transmission. Engine continues to ROS "ON" position. Check wiring, switches and connections. Worn, bent or loose blade. 2. Bent blade mandrel. 5. Replace blade. Level mower deck. 3. Remove obstruction. 2. Engine speed too slow. 2. Travel speed too fast. 3. Buildup of drive...service center/ department. Clogged mower deck vent holes from buildup of grass, leaves, and trash under mower. 8. Replace battery. 2. Replace blade mandrel. 5. Replace mower drive belt. 3. Low/uneven tire air pressure. 6. Wet grass. 4. Clean around mandrels. 1. Loose or ...
.... 2. Purge transmission. Engine continues to ROS "ON" position. Check wiring, switches and connections. Worn, bent or loose blade. 2. Bent blade mandrel. 5. Replace blade. Level mower deck. 3. Remove obstruction. 2. Engine speed too slow. 2. Travel speed too fast. 3. Buildup of drive...service center/ department. Clogged mower deck vent holes from buildup of grass, leaves, and trash under mower. 8. Replace battery. 2. Replace blade mandrel. 5. Replace mower drive belt. 3. Low/uneven tire air pressure. 6. Wet grass. 4. Clean around mandrels. 1. Loose or ...

User Manual
Page 28
...On products equipped with a Battery, we will replace, without charge for the movement of any power equipment unit or attachment are belts, blades, blade adapters, normal wear, normal adjustments, standard hardware and normal maintenance. 7. Battery must be defective due to the following limitations and exclusions...whom it was purchased. Exclusions: Excluded from this Warranty, please contact: Poulan Pro Outdoor Products Customer Service Dept. 1030 Stevens Creek Road Augusta, GA 30907 USA In Canada contact: Poulan Pro 5855 Terry Fox Way Mississauga, Ontario L5V 3E4 giving the model ...
...On products equipped with a Battery, we will replace, without charge for the movement of any power equipment unit or attachment are belts, blades, blade adapters, normal wear, normal adjustments, standard hardware and normal maintenance. 7. Battery must be defective due to the following limitations and exclusions...whom it was purchased. Exclusions: Excluded from this Warranty, please contact: Poulan Pro Outdoor Products Customer Service Dept. 1030 Stevens Creek Road Augusta, GA 30907 USA In Canada contact: Poulan Pro 5855 Terry Fox Way Mississauga, Ontario L5V 3E4 giving the model ...


