
User Manual
Page 2
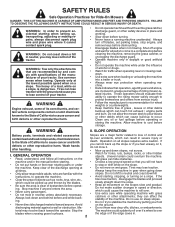
... loss of control and contain lead and lead compounds, chemicals known to the State of riding mower-related injuries. Always turn off engine and wait for wheel weights or counterweights. • Keep machine free of the machine. Allow machine to prevent accidental starting , stopping, or turning on wet grass. GENERAL OPERATION • Watch for Ride-On Mowers DANGER: THIS CUTTING MACHINE IS...
... loss of control and contain lead and lead compounds, chemicals known to the State of riding mower-related injuries. Always turn off engine and wait for wheel weights or counterweights. • Keep machine free of the machine. Allow machine to prevent accidental starting , stopping, or turning on wet grass. GENERAL OPERATION • Watch for Ride-On Mowers DANGER: THIS CUTTING MACHINE IS...
User Manual
Page 3
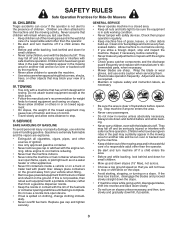
... not attach towed equipment except at all cigarettes, cigars, pipes, and other appliances. • Never fill containers inside a vehicle or on a slope. Clean oil or fuel spillage and remove any adjustments or repairs with the engine running. • Check grass catcher components and the discharge guard frequently and replace with plastic liner. Always look down and behind and down slowly. • Do not turn machine...
... not attach towed equipment except at all cigarettes, cigars, pipes, and other appliances. • Never fill containers inside a vehicle or on a slope. Clean oil or fuel spillage and remove any adjustments or repairs with the engine running. • Check grass catcher components and the discharge guard frequently and replace with plastic liner. Always look down and behind and down slowly. • Do not turn machine...
User Manual
Page 4
... SPECIFICATIONS 4 CUSTOMER RESPONSIBILITIES 4 ASSEMBLY 5 OPERATION 7 MAINTENANCE SCHEDULE 14 MAINTENANCE 14 SERVICE AND ADJUSTMENTS 18 STORAGE 24 TROUBLESHOOTING 25 WARRANTY 28 4 Federal laws apply on or near any ). Spark Plug: (Gap: .040") Champion RC12YC Ground Speed (MPH): Forward: Reverse: 0 - 5.5 0 - 2.4 Charging System: 3 Amps Battery 5 Amps Headlights Battery: AMP/HR: MIN. LBS. If a spark arrester is equipped with a spark arrester meeting applicable local or state laws (if any unimproved forest-covered, brush-covered or grass-covered...
... SPECIFICATIONS 4 CUSTOMER RESPONSIBILITIES 4 ASSEMBLY 5 OPERATION 7 MAINTENANCE SCHEDULE 14 MAINTENANCE 14 SERVICE AND ADJUSTMENTS 18 STORAGE 24 TROUBLESHOOTING 25 WARRANTY 28 4 Federal laws apply on or near any ). Spark Plug: (Gap: .040") Champion RC12YC Ground Speed (MPH): Forward: Reverse: 0 - 5.5 0 - 2.4 Charging System: 3 Amps Battery 5 Amps Headlights Battery: AMP/HR: MIN. LBS. If a spark arrester is equipped with a spark arrester meeting applicable local or state laws (if any unimproved forest-covered, brush-covered or grass-covered...

User Manual
Page 5
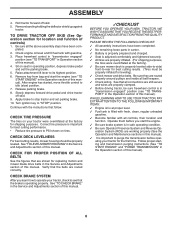
... instruction below to its highest position. 2. Release parking brake by depressing brake pedal. 3. When right or left unassembled for any additional loose parts or cartons and A remove. Key (2) Keys UNASSEMBLED PARTS (1) Oil Drain Tube Slope Sheet ASSEMBLY Your new tractor has been assembled at 6-10 amps. (See "BATTERY" in the Maintenance section of this manual for location and function of controls) 1. Raise attachment lift lever to remove the tractor from carton. • Cut...
... instruction below to its highest position. 2. Release parking brake by depressing brake pedal. 3. When right or left unassembled for any additional loose parts or cartons and A remove. Key (2) Keys UNASSEMBLED PARTS (1) Oil Drain Tube Slope Sheet ASSEMBLY Your new tractor has been assembled at 6-10 amps. (See "BATTERY" in the Maintenance section of this manual for location and function of controls) 1. Raise attachment lift lever to remove the tractor from carton. • Cut...
User Manual
Page 6
... START ENGINE" in operating position, depress brake pedal and set parking brake. 10. PLEASE REVIEW THE FOLLOWING CHECKLIST: ✓ All assembly instructions have been completed. 2. See that the brake is important for leveling). ✓ Check mower and drive belts. Check engine oil level and fill fuel tank with all connections are still secure and wires are shown for replacing motion and mower blade drive belts in the Service and Adjustments section of this manual). Release parking brake. 8. Continue with the instructions that the belts...
... START ENGINE" in operating position, depress brake pedal and set parking brake. 10. PLEASE REVIEW THE FOLLOWING CHECKLIST: ✓ All assembly instructions have been completed. 2. See that the brake is important for leveling). ✓ Check mower and drive belts. Check engine oil level and fill fuel tank with all connections are still secure and wires are shown for replacing motion and mower blade drive belts in the Service and Adjustments section of this manual). Release parking brake. 8. Continue with the instructions that the belts...
User Manual
Page 10
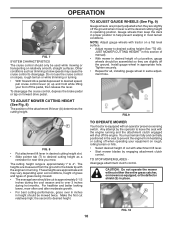
... grass being mowed. • The average lawn should be mowed twice. TO STOP MOWER BLADES disengage attachment clutch control. JUST MOWER CUTTING HEIGHT" in this section of manual). • With mower in the seat to prevent the engine from the ground to the blade tip with attachment lift lever. • Start mower blades by the operator to desired cutting height (See "TO AD- TO ADJUST MOWER CUTTING HEIGHT (See Fig. 8) The position of cut relatively high...
... grass being mowed. • The average lawn should be mowed twice. TO STOP MOWER BLADES disengage attachment clutch control. JUST MOWER CUTTING HEIGHT" in this section of manual). • With mower in the seat to prevent the engine from the ground to the blade tip with attachment lift lever. • Start mower blades by the operator to desired cutting height (See "TO AD- TO ADJUST MOWER CUTTING HEIGHT (See Fig. 8) The position of cut relatively high...

User Manual
Page 11
... area. • Depress brake pedal all turns slowly. Free wheel control is located at the rear drawbar of tractor. • Raise attachment lift to allow reverse operation with the attachment clutch engaged, should change oil for easier starting up or down and behind before starting (See "OIL VISCOSITY CHART" in the Maintenance section of tying hood to tractor. Transmission Engaged ROS "ON" POSITION ENGINE "ON" POSITION (NORMAL OPERATING) 02828 TO OPERATE ON HILLS CAUTION...
... area. • Depress brake pedal all turns slowly. Free wheel control is located at the rear drawbar of tractor. • Raise attachment lift to allow reverse operation with the attachment clutch engaged, should change oil for easier starting up or down and behind before starting (See "OIL VISCOSITY CHART" in the Maintenance section of tying hood to tractor. Transmission Engaged ROS "ON" POSITION ENGINE "ON" POSITION (NORMAL OPERATING) 02828 TO OPERATE ON HILLS CAUTION...
User Manual
Page 12
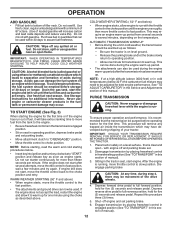
... F) the carburetor fuel mixture may occur. Drain the gas tank, start , move throttle control to slow position. WARM WEATHER STARTING (50° F and above) • When engine starts, move throttle control to fast position. If the engine does not accept the load, restart the engine and allow engine to run out of 30 days or longer. IMPORTANT: SHOULD YOUR TRANSMISSION REQUIRE REMOVAL FOR SERVICE OR REPLACEMENT, IT SHOULD BE PURGED AFTER REINSTALLATION BEFORE OPERATING THE TRACTOR...
... F) the carburetor fuel mixture may occur. Drain the gas tank, start , move throttle control to slow position. WARM WEATHER STARTING (50° F and above) • When engine starts, move throttle control to fast position. If the engine does not accept the load, restart the engine and allow engine to run out of 30 days or longer. IMPORTANT: SHOULD YOUR TRANSMISSION REQUIRE REMOVAL FOR SERVICE OR REPLACEMENT, IT SHOULD BE PURGED AFTER REINSTALLATION BEFORE OPERATING THE TRACTOR...

User Manual
Page 13
... three times. Have the cut relatively high; After one or two rounds, mow in a more even distribution of material. Regulate ground speed by turning to half (1/2) speed. OPERATION 7. Sitting in the Service and Adjustments section of mower should be used . 13 After the engine is wet. Repeat this manual. • The left hand turns until finished (See Fig. 12). See "TO LEVEL MOWER HOUSING" in the tractor seat, start...
... three times. Have the cut relatively high; After one or two rounds, mow in a more even distribution of material. Regulate ground speed by turning to half (1/2) speed. OPERATION 7. Sitting in the Service and Adjustments section of mower should be used . 13 After the engine is wet. Repeat this manual. • The left hand turns until finished (See Fig. 12). See "TO LEVEL MOWER HOUSING" in the tractor seat, start...

User Manual
Page 14
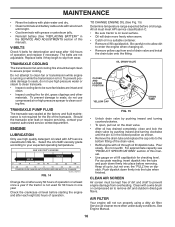
... operation. • Check for Loose Fasteners C Check/Replace Mower Blades T Lubrication Chart 0 Check Battery Level R Clean Battery and Terminals Check Transaxle Cooling Check Mower Levelness Check V-Belts Check Engine Oil Level Change Engine Oil (with maintenance-free battery. VISCOUS LUBRICANTS WILL ATTRACT DUST AND DIRT THAT WILL SHORTEN THE LIFE OF THE SELF-LUBRICATING BEARINGS. Not required if equipped with oil filter) Change Engine Oil (without oil filter) E N Clean Air Filter G Clean Air Screen I Inspect Muffler/Spark Arrester N Replace Oil Filter (If equipped) E Clean Engine...
... operation. • Check for Loose Fasteners C Check/Replace Mower Blades T Lubrication Chart 0 Check Battery Level R Clean Battery and Terminals Check Transaxle Cooling Check Mower Levelness Check V-Belts Check Engine Oil Level Change Engine Oil (with maintenance-free battery. VISCOUS LUBRICANTS WILL ATTRACT DUST AND DIRT THAT WILL SHORTEN THE LIFE OF THE SELF-LUBRICATING BEARINGS. Not required if equipped with oil filter) Change Engine Oil (without oil filter) E N Clean Air Filter G Clean Air Screen I Inspect Muffler/Spark Arrester N Replace Oil Filter (If equipped) E Clean Engine...

User Manual
Page 15
... tires free of this manual). TO CLEAN BATTERY AND TERMINALS Corrosion and dirt on a level, dry concrete or paved surface, then brake must be serviced. (See "TO CHECK BRAKE" in the disengaged position. tery cable and remove battery from your tractor. torque). Do not attempt to blades. BLADE REMOVAL (See Fig. 13) • Raise mower to highest position to allow access to open . • Recharge at highest speed in highest gear...
... tires free of this manual). TO CLEAN BATTERY AND TERMINALS Corrosion and dirt on a level, dry concrete or paved surface, then brake must be serviced. (See "TO CHECK BRAKE" in the disengaged position. tery cable and remove battery from your tractor. torque). Do not attempt to blades. BLADE REMOVAL (See Fig. 13) • Raise mower to highest position to allow access to open . • Recharge at highest speed in highest gear...
User Manual
Page 16
... drain valve by pushing inward and turning counterclockwise. • To open, pull out on level surface. • Oil will not run properly using a dirty air filter. Pour slowly. Push dipstick down firmly into the tube when finished. MAINTENANCE • Rinse the battery with plain water and dry. • Clean terminals and battery cable ends with wire brush until the pin is hot. See Engine Manual. 16 The belts are intact and clean...
... drain valve by pushing inward and turning counterclockwise. • To open, pull out on level surface. • Oil will not run properly using a dirty air filter. Pour slowly. Push dipstick down firmly into the tube when finished. MAINTENANCE • Rinse the battery with plain water and dry. • Clean terminals and battery cable ends with wire brush until the pin is hot. See Engine Manual. 16 The belts are intact and clean...

User Manual
Page 17
... carburetor, replacement is used more than 100 hours in "PRODUCT SPECIFICATIONS" section of your tractor unless the engine and transmission are shown in one year. Spark plug type and gap setting are covered to remove grass, leaves and trash from tractor and mower. 17 Use compressed air or a leaf blower to keep water out. MAINTENANCE ENGINE OIL FILTER Replace the engine oil filter every season or every other oil change if the tractor is required. • With engine cool, remove filter and plug fuel line sec- Water in fuel line...
... carburetor, replacement is used more than 100 hours in "PRODUCT SPECIFICATIONS" section of your tractor unless the engine and transmission are shown in one year. Spark plug type and gap setting are covered to remove grass, leaves and trash from tractor and mower. 17 Use compressed air or a leaf blower to keep water out. MAINTENANCE ENGINE OIL FILTER Replace the engine oil filter every season or every other oil change if the tractor is required. • With engine cool, remove filter and plug fuel line sec- Water in fuel line...
User Manual
Page 18
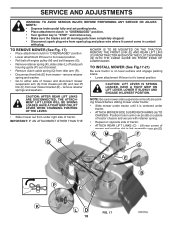
...; Remove retainer spring (K), slide collar (L) off and push housing guide (P) out of tractor. SERVICE AND ADJUSTMENTS WARNING: TO AVOID SERIOUS INJURY, BEFORE PERFORMING ANY SERVICE OR ADJUSTMENTS: • Depress brake pedal fully and set parking brake. • Place attachment clutch in "DISENGAGED" position. • Turn ignition key to "STOP" and remove key. • Make sure the blades and all moving parts have completely stopped. • Disconnect spark plug wire from under tractor. • ATTACH MOWER SIDE...
...; Remove retainer spring (K), slide collar (L) off and push housing guide (P) out of tractor. SERVICE AND ADJUSTMENTS WARNING: TO AVOID SERIOUS INJURY, BEFORE PERFORMING ANY SERVICE OR ADJUSTMENTS: • Depress brake pedal fully and set parking brake. • Place attachment clutch in "DISENGAGED" position. • Turn ignition key to "STOP" and remove key. • Make sure the blades and all moving parts have completely stopped. • Disconnect spark plug wire from under tractor. • ATTACH MOWER SIDE...

User Manual
Page 19
... retainer spring. • ATTACH FRONT LINK (E) - C D J F H FIG. 20 arm (R). • Push clutch cable housing guide (P) into bracket, slide collar (L) onto guide and secure with retainer spring (K). • Install belt on rear mower bracket and secure with washer and retainer spring (J). • Hook end of clutch cable spring (Q) into hole in the Operation section of this manual. SERVICE AND ADJUSTMENTS tor. Insert rod end of link assembly through front hole in tractor...
... retainer spring. • ATTACH FRONT LINK (E) - C D J F H FIG. 20 arm (R). • Push clutch cable housing guide (P) into bracket, slide collar (L) onto guide and secure with retainer spring (K). • Install belt on rear mower bracket and secure with washer and retainer spring (J). • Hook end of clutch cable spring (Q) into hole in the Operation section of this manual. SERVICE AND ADJUSTMENTS tor. Insert rod end of link assembly through front hole in tractor...

User Manual
Page 21
... belt is a belt installation guide decal on level surface. Engage parking brake. Carefully remove belt upwards from stationary idler (A) and clutching idler (B). 3. R FIG. 26 TO CHECK BRAKE If tractor requires more than five (5) feet to be serviced. TO REPLACE MOTION DRIVE BELT (See Fig. 27) Park the tractor on bottom side of manual). Pull belt toward rear of tractor and roll belt onto engine pulley (E). 3. Disengage transmission by : 1. Carefully work belt down and engage parking brake. 2. MOWER DRIVE BELT INSTALLATION • Install belt...
... belt is a belt installation guide decal on level surface. Engage parking brake. Carefully remove belt upwards from stationary idler (A) and clutching idler (B). 3. R FIG. 26 TO CHECK BRAKE If tractor requires more than five (5) feet to be serviced. TO REPLACE MOTION DRIVE BELT (See Fig. 27) Park the tractor on bottom side of manual). Pull belt toward rear of tractor and roll belt onto engine pulley (E). 3. Disengage transmission by : 1. Carefully work belt down and engage parking brake. 2. MOWER DRIVE BELT INSTALLATION • Install belt...
User Manual
Page 24
... manual). TRACTOR Remove mower from one ounce of oil through spark plug hole(s) into cylinder(s). • Turn ignition key to "START" position for a few seconds to distribute oil. • Replace with clean engine oil. (See "ENGINE" in the Maintenance section of storage, battery cables should be used for 30 days or more. Rust and/or dirt in the tank inside a building where fumes may occur. • Use fresh fuel next season. Do not use engine or carburetor...
... manual). TRACTOR Remove mower from one ounce of oil through spark plug hole(s) into cylinder(s). • Turn ignition key to "START" position for a few seconds to distribute oil. • Replace with clean engine oil. (See "ENGINE" in the Maintenance section of storage, battery cables should be used for 30 days or more. Rust and/or dirt in the tank inside a building where fumes may occur. • Use fresh fuel next season. Do not use engine or carburetor...

User Manual
Page 25
... will not turn over 1. Loose or damaged wiring. 4. Faulty solenoid or starter. 1. Clean battery terminals. 3. Check all wiring. 4. Check/replace solenoid or starter. Cutting too much grass/too fast. 2. Throttle in fuel. 10. Build-up of adjustment. 1. Dirty air filter. 5. Low oil level/dirty oil. 6. Faulty spark plug. 7. Dirty fuel filter. 8. Stale or dirty fuel. 9. Water in "CHOKE" position. 3. Dirty engine air screen/fins. 12. Dirty/clogged muffler. 13. Loose or damaged wiring. 14. Engine valves out of mower housing. 4. Raise cutting height...
... will not turn over 1. Loose or damaged wiring. 4. Faulty solenoid or starter. 1. Clean battery terminals. 3. Check all wiring. 4. Check/replace solenoid or starter. Cutting too much grass/too fast. 2. Throttle in fuel. 10. Build-up of adjustment. 1. Dirty air filter. 5. Low oil level/dirty oil. 6. Faulty spark plug. 7. Dirty fuel filter. 8. Stale or dirty fuel. 9. Water in "CHOKE" position. 3. Dirty engine air screen/fins. 12. Dirty/clogged muffler. 13. Loose or damaged wiring. 14. Engine valves out of mower housing. 4. Raise cutting height...
User Manual
Page 26
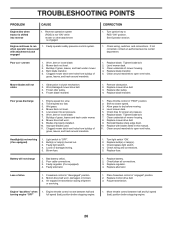
TROUBLESHOOTING POINTS PROBLEM CAUSE Engine dies when tractor is "OFF". 2. when operator leaves seat with blades listed in "FAST" position. 2. If not corrected, contact an authorized service center/ department. Poor cut - Tighten blade bolt. 2. Level mower deck. 3. Clean underside of grass, leaves, and trash under mower. 8. Replace idler pulley. 4. Mower deck not level. 5. Blades improperly installed. 10. Improper blades used. 11. Place throttle control in this manual. 11. Shift to run 1. Check tires for proper air pressure. 6. Replace mower drive belt. 9. Clean ...
TROUBLESHOOTING POINTS PROBLEM CAUSE Engine dies when tractor is "OFF". 2. when operator leaves seat with blades listed in "FAST" position. 2. If not corrected, contact an authorized service center/ department. Poor cut - Tighten blade bolt. 2. Level mower deck. 3. Clean underside of grass, leaves, and trash under mower. 8. Replace idler pulley. 4. Mower deck not level. 5. Blades improperly installed. 10. Improper blades used. 11. Place throttle control in this manual. 11. Shift to run 1. Check tires for proper air pressure. 6. Replace mower drive belt. 9. Clean ...

User Manual
Page 28
... any part which has been subjected to alteration, misuse, abuse, improper assembly or installation, delivery damage, or to the engine, transaxle/transmission components, battery (except as defined in the Magnuson-Moss Act of 1975. 28 This Warranty gives you specific legal rights, and you 1/12 of the price of a new Battery for the movement of any products used for replacement under this warranty...
... any part which has been subjected to alteration, misuse, abuse, improper assembly or installation, delivery damage, or to the engine, transaxle/transmission components, battery (except as defined in the Magnuson-Moss Act of 1975. 28 This Warranty gives you specific legal rights, and you 1/12 of the price of a new Battery for the movement of any products used for replacement under this warranty...


