
User Manual
Page 6
...and charged. ✓ Seat is adjusted comfortably and tightened securely. ✓ All tires are shown for replacing motion and mower blade drive belts in the Operation section of this manual. Follow proper starting and transmission purging instructions (See "TO START ENGINE" and "PURGE TRANSMISSION" in...that the brake is important for best cutting performance. • Reduce tire pressure to -rear for leveling). ✓ Check mower and drive belts. See "TO LEVEL MOWER HOUSING" in the Operation section of this manual. ✓CHECKLIST BEFORE YOU OPERATE YOUR NEW TRACTOR, WE WISH ...
...and charged. ✓ Seat is adjusted comfortably and tightened securely. ✓ All tires are shown for replacing motion and mower blade drive belts in the Operation section of this manual. Follow proper starting and transmission purging instructions (See "TO START ENGINE" and "PURGE TRANSMISSION" in...that the brake is important for best cutting performance. • Reduce tire pressure to -rear for leveling). ✓ Check mower and drive belts. See "TO LEVEL MOWER HOUSING" in the Operation section of this manual. ✓CHECKLIST BEFORE YOU OPERATE YOUR NEW TRACTOR, WE WISH ...
User Manual
Page 14
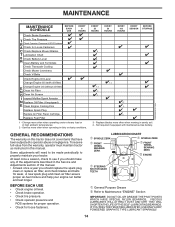
...; Refer to see if you should replace the spark plug, clean or replace air filter, and check blades and belts for loose fasteners. Change more often when mowing in dirty or dusty conditions. VISCOUS LUBRICANTS WILL ATTRACT DUST AND DIRT...Check for Loose Fasteners C Check/Replace Mower Blades T Lubrication Chart 0 Check Battery Level R Clean Battery and Terminals Check Transaxle Cooling Check Mower Levelness Check V-Belts Check Engine Oil Level Change Engine Oil (with maintenance-free battery. EVERY 25 HOURS EVERY 50 HOURS EVERY 100 HOURS EVERY SEASON BEFORE STORAGE 3 4 1,2 ...
...; Refer to see if you should replace the spark plug, clean or replace air filter, and check blades and belts for loose fasteners. Change more often when mowing in dirty or dusty conditions. VISCOUS LUBRICANTS WILL ATTRACT DUST AND DIRT...Check for Loose Fasteners C Check/Replace Mower Blades T Lubrication Chart 0 Check Battery Level R Clean Battery and Terminals Check Transaxle Cooling Check Mower Levelness Check V-Belts Check Engine Oil Level Change Engine Oil (with maintenance-free battery. EVERY 25 HOURS EVERY 50 HOURS EVERY 100 HOURS EVERY SEASON BEFORE STORAGE 3 4 1,2 ...
User Manual
Page 16
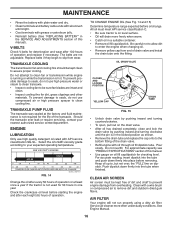
... more freely when warm. • Catch oil in a suitable container. • Remove oil fill cap/dipstick. V-BELTS Check V-belts for dirt, grass clippings and other materials. The belts are intact and clean. • Inspect cooling fins for deterioration and wear after 100 hours of the drain valve. ... SPECIFICATIONS" section of operation. CLEAN AIR SCREEN Air screen must meet API service classification C. • Be sure tractor is hot. Replace belts if they begin to enter the engine when changing oil. • Remove yellow cap from wear. To prevent possible damage to seals, do...
... more freely when warm. • Catch oil in a suitable container. • Remove oil fill cap/dipstick. V-BELTS Check V-belts for dirt, grass clippings and other materials. The belts are intact and clean. • Inspect cooling fins for deterioration and wear after 100 hours of the drain valve. ... SPECIFICATIONS" section of operation. CLEAN AIR SCREEN Air screen must meet API service classification C. • Be sure tractor is hot. Replace belts if they begin to enter the engine when changing oil. • Remove yellow cap from wear. To prevent possible damage to seals, do...

User Manual
Page 18
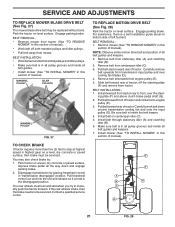
... pedal fully and set parking brake. • Place attachment clutch in "DISENGAGED" position. • Turn ignition key to its lowest position. • Roll belt off engine pulley (M) and belt keepers (G). • Remove retainer spring (K), slide collar (L) off and push housing guide (P) out of bracket. • Remove clutch cable spring (Q) from idler arm...
... pedal fully and set parking brake. • Place attachment clutch in "DISENGAGED" position. • Turn ignition key to its lowest position. • Roll belt off engine pulley (M) and belt keepers (G). • Remove retainer spring (K), slide collar (L) off and push housing guide (P) out of bracket. • Remove clutch cable spring (Q) from idler arm...

User Manual
Page 19
... IN ALL MOWER PULLEY GROOVES. • Raise attachment lift lever to highest position. • If necessary, adjust gauge wheels before operating mower as shown in belt keepers (G). FIG. 20 QR P GM A C F G E B K LD FIG. 22 19 B E FIG. 19 • Insert end of link (E) into hole in idler arm (R). SERVICE AND ADJUSTMENTS •...
... IN ALL MOWER PULLEY GROOVES. • Raise attachment lift lever to highest position. • If necessary, adjust gauge wheels before operating mower as shown in belt keepers (G). FIG. 20 QR P GM A C F G E B K LD FIG. 22 19 B E FIG. 19 • Insert end of link (E) into hole in idler arm (R). SERVICE AND ADJUSTMENTS •...
User Manual
Page 21
...brake by placing freewheel control in "transmission disengaged" position. Park the tractor on a level, dry concrete or paved surface, depress brake pedal all belt guides and keepers. 2. Engage parking brake. Park tractor on level surface. Disengage transmission by : 1. The rear wheels must be serviced. If...Install mower (See "TO INSTALL MOWER" in this section of tractor, off both mandrel pulleys and idler pulleys. • Make sure belt is a belt installation guide decal on a level, dry concrete or paved surface, then brake must lock and skid when you try to stop at ...
...brake by placing freewheel control in "transmission disengaged" position. Park the tractor on a level, dry concrete or paved surface, depress brake pedal all belt guides and keepers. 2. Engage parking brake. Park tractor on level surface. Disengage transmission by : 1. The rear wheels must be serviced. If...Install mower (See "TO INSTALL MOWER" in this section of tractor, off both mandrel pulleys and idler pulleys. • Make sure belt is a belt installation guide decal on a level, dry concrete or paved surface, then brake must lock and skid when you try to stop at ...
User Manual
Page 24
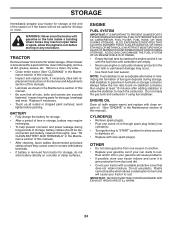
... to rust. sand lightly before storing in the Mainte- placement instructions in the Service and Adjustments section of this manual). • Inspect and replace belts, if necessary (See belt re- Store in a clean, dry area. • Clean entire tractor (See "CLEANING" in any enclosure. Replace if necessary. • Touch up all rusted...
... to rust. sand lightly before storing in the Mainte- placement instructions in the Service and Adjustments section of this manual). • Inspect and replace belts, if necessary (See belt re- Store in a clean, dry area. • Clean entire tractor (See "CLEANING" in any enclosure. Replace if necessary. • Touch up all rusted...
User Manual
Page 26
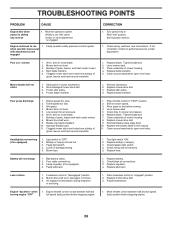
... blade. 2. Bent blade mandrel. 5. Tighten blade bolt. 2. Replace blade mandrel. 5. Clean around mandrels. 1. Worn/damaged mower drive belt. 3. Frozen blade mandrel. 1. Mower deck not level. 5. Tighten blade bolt. 7. Replace with attachment clutch engaged CORRECTION 1. Check/replace...6. Loose or damaged wiring. 5. Air trapped in clutch mechanism. 2. Wet grass. 4. Faulty alternator. 1. Replace mower drive belt. 3. Replace blade mandrel. Low/uneven tire air pressure. 6. Blades improperly installed. 10. Reinstall blades sharp edge down. 10...
... blade. 2. Bent blade mandrel. 5. Tighten blade bolt. 2. Replace blade mandrel. 5. Clean around mandrels. 1. Worn/damaged mower drive belt. 3. Frozen blade mandrel. 1. Mower deck not level. 5. Tighten blade bolt. 7. Replace with attachment clutch engaged CORRECTION 1. Check/replace...6. Loose or damaged wiring. 5. Air trapped in clutch mechanism. 2. Wet grass. 4. Faulty alternator. 1. Replace mower drive belt. 3. Replace blade mandrel. Low/uneven tire air pressure. 6. Blades improperly installed. 10. Reinstall blades sharp edge down. 10...
User Manual
Page 28
... concerning this Warranty are the responsibility of the product. 6. This Warranty gives you specific legal rights, and you , any power equipment unit or attachment are belts, blades, blade adapters, normal wear, normal adjustments, standard hardware and normal maintenance. 7. This is requested by the purchaser unless such return is a limited Warranty within...
... concerning this Warranty are the responsibility of the product. 6. This Warranty gives you specific legal rights, and you , any power equipment unit or attachment are belts, blades, blade adapters, normal wear, normal adjustments, standard hardware and normal maintenance. 7. This is requested by the purchaser unless such return is a limited Warranty within...

