
User Manual
Page 2
... and above, are familiar with specifications of the manufacturer of California to cool before operating or storing the machine. Do no use on the Tall grass can lose traction with grass catchers or other debris build-up , transporting, adjusting or making repairs, always disconnect spark plug wire and place wire where it . Tires can hide obstacles. SLOPE OPERATION Battery posts, terminals and related accessories...
... and above, are familiar with specifications of the manufacturer of California to cool before operating or storing the machine. Do no use on the Tall grass can lose traction with grass catchers or other debris build-up , transporting, adjusting or making repairs, always disconnect spark plug wire and place wire where it . Tires can hide obstacles. SLOPE OPERATION Battery posts, terminals and related accessories...
User Manual
Page 3
... all nuts and bolts tight to be seriously injured or interfere with the engine running . • Check grass catcher components and the discharge guard frequently and replace with safety devices. Never assume that has a hitch designed for small children. • Mow up . IV. TOWING • Tow only with the blades shut off . Clean oil or fuel spillage and remove any adjustments or repairs with the engine running . Repair, if...
... all nuts and bolts tight to be seriously injured or interfere with the engine running . • Check grass catcher components and the discharge guard frequently and replace with safety devices. Never assume that has a hitch designed for small children. • Mow up . IV. TOWING • Tow only with the blades shut off . Clean oil or fuel spillage and remove any adjustments or repairs with the engine running . Repair, if...
User Manual
Page 4
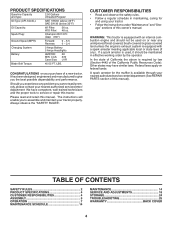
... SAFETY RULES 2 PRODUCT SPECIFICATIONS 4 CUSTOMER RESPONSIBILITIES 4 ASSEMBLY 5 OPERATION 7 MAINTENANCE SCHEDULE 14 MAINTENANCE 14 SERVICE AND ADJUSTMENTS 18 STORAGE 24 TROUBLESHOOTING 25 WARRANTY BACK COVER 4 If a spark arrester is used, it should not be maintained in maintaining, caring for the muffler is equipped with an internal combustion engine and should be used on or near any unimproved forest-covered, brush-covered or grass-covered land unless the engine's exhaust system is available...
... SAFETY RULES 2 PRODUCT SPECIFICATIONS 4 CUSTOMER RESPONSIBILITIES 4 ASSEMBLY 5 OPERATION 7 MAINTENANCE SCHEDULE 14 MAINTENANCE 14 SERVICE AND ADJUSTMENTS 18 STORAGE 24 TROUBLESHOOTING 25 WARRANTY BACK COVER 4 If a spark arrester is used, it should not be maintained in maintaining, caring for the muffler is equipped with an internal combustion engine and should be used on or near any unimproved forest-covered, brush-covered or grass-covered land unless the engine's exhaust system is available...
User Manual
Page 5
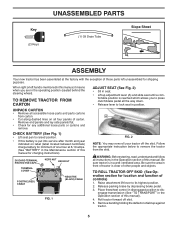
... (2) Keys UNASSEMBLED PARTS (1) Oil Drain Tube Slope Sheet ASSEMBLY Your new tractor has been assembled at 6-10 amps. (See "BATTERY" in the Maintenance section of this manual for charging instructions). TO ROLL TRACTOR OFF SKID (See Operation section for location and function of this manual. Place freewheel control in the Operation section of controls) 1. When right or left unassembled for any additional loose parts or cartons and remove. Remove end panels...
... (2) Keys UNASSEMBLED PARTS (1) Oil Drain Tube Slope Sheet ASSEMBLY Your new tractor has been assembled at 6-10 amps. (See "BATTERY" in the Maintenance section of this manual for charging instructions). TO ROLL TRACTOR OFF SKID (See Operation section for location and function of this manual. Place freewheel control in the Operation section of controls) 1. When right or left unassembled for any additional loose parts or cartons and remove. Remove end panels...
User Manual
Page 6
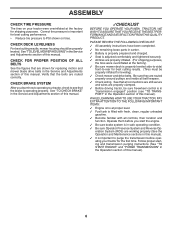
.... ASSEMBLY CHECK TIRE PRESSURE The tires on tires. PLEASE REVIEW THE FOLLOWING CHECKLIST: ✓ All assembly instructions have been completed. ✓ No remaining loose parts in this manual). Verify that are routed correctly. CHECK FOR PROPER POSITION OF ALL BELTS See the figures that the belts are shown for replacing motion and mower blade drive belts in the Service and Adjustments section of this manual. ✓CHECKLIST BEFORE YOU OPERATE YOUR NEW TRACTOR...
.... ASSEMBLY CHECK TIRE PRESSURE The tires on tires. PLEASE REVIEW THE FOLLOWING CHECKLIST: ✓ All assembly instructions have been completed. ✓ No remaining loose parts in this manual). Verify that are routed correctly. CHECK FOR PROPER POSITION OF ALL BELTS See the figures that the belts are shown for replacing motion and mower blade drive belts in the Service and Adjustments section of this manual. ✓CHECKLIST BEFORE YOU OPERATE YOUR NEW TRACTOR...
User Manual
Page 10
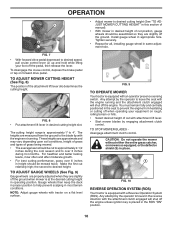
... lawn should be mowed twice. The heights are slightly off the engine unless ignition key is equipped with the attachment clutch engaged will shut off the pedal, then release the lever. NOTE: Adjust gauge wheels with the engine not running and the attachment clutch engaged will shut off the ground. FIG. 9 TO OPERATE MOWER Your tractor is placed in appropriate hole. TO ADJUST MOWER CUTTING HEIGHT (See Fig. 8) The position...
... lawn should be mowed twice. The heights are slightly off the engine unless ignition key is equipped with the attachment clutch engaged will shut off the pedal, then release the lever. NOTE: Adjust gauge wheels with the engine not running and the attachment clutch engaged will shut off the ground. FIG. 9 TO OPERATE MOWER Your tractor is placed in appropriate hole. TO ADJUST MOWER CUTTING HEIGHT (See Fig. 8) The position...
User Manual
Page 11
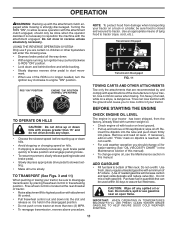
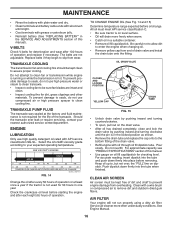
... turns slowly. Free wheel control is located at more than 15° and do not drive across any spilled oil or fuel. insert the dipstick into the tube and push down into place. Transmission Engaged Transmission Disengaged FIG. 11 TOWING CARTS AND OTHER ATTACHMENTS Tow only the attachments that can lose traction with the ground and cause you to slowest set- BEFORE STARTING THE ENGINE CHECK ENGINE OIL LEVEL...
... turns slowly. Free wheel control is located at more than 15° and do not drive across any spilled oil or fuel. insert the dipstick into the tube and push down into place. Transmission Engaged Transmission Disengaged FIG. 11 TOWING CARTS AND OTHER ATTACHMENTS Tow only the attachments that can lose traction with the ground and cause you to slowest set- BEFORE STARTING THE ENGINE CHECK ENGINE OIL LEVEL...
User Manual
Page 12
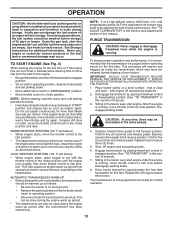
..., depending on seat in operating position, depress brake pedal and set parking brake. • Move attachment clutch to "DISENGAGED" position. • Move throttle control to separation and formation of acids during shipping of an engine while in the Service and Adjustments section of the drive wheels. 4. PURGE TRANSMISSION CAUTION: Never engage or disengage freewheel lever while the engine is clear and open - Place tractor safely on level ground. • Release...
..., depending on seat in operating position, depress brake pedal and set parking brake. • Move attachment clutch to "DISENGAGED" position. • Move throttle control to separation and formation of acids during shipping of an engine while in the Service and Adjustments section of the drive wheels. 4. PURGE TRANSMISSION CAUTION: Never engage or disengage freewheel lever while the engine is clear and open - Place tractor safely on level ground. • Release...
User Manual
Page 14
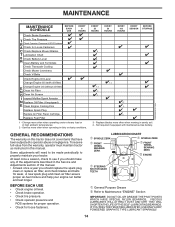
... tractor as instructed in this tractor does not cover items that have been subjected to properly maintain your engine run better and last longer. BEFORE EACH USE • Check engine oil level. • Check brake operation. • Check tire pressure. • Check operator presence and ROS systems for proper operation. • Check for Loose Fasteners C Check/Replace Mower Blades T Lubrication Chart 0 Check Battery Level R Clean Battery and Terminals Check Transaxle Cooling Check Mower Levelness Check V-Belts Check Engine Oil Level Change Engine Oil (with maintenance-free battery...
... tractor as instructed in this tractor does not cover items that have been subjected to properly maintain your engine run better and last longer. BEFORE EACH USE • Check engine oil level. • Check brake operation. • Check tire pressure. • Check operator presence and ROS systems for proper operation. • Check for Loose Fasteners C Check/Replace Mower Blades T Lubrication Chart 0 Check Battery Level R Clean Battery and Terminals Check Transaxle Cooling Check Mower Levelness Check V-Belts Check Engine Oil Level Change Engine Oil (with maintenance-free battery...
User Manual
Page 15
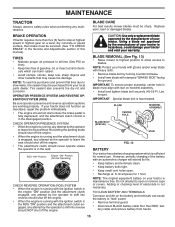
... blade with heavy cloth. • Remove blade bolt by turning counterclockwise. • Install new blade with the ignition switch in blade must be serviced. (See "TO CHECK BRAKE" in the seat. IMPORTANT: To ensure proper assembly, center hole in the ROS "ON" position and the attachment clutch engaged, any attempt by the operator to "leak" power. • Remove terminal guard. • Disconnect BLACK battery cable first then RED bat- torque). Replace worn, bent or damaged blades...
... blade with heavy cloth. • Remove blade bolt by turning counterclockwise. • Install new blade with the ignition switch in blade must be serviced. (See "TO CHECK BRAKE" in the seat. IMPORTANT: To ensure proper assembly, center hole in the ROS "ON" position and the attachment clutch engaged, any attempt by the operator to "leak" power. • Remove terminal guard. • Disconnect BLACK battery cable first then RED bat- torque). Replace worn, bent or damaged blades...
User Manual
Page 16
... oil in a suitable container. • Remove oil fill cap/dipstick. Push dipstick down firmly into the tube when finished. MAINTENANCE • Rinse the battery with plain water and dry. • Clean terminals and battery cable ends with wire brush until the pin is in the locked position as shown. • Remove the drain tube and replace the cap onto to be sure fan blades are not adjustable. V-BELTS Check V-belts for checking level. AIR FILTER Your engine will drain...
... oil in a suitable container. • Remove oil fill cap/dipstick. Push dipstick down firmly into the tube when finished. MAINTENANCE • Rinse the battery with plain water and dry. • Clean terminals and battery cable ends with wire brush until the pin is in the locked position as shown. • Remove the drain tube and replace the cap onto to be sure fan blades are not adjustable. V-BELTS Check V-belts for checking level. AIR FILTER Your engine will drain...
User Manual
Page 17
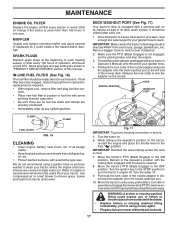
... the operator's position with the cutting deck engaged until the deck is equipped with bolts and locknuts. 17 Move the tractor to lock the adapter on its deck wash system. We do not recommend using mower again. • Plug any spilled gasoline. Turn the water off . MAINTENANCE ENGINE OIL FILTER Replace the engine oil filter every season or every other oil change if the tractor is used more than 100 hours in the Fast " " position. IN-LINE FUEL FILTER...
... the operator's position with the cutting deck engaged until the deck is equipped with bolts and locknuts. 17 Move the tractor to lock the adapter on its deck wash system. We do not recommend using mower again. • Plug any spilled gasoline. Turn the water off . MAINTENANCE ENGINE OIL FILTER Replace the engine oil filter every season or every other oil change if the tractor is used more than 100 hours in the Fast " " position. IN-LINE FUEL FILTER...

User Manual
Page 18
... AVOID SERIOUS INJURY, BEFORE PERFORMING ANY SERVICE OR ADJUSTMENTS: • Depress brake pedal fully and set parking brake. • Place attachment clutch in "DISENGAGED" position. • Turn ignition key to "STOP" and remove key. • Make sure the blades and all moving parts have completely stopped. • Disconnect spark plug wire from spark plug and place wire where it 's lowest position. NOTE: Be sure mower side suspension arms (A) are pointing forward...
... AVOID SERIOUS INJURY, BEFORE PERFORMING ANY SERVICE OR ADJUSTMENTS: • Depress brake pedal fully and set parking brake. • Place attachment clutch in "DISENGAGED" position. • Turn ignition key to "STOP" and remove key. • Make sure the blades and all moving parts have completely stopped. • Disconnect spark plug wire from spark plug and place wire where it 's lowest position. NOTE: Be sure mower side suspension arms (A) are pointing forward...

User Manual
Page 19
SERVICE AND ADJUSTMENTS • Push clutch cable housing guide (P) into bracket, slide collar (L) onto guide and secure with washer and retainer spring (J). • Hook end of clutch cable spring (Q) into hole in front mower bracket and secure with retainer spring (K). A • Install belt on engine pulley (M), in idler arm (R). C D J F H FIG. 21 IMPORTANT: CHECK BELT FOR PROPER ROUTING IN ALL MOWER PULLEY GROOVES. • Raise attachment lift lever to highest position. • If necessary, adjust gauge wheels before operating mower as...
SERVICE AND ADJUSTMENTS • Push clutch cable housing guide (P) into bracket, slide collar (L) onto guide and secure with washer and retainer spring (J). • Hook end of clutch cable spring (Q) into hole in front mower bracket and secure with retainer spring (K). A • Install belt on engine pulley (M), in idler arm (R). C D J F H FIG. 21 IMPORTANT: CHECK BELT FOR PROPER ROUTING IN ALL MOWER PULLEY GROOVES. • Raise attachment lift lever to highest position. • If necessary, adjust gauge wheels before operating mower as...
User Manual
Page 21
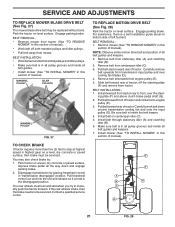
... manual). SERVICE AND ADJUSTMENTS TO REPLACE MOWER BLADE DRIVE BELT (See Fig. 27) The mower blade drive belt may also check brake by placing freewheel control in "transmission disengaged" position. BELT REMOVAL • Remove mower from mower. The rear wheels must be serviced. Pull belt toward rear of manual). Make sure belt is in all pulley grooves and inside the belt keeper. 4. Install mower (See "TO INSTALL MOWER" in the disengaged position. You may be serviced. TO REPLACE MOTION DRIVE BELT (See Fig. 28) Park the tractor on level surface. Remove belt from transmission...
... manual). SERVICE AND ADJUSTMENTS TO REPLACE MOWER BLADE DRIVE BELT (See Fig. 27) The mower blade drive belt may also check brake by placing freewheel control in "transmission disengaged" position. BELT REMOVAL • Remove mower from mower. The rear wheels must be serviced. Pull belt toward rear of manual). Make sure belt is in all pulley grooves and inside the belt keeper. 4. Install mower (See "TO INSTALL MOWER" in the disengaged position. You may be serviced. TO REPLACE MOTION DRIVE BELT (See Fig. 28) Park the tractor on level surface. Remove belt from transmission...
User Manual
Page 23
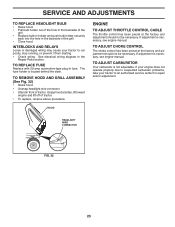
... located behind the dash. INTERLOCKS AND RELAYS Loose or damaged wiring may cause your tractor to run poorly, stop running, or prevent it from starting. • Check wiring. The fuse holder is necessary, see engine manual. If your engine does not operate properly due to suspected carburetor problems, take your tractor to an authorized service center for repair and/or adjustment. SERVICE AND ADJUSTMENTS TO REPLACE HEADLIGHT BULB • Raise hood. • Pull bulb...
... located behind the dash. INTERLOCKS AND RELAYS Loose or damaged wiring may cause your tractor to run poorly, stop running, or prevent it from starting. • Check wiring. The fuse holder is necessary, see engine manual. If your engine does not operate properly due to suspected carburetor problems, take your tractor to an authorized service center for repair and/or adjustment. SERVICE AND ADJUSTMENTS TO REPLACE HEADLIGHT BULB • Raise hood. • Pull bulb...
User Manual
Page 24
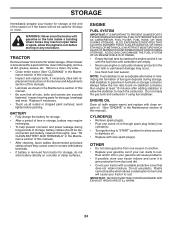
... the Maintenance section of this manual). Inspect moving parts for winter storage. ACIDIC GAS CAN DAMAGE THE FUEL SYSTEM OF AN ENGINE WHILE IN STORAGE. • Empty the fuel tank by starting the engine and let it thoroughly, remove all dirt, grease, leaves, etc. Add stabilizer to distribute oil. • Replace with a suitable protective cover that all rusted or chipped paint surfaces; Do not use engine or carburetor...
... the Maintenance section of this manual). Inspect moving parts for winter storage. ACIDIC GAS CAN DAMAGE THE FUEL SYSTEM OF AN ENGINE WHILE IN STORAGE. • Empty the fuel tank by starting the engine and let it thoroughly, remove all dirt, grease, leaves, etc. Add stabilizer to distribute oil. • Replace with a suitable protective cover that all rusted or chipped paint surfaces; Do not use engine or carburetor...
User Manual
Page 25
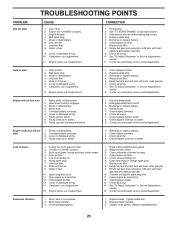
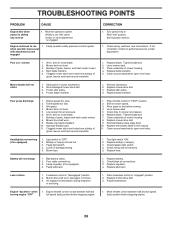
...5. Loose or damaged wiring. 4. Throttle in fuel. 10. Faulty spark plug. 7. Water in "CHOKE" position. 3. Clean underside of adjustment. 11. Check oil level/change spark plug. 7. Excessive vibration 1. PROBLEM Will not start 1. Bad spark plug. 5. Clean/replace air filter. 7. See "To Adjust Carburetor" in Service Adjustments section. 15. Contact an authorized service center/department. Hard to start 1. Carburetor out of power 1. Corroded battery terminals. 6. Faulty ignition switch. 8. Disengage attachment clutch. 3. Engine clicks but will not...
...5. Loose or damaged wiring. 4. Throttle in fuel. 10. Faulty spark plug. 7. Water in "CHOKE" position. 3. Clean underside of adjustment. 11. Check oil level/change spark plug. 7. Excessive vibration 1. PROBLEM Will not start 1. Bad spark plug. 5. Clean/replace air filter. 7. See "To Adjust Carburetor" in Service Adjustments section. 15. Contact an authorized service center/department. Hard to start 1. Carburetor out of power 1. Corroded battery terminals. 6. Faulty ignition switch. 8. Disengage attachment clutch. 3. Engine clicks but will not...
User Manual
Page 26
.... 5. Check/replace light switch. 4. Replace regulator. 4. uneven 1. Level mower deck. 3. Faulty light switch. 4. Purge transmission. Engine throttle control not set between half and full speed (fast) position before stopping engine. 26 See Operation section. 1. Tighten blade bolt. 2. Replace blade mandrel. Allow grass to slower speed. 3. Bulb(s) or lamp(s) burned out. 3. Poor cable connections. 3. Replace alternator. Tighten blade bolt. 7. Replace mower drive belt. 9. Blown fuse. 1. Check wiring and connections. 5. Bad battery cell(s). 2. Remove...
.... 5. Check/replace light switch. 4. Replace regulator. 4. uneven 1. Level mower deck. 3. Faulty light switch. 4. Purge transmission. Engine throttle control not set between half and full speed (fast) position before stopping engine. 26 See Operation section. 1. Tighten blade bolt. 2. Replace blade mandrel. Allow grass to slower speed. 3. Bulb(s) or lamp(s) burned out. 3. Poor cable connections. 3. Replace alternator. Tighten blade bolt. 7. Replace mower drive belt. 9. Blown fuse. 1. Check wiring and connections. 5. Bad battery cell(s). 2. Remove...
User Manual
Page 28
... due to materials or workmanship. Transportation charges for any parts submitted for the movement of original purchase. 5. The Warranty period for any power equipment unit or attachment are belts, blades, blade adapters, normal wear, normal adjustments, standard hardware and normal maintenance. 7. Exclusions: Excluded from the date of any products used for parts or labor incurred in materials and workmanship. Some areas...
... due to materials or workmanship. Transportation charges for any parts submitted for the movement of original purchase. 5. The Warranty period for any power equipment unit or attachment are belts, blades, blade adapters, normal wear, normal adjustments, standard hardware and normal maintenance. 7. Exclusions: Excluded from the date of any products used for parts or labor incurred in materials and workmanship. Some areas...


