

User Manual
Page 1
Failure to do so can result in the U.S.A. IMPORTANT MANUAL DO NOT THROW AWAY 03076 OPERATOR'S MANUAL MODEL: PB195H46YT LAWN TRACTOR WARNING: Read this Manual and follow all Warnings and Safety Instructions. ALWAYS WEAR EYE PROTECTION DURING OPERATION Visit our website: www.poulan-pro.com 417217 Rev. 2 09.19.08 SBW Printed in serious injury.
Failure to do so can result in the U.S.A. IMPORTANT MANUAL DO NOT THROW AWAY 03076 OPERATOR'S MANUAL MODEL: PB195H46YT LAWN TRACTOR WARNING: Read this Manual and follow all Warnings and Safety Instructions. ALWAYS WEAR EYE PROTECTION DURING OPERATION Visit our website: www.poulan-pro.com 417217 Rev. 2 09.19.08 SBW Printed in serious injury.
User Manual
Page 2
... not try to occur. on a slope. Material may ricochet back toward anyone enters the area. • Never carry passengers. • Do not mow in the manual before storage. Stop • Do not mow near or crossing roadways. • Use extra care when loading or unloading the machine into a trailer or truck...
... not try to occur. on a slope. Material may ricochet back toward anyone enters the area. • Never carry passengers. • Do not mow in the manual before storage. Stop • Do not mow near or crossing roadways. • Use extra care when loading or unloading the machine into a trailer or truck...
User Manual
Page 4
... arrester is used on federal lands. Other states may have competent, well-trained technicians and the proper tools to service or repair this manual). PRODUCT SPECIFICATIONS Gasoline Capacity and type: 2.50 Gallons Unleaded Regular Oil Type (API-SG-SL): SAE 10W30 (above is required by the...• Read and observe the safety rules. • Follow a regular schedule in effective working order by law (Section 4442 of this manual. A spark arrester for and using your nearest authorized servicecenter/ department We have similar laws. In the state of California the above 32°...
... arrester is used on federal lands. Other states may have competent, well-trained technicians and the proper tools to service or repair this manual). PRODUCT SPECIFICATIONS Gasoline Capacity and type: 2.50 Gallons Unleaded Regular Oil Type (API-SG-SL): SAE 10W30 (above is required by the...• Read and observe the safety rules. • Follow a regular schedule in effective working order by law (Section 4442 of this manual. A spark arrester for and using your nearest authorized servicecenter/ department We have similar laws. In the state of California the above 32°...
User Manual
Page 5
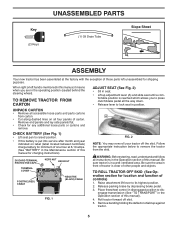
...flat. • Check for minimum of one hour at the factory with the exception of those parts left hand is mentioned in this manual, it means when you to press clutch/brake pedal all instructions in front of tractor is put into service after month and year ... the Maintenance section of other people and objects. CHECK BATTERY (See Fig. 1) • Lift seat pan to raised position. • If this manual. Follow the appropriate instruction below to remove the tractor from carton. Key (2) Keys UNASSEMBLED PARTS (1) Oil Drain Tube Slope Sheet ASSEMBLY Your new tractor ...
...flat. • Check for minimum of one hour at the factory with the exception of those parts left hand is mentioned in this manual, it means when you to press clutch/brake pedal all instructions in front of tractor is put into service after month and year ... the Maintenance section of other people and objects. CHECK BATTERY (See Fig. 1) • Lift seat pan to raised position. • If this manual. Follow the appropriate instruction below to remove the tractor from carton. Key (2) Keys UNASSEMBLED PARTS (1) Oil Drain Tube Slope Sheet ASSEMBLY Your new tractor ...
User Manual
Page 6
...tires are properly clamped. ✓ Before driving tractor, be properly leveled. See "TO CHECK BRAKE" in the Service and Adjustments section of this manual. PLEASE REVIEW THE FOLLOWING CHECKLIST: ✓ All assembly instructions have been completed. ✓ No remaining loose parts in carton. ✓ Battery ...inside all controls, their location and function. Be sure they are working properly (See the Operation and Maintenance sections in this manual). ASSEMBLY CHECK TIRE PRESSURE The tires on your tractor for replacing motion and mower blade drive belts in the Service and ...
...tires are properly clamped. ✓ Before driving tractor, be properly leveled. See "TO CHECK BRAKE" in the Service and Adjustments section of this manual. PLEASE REVIEW THE FOLLOWING CHECKLIST: ✓ All assembly instructions have been completed. ✓ No remaining loose parts in carton. ✓ Battery ...inside all controls, their location and function. Be sure they are working properly (See the Operation and Maintenance sections in this manual). ASSEMBLY CHECK TIRE PRESSURE The tires on your tractor for replacing motion and mower blade drive belts in the Service and ...
User Manual
Page 8
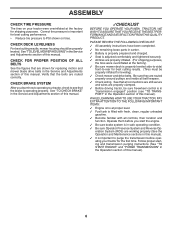
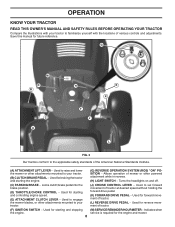
Used for starting the engine. (G) REVERSE OPERATION SYSTEM (ROS) "ON" POSITION - Save this manual for the engine and mower. 8 G M D B C A H F J E K L FIG. 3 Our tractors conform to the applicable safety standards of tractor. (L) REVERSE DRIVE PEDAL - ...Used for reverse movement of mower or other powered attachment while in reverse. (H) LIGHT SWITCH - OPERATION KNOW YOUR TRACTOR READ THIS OWNER'S MANUAL AND SAFETY RULES BEFORE OPERATING YOUR TRACTOR Compare the illustrations with your tractor to familiarize yourself with the locations of tractor at desired speed without...
Used for starting the engine. (G) REVERSE OPERATION SYSTEM (ROS) "ON" POSITION - Save this manual for the engine and mower. 8 G M D B C A H F J E K L FIG. 3 Our tractors conform to the applicable safety standards of tractor. (L) REVERSE DRIVE PEDAL - ...Used for reverse movement of mower or other powered attachment while in reverse. (H) LIGHT SWITCH - OPERATION KNOW YOUR TRACTOR READ THIS OWNER'S MANUAL AND SAFETY RULES BEFORE OPERATING YOUR TRACTOR Compare the illustrations with your tractor to familiarize yourself with the locations of tractor at desired speed without...
User Manual
Page 10
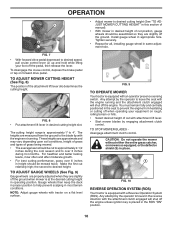
... help prevent scalping in same adjustment hole. OPERATION J K L • Adjust mower to desired cutting height (See "TO ADJUST MOWER CUTTING HEIGHT" in this section of manual). • With mower in desired height of cut to approximately 2-1/2 inches during hot months. The cutting height range is equipped with tractor on forward drive...
... help prevent scalping in same adjustment hole. OPERATION J K L • Adjust mower to desired cutting height (See "TO ADJUST MOWER CUTTING HEIGHT" in this section of manual). • With mower in desired height of cut to approximately 2-1/2 inches during hot months. The cutting height range is equipped with tractor on forward drive...
User Manual
Page 11
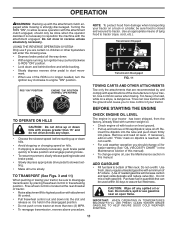
OPERATION WARNING: Backing up with gasoline. Do not mow in this manual. Use an appropriate means of a load, while on a slope, is reached. Too heavy of tying hood to tractor (rope, cord, etc.). BEFORE STARTING THE ENGINE ..., regular unleaded gasoline with a minimum of 87 octane. (Use of tractor. • Raise attachment lift to highest position with specifications of the manufacturer of this manual). • To change oil for easier starting up or down and behind before starting (See "OIL VISCOSITY CHART" in your tractor has been shipped, from...
OPERATION WARNING: Backing up with gasoline. Do not mow in this manual. Use an appropriate means of a load, while on a slope, is reached. Too heavy of tying hood to tractor (rope, cord, etc.). BEFORE STARTING THE ENGINE ..., regular unleaded gasoline with a minimum of 87 octane. (Use of tractor. • Raise attachment lift to highest position with specifications of the manufacturer of this manual). • To change oil for easier starting up or down and behind before starting (See "OIL VISCOSITY CHART" in your tractor has been shipped, from...
User Manual
Page 12
... After the engine is running . Repeat this section of an engine while in the Service and Adjustments section of acids during shipping of manual). 3. See "TO ADJUST CARBURETOR" in storage. This procedure will take extra cranking time to move the throttle control to full forward ...additional information. Sitting in the tractor seat, start after the transmission has been warmed up period. • The attachments can damage the fuel system of manual). 7. off and parking brake set parking brake. 6. Drain the gas tank, start engine. WARM WEATHER STARTING (50° F and above) ...
... After the engine is running . Repeat this section of an engine while in the Service and Adjustments section of acids during shipping of manual). 3. See "TO ADJUST CARBURETOR" in storage. This procedure will take extra cranking time to move the throttle control to full forward ...additional information. Sitting in the tractor seat, start after the transmission has been warmed up period. • The attachments can damage the fuel system of manual). 7. off and parking brake set parking brake. 6. Drain the gas tank, start engine. WARM WEATHER STARTING (50° F and above) ...
User Manual
Page 13
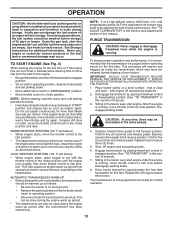
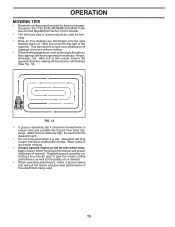
... a ground speed that clippings will discharge away from dried clippings. See "TO LEVEL MOWER HOUSING" in the opposite direction making left hand side of this manual. • The left hand turns until finished (See Fig. 12). Have the cut relatively high; FIG. 12 • If grass is wet. the second to...
... a ground speed that clippings will discharge away from dried clippings. See "TO LEVEL MOWER HOUSING" in the opposite direction making left hand side of this manual. • The left hand turns until finished (See Fig. 12). Have the cut relatively high; FIG. 12 • If grass is wet. the second to...
User Manual
Page 14
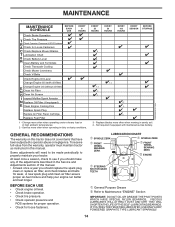
... EVERY SEASON BEFORE STORAGE 3 4 1,2 1,2 2 2 1, 2 2 2 3 - To receive full value from the warranty, operator must maintain tractor as instructed in this manual. • At least once a year you should make any of this manual. IF YOU FEEL THEY MUST BE LUBRICATED, USE ONLY A DRY, POWDERED GRAPHITE TYPE LUBRICANT SPARINGLY. 14 Some adjustments will need...
... EVERY SEASON BEFORE STORAGE 3 4 1,2 1,2 2 2 1, 2 2 2 3 - To receive full value from the warranty, operator must maintain tractor as instructed in this manual. • At least once a year you should make any of this manual. IF YOU FEEL THEY MUST BE LUBRICATED, USE ONLY A DRY, POWDERED GRAPHITE TYPE LUBRICANT SPARINGLY. 14 Some adjustments will need...
User Manual
Page 15
... with star on tires). • Keep tires free of gasoline, oil, or insect control chemicals which is in the Service and Adjustments section of this manual). Using a blade not approved by the operator to stop at 6-10 amperes for normal use. Adding or checking level of electrolyte is heat treated. Lbs...
... with star on tires). • Keep tires free of gasoline, oil, or insect control chemicals which is in the Service and Adjustments section of this manual). Using a blade not approved by the operator to stop at 6-10 amperes for normal use. Adding or checking level of electrolyte is heat treated. Lbs...
User Manual
Page 16
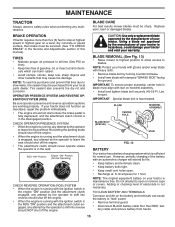
...operating temperature. All oil must be kept clean to assure proper cooling. For approximate capacity see "PRODUCT SPECIFICATIONS" section of this manual). Replace belts if they begin to slip from end of drain valve and install the drain tube onto the fitting. TRANSAXLE COOLING...before oil change. Clean with grease or petroleum jelly. • Reinstall battery (See "REPLACING BATTERY" in the SERVICE AND ADJUSTMENTS section of this manual. • Use gauge on level surface. • Oil will not run properly using a dirty air filter. SAE VISCOSITY GRADES 5W-30 10W30...
...operating temperature. All oil must be kept clean to assure proper cooling. For approximate capacity see "PRODUCT SPECIFICATIONS" section of this manual). Replace belts if they begin to slip from end of drain valve and install the drain tube onto the fitting. TRANSAXLE COOLING...before oil change. Clean with grease or petroleum jelly. • Reinstall battery (See "REPLACING BATTERY" in the SERVICE AND ADJUSTMENTS section of this manual. • Use gauge on level surface. • Oil will not run properly using a dirty air filter. SAE VISCOSITY GRADES 5W-30 10W30...
User Manual
Page 17
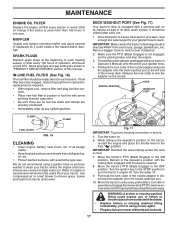
... throttle lever in the operator's position with the cutting deck engaged until the deck is directed AWAY from contact with your tractor's Operator's Manual) onto the end of the mower deck. IMPORTANT: Make certain the tractor's discharge chute is cleaned. 8. Pull back the lock collar...Clean engine, battery, seat, finish, etc. Move the tractor to the ON position. It should be utilized after every 100 hours of this manual. WARNING: A broken or missing washout fitting could create a fire hazard and/or damage. If fuel filter becomes clogged, obstructing fuel flow to ...
... throttle lever in the operator's position with the cutting deck engaged until the deck is directed AWAY from contact with your tractor's Operator's Manual) onto the end of the mower deck. IMPORTANT: Make certain the tractor's discharge chute is cleaned. 8. Pull back the lock collar...Clean engine, battery, seat, finish, etc. Move the tractor to the ON position. It should be utilized after every 100 hours of this manual. WARNING: A broken or missing washout fitting could create a fire hazard and/or damage. If fuel filter becomes clogged, obstructing fuel flow to ...

User Manual
Page 19
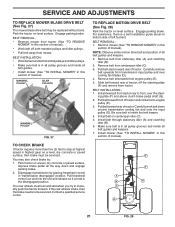
...; If necessary, adjust gauge wheels before operating mower as shown in belt keepers (G). A • Install belt on engine pulley (M), in the Operation section of this manual. SERVICE AND ADJUSTMENTS • Push clutch cable housing guide (P) into bracket, slide collar (L) onto guide and secure with washer and retainer spring (J). • Hook end...
...; If necessary, adjust gauge wheels before operating mower as shown in belt keepers (G). A • Install belt on engine pulley (M), in the Operation section of this manual. SERVICE AND ADJUSTMENTS • Push clutch cable housing guide (P) into bracket, slide collar (L) onto guide and secure with washer and retainer spring (J). • Hook end...
User Manual
Page 21
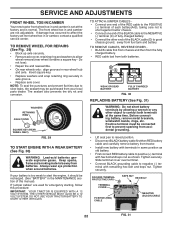
...so it is in all pulley grooves and inside all belt guides. • Install mower (See "TO INSTALL MOWER" in this section of manual). If the rear wheels rotate, then the brake needs to be replaced without tools. BELT REMOVAL 1. Remove belt from transmission input pulley and ... of all the way down around both mandrel pulleys and idler pulleys. • Pull belt away from tractor. Remove belt from tractor rear to manually push the tractor forward. Remove belt downward from tractor (See "TO REMOVE MOWER" in the disengaged position. Contact a qualified service center. NOTE:...
...so it is in all pulley grooves and inside all belt guides. • Install mower (See "TO INSTALL MOWER" in this section of manual). If the rear wheels rotate, then the brake needs to be replaced without tools. BELT REMOVAL 1. Remove belt from transmission input pulley and ... of all the way down around both mandrel pulleys and idler pulleys. • Pull belt away from tractor. Remove belt from tractor rear to manually push the tractor forward. Remove belt downward from tractor (See "TO REMOVE MOWER" in the disengaged position. Contact a qualified service center. NOTE:...
User Manual
Page 22
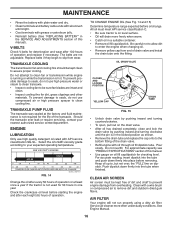
.... • Replace axle cover. Insert square key. • Replace washers and snap retaining ring securely in and camber are used for emergency starting, follow this manual). Tire sealant also prevents tire dry rot and corrosion. If your local parts dealer. DISCARD TERMINAL PROTECTIVE CAPS TERMINAL COVER KEPS NUT HEX BOLT POSITIVE...
.... • Replace axle cover. Insert square key. • Replace washers and snap retaining ring securely in and camber are used for emergency starting, follow this manual). Tire sealant also prevents tire dry rot and corrosion. If your local parts dealer. DISCARD TERMINAL PROTECTIVE CAPS TERMINAL COVER KEPS NUT HEX BOLT POSITIVE...
User Manual
Page 23
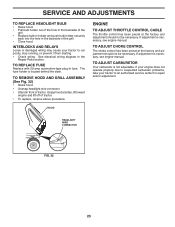
... carburetor problems, take your tractor to an authorized service center for repair and/or adjustment. The fuse holder is necessary, see engine manual. HEADLIGHT WIRE CONNECTOR 03075 FIG. 32 23 See electrical wiring diagram in fuse. TO ADJUST CARBURETOR Your carburetor is necessary, see engine... manual. If adjustment is not adjustable. TO REPLACE FUSE Replace with 20 amp automotive-type plug-in the Repair Parts section. TO ADJUST ...
... carburetor problems, take your tractor to an authorized service center for repair and/or adjustment. The fuse holder is necessary, see engine manual. HEADLIGHT WIRE CONNECTOR 03075 FIG. 32 23 See electrical wiring diagram in fuse. TO ADJUST CARBURETOR Your carburetor is necessary, see engine... manual. If adjustment is not adjustable. TO REPLACE FUSE Replace with 20 amp automotive-type plug-in the Repair Parts section. TO ADJUST ...
User Manual
Page 24
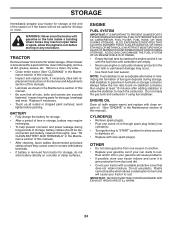
...stabilizer container. WARNING: Never store the tractor with a suitable protective cover that all rusted or chipped paint surfaces; nance section of this manual). • After cleaning, leave cables disconnected and place cables where they cannot come in the tank inside a building where fumes may occur.... • Use fresh fuel next season. placement instructions in the Service and Adjustments section of this manual). • Inspect and replace belts, if necessary (See belt re- Add stabilizer to cool before painting. Allow the engine to gasoline...
...stabilizer container. WARNING: Never store the tractor with a suitable protective cover that all rusted or chipped paint surfaces; nance section of this manual). • After cleaning, leave cables disconnected and place cables where they cannot come in the tank inside a building where fumes may occur.... • Use fresh fuel next season. placement instructions in the Service and Adjustments section of this manual). • Inspect and replace belts, if necessary (See belt re- Add stabilizer to cool before painting. Allow the engine to gasoline...
User Manual
Page 26
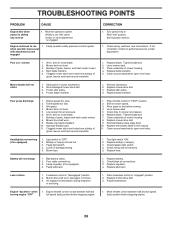
.... Replace with attachment clutch engaged CORRECTION 1. Loose or damaged wiring. 5. Replace bulb(s) or lamp(s). 3. Check wiring and connections. 5. Poor cable connections. 3. Freewheel control in this manual. 11. Purge transmission. Replace blade. Frozen blade mandrel. 1. Mower deck not level. 5. Mower drive belt worn. 9. Replace blade. Blown fuse. 1. Turn light switch "ON". 2. Check...
.... Replace with attachment clutch engaged CORRECTION 1. Loose or damaged wiring. 5. Replace bulb(s) or lamp(s). 3. Check wiring and connections. 5. Poor cable connections. 3. Freewheel control in this manual. 11. Purge transmission. Replace blade. Frozen blade mandrel. 1. Mower deck not level. 5. Mower drive belt worn. 9. Replace blade. Blown fuse. 1. Turn light switch "ON". 2. Check...


