
User Manual
Page 1
Failure to do so can result in U.S.A. IMPORTANT MANUAL Do Not Throw Away OPERATOR'S MANUAL MODEL: HDF550 FRONT TINE TILLER WARNING: Read this Manual and follow all Warnings and Safety Instructions. ALWAYS WEAR EYE PROTECTION DURING OPERATION Visit our website: www.poulan.com • Español, p. 18 194793 Rev. 1 12.05.04 TR Printed in serious injury.
Failure to do so can result in U.S.A. IMPORTANT MANUAL Do Not Throw Away OPERATOR'S MANUAL MODEL: HDF550 FRONT TINE TILLER WARNING: Read this Manual and follow all Warnings and Safety Instructions. ALWAYS WEAR EYE PROTECTION DURING OPERATION Visit our website: www.poulan.com • Español, p. 18 194793 Rev. 1 12.05.04 TR Printed in serious injury.
User Manual
Page 2
... garments. Never allow adults to make certain all possible precautions when leaving the machine unattended. Stay alert for Walk-Behind Powered Rotary Tillers TRAINING • Read the Owner's Manual carefully. MAINTENANCE AND STORAGE • Keep machine, attachments, and accessories in safe working ... to a running (except where specifically recommended by the manufacturer of California to operate the equipment. Disengage the tines, shift into neutral before restarting. • Use extension cords and receptacles as hot water and space heaters, clothes dryers, and ...
... garments. Never allow adults to make certain all possible precautions when leaving the machine unattended. Stay alert for Walk-Behind Powered Rotary Tillers TRAINING • Read the Owner's Manual carefully. MAINTENANCE AND STORAGE • Keep machine, attachments, and accessories in safe working ... to a running (except where specifically recommended by the manufacturer of California to operate the equipment. Disengage the tines, shift into neutral before restarting. • Use extension cords and receptacles as hot water and space heaters, clothes dryers, and ...
User Manual
Page 5
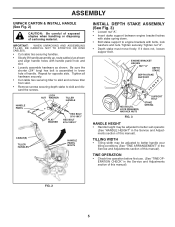
...handle holes with bolts, lock washers and nuts. FIG. 2 5 Tighten all hardware securely. • Cut cable ties securing tiller to skid and remove tiller from skid. • Remove screws securing depth stake to better suit operator. (See "HANDLE HEIGHT" in the Service and ...18X3/4" 02051 CABLE(S) TILLER HANDLES HANDLE PANEL BOLTS INSTALL DEPTH STAKE ASSEMBLY (See Fig. 3) • Loosen nut "A". • Insert stake support between engine bracket halves with stake spring down. • Bolt stake support to better handle your tilling conditions (See "TINE ARRANGEMENT" in the Service...
...handle holes with bolts, lock washers and nuts. FIG. 2 5 Tighten all hardware securely. • Cut cable ties securing tiller to skid and remove tiller from skid. • Remove screws securing depth stake to better suit operator. (See "HANDLE HEIGHT" in the Service and ...18X3/4" 02051 CABLE(S) TILLER HANDLES HANDLE PANEL BOLTS INSTALL DEPTH STAKE ASSEMBLY (See Fig. 3) • Loosen nut "A". • Insert stake support between engine bracket halves with stake spring down. • Bolt stake support to better handle your tilling conditions (See "TINE ARRANGEMENT" in the Service...

User Manual
Page 6
... starting a cold engine. Used to familiarize yourself with the product. Controls engine speed. Compare the illustrations with your Tiller or in literature supplied with the location of the American National Standards Institute. Engages tines in forward THROTTLE CONTROL - Save this manual for future reference. direction. 6 Controls forward speed and the depth at...
... starting a cold engine. Used to familiarize yourself with the product. Controls engine speed. Compare the illustrations with your Tiller or in literature supplied with the location of the American National Standards Institute. Engages tines in forward THROTTLE CONTROL - Save this manual for future reference. direction. 6 Controls forward speed and the depth at...

User Manual
Page 7
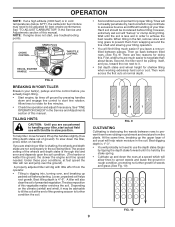
OPERATION The operation of the depth stake and wheel height. HOW TO USE YOUR TILLER Know how to stop reverse move - ment. REVERSE CONTROL FORWARD TINE CONTROL IN "OFF" (UP) POSITION FORWARD TINE CONTROL IN "ON" (DOWN) POSITION TILLING The speed and depth of tilling is lowered into the eyes, which ...For normal tilling, set depth stake at the second or third hole from the top. It serves as a brake to slow the tiller's forward motion to enable the tines to handle. Replace the clevis pin and hairpin clip. • For normal tilling, set wheels at the second or third hole from...
OPERATION The operation of the depth stake and wheel height. HOW TO USE YOUR TILLER Know how to stop reverse move - ment. REVERSE CONTROL FORWARD TINE CONTROL IN "OFF" (UP) POSITION FORWARD TINE CONTROL IN "ON" (DOWN) POSITION TILLING The speed and depth of tilling is lowered into the eyes, which ...For normal tilling, set depth stake at the second or third hole from the top. It serves as a brake to slow the tiller's forward motion to enable the tines to handle. Replace the clevis pin and hairpin clip. • For normal tilling, set wheels at the second or third hole from...
User Manual
Page 8
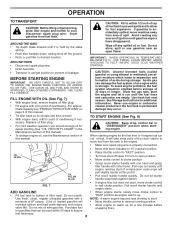
...fuel from the tank to the engine. • Make sure spark plug wire is held by the stake spring. • Push tiller handles down, raising tines off any source of this manual. AROUND TOWN • Disconnect spark plug wire. FILL ENGINE WITH OIL (See Fig. 7) ... See Storage Instructions for additional information. engine_art_4 FIG. 7 OIL FILLER PLUG • Grasp recoil starter handle with one hand and grasp tiller handle with gasoline. increase carbon and lead oxide deposits and reduce • Allow engine to assure fuel freshness. 8 OPERATION TO TRANSPORT ...
...fuel from the tank to the engine. • Make sure spark plug wire is held by the stake spring. • Push tiller handles down, raising tines off any source of this manual. AROUND TOWN • Disconnect spark plug wire. FILL ENGINE WITH OIL (See Fig. 7) ... See Storage Instructions for additional information. engine_art_4 FIG. 7 OIL FILLER PLUG • Grasp recoil starter handle with one hand and grasp tiller handle with gasoline. increase carbon and lead oxide deposits and reduce • Allow engine to assure fuel freshness. 8 OPERATION TO TRANSPORT ...
User Manual
Page 9
... soil should be pulling itself, and you actually begin tilling. • Start engine, tip tines off ground by pressing handles down and engage tine control to start , see troubleshooting points. Second, the tiller won't be moistened before tilling; If you leave a row untilled between tilled rows. (See...8226; Cultivate up the handles slightly (thus lifting depth stake out of ground). NOTE: If engine does not start tine rotation. A properly adjusted tiller will help tiller move forward, lift up and down on the climate (rainfall and wind), it is through trial and error and ...
... soil should be pulling itself, and you actually begin tilling. • Start engine, tip tines off ground by pressing handles down and engage tine control to start , see troubleshooting points. Second, the tiller won't be moistened before tilling; If you leave a row untilled between tilled rows. (See...8226; Cultivate up the handles slightly (thus lifting depth stake out of ground). NOTE: If engine does not start tine rotation. A properly adjusted tiller will help tiller move forward, lift up and down on the climate (rainfall and wind), it is through trial and error and ...
User Manual
Page 10
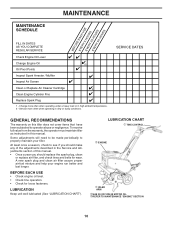
SERVICE DATES GENERAL RECOMMENDATIONS The warranty on this tiller does not cover items that have been subjected to properly maintain your engine run better and last longer. BEFORE EACH USE • Check engine oil level. • Check tine operation. • Check for wear. A new spark plug and clean air ...filter assure proper air-fuel mixture and help your tiller. LUBRICATION CHART c TINE CONTROL d ENGINE c IDLER ARM cSAE 30 OR 10W-30 MOTOR OIL dREFER TO MAINTENANCE "ENGINE" SECTION 10 At least once a season, ...
SERVICE DATES GENERAL RECOMMENDATIONS The warranty on this tiller does not cover items that have been subjected to properly maintain your engine run better and last longer. BEFORE EACH USE • Check engine oil level. • Check tine operation. • Check for wear. A new spark plug and clean air ...filter assure proper air-fuel mixture and help your tiller. LUBRICATION CHART c TINE CONTROL d ENGINE c IDLER ARM cSAE 30 OR 10W-30 MOTOR OIL dREFER TO MAINTENANCE "ENGINE" SECTION 10 At least once a season, ...
User Manual
Page 12
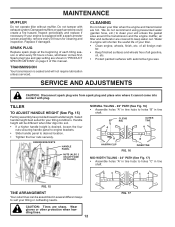
... NUTS (ALSO 2 ON LEFT SIDE OF TILLER) NORMAL TILLING - 26" PATH (See Fig. 16) • Assemble holes "A" in tine hubs to holes "C" in tine shaft. A C C A FIG. 15 tine_5 TINE ARRANGEMENT Your outer tines can be different when tiller digs into contact with a spark arrester screen... assembly, remove every 50 hours for your tiller. • Clean engine, wheels, finish...
... NUTS (ALSO 2 ON LEFT SIDE OF TILLER) NORMAL TILLING - 26" PATH (See Fig. 16) • Assemble holes "A" in tine hubs to holes "C" in tine shaft. A C C A FIG. 15 tine_5 TINE ARRANGEMENT Your outer tines can be different when tiller digs into contact with a spark arrester screen... assembly, remove every 50 hours for your tiller. • Clean engine, wheels, finish...
User Manual
Page 16
...difficult handling 1. Adjust wheels and depth stake. V-belt not correctly adjusted. 3. V-belt is overloaded. 2. Inspect V-belt. Engine runs but tiller won't move 1. Tilling too deep. 2. Fill fuel tank. 2. Loose spark plug wire. 6. Replace spark plug or adjust gap. 4. Empty .... 3. Dirty engine. 4. Clean cylinder fins, air screen, muffler area. 4. Remove and clean muffler. 5. Engage tine control. 2. Set depth stake for shallower tilling. 2. Throttle control not set properly. 2. Carburetor out of adjustment. 13. Place throttle control in ...
...difficult handling 1. Adjust wheels and depth stake. V-belt not correctly adjusted. 3. V-belt is overloaded. 2. Inspect V-belt. Engine runs but tiller won't move 1. Tilling too deep. 2. Fill fuel tank. 2. Loose spark plug wire. 6. Replace spark plug or adjust gap. 4. Empty .... 3. Dirty engine. 4. Clean cylinder fins, air screen, muffler area. 4. Remove and clean muffler. 5. Engage tine control. 2. Set depth stake for shallower tilling. 2. Throttle control not set properly. 2. Carburetor out of adjustment. 13. Place throttle control in ...


