
User Manual
Page 1
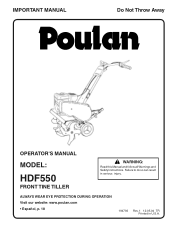
Failure to do so can result in U.S.A. IMPORTANT MANUAL Do Not Throw Away OPERATOR'S MANUAL MODEL: HDF550 FRONT TINE TILLER WARNING: Read this Manual and follow all Warnings and Safety Instructions. ALWAYS WEAR EYE PROTECTION DURING OPERATION Visit our website: www.poulan.com • Español, p. 18 194793 Rev. 1 12.05.04 TR Printed in serious injury.
Failure to do so can result in U.S.A. IMPORTANT MANUAL Do Not Throw Away OPERATOR'S MANUAL MODEL: HDF550 FRONT TINE TILLER WARNING: Read this Manual and follow all Warnings and Safety Instructions. ALWAYS WEAR EYE PROTECTION DURING OPERATION Visit our website: www.poulan.com • Español, p. 18 194793 Rev. 1 12.05.04 TR Printed in serious injury.
User Manual
Page 2
... vibrate abnormally, stop the engine (motor), remove the wire from the spark plug, thoroughly inspect the tiller for an extended period. - it cannot contact spark plug in any adjustments while the engine (motor) is generally a warning of the equipment. Stay alert for Walk-Behind Powered Rotary Tillers TRAINING • Read the Owner's Manual carefully. Allow the engine to cool before restarting and operating the tiller. • Exercise caution to...
... vibrate abnormally, stop the engine (motor), remove the wire from the spark plug, thoroughly inspect the tiller for an extended period. - it cannot contact spark plug in any adjustments while the engine (motor) is generally a warning of the equipment. Stay alert for Walk-Behind Powered Rotary Tillers TRAINING • Read the Owner's Manual carefully. Allow the engine to cool before restarting and operating the tiller. • Exercise caution to...
User Manual
Page 3
.... PRODUCT SPECIFICATIONS Gasoline Capacity: Oil (API-SG-SL): (Capacity: 20 oz./0.6L) Spark Plug: (Gap: .030"/0.76mm) 3 Quarts (2.8L) Unleaded Regular SAE 30 (Above 32°F/0°C) SAE 5w-30(Below 32°F/0°C) Champion RC12YC CONGRATULATIONS on your nearest authorized service center. We have competent, well-trained technicians and the proper tools to assemble and maintain your tiller. • Follow instructions under "Maintenance...
.... PRODUCT SPECIFICATIONS Gasoline Capacity: Oil (API-SG-SL): (Capacity: 20 oz./0.6L) Spark Plug: (Gap: .030"/0.76mm) 3 Quarts (2.8L) Unleaded Regular SAE 30 (Above 32°F/0°C) SAE 5w-30(Below 32°F/0°C) Champion RC12YC CONGRATULATIONS on your nearest authorized service center. We have competent, well-trained technicians and the proper tools to assemble and maintain your tiller. • Follow instructions under "Maintenance...
User Manual
Page 4
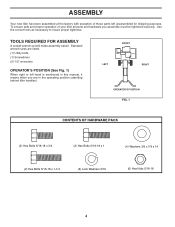
... operation of those parts left hand is mentioned in this manual, it means when you assemble must be tightened securely. Use the correct tools as necessary to insure proper tightness. Standard wrench sizes are in the operating position (standing behind tiller handles). ASSEMBLY Your new tiller has been assembled at the factory with exception of your tiller all parts and hardware you are listed. (1) Utility knife (1) Screwdriver (2) 1/2" wrenches OPERATOR'S POSITION...
... operation of those parts left hand is mentioned in this manual, it means when you assemble must be tightened securely. Use the correct tools as necessary to insure proper tightness. Standard wrench sizes are in the operating position (standing behind tiller handles). ASSEMBLY Your new tiller has been assembled at the factory with exception of your tiller all parts and hardware you are listed. (1) Utility knife (1) Screwdriver (2) 1/2" wrenches OPERATOR'S POSITION...
User Manual
Page 5
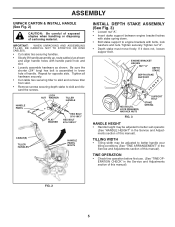
... shorter (3/4" long) hex bolt is assembled in the Service and Adjustments section of this manual). If it does not, loosen support bolt. TINE OPERATION • Check tine operation before first use. (See "TINE OPERATION CHECK" in lower hole of this manual). Tighten all hardware securely. • Cut cable ties securing tiller to skid and remove tiller from skid. • Remove screws securing depth stake to better handle your tilling conditions (See...
... shorter (3/4" long) hex bolt is assembled in the Service and Adjustments section of this manual). If it does not, loosen support bolt. TINE OPERATION • Check tine operation before first use. (See "TINE OPERATION CHECK" in lower hole of this manual). Tighten all hardware securely. • Cut cable ties securing tiller to skid and remove tiller from skid. • Remove screws securing depth stake to better handle your tilling conditions (See...

User Manual
Page 6
.... direction. direction. 6 CHOKE CONTROL - Save this manual for future reference. These symbols may appear on your tiller to start the engine. Controls engine speed. REVERSE TINE CONTROL - Engages tines in reverse RECOIL STARTER HANDLE - FORWARD TINE CONTROL REVERSE TINE CONTROL DEPTH STAKE RECOIL STARTER HANDLE CHOKE CONTROL THROTTLE CONTROL TINE SHIELD TINES FIG. 4 MEETS ANSI SAFETY REQUIREMENTS Our tillers conform to the safety standards of various controls and adjustments. Controls forward speed and the depth...
.... direction. direction. 6 CHOKE CONTROL - Save this manual for future reference. These symbols may appear on your tiller to start the engine. Controls engine speed. REVERSE TINE CONTROL - Engages tines in reverse RECOIL STARTER HANDLE - FORWARD TINE CONTROL REVERSE TINE CONTROL DEPTH STAKE RECOIL STARTER HANDLE CHOKE CONTROL THROTTLE CONTROL TINE SHIELD TINES FIG. 4 MEETS ANSI SAFETY REQUIREMENTS Our tillers conform to the safety standards of various controls and adjustments. Controls forward speed and the depth...

User Manual
Page 7
... wheel height. Change wheel position. HOW TO USE YOUR TILLER Know how to stop reverse move - ment. • Release reverse tine control to start engine. Change depth stake to penetrate the ground. Replace the clevis pin and hairpin clip. • For normal tilling, set wheels at the second or third hole from the top. Always wear safety glasses or eye shields before adding fuel and oil...
... wheel height. Change wheel position. HOW TO USE YOUR TILLER Know how to stop reverse move - ment. • Release reverse tine control to start engine. Change depth stake to penetrate the ground. Replace the clevis pin and hairpin clip. • For normal tilling, set wheels at the second or third hole from the top. Always wear safety glasses or eye shields before adding fuel and oil...
User Manual
Page 8
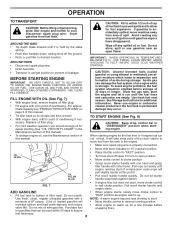
... lever indicator to desired running position. Replace oil filler plug. • For cold weather operation you should be used within 1/2 inch of top of spill. When starting engine for easier starting engine. • To change oil for the first time or if engine has run until engine starts. OIL LEVEL • Place throttle control in "DISENGAGED" position when starting (See "OIL VISCOSITY CHART" in the Maintenance section of ignition until gasoline vapors have disappeared. Pull recoil starter handle until the fuel lines...
... lever indicator to desired running position. Replace oil filler plug. • For cold weather operation you should be used within 1/2 inch of top of spill. When starting engine for easier starting engine. • To change oil for the first time or if engine has run until engine starts. OIL LEVEL • Place throttle control in "DISENGAGED" position when starting (See "OIL VISCOSITY CHART" in the Maintenance section of ignition until gasoline vapors have disappeared. Pull recoil starter handle until the fuel lines...
User Manual
Page 9
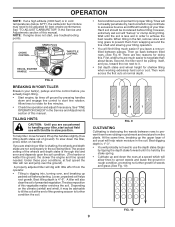
... the soil is destroying the weeds between passes. First, wide turns are two reasons for best engine performance. FIG. 10 9 OPERATION NOTE: If at a high altitude (3000 feet) or in cold temperatures (below 32°F), the carburetor fuel mixture may contribute to be adjusted for doing this manual. NOTE: If engine does not start actual field use the depth stake. TILLING HINTS...
... the soil is destroying the weeds between passes. First, wide turns are two reasons for best engine performance. FIG. 10 9 OPERATION NOTE: If at a high altitude (3000 feet) or in cold temperatures (below 32°F), the carburetor fuel mixture may contribute to be adjusted for doing this manual. NOTE: If engine does not start actual field use the depth stake. TILLING HINTS...
User Manual
Page 10
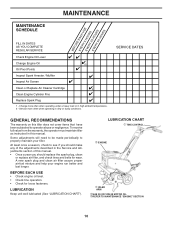
...SCHEDULE MAINTENANCE EEEBVVVEFEEERRROYYYRE55205EHAHHOCOOUHUURRRSUSSSE FILL IN DATES AS YOU COMPLETE REGULAR SERVICE Check Engine Oil Level Change Engine Oil Oil Pivot Points Inspect Spark Arrester / Muffler Inspect Air Screen Clean or Replace Air Cleaner Cartridge 2 Clean Engine Cylinder Fins Replace Spark Plug 1 - SERVICE DATES GENERAL RECOMMENDATIONS The warranty on this tiller does not cover items that have been subjected to properly maintain your engine run better and last longer. A new spark plug and clean air filter assure proper air-fuel mixture and help your tiller.
...SCHEDULE MAINTENANCE EEEBVVVEFEEERRROYYYRE55205EHAHHOCOOUHUURRRSUSSSE FILL IN DATES AS YOU COMPLETE REGULAR SERVICE Check Engine Oil Level Change Engine Oil Oil Pivot Points Inspect Spark Arrester / Muffler Inspect Air Screen Clean or Replace Air Cleaner Cartridge 2 Clean Engine Cylinder Fins Replace Spark Plug 1 - SERVICE DATES GENERAL RECOMMENDATIONS The warranty on this tiller does not cover items that have been subjected to properly maintain your engine run better and last longer. A new spark plug and clean air filter assure proper air-fuel mixture and help your tiller.

User Manual
Page 11
... clean or dry cartridge. Check your engine oil level more frequently to avoid possible engine damage from tank before performing any maintenance (except carburetor adjustment) to prevent accidental starting of engine. Check the crankcase oil level before oil change. All oil must meet API service classification SG-SL. • Be sure tiller is used in increased oil consumption when used above 32°F (0°C). See"CHECK ENGINE OIL LEVEL" in a suitable container. • Remove drain plug. • Tip tiller...
... clean or dry cartridge. Check your engine oil level more frequently to avoid possible engine damage from tank before performing any maintenance (except carburetor adjustment) to prevent accidental starting of engine. Check the crankcase oil level before oil change. All oil must meet API service classification SG-SL. • Be sure tiller is used in increased oil consumption when used above 32°F (0°C). See"CHECK ENGINE OIL LEVEL" in a suitable container. • Remove drain plug. • Tip tiller...
User Manual
Page 12
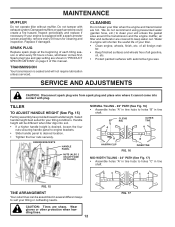
... holes "B" in tine shaft. Water in "PRODUCT SPECIFICATIONS" on page 3 of all gasoline, oil, etc. • Protect painted surfaces with a spark arrester screen assembly, remove every 50 hours for your unit unless the gasket area around the transmission and the engine muffler, air filter and carburetor are hot. SERVICE AND ADJUSTMENTS CAUTION: Disconnect spark plug wire from spark plug and place wire where it cannot come...
... holes "B" in tine shaft. Water in "PRODUCT SPECIFICATIONS" on page 3 of all gasoline, oil, etc. • Protect painted surfaces with a spark arrester screen assembly, remove every 50 hours for your unit unless the gasket area around the transmission and the engine muffler, air filter and carburetor are hot. SERVICE AND ADJUSTMENTS CAUTION: Disconnect spark plug wire from spark plug and place wire where it cannot come...
User Manual
Page 13
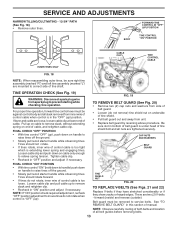
... assembly (marked "L") are tightened securely. FINAL CHECK "OFF" POSITION • With tine control "OFF" (up on cable to raise tines off the ground. • Slowly pull recoil starter handle while observing tines. NOTE: Observe carefully routing of both belts and location of all nuts are mounted to prevent starting while checking tine operation. TO REMOVE BELT GUARD (See Fig. 20) • Remove two (2) cap nuts and washers from side of belt guard...
... assembly (marked "L") are tightened securely. FINAL CHECK "OFF" POSITION • With tine control "OFF" (up on cable to raise tines off the ground. • Slowly pull recoil starter handle while observing tines. NOTE: Observe carefully routing of both belts and location of all nuts are mounted to prevent starting while checking tine operation. TO REMOVE BELT GUARD (See Fig. 20) • Remove two (2) cap nuts and washers from side of belt guard...
User Manual
Page 14
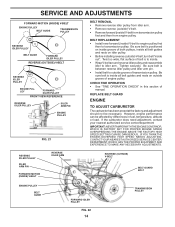
... pulleys, inside )V-belt from transmission pulley first and then from idler arm. • Remove reverse (outside )V-belt, turn belt"inside out". IF YOU THINK THE ENGINE-GOVERNED HIGH SPEED NEEDS ADJUSTING, CONTACTYOUR NEAREST AUTHORIZED SERVICE CENTER/ DEPARTMENT, WHICH HAS THE PROPER EQUIPMENT AND EXPERIENCE TO MAKE ANY NECESSARY ADJUSTMENTS. BELT REPLACEMENT • Install new forward (inside . • WrapV-belt around reverse idler pulley and reassemble idler to idler arm. CHECK TINE OPERATION...
... pulleys, inside )V-belt from transmission pulley first and then from idler arm. • Remove reverse (outside )V-belt, turn belt"inside out". IF YOU THINK THE ENGINE-GOVERNED HIGH SPEED NEEDS ADJUSTING, CONTACTYOUR NEAREST AUTHORIZED SERVICE CENTER/ DEPARTMENT, WHICH HAS THE PROPER EQUIPMENT AND EXPERIENCE TO MAKE ANY NECESSARY ADJUSTMENTS. BELT REPLACEMENT • Install new forward (inside . • WrapV-belt around reverse idler pulley and reassemble idler to idler arm. CHECK TINE OPERATION...

User Manual
Page 15
... can if your can starts to cool before painting. Run engine at the end of oil through spark plug hole into cylinder. • Pull starter handle slowly several times to reach the carburetor. Rust and/or dirt in your gasoline will cause your unit to gasoline in any enclosure. ENGINE OIL Drain oil (with engine warm) and replace with gasoline in the Maintenance section of fuel gum deposits during...
... can if your can starts to cool before painting. Run engine at the end of oil through spark plug hole into cylinder. • Pull starter handle slowly several times to reach the carburetor. Rust and/or dirt in your gasoline will cause your unit to gasoline in any enclosure. ENGINE OIL Drain oil (with engine warm) and replace with gasoline in the Maintenance section of fuel gum deposits during...
User Manual
Page 16
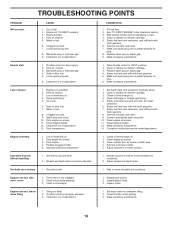
... 3. Check oil level/change spark plug. 5. Engine overheats 1. Check oil level/change oil. 2. Wait for shallower tilling. 2. Fill fuel tank. 2. Bad spark plug or improper gap. 4. Empty fuel tank and refill with fresh gasoline. 8. Adjust carburetor to start 1. Tine control is seated properly on plug. 6. Throttle control not properly adjusted. 3. Check throttle control setting. 3. Out of power 1. Clean or replace air cleaner cartridge. 5. Make sure spark plug wire is not engaged. 2. Hard to richer position. Engine is overloaded. 2. Remove fuel...
... 3. Check oil level/change spark plug. 5. Engine overheats 1. Check oil level/change oil. 2. Wait for shallower tilling. 2. Fill fuel tank. 2. Bad spark plug or improper gap. 4. Empty fuel tank and refill with fresh gasoline. 8. Adjust carburetor to start 1. Tine control is seated properly on plug. 6. Throttle control not properly adjusted. 3. Check throttle control setting. 3. Out of power 1. Clean or replace air cleaner cartridge. 5. Make sure spark plug wire is not engaged. 2. Hard to richer position. Engine is overloaded. 2. Remove fuel...
User Manual
Page 17
... responsibility of the purchaser. The Warranty period for any products used for parts or labor incurred in replacing parts, any power equipment unit or attachment are belts, tines, tine adapters, normal wear, normal adjustments, standard hardware and normal maintenance. 6. Exclusions: Excluded from the date of original purchase. 4. This is free from whom it was purchased. LIMITED WARRANTY The Manufacturer warrants to the...
... responsibility of the purchaser. The Warranty period for any products used for parts or labor incurred in replacing parts, any power equipment unit or attachment are belts, tines, tine adapters, normal wear, normal adjustments, standard hardware and normal maintenance. 6. Exclusions: Excluded from the date of original purchase. 4. This is free from whom it was purchased. LIMITED WARRANTY The Manufacturer warrants to the...
User Manual
Page 36
..., some adjustments or part replacement may be directed to continually improve all requests for updated information and assistance. Model Number/Manufacturer's I.D. If the operating characteristics or the appearance of your product differs from those described in this Manual, please contact your local dealer(s). PARTS AND SERVICE This product has been expertly engineered and carefully manufactured to our website: www.poulan.com/support.asp...
..., some adjustments or part replacement may be directed to continually improve all requests for updated information and assistance. Model Number/Manufacturer's I.D. If the operating characteristics or the appearance of your product differs from those described in this Manual, please contact your local dealer(s). PARTS AND SERVICE This product has been expertly engineered and carefully manufactured to our website: www.poulan.com/support.asp...


