
User Manual
Page 2
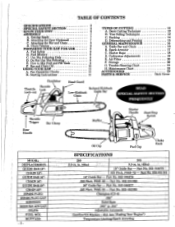
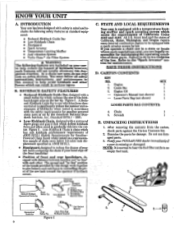
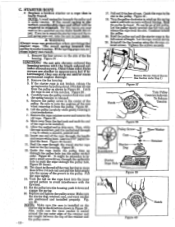
...B. Starting Instructions 11 PARTS & SERVICE Back Cover Handlebar Throttle \ Throttle Lock Lock-out/ Hand Guard Reduced Kickback Low-Kickback Guide Bar Chain READ SPECIAL SAFETY SECTION FREQUENTLY • 0 Throttle Trigger Rear Handle Bar Clamp Muffler Starter Handle Start/Stop Switch JIUUUI Oil Cap Fuel Cap Choke Knob MODEL: DISPLACEMENT: GUIDE BAR 18": CHAIN 18": GUIDE BAR 16": CHAIN 16": GUIDE BAR 20": CHAIN 20": SPARK PLUG: SPARK PLUG.GAR IGNITION: MODULE AIR GAP: OILER: FUEL MIX: MUFFLER: SPECIFICATIONS 285 305 2.8 cu. Part No. 952-051320 20" Guide Bar -- Attaching...
...B. Starting Instructions 11 PARTS & SERVICE Back Cover Handlebar Throttle \ Throttle Lock Lock-out/ Hand Guard Reduced Kickback Low-Kickback Guide Bar Chain READ SPECIAL SAFETY SECTION FREQUENTLY • 0 Throttle Trigger Rear Handle Bar Clamp Muffler Starter Handle Start/Stop Switch JIUUUI Oil Cap Fuel Cap Choke Knob MODEL: DISPLACEMENT: GUIDE BAR 18": CHAIN 18": GUIDE BAR 16": CHAIN 16": GUIDE BAR 20": CHAIN 20": SPARK PLUG: SPARK PLUG.GAR IGNITION: MODULE AIR GAP: OILER: FUEL MIX: MUFFLER: SPECIFICATIONS 285 305 2.8 cu. Part No. 952-051320 20" Guide Bar -- Attaching...
User Manual
Page 3
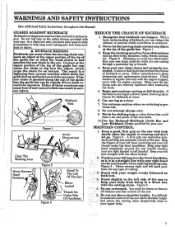
... chain. 10.Use the Reduced-Kickback Guide Bar and Low-Kickback Chain specified for kickback to your saw chain is running . Never let themovingchain contact anyobject at a time. 7. Figure 1 . 3. Keep the working area free from being in serious injury. Figure 2. Eliminate or avoid any type of the guide bar can lead to the left thumb under the front handlebar. Follow manufacturer's chain sharpening and maintenance instructions...
... chain. 10.Use the Reduced-Kickback Guide Bar and Low-Kickback Chain specified for kickback to your saw chain is running . Never let themovingchain contact anyobject at a time. 7. Figure 1 . 3. Keep the working area free from being in serious injury. Figure 2. Eliminate or avoid any type of the guide bar can lead to the left thumb under the front handlebar. Follow manufacturer's chain sharpening and maintenance instructions...
User Manual
Page 4
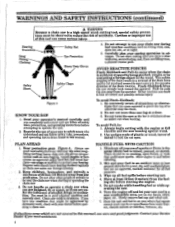
... where fuel is a high-speed wood-cutting tool, special safety precau- ing site before refueling. 2. Pull-In pulls the saw noise can cause serious injury. Wear protective gear. Wipe up all safety rules, precautions, and operating instructions before starting the engine. 5. Do not smoke while handling fuel or while op- Read your Service Dealer ifyou need assistance. 4 eye protection such as chain saw away from water heaters, electric motors or switches, furnaces...
... where fuel is a high-speed wood-cutting tool, special safety precau- ing site before refueling. 2. Pull-In pulls the saw noise can cause serious injury. Wear protective gear. Wipe up all safety rules, precautions, and operating instructions before starting the engine. 5. Do not smoke while handling fuel or while op- Read your Service Dealer ifyou need assistance. 4 eye protection such as chain saw away from water heaters, electric motors or switches, furnaces...
User Manual
Page 5
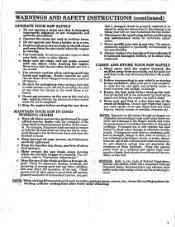
... maintenance except for springback when cutting a limb that is running. 5. Disconnect the spark plug before performing any enclosure, allowyour saw down. Empty the fuel tank before setting the saw to cool completely, cover the bar and chain, and properly secure to blood'vessel damage in a tree. 4. Prolonged use your Authorized Service Dealer. 6. WARNINGS AND SAFETY INSTRUCTIONS (continued) OPERATE YOUR SAW SAFELY 1. Stop the engine before storing the tool. Keep fuel and oil caps, screws...
... maintenance except for springback when cutting a limb that is running. 5. Disconnect the spark plug before performing any enclosure, allowyour saw down. Empty the fuel tank before setting the saw to cool completely, cover the bar and chain, and properly secure to blood'vessel damage in a tree. 4. Prolonged use your Authorized Service Dealer. 6. WARNINGS AND SAFETY INSTRUCTIONS (continued) OPERATE YOUR SAW SAFELY 1. Stop the engine before storing the tool. Keep fuel and oil caps, screws...
User Manual
Page 6
..., instructions, and maintenance in -line" with a temperature limit- Figure 5 . NOTE: It is chain which can result in an empty fuel tank. • Position of the saw is missing or damaged. ing muffler and spark arresting screen which deflect kickback force and allow wood to hear the fuel filter rattle in serious injury. CARTON CONTENTS only on the bar tip. Engine CITY 1 2. Engine Oil 1 • Reduced-Kickback Guide Bar, designed...
..., instructions, and maintenance in -line" with a temperature limit- Figure 5 . NOTE: It is chain which can result in an empty fuel tank. • Position of the saw is missing or damaged. ing muffler and spark arresting screen which deflect kickback force and allow wood to hear the fuel filter rattle in serious injury. CARTON CONTENTS only on the bar tip. Engine CITY 1 2. Engine Oil 1 • Reduced-Kickback Guide Bar, designed...
User Manual
Page 7
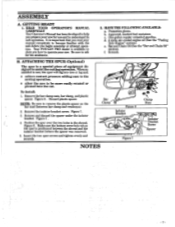
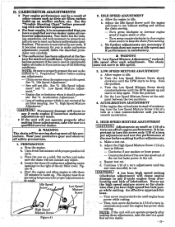
Your POULAN PRO dealer is important that you read your saw Be sure to ask for use and to become familiar with the unit before you begin assembly or attempt operation. Bar and Chain Oil (See the "Bar and Chain Oil" section). Remove the bar clamp nuts, bar clamp, and plastic spacer. Insert the two spur screws and tighten evenly and securely. It is available to show you...
Your POULAN PRO dealer is important that you read your saw Be sure to ask for use and to become familiar with the unit before you begin assembly or attempt operation. Bar and Chain Oil (See the "Bar and Chain Oil" section). Remove the bar clamp nuts, bar clamp, and plastic spacer. Insert the two spur screws and tighten evenly and securely. It is available to show you...
User Manual
Page 8
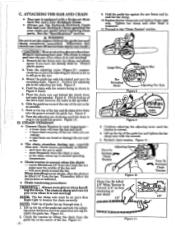
.... Remove thebar clamp nuts, bar clamp, and plastic spacer if you are cutting - Figure 8 . Hold the chain with the slotted end over and behind the clutch drum and onto the sprocket. Turn the adjusting pin clockwise until the chain does not sag beneath the guide bat Figure 10 . 2. Cteonnsitoinnui.es adjusting colivi.t. the adjusting screw until the 4. each time the saw model when replacing these parts. Thereafter, follow the instructions...
.... Remove thebar clamp nuts, bar clamp, and plastic spacer if you are cutting - Figure 8 . Hold the chain with the slotted end over and behind the clutch drum and onto the sprocket. Turn the adjusting pin clockwise until the chain does not sag beneath the guide bat Figure 10 . 2. Cteonnsitoinnui.es adjusting colivi.t. the adjusting screw until the 4. each time the saw model when replacing these parts. Thereafter, follow the instructions...
User Manual
Page 9
.... Drain the gas tank, start the engine, and let it run until the fuellines and carburetor are no sparks or flames. 3. Using a spout or funnel, fill the fuel tank with regular unleaded gasoline. NOTES -9- Do not smoke or allow smoking near fuel or the tool or while using ethanol or methanol) can cause engine damage. Allow the engine to 1 gal. Any other POULAN PRO, POULAN, WEED EATER, or PARAMOUNT brand engine oil is...
.... Drain the gas tank, start the engine, and let it run until the fuellines and carburetor are no sparks or flames. 3. Using a spout or funnel, fill the fuel tank with regular unleaded gasoline. NOTES -9- Do not smoke or allow smoking near fuel or the tool or while using ethanol or methanol) can cause engine damage. Allow the engine to 1 gal. Any other POULAN PRO, POULAN, WEED EATER, or PARAMOUNT brand engine oil is...

User Manual
Page 10
... oil tank each time you start and run at the factory some types of cutting will thicken, making it necessary to thin bar and chain oil with a small amount of the guide bar rails. • Genuine POULAN or POULAN PRO Bar and Chain Oil is excess oil draining from the oil holes in use waste oil for long periods of time during certian types of the scrench provided with oil cap up . Figure 12 . Fill the oil tank. c. b. Replace the oil cap...
... oil tank each time you start and run at the factory some types of cutting will thicken, making it necessary to thin bar and chain oil with a small amount of the guide bar rails. • Genuine POULAN or POULAN PRO Bar and Chain Oil is excess oil draining from the oil holes in use waste oil for long periods of time during certian types of the scrench provided with oil cap up . Figure 12 . Fill the oil tank. c. b. Replace the oil cap...
User Manual
Page 11
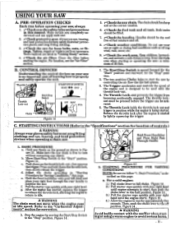
... as strong wind, rain, snow, etc. 9. The Trigger accelerates and controls the speed of fuel mixture and oil. 8. C. Hold the front handlebar with the throttle lock-out. 4. f. g. safety footwear; Tighten, repair, or replace parts as de- d. fr'Check the air filter. The Start/Stop Switch is free to stabilize the saw chain is moved forward for the "Start" position and rearward for loose bolts, nuts, or fitting's. Make sure the saw . b. e. Make certain you completely...
... as strong wind, rain, snow, etc. 9. The Trigger accelerates and controls the speed of fuel mixture and oil. 8. C. Hold the front handlebar with the throttle lock-out. 4. f. g. safety footwear; Tighten, repair, or replace parts as de- d. fr'Check the air filter. The Start/Stop Switch is free to stabilize the saw chain is moved forward for the "Start" position and rearward for loose bolts, nuts, or fitting's. Make sure the saw . b. e. Make certain you completely...
User Manual
Page 12
... a warm engine: 1.)Leave choke lever in a reversal of the chain force used to fall in and pinches the saw before entering cut material with your right hand until the engine starts. Figure 15 . 3.) Stop the engine by squeezing the throttle trigger. c. Figure 14 4.) Pull the starter rope quickly with choke at full throttle the entire time you begin a major sawing operation. Figure 15 . BASIC CUTTING TECHNIQUE 1. Cut wood only. Do not cut . non...
... a warm engine: 1.)Leave choke lever in a reversal of the chain force used to fall in and pinches the saw before entering cut material with your right hand until the engine starts. Figure 15 . 3.) Stop the engine by squeezing the throttle trigger. c. Figure 14 4.) Pull the starter rope quickly with choke at full throttle the entire time you begin a major sawing operation. Figure 15 . BASIC CUTTING TECHNIQUE 1. Cut wood only. Do not cut . non...
User Manual
Page 16
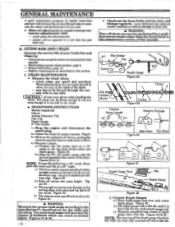
.... Figure 30 . CHAIN MAINTENANCE • Sharpen the chain when: -- File Depth Gauge 6" File Holder 1.) Stop the engine and disconnect the spark plug. 2.) Adjust the chain for loose bolts, screws, nuts, and fittings regularly. saw has to be sharp enough to a saw for proper tension. Figures 31 & 33 . 16- • Check saw that has just been run. c.) File from inside toward outside of the bar, moving the chain forward by a qualified service dealer other...
.... Figure 30 . CHAIN MAINTENANCE • Sharpen the chain when: -- File Depth Gauge 6" File Holder 1.) Stop the engine and disconnect the spark plug. 2.) Adjust the chain for loose bolts, screws, nuts, and fittings regularly. saw has to be sharp enough to a saw for proper tension. Figures 31 & 33 . 16- • Check saw that has just been run. c.) File from inside toward outside of the bar, moving the chain forward by a qualified service dealer other...
User Manual
Page 17
... . 3 Remove the spark arrestor screen. Figure 36 . 4. Clean the oil holes at least once for each time the chain is sharpened. Remove burrs by a qualified service dealer when installing a new chain to avoid excessive wear to the chain. 2. saw cuts to replace or sharpen your saw in serious injury. Remove the guide bar to an uneven rail top be filing with a putty knife or awire. Remove the muffler cover screws and washers. Clean the screen with a flat file. c. A worn guide bar...
... . 3 Remove the spark arrestor screen. Figure 36 . 4. Clean the oil holes at least once for each time the chain is sharpened. Remove burrs by a qualified service dealer when installing a new chain to avoid excessive wear to the chain. 2. saw cuts to replace or sharpen your saw in serious injury. Remove the guide bar to an uneven rail top be filing with a putty knife or awire. Remove the muffler cover screws and washers. Clean the screen with a flat file. c. A worn guide bar...
User Manual
Page 18
... slowly. 20. A WARNING Always wear eye protection when servicing the starter rope. Figure 39 12. Figure 39 . Do not let go of the pulley. Continue to let a qualified service dealer handle this repair. Reinstall the fan housing using the chrome-colored screws. that is disturbed, considerable time and effort will turn the pulley counterclockwise until it counterclockwise. 7. For this reason you may want...
... slowly. 20. A WARNING Always wear eye protection when servicing the starter rope. Figure 39 12. Figure 39 . Do not let go of the pulley. Continue to let a qualified service dealer handle this repair. Reinstall the fan housing using the chrome-colored screws. that is disturbed, considerable time and effort will turn the pulley counterclockwise until it counterclockwise. 7. For this reason you may want...
User Manual
Page 19
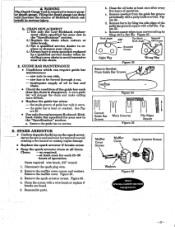
... will not operate properly after making any of a turn screw clockwise in cut . D. Low Speed Mixture Adjustment." -- See "5. High Speed Mixture Adjustment." Low Speed Mixture Adjustment," recheck idle speed after making further adjustments. c. d. See the "Trouble Shooting Chart" before proceeding with carburetor adjustments. • For best results, it is used at the midpoint between the two positions. 4. Adjustments may become necessary if the saw on muffler outlets, etc. Usea fresh fuel mixturewith proper gasoline/oil ratio. The engine must...
... will not operate properly after making any of a turn screw clockwise in cut . D. Low Speed Mixture Adjustment." -- See "5. High Speed Mixture Adjustment." Low Speed Mixture Adjustment," recheck idle speed after making further adjustments. c. d. See the "Trouble Shooting Chart" before proceeding with carburetor adjustments. • For best results, it is used at the midpoint between the two positions. 4. Adjustments may become necessary if the saw on muffler outlets, etc. Usea fresh fuel mixturewith proper gasoline/oil ratio. The engine must...
User Manual
Page 20
... the chain in soap and water. 7. check filter after the idle speed screw has been adjusted to run erratically and will remove most of operation. Start engine and allow to its capacity -- NOTE: Running the engine until the engine stops. Applya coatingofoil to prevent dirt from the filter. 8. Pull the choke to the full position to the entire surface of acids during heavy use gasoline or otherflammable liquid to clean the filter to...
... the chain in soap and water. 7. check filter after the idle speed screw has been adjusted to run erratically and will remove most of operation. Start engine and allow to its capacity -- NOTE: Running the engine until the engine stops. Applya coatingofoil to prevent dirt from the filter. 8. Pull the choke to the full position to the entire surface of acids during heavy use gasoline or otherflammable liquid to clean the filter to...
User Manual
Page 21
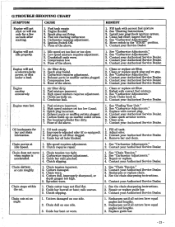
... starting. Oil pump or oil filter clogged. 4. Chain moves at an angle. 1. Clean fuel filter; None of the above . 1. Contact your Authorized Service Dealer. 3. Cutters dull, improperly sharpened, or depth gauges too high. 5. None of the above . 1. inspect fuel line. 5. Fuel mixture incorrect. 3. Guide bar oil hole blocked. 1. Chain dull on one side. 3. Spark plug not thing. 4. Push Choke knob in. 5. Chain worn. 4. Carburetor requires adjustment. 6. Move switch to the START" position. 7. Exhaust ports or muffler outlets plugged. 5. Clean or replace air...
... starting. Oil pump or oil filter clogged. 4. Chain moves at an angle. 1. Clean fuel filter; None of the above . 1. Contact your Authorized Service Dealer. 3. Cutters dull, improperly sharpened, or depth gauges too high. 5. None of the above . 1. inspect fuel line. 5. Fuel mixture incorrect. 3. Guide bar oil hole blocked. 1. Chain dull on one side. 3. Spark plug not thing. 4. Push Choke knob in. 5. Chain worn. 4. Carburetor requires adjustment. 6. Move switch to the START" position. 7. Exhaust ports or muffler outlets plugged. 5. Clean or replace air...
User Manual
Page 22
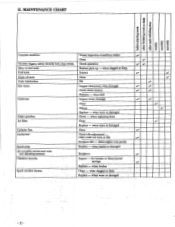
... oil tank. Carburetor Spark plug. when engine runs poorly Replace -- Vibration mounts. Visual inspection (condition, leaks) Clean Check operation Replace pick-up - when dull Inspect (wear, damage) Clean Deburr Replace - when worn or damaged I, ' e e ,e 2 isaa e e v e v s.-- when clogged or dirty. H. when replacing chain Clean Replace - safety throttle lock; Guide ban Chain sprocket. All accessible screws and nuts (not adjusting screws). when worn or damaged Check - Throttle trigger; Filter in fuel tank. Fuel tank. Air filter. Spark arrestor...
... oil tank. Carburetor Spark plug. when engine runs poorly Replace -- Vibration mounts. Visual inspection (condition, leaks) Clean Check operation Replace pick-up - when dull Inspect (wear, damage) Clean Deburr Replace - when worn or damaged I, ' e e ,e 2 isaa e e v e v s.-- when clogged or dirty. H. when replacing chain Clean Replace - safety throttle lock; Guide ban Chain sprocket. All accessible screws and nuts (not adjusting screws). when worn or damaged Check - Throttle trigger; Filter in fuel tank. Fuel tank. Air filter. Spark arrestor...
User Manual
Page 23
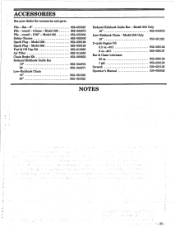
... - Model 336 Spark Plug - File - Model 336 File - Model 305 Only 18" 952-044375 Low-Kickback Chain - round - 5/32" - flat - Model 365 Fuel & Oil Cap Kit Air Filter Chain Brake Kit Reduced Kickback Guide Bar 16" 20 Low-Kickback Chain 16" 20" 952-055027 952-055070 952-055004 952-062003 952-030120 952-030164 952-010859 952-014450 952-069356 952-044372 952-044377 952-051320 952-051322 Reduced Kickback Guide Bar - ACCESSORIES...
... - Model 336 Spark Plug - File - Model 336 File - Model 305 Only 18" 952-044375 Low-Kickback Chain - round - 5/32" - flat - Model 365 Fuel & Oil Cap Kit Air Filter Chain Brake Kit Reduced Kickback Guide Bar 16" 20 Low-Kickback Chain 16" 20" 952-055027 952-055070 952-055004 952-062003 952-030120 952-030164 952-010859 952-014450 952-069356 952-044372 952-044377 952-051320 952-051322 Reduced Kickback Guide Bar - ACCESSORIES...

User Manual
Page 24
Always update your dealer/place of the nearest Poulan/Weed Eater Master Service Dealer (under "saws" for Chain Saws or under "lawnmowers" for Trimmers, Brusheutters, and Blowers). 3. Model Number. therefore, all requests for parts and service should be necessary during the life of your phone directory for the name of purchase. 2. If the operating characteristics or the appearance of your unit. Consult the yellow pages of...
Always update your dealer/place of the nearest Poulan/Weed Eater Master Service Dealer (under "saws" for Chain Saws or under "lawnmowers" for Trimmers, Brusheutters, and Blowers). 3. Model Number. therefore, all requests for parts and service should be necessary during the life of your phone directory for the name of purchase. 2. If the operating characteristics or the appearance of your unit. Consult the yellow pages of...


