User Guide
Page 13
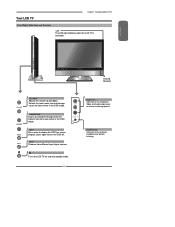
... activated. CHANNEL▲▼ Scans up and down through channels. Selects sub-menu item when in the OSD mode. HEADPHONE Connects to turn the OSD off. Turns the LCD TV on external video equipment. VIDEO L R VIDEO1 IN MENU Press once to display the OSD (on screen display), press again to the external headphone for...
... activated. CHANNEL▲▼ Scans up and down through channels. Selects sub-menu item when in the OSD mode. HEADPHONE Connects to turn the OSD off. Turns the LCD TV on external video equipment. VIDEO L R VIDEO1 IN MENU Press once to display the OSD (on screen display), press again to the external headphone for...
User Guide
Page 15
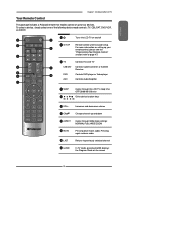
...MUTE Pressing once mutes audio. ENGLISH Your Remote Control Chapter 1 Introducing the LCD TV This package includes a Polaroid remote that enables control of the following device mode controls: TV, CBL/SAT, DVD/VCR, or AUDIO. 2 SET UP 1 3 TV CAB/ SAT DVD AUX SLEEP 4 DVD MENU 5 6 VOL CH ...PAGE 7 8 9 MUTE ASPECT LAST 10 LIVE TV GUIDE PIP MENU 11 OK INFO CC EXIT DVR 1 2 3 ABC DEF 4 5 6 GHI JKL MNO 7 8 9 PQRS TUV WXYZ INPUT . 0 ENTER 1 Turns the LCD TV on and off 2 SET UP Remote control universal code setup. To select ...
...MUTE Pressing once mutes audio. ENGLISH Your Remote Control Chapter 1 Introducing the LCD TV This package includes a Polaroid remote that enables control of the following device mode controls: TV, CBL/SAT, DVD/VCR, or AUDIO. 2 SET UP 1 3 TV CAB/ SAT DVD AUX SLEEP 4 DVD MENU 5 6 VOL CH ...PAGE 7 8 9 MUTE ASPECT LAST 10 LIVE TV GUIDE PIP MENU 11 OK INFO CC EXIT DVR 1 2 3 ABC DEF 4 5 6 GHI JKL MNO 7 8 9 PQRS TUV WXYZ INPUT . 0 ENTER 1 Turns the LCD TV on and off 2 SET UP Remote control universal code setup. To select ...

User Guide
Page 20
... remote to wall outlet. Always disconnect the LCD TV from the main voltage when the LCD TV will not be used for a long period of the TV and connect the power cord to turn on the front panel is designed to the LCD TV's TV CABLE terminal. In the event of TV 4A 250V 5x20mm Fuse BE SURE TO UNPLUG...
... remote to wall outlet. Always disconnect the LCD TV from the main voltage when the LCD TV will not be used for a long period of the TV and connect the power cord to turn on the front panel is designed to the LCD TV's TV CABLE terminal. In the event of TV 4A 250V 5x20mm Fuse BE SURE TO UNPLUG...

User Guide
Page 21
...Channel Scanning will be required to run Channel Scanning for each RF input to select digital channel (for example 9.1) Channel List 5-2 RF5-2 9-1 KQED-HD 9-2 KOED-SD 8 CCT 12 13 15 The digital main channel might include many subchannels (for the current input (antenna or cable). Use the ... then press ▲▼ to display the Input List. ENGLISH Chapter 2 Installing the LCD TV Press the button on the remote to turn on the LCD TV. (Scroll down using the UP/DOWN buttons to see Computer-VGA option) Main TV(CABLE/AIR) VIDEO1 (SIDE) VIDEO2 (REAR) VIDEO3 (S-VIDEO) VIDEO4 (YPbPr1) VIDEO5 ...
...Channel Scanning will be required to run Channel Scanning for each RF input to select digital channel (for example 9.1) Channel List 5-2 RF5-2 9-1 KQED-HD 9-2 KOED-SD 8 CCT 12 13 15 The digital main channel might include many subchannels (for the current input (antenna or cable). Use the ... then press ▲▼ to display the Input List. ENGLISH Chapter 2 Installing the LCD TV Press the button on the remote to turn on the LCD TV. (Scroll down using the UP/DOWN buttons to see Computer-VGA option) Main TV(CABLE/AIR) VIDEO1 (SIDE) VIDEO2 (REAR) VIDEO3 (S-VIDEO) VIDEO4 (YPbPr1) VIDEO5 ...

User Guide
Page 22
... connect the VCR's s-video output jack to the LCD TV's audio inputs. Press the button on the remote to turn on the remote to the LCD TV's VIDEO2 IN jacks. METHOD B: Use an audio cable to connect the VCR's audio output jacks to the LCD TV's S-VIDEO IN input jack. To watch a videotape..., press the INPUT button on the LCD TV. Connect all AC power sources, before turning on the power switch of TV HDMI 2 IN HDMI 1 IN AUDIO L R VGA IN AUDIO L R VIDEO L R ...
... connect the VCR's s-video output jack to the LCD TV's audio inputs. Press the button on the remote to turn on the remote to the LCD TV's VIDEO2 IN jacks. METHOD B: Use an audio cable to connect the VCR's audio output jacks to the LCD TV's S-VIDEO IN input jack. To watch a videotape..., press the INPUT button on the LCD TV. Connect all AC power sources, before turning on the power switch of TV HDMI 2 IN HDMI 1 IN AUDIO L R VGA IN AUDIO L R VIDEO L R ...

User Guide
Page 23
... L COAXIAL L R R YPbPr2 IN AUDIO HDTV/TV Air/CABLE VHF/UHF IN AUDIO Cable or S-VIDEO Cable GAME CONSOLE B AV Cable NOTE: The connections shown for compatibility. 21 Not all AC power sources, before turning on the remote to turn on the LCD TV. Use an S-Video cable to connect the video ...camera's or game console's s-video output jack to the LCD TV's VIDEO2 IN jacks or VIDEO1 IN jacks. Connect all cameras have...
... L COAXIAL L R R YPbPr2 IN AUDIO HDTV/TV Air/CABLE VHF/UHF IN AUDIO Cable or S-VIDEO Cable GAME CONSOLE B AV Cable NOTE: The connections shown for compatibility. 21 Not all AC power sources, before turning on the remote to turn on the LCD TV. Use an S-Video cable to connect the video ...camera's or game console's s-video output jack to the LCD TV's VIDEO2 IN jacks or VIDEO1 IN jacks. Connect all cameras have...

User Guide
Page 25
ENGLISH Chapter 2 Installing the LCD TV Connect all AC power sources, before turning on the power switch of a composite video or S-video cable. 23 For best picture quality, if your equipment has component video output, use a component cable instead of the LCD TV or other connected equipment. To watch a DVD, press the INPUT button on the remote to turn on the remote to select VIDEO2( METHOD A), or VIDEO3 ( METHOD B), or VIDEO4/VIDEO5 (METHOD C). Press the button on the LCD TV.
ENGLISH Chapter 2 Installing the LCD TV Connect all AC power sources, before turning on the power switch of a composite video or S-video cable. 23 For best picture quality, if your equipment has component video output, use a component cable instead of the LCD TV or other connected equipment. To watch a DVD, press the INPUT button on the remote to turn on the remote to select VIDEO2( METHOD A), or VIDEO3 ( METHOD B), or VIDEO4/VIDEO5 (METHOD C). Press the button on the LCD TV.
User Guide
Page 26
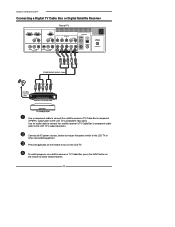
.../AUDIO Cable Pb Pr Use a component cable to connect the satellite receiver's/TV Cable Box's component (YPbPr1) output jacks to turn on the LCD TV. To watch programs via satellite receiver or TV Cable Box, press the INPUT button on the remote to the LCD TV's component input jacks. Use an audio cable to connect the satellite...
.../AUDIO Cable Pb Pr Use a component cable to connect the satellite receiver's/TV Cable Box's component (YPbPr1) output jacks to turn on the LCD TV. To watch programs via satellite receiver or TV Cable Box, press the INPUT button on the remote to the LCD TV's component input jacks. Use an audio cable to connect the satellite...
User Guide
Page 27
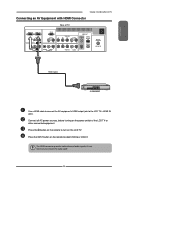
...connected equipment. Press the button on the remote to the LCD TV's HDMI IN jacks. The HDMI connector provides both video and audio signals, it's not necessary to select VIDEO6 or VIDEO7. Connect all AC power sources, before turning on the remote to connect the audio cable. 25 ... AUDIO VIDEO2 IN S-VIDEO L AUDIO R S-VIDEO IN YPbPr1 IN Y Pb Pr AUDIO AUDIO OUT STEREO DIGITAL OPTICAL L R Y Pb Pr L COAXIAL L R R YPbPr2 IN AUDIO HDTV/TV Air/CABLE VHF/UHF IN HDMI Cable AV EQUIPMENT Use a HDMI cable to connect the AV equipment's HDMI output jack to turn on the LCD TV.
...connected equipment. Press the button on the remote to the LCD TV's HDMI IN jacks. The HDMI connector provides both video and audio signals, it's not necessary to select VIDEO6 or VIDEO7. Connect all AC power sources, before turning on the remote to connect the audio cable. 25 ... AUDIO VIDEO2 IN S-VIDEO L AUDIO R S-VIDEO IN YPbPr1 IN Y Pb Pr AUDIO AUDIO OUT STEREO DIGITAL OPTICAL L R Y Pb Pr L COAXIAL L R R YPbPr2 IN AUDIO HDTV/TV Air/CABLE VHF/UHF IN HDMI Cable AV EQUIPMENT Use a HDMI cable to connect the AV equipment's HDMI output jack to turn on the LCD TV.

User Guide
Page 28
...LCD TV. If the LCD TV is connected to AV equipment's DVI connector, you will need an HDMI-to turn on the remote to -DVI cable or an HDMI adapter(not suplied) and an audio cable. 26 Press the INPUT button on the power switch of TV... Pr AUDIO AUDIO OUT STEREO DIGITAL OPTICAL L R Y Pb Pr L COAXIAL L R R YPbPr2 IN AUDIO HDTV/TV Air/CABLE VHF/UHF IN AUDIO Cable HDMI-to-DVI Cable AUD IO L R DVI IN AV EQUIPMENT Use a...to-DVI cable to connect the AV equipment's DVI output jack to the LCD TV's HDMI IN jacks. Use an audio cable to connect the AV equipment's audio output ...
...LCD TV. If the LCD TV is connected to AV equipment's DVI connector, you will need an HDMI-to turn on the remote to -DVI cable or an HDMI adapter(not suplied) and an audio cable. 26 Press the INPUT button on the power switch of TV... Pr AUDIO AUDIO OUT STEREO DIGITAL OPTICAL L R Y Pb Pr L COAXIAL L R R YPbPr2 IN AUDIO HDTV/TV Air/CABLE VHF/UHF IN AUDIO Cable HDMI-to-DVI Cable AUD IO L R DVI IN AV EQUIPMENT Use a...to-DVI cable to connect the AV equipment's DVI output jack to the LCD TV's HDMI IN jacks. Use an audio cable to connect the AV equipment's audio output ...
User Guide
Page 29
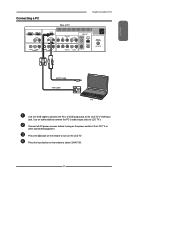
...Pr L COAXIAL L R R YPbPr2 IN AUDIO HDTV/TV Air/CABLE VHF/UHF IN AUDIO Cable VGA Cable PC Use a D-SUB cable to connect the PC's D-SUB output jack to select COMPUTER. 27 Connect all AC power sources, before turning on the remote to the LCD TV's VGA input jack. Press the button on the... remote to LCD TV's. Use an audio cable to connect the PC's audio output jacks to turn on the LCD TV. ENGLISH Connecting a PC Rear of the LCD TV or other connected equipment.
...Pr L COAXIAL L R R YPbPr2 IN AUDIO HDTV/TV Air/CABLE VHF/UHF IN AUDIO Cable VGA Cable PC Use a D-SUB cable to connect the PC's D-SUB output jack to select COMPUTER. 27 Connect all AC power sources, before turning on the remote to the LCD TV's VGA input jack. Press the button on the... remote to LCD TV's. Use an audio cable to connect the PC's audio output jacks to turn on the LCD TV. ENGLISH Connecting a PC Rear of the LCD TV or other connected equipment.
User Guide
Page 30
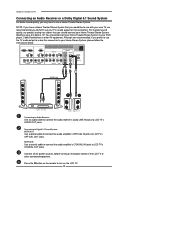
...audio cable to connect the audio receiver's audio LINE IN jacks to LCD TV's OPTICAL OUT jacks. Press the button on the remote to turn on the power switch of the LCD TV or other AV equipment. Chapter 3 Using the LCD TV Connecting an Audio Receiver or a Dolby Digital 5.1 Sound System For better... to connect the audio amplifier's OPTICAL IN jacks to LCD TV's AUDIO OUT jacks. Connect all AC power sources, before turning on the LCD TV. 28 You should connect your Home Theater/Stereo System directly to your new TV, we recommend that you do NOT use a Home Theater/Stereo System...
...audio cable to connect the audio receiver's audio LINE IN jacks to LCD TV's OPTICAL OUT jacks. Press the button on the remote to turn on the power switch of the LCD TV or other AV equipment. Chapter 3 Using the LCD TV Connecting an Audio Receiver or a Dolby Digital 5.1 Sound System For better... to connect the audio amplifier's OPTICAL IN jacks to LCD TV's AUDIO OUT jacks. Connect all AC power sources, before turning on the LCD TV. 28 You should connect your Home Theater/Stereo System directly to your new TV, we recommend that you do NOT use a Home Theater/Stereo System...

User Guide
Page 32
... AUDIO MENU: Allows you to select your picture settings. ▪ If the signal source is TV/VIDEO/S-VIDEO/YPbPr/ HDMI, the VIDEO MENU appears as: ▪ If the signal source is TV, the AUDIO MENU appears as: Bass Treble Balance Sound Effect Speaker Surround On 50 Bass 50...Treble 50 0 Balance 0 Sound Effect Surround MTS Stereo SPDIF Type Dolby Digital Audio Language English Speaker On 30 Chapter 3 Using the LCD TV Operating the Menu Press the button to turn the LCD TV on the screen. Press the MENU button on the remote control,the on-screen menu will appear on .
... AUDIO MENU: Allows you to select your picture settings. ▪ If the signal source is TV/VIDEO/S-VIDEO/YPbPr/ HDMI, the VIDEO MENU appears as: ▪ If the signal source is TV, the AUDIO MENU appears as: Bass Treble Balance Sound Effect Speaker Surround On 50 Bass 50...Treble 50 0 Balance 0 Sound Effect Surround MTS Stereo SPDIF Type Dolby Digital Audio Language English Speaker On 30 Chapter 3 Using the LCD TV Operating the Menu Press the button to turn the LCD TV on the screen. Press the MENU button on the remote control,the on-screen menu will appear on .
User Guide
Page 34
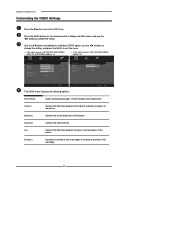
decrease it for soft edges 32 Chapter 3 Using the LCD TV Customizing the VIDEO Settings Press the button to turn the LCD TV on the remote control to display the Main menu, and use the ◄► buttons to change the setting, and press the MENU to exit ...the menu ▪ If the signal source is TV/VIDEO/S-VIDEO/YPbPr/ HDMI, the VIDEO MENU appears as...
decrease it for soft edges 32 Chapter 3 Using the LCD TV Customizing the VIDEO Settings Press the button to turn the LCD TV on the remote control to display the Main menu, and use the ◄► buttons to change the setting, and press the MENU to exit ...the menu ▪ If the signal source is TV/VIDEO/S-VIDEO/YPbPr/ HDMI, the VIDEO MENU appears as...

User Guide
Page 36
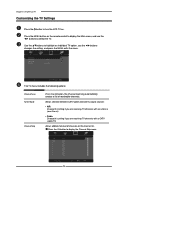
Press the MENU button on . Use the ▲▼buttons to highlight an individual AUDIO option, use the ◄► buttons to turn the LCD TV on the remote control to display the Main menu, and use the ◄► buttons to change the setting, and press the MENU to exit ... the speakers while watching a scene in the original program ▪ Mono: Allows mono output (useful when stereo is noisy or inconsistent) 34 Chapter 3 Using the LCD TV Customizing the AUDIO Settings Press the button to select the AUDIO.
Press the MENU button on . Use the ▲▼buttons to highlight an individual AUDIO option, use the ◄► buttons to turn the LCD TV on the remote control to display the Main menu, and use the ◄► buttons to change the setting, and press the MENU to exit ... the speakers while watching a scene in the original program ▪ Mono: Allows mono output (useful when stereo is noisy or inconsistent) 34 Chapter 3 Using the LCD TV Customizing the AUDIO Settings Press the button to select the AUDIO.
User Guide
Page 37
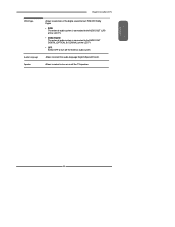
ENGLISH Chapter 3 Using the LCD TV SPDIF Type Audio Language Speaker Allows to selection of the digital sound format: PCM/OFF/Dolby Digital ▪ PCM: The external audio system is connected to the AUDIO OUT (L/R) of the LCD TV ▪ Dolby Digital: The external audio system is connected to the AUDIO OUT DIGITAL (OPTICAL or COAXIAL) ot the LCD TV ▪ OFF: Select OFF to turn on or off the external audio system Allows to turn off the TV speakers. 35 Allows to select to select the audio language:English/Spanish/French.
ENGLISH Chapter 3 Using the LCD TV SPDIF Type Audio Language Speaker Allows to selection of the digital sound format: PCM/OFF/Dolby Digital ▪ PCM: The external audio system is connected to the AUDIO OUT (L/R) of the LCD TV ▪ Dolby Digital: The external audio system is connected to the AUDIO OUT DIGITAL (OPTICAL or COAXIAL) ot the LCD TV ▪ OFF: Select OFF to turn on or off the external audio system Allows to turn off the TV speakers. 35 Allows to select to select the audio language:English/Spanish/French.
User Guide
Page 38
... menu, and use the ◄► buttons to highlight an individual TV option, use the ◄► buttons changes the setting, and press the MENU exits the menu. Press the OK button to turn the LCD TV on. Use the ▲▼buttons to select the TV. Press the MENU button on the channel list.
... menu, and use the ◄► buttons to highlight an individual TV option, use the ◄► buttons changes the setting, and press the MENU exits the menu. Press the OK button to turn the LCD TV on. Use the ▲▼buttons to select the TV. Press the MENU button on the channel list.
User Guide
Page 39
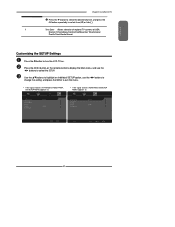
... English Middle OSD Language Time Setup Parental Gamma Reset Default English Middle Setup Select Exit 37 Press the MENU button on . ENGLISH Chapter 3 Using the LCD TV Press the ▼ button to select the desired channel, and press the OK button repeatedly to select show ( ) or hide( ) F Time...of USA: Eastern Time/Indiana/Central time/Mountain Time/Arizona/ Pacific Time/Alaska/Hawaii Customizing the SETUP Settings Press the button to turn the LCD TV on the remote control to display the Main menu, and use the ◄► buttons to change the setting, and press the ...
... English Middle OSD Language Time Setup Parental Gamma Reset Default English Middle Setup Select Exit 37 Press the MENU button on . ENGLISH Chapter 3 Using the LCD TV Press the ▼ button to select the desired channel, and press the OK button repeatedly to select show ( ) or hide( ) F Time...of USA: Eastern Time/Indiana/Central time/Mountain Time/Arizona/ Pacific Time/Alaska/Hawaii Customizing the SETUP Settings Press the button to turn the LCD TV on the remote control to display the Main menu, and use the ◄► buttons to change the setting, and press the ...


