
User Guide
Page 7
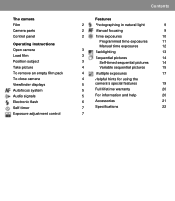
...Film Camera parts Control panel Operating instructions Open camera Load film Position subject Take picture To remove an empty film pack To close camera Viewfinder displays Autofocus system Audio signals Electronic flash Self-timer Exposure adjustment control Contents Features 2 Photographing in natural light 9 2 Manual focusing 9 2 Time exposures 10 Programmed time exposures 11 Manual time exposures 12 3 Backlighting 13 3 Sequential pictures 14 3 Self-timed sequential pictures 14 4 Variable sequential pictures 15 4 Multiple exposures 17 4 Helpful hints for using...
...Film Camera parts Control panel Operating instructions Open camera Load film Position subject Take picture To remove an empty film pack To close camera Viewfinder displays Autofocus system Audio signals Electronic flash Self-timer Exposure adjustment control Contents Features 2 Photographing in natural light 9 2 Manual focusing 9 2 Time exposures 10 Programmed time exposures 11 Manual time exposures 12 3 Backlighting 13 3 Sequential pictures 14 3 Self-timed sequential pictures 14 4 Variable sequential pictures 15 4 Multiple exposures 17 4 Helpful hints for using...
User Guide
Page 8
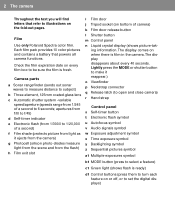
... q Release latch (to open and close camera) r Hand strap Control panel s Self-timer button t Electronic flash symbol u Autofocus symbol v Audio signals symbol w Exposure adjustment symbol x Time exposure symbol y Backlighting symbol z Sequential pictures symbol a1 Multiple exposures symbol b1 MODE button (press to select a feature) c1 Green light (shows flash is ready) d1 Control buttons (press them to turn each feature on the fold-out pages. The camera Film Use only Polaroid Spectra...
... q Release latch (to open and close camera) r Hand strap Control panel s Self-timer button t Electronic flash symbol u Autofocus symbol v Audio signals symbol w Exposure adjustment symbol x Time exposure symbol y Backlighting symbol z Sequential pictures symbol a1 Multiple exposures symbol b1 MODE button (press to select a feature) c1 Green light (shows flash is ready) d1 Control buttons (press them to turn each feature on the fold-out pages. The camera Film Use only Polaroid Spectra...
User Guide
Page 9
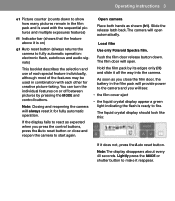
... control buttons, press the Auto reset button or close the film door, the battery in the film pack will provide power to the camera and you close and reopen the camera to fire. As soon as shown (h1). Operating instructions Open camera Place both hands as you will always reset it for creative picture-taking. The camera will open automatically. Push the film door release button down...
... control buttons, press the Auto reset button or close the film door, the battery in the film pack will provide power to the camera and you close and reopen the camera to fire. As soon as shown (h1). Operating instructions Open camera Place both hands as you will always reset it for creative picture-taking. The camera will open automatically. Push the film door release button down...
User Guide
Page 10
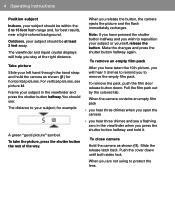
... the shutter button halfway and hold the camera as shown (l1). 4 Operating instructions Position subject Indoors, your subject should see: The distance to your subject; Outdoors, your subject should be within the 2 to 15 foot flash range and, for best results, near a light-colored background. To close camera Hold the camera as shown (j1) for example: A green "good picture" symbol...
... the shutter button halfway and hold the camera as shown (l1). 4 Operating instructions Position subject Indoors, your subject should see: The distance to your subject; Outdoors, your subject should be within the 2 to 15 foot flash range and, for best results, near a light-colored background. To close camera Hold the camera as shown (j1) for example: A green "good picture" symbol...
User Guide
Page 11
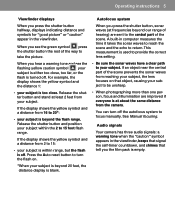
... subject is used to provide the correct lens setting. • Be sure the sonar waves have a clear path to your subject is beyond the flash range. Autofocus system When you press the shutter button, sonar waves (at frequencies beyond our range of the way to 15 foot flash range. See Manual focusing. Audio signals Your camera has three...
... subject is used to provide the correct lens setting. • Be sure the sonar waves have a clear path to your subject is beyond the flash range. Autofocus system When you press the shutter button, sonar waves (at frequencies beyond our range of the way to 15 foot flash range. See Manual focusing. Audio signals Your camera has three...
User Guide
Page 12
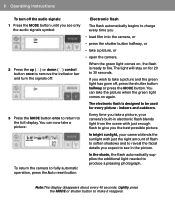
... 30 seconds. Lightly press the MODE or shutter button to produce a pleasing photograph. You can now take a picture and the green light has gone off : 3 Press the MODE button once to return to fully automatic operation, press the Auto reset button. indoors and outdoors. Every time you wish to take a picture: To return the camera to the full display. If you take a picture, or • open the camera. In...
... 30 seconds. Lightly press the MODE or shutter button to produce a pleasing photograph. You can now take a picture and the green light has gone off : 3 Press the MODE button once to return to fully automatic operation, press the Auto reset button. indoors and outdoors. Every time you wish to take a picture: To return the camera to the full display. If you take a picture, or • open the camera. In...
User Guide
Page 13
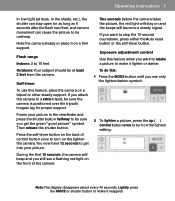
... to stop the 12-second countdown, press either the Auto reset button or the self-timer button. To do this feature when you get into your picture in the shade, etc.), the shutter can stay open for proper support. Flash range Indoors: 2 to a table tripod, be unsharp. You now have 12 seconds to turn on the back of the camera. Exposure adjustment control Use this : 1 Press the MODE button...
... to stop the 12-second countdown, press either the Auto reset button or the self-timer button. To do this feature when you get into your picture in the shade, etc.), the shutter can stay open for proper support. Flash range Indoors: 2 to a table tripod, be unsharp. You now have 12 seconds to turn on the back of the camera. Exposure adjustment control Use this : 1 Press the MODE button...
User Guide
Page 14
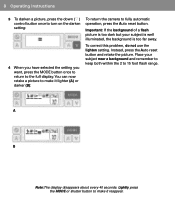
... the Auto reset button and retake the picture. A B Note:The display disappears about every 40 seconds. 8 Operating instructions 3 To darken a picture, press the down (៓) control button once to turn on the darken setting: 4 When you have selected the setting you want, press the MODE button once to return to 15 foot flash range. Lightly press the MODE or shutter button to fully automatic operation, press the Auto reset button...
... the Auto reset button and retake the picture. A B Note:The display disappears about every 40 seconds. 8 Operating instructions 3 To darken a picture, press the down (៓) control button once to turn on the darken setting: 4 When you have selected the setting you want, press the MODE button once to return to 15 foot flash range. Lightly press the MODE or shutter button to fully automatic operation, press the Auto reset button...
User Guide
Page 15
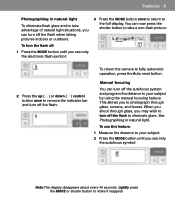
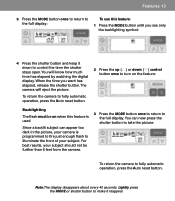
... automatic operation, press the Auto reset button. 2 Press the up (។) or down (៓) control button once to remove the indicator bar and turn off the flash: Manual focusing You can turn off the flash to the full display. Features Photographing in natural light. When you shoot through glass, screens, and fences. Lightly press the MODE or shutter button to your subject by using the manual focusing feature...
... automatic operation, press the Auto reset button. 2 Press the up (។) or down (៓) control button once to remove the indicator bar and turn off the flash: Manual focusing You can turn off the flash to the full display. Features Photographing in natural light. When you shoot through glass, screens, and fences. Lightly press the MODE or shutter button to your subject by using the manual focusing feature...
User Guide
Page 16
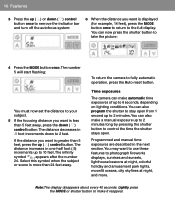
... up to fully automatic operation, press the Auto reset button. Time exposures The camera can also program the shutter to stay open . You can now press the shutter button to take the picture: 4 Press the MODE button once.The number 5 will start flashing: You must now set the distance to your subject. 5 If the focusing distance you want is more . Programmed and manual time exposures are described in fi...
... up to fully automatic operation, press the Auto reset button. Time exposures The camera can also program the shutter to stay open . You can now press the shutter button to take the picture: 4 Press the MODE button once.The number 5 will start flashing: You must now set the distance to your subject. 5 If the focusing distance you want is more . Programmed and manual time exposures are described in fi...
User Guide
Page 18
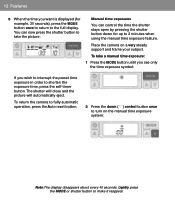
... to 2 minutes when using the manual time exposure feature. To return the camera to fully automatic operation, press the Auto reset button. 2 Press the down for example, 30 seconds), press the MODE button once to return to the full display. You can control the time the shutter stays open by pressing the shutter button down (៓) control button once to turn on a very steady support and frame your subject...
... to 2 minutes when using the manual time exposure feature. To return the camera to fully automatic operation, press the Auto reset button. 2 Press the down for example, 30 seconds), press the MODE button once to return to the full display. You can control the time the shutter stays open by pressing the shutter button down (៓) control button once to turn on a very steady support and frame your subject...
User Guide
Page 19
... camera is used. Note:The display disappears about every 40 seconds. When the time you see only the backlighting symbol: 4 Press the shutter button and keep it reappear. For best results, your subject should not be on when this feature: 1 Press the MODE button until you want has elapsed, release the shutter button. Lightly press the MODE or shutter button to fully automatic operation, press the Auto reset button...
... camera is used. Note:The display disappears about every 40 seconds. When the time you see only the backlighting symbol: 4 Press the shutter button and keep it reappear. For best results, your subject should not be on when this feature: 1 Press the MODE button until you want has elapsed, release the shutter button. Lightly press the MODE or shutter button to fully automatic operation, press the Auto reset button...
User Guide
Page 20
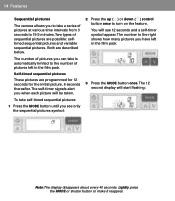
... thereafter. The number of pictures at various time intervals from 3 seconds to make it reappear. To take self-timed sequential pictures: 1 Press the MODE button until you can take a series of pictures you see 12 seconds and a self-timer symbol appear. 14 Features Sequential pictures The camera allows you to take is automatically limited to turn on the feature. Lightly press the MODE or shutter button to 19...
... thereafter. The number of pictures at various time intervals from 3 seconds to make it reappear. To take self-timed sequential pictures: 1 Press the MODE button until you can take a series of pictures you see 12 seconds and a self-timer symbol appear. 14 Features Sequential pictures The camera allows you to take is automatically limited to turn on the feature. Lightly press the MODE or shutter button to 19...
User Guide
Page 21
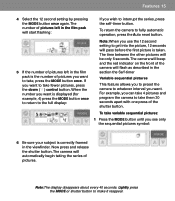
... take fewer pictures, press the down (៓) control button. When the number you want . The time between the other pictures will automatically begin taking the series of the shutter button. Note:The display disappears about every 40 seconds. Lightly press the MODE or shutter button to fully automatic operation, press the Auto reset button. Features 15 4 Select the 12 second setting by pressing the MODE button once again...
... take fewer pictures, press the down (៓) control button. When the number you want . The time between the other pictures will automatically begin taking the series of the shutter button. Note:The display disappears about every 40 seconds. Lightly press the MODE or shutter button to fully automatic operation, press the Auto reset button. Features 15 4 Select the 12 second setting by pressing the MODE button once again...
User Guide
Page 23
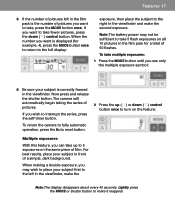
... the MODE button once. Lightly press the MODE or shutter button to interrupt the series, press the self-timer button. To take fewer pictures, press the down (៓) control button once to turn on the same piece of film. Note: The battery power may wish to place your subject is the number of pictures. When the number you want to take multiple exposures: 1 Press the MODE button until you...
... the MODE button once. Lightly press the MODE or shutter button to interrupt the series, press the self-timer button. To take fewer pictures, press the down (៓) control button once to turn on the same piece of film. Note: The battery power may wish to place your subject is the number of pictures. When the number you want to take multiple exposures: 1 Press the MODE button until you...

User Guide
Page 24
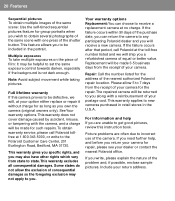
... the first exposure. For repair information, contact a Polaroid Service Center. Lightly press the MODE or shutter button to or immersed in water or other fluids, disassembled, or operated if dropped or damaged. The film stays in their presence. The camera will eject the picture after you take . If you want to make 2 exposures, press the MODE button once more than 2 exposures, press the up...
... the first exposure. For repair information, contact a Polaroid Service Center. Lightly press the MODE or shutter button to or immersed in water or other fluids, disassembled, or operated if dropped or damaged. The film stays in their presence. The camera will eject the picture after you take . If you want to make 2 exposures, press the MODE button once more than 2 exposures, press the up...

User Guide
Page 25
... the camera and film warm. Manual time exposures To photograph fireworks: Use the manual time exposure feature. Lens To remove fingerprints, breathe on the lens and wipe it gently with a programmed time exposure of 1 second. Do not use the manual focusing feature as streaks of light in your picture. The resulting portrait will give correct exposure of the background. Features 19 Guide to better pictures Bright light sources If...
... the camera and film warm. Manual time exposures To photograph fireworks: Use the manual time exposure feature. Lens To remove fingerprints, breathe on the lens and wipe it gently with a programmed time exposure of 1 second. Do not use the manual focusing feature as streaks of light in your picture. The resulting portrait will give correct exposure of the background. Features 19 Guide to better pictures Bright light sources If...
User Guide
Page 26
... with one press of the shutter button. 20 Features Sequential pictures To obtain multiple images of the same scene: Use the self-timed sequential pictures feature for group portraits when you return your camera for repair, please see your dealer or contact the nearest Polaroid office. For information and help , and before you wish to the Polaroid Customer Care Center, 201...
... with one press of the shutter button. 20 Features Sequential pictures To obtain multiple images of the same scene: Use the self-timed sequential pictures feature for group portraits when you return your camera for repair, please see your dealer or contact the nearest Polaroid office. For information and help , and before you wish to the Polaroid Customer Care Center, 201...
User Guide
Page 27
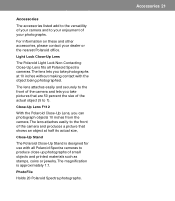
..., coins or jewelry. Light Lock Close-Up Lens The Polaroid Light Lock Non-Contacting Close-Up Lens fits all Polaroid Spectra cameras.The lens lets you take pictures that shows an object at 10 inches without making contact with all Polaroid Spectra cameras to your enjoyment of your dealer or the nearest Polaroid office. For information on these and other accessories, please contact your photographs...
..., coins or jewelry. Light Lock Close-Up Lens The Polaroid Light Lock Non-Contacting Close-Up Lens fits all Polaroid Spectra cameras.The lens lets you take pictures that shows an object at 10 inches without making contact with all Polaroid Spectra cameras to your enjoyment of your dealer or the nearest Polaroid office. For information on these and other accessories, please contact your photographs...
User Guide
Page 28
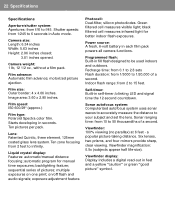
...: Apertures: from 1/245 to 6 seconds in Auto mode. Shutter speeds: from f/l0 to 15 feet. motorized picture ejection. Power source: A fresh, 6-volt battery in feet and a yellow "caution" or green "good picture" symbol. Recharge time: from 0.1 to 2.8 sets Flash duration: from 2 to f/45. exposure adjustment feature. Liquid crystal display: Features: automatic/manual distance focusing; Viewfinder: 100% viewing (no parallax) at 6 feet - black filtered cell measures infrared light for manual time exposures; Film size...
...: Apertures: from 1/245 to 6 seconds in Auto mode. Shutter speeds: from f/l0 to 15 feet. motorized picture ejection. Power source: A fresh, 6-volt battery in feet and a yellow "caution" or green "good picture" symbol. Recharge time: from 0.1 to 2.8 sets Flash duration: from 2 to f/45. exposure adjustment feature. Liquid crystal display: Features: automatic/manual distance focusing; Viewfinder: 100% viewing (no parallax) at 6 feet - black filtered cell measures infrared light for manual time exposures; Film size...


