User Guide
Page 2
... keep it nearby for future reference. To reduce the risk of fire or electric shock, do not expose this equipment from the type of power source indicated on the 3-prong plug is intended to alert the user to overturn. ▪ Do not disable the 3-wire grounding type plug. The grounding...
... keep it nearby for future reference. To reduce the risk of fire or electric shock, do not expose this equipment from the type of power source indicated on the 3-prong plug is intended to alert the user to overturn. ▪ Do not disable the 3-wire grounding type plug. The grounding...

User Guide
Page 3
... near water. ▪ Never expose the equipment to rain or moisture, does not operate normally, or has been dropped. ▪ Always remove the power cord from the apparatus. ▪ Do not place the equipment on uneven or unstable carts, stands, tables, shelves etc. Never place the equipment :...exit from the outlet before cleaning the equipment. ▪ Never use attachments/accessories specified by the manufacturer. 3 Do not handle the AC power cord with care. The equipment may result to dangerous voltage or other hazards and may void your equipment. Leave an open space around the...
... near water. ▪ Never expose the equipment to rain or moisture, does not operate normally, or has been dropped. ▪ Always remove the power cord from the apparatus. ▪ Do not place the equipment on uneven or unstable carts, stands, tables, shelves etc. Never place the equipment :...exit from the outlet before cleaning the equipment. ▪ Never use attachments/accessories specified by the manufacturer. 3 Do not handle the AC power cord with care. The equipment may result to dangerous voltage or other hazards and may void your equipment. Leave an open space around the...
User Guide
Page 4
... to an antenna discharge unit, size of grounding conductors, location of antenna discharge unit, connection to prevent contact with power lines. Direct contact with power lines may be fatal and should be avoided at all costs. Warnings and Precautions Outdoor Antenna Safety Instructions If an outdoor...▪ An outdoor antenna should not be located in any area where it could come in contact with overhead power lines, or any other electric light or power circuits. ▪ When installing an outdoor antenna system, extreme caution should be taken to grounding electrodes, and requirements...
... to an antenna discharge unit, size of grounding conductors, location of antenna discharge unit, connection to prevent contact with power lines. Direct contact with power lines may be fatal and should be avoided at all costs. Warnings and Precautions Outdoor Antenna Safety Instructions If an outdoor...▪ An outdoor antenna should not be located in any area where it could come in contact with overhead power lines, or any other electric light or power circuits. ▪ When installing an outdoor antenna system, extreme caution should be taken to grounding electrodes, and requirements...
User Guide
Page 7
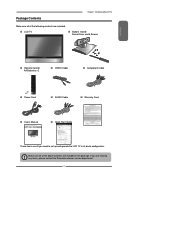
Make sure all of the above contents are all of the following contents are missing any items, please contact the Polaroid customer service department. 7 LCD TV Bottom Stand / Screw Driver and 6 Screws ENGLISH Remote Control/ AA Batteries x 2 VIDEO Cable Component Cable Power Cord AUDIO Cable Warranty Card User's Manual Quick Start Guide These items are included in its basic configuration. If you need to set up and operate the LCD TV in the package. Package Contents Chapter 1 Introducing the LCD TV Make sure all you are included.
Make sure all of the above contents are all of the following contents are missing any items, please contact the Polaroid customer service department. 7 LCD TV Bottom Stand / Screw Driver and 6 Screws ENGLISH Remote Control/ AA Batteries x 2 VIDEO Cable Component Cable Power Cord AUDIO Cable Warranty Card User's Manual Quick Start Guide These items are included in its basic configuration. If you need to set up and operate the LCD TV in the package. Package Contents Chapter 1 Introducing the LCD TV Make sure all you are included.
User Guide
Page 9
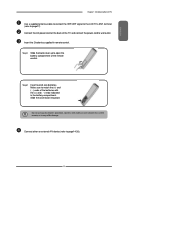
... at the back of the TV and connect the power cord to open the battery compartment of the batteries with the (+) and ( - ) ends indicated in remote control. Step2 Insert two AA size batteries. Slide the ... outlet. Connect other an external A/V device (refer to match the (+) and ( - ) ends of the remote control. Make sure to page14-26). 9 terminal (refer to the LCD TV's ANT. ENGLISH Chapter 1 Introducing the LCD TV Use a supplied antenna cable to connect the VHF/UHF signal to page17).
... at the back of the TV and connect the power cord to open the battery compartment of the batteries with the (+) and ( - ) ends indicated in remote control. Step2 Insert two AA size batteries. Slide the ... outlet. Connect other an external A/V device (refer to match the (+) and ( - ) ends of the remote control. Make sure to page14-26). 9 terminal (refer to the LCD TV's ANT. ENGLISH Chapter 1 Introducing the LCD TV Use a supplied antenna cable to connect the VHF/UHF signal to page17).

User Guide
Page 11
...OUT-DIGITAL-OPTICAL/COAXIAL Connects to the composite VIDEO and AUDIO(L/R) output jacks on external video equipment. Rear View and Jacks Chapter 1 Introducing the LCD TV ENGLISH VIDEO2 IN Connects to the OPTICAL AUDIO jack on the digital/standard 5.1 audio system. AUDIO OUT-STEREO Connects to receive high/standard de... IN AUD IO OUT YPbPr1 IN Y Pb Pr AUD IO STEREO DIGITAL OPTICAL TV CABLE HDTV AIR L R L Y Pb Pr AUD IO COAXIAL L R R YPbPr2 IN VHF/UHF IN YPbPr1 IN/YPbPr2 IN Connects to the AC power cord. 11 VGA IN Connects the PC, or other AV equipment with HDMI ...
...OUT-DIGITAL-OPTICAL/COAXIAL Connects to the composite VIDEO and AUDIO(L/R) output jacks on external video equipment. Rear View and Jacks Chapter 1 Introducing the LCD TV ENGLISH VIDEO2 IN Connects to the OPTICAL AUDIO jack on the digital/standard 5.1 audio system. AUDIO OUT-STEREO Connects to receive high/standard de... IN AUD IO OUT YPbPr1 IN Y Pb Pr AUD IO STEREO DIGITAL OPTICAL TV CABLE HDTV AIR L R L Y Pb Pr AUD IO COAXIAL L R R YPbPr2 IN VHF/UHF IN YPbPr1 IN/YPbPr2 IN Connects to the AC power cord. 11 VGA IN Connects the PC, or other AV equipment with HDMI ...
User Guide
Page 14
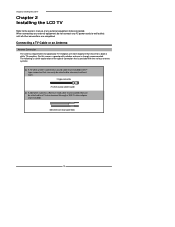
... equipment, do not connect any external equipment to wall outlets until all other connections are more important than those for a black & white TV reception. F-type connector 75-ohm coaxial cable (round) ■ A 300-ohm system is a flat twin-lead cable (not included) that...of any AC power cords to be connected. Connecting a TV Cable or an Antenna Antenna Connection The antenna requirements for good color TV reception are completed. For this reason, a good quality outdoor antenna is strongly recommended. Chapter 2 Installing the LCD TV Chapter 2 Installing the LCD TV Refer to the ...
... equipment, do not connect any external equipment to wall outlets until all other connections are more important than those for a black & white TV reception. F-type connector 75-ohm coaxial cable (round) ■ A 300-ohm system is a flat twin-lead cable (not included) that...of any AC power cords to be connected. Connecting a TV Cable or an Antenna Antenna Connection The antenna requirements for good color TV reception are completed. For this reason, a good quality outdoor antenna is strongly recommended. Chapter 2 Installing the LCD TV Chapter 2 Installing the LCD TV Refer to the ...
User Guide
Page 17
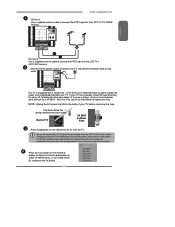
... remote to turn on the remote to replace the fuse. TV CABLE HDTV AIR VHF/UHF IN This TV is blown, visit your TV. To completely disconnect the main voltage, please remove the power plug from the main voltage when the LCD TV will not be used for a 4A 250V - 5x20mm Time...(YPbPr2) VIDEO6 (HDMI) COMPUTER (VGA) 17 Firm Plastic Prying Tool D (Using a metal tool may cause shock) Back of the TV and connect the power cord to the LCD TV's HDTV AIR terminal. TV CABLE HDTV AIR VHF/UHF IN ENGLISH B A METHOD B: Use a supplied antenna cable to connect the ATSC signal to wall outlet.
... remote to turn on the remote to replace the fuse. TV CABLE HDTV AIR VHF/UHF IN This TV is blown, visit your TV. To completely disconnect the main voltage, please remove the power plug from the main voltage when the LCD TV will not be used for a 4A 250V - 5x20mm Time...(YPbPr2) VIDEO6 (HDMI) COMPUTER (VGA) 17 Firm Plastic Prying Tool D (Using a metal tool may cause shock) Back of the TV and connect the power cord to the LCD TV's HDTV AIR terminal. TV CABLE HDTV AIR VHF/UHF IN ENGLISH B A METHOD B: Use a supplied antenna cable to connect the ATSC signal to wall outlet.
User Guide
Page 18
..., before turning on the remote to select VIDEO2( METHOD A), or VIDEO3 (METHOD B). 18 To watch a videotape, press the Input button on the power switch of TV HDMI IN AUD IO L R VGA IN AUD IO L R VIDEO L R AUD IO VIDEO2 IN L R S-VIDEO AUD IO S-VIDEO IN AUD IO OUT YPbPr1 IN Y... AUDIO Cable S-VIDEO Cable A B METHOD A: Use a composite cable to connect the VCR's composite video/audio jacks to the LCD TV's S-VIDEO IN input jack. Press the button on the remote to the LCD TV's audio inputs. METHOD B: Use an audio cable to connect the VCR's audio output jacks to turn on the...
..., before turning on the remote to select VIDEO2( METHOD A), or VIDEO3 (METHOD B). 18 To watch a videotape, press the Input button on the power switch of TV HDMI IN AUD IO L R VGA IN AUD IO L R VIDEO L R AUD IO VIDEO2 IN L R S-VIDEO AUD IO S-VIDEO IN AUD IO OUT YPbPr1 IN Y... AUDIO Cable S-VIDEO Cable A B METHOD A: Use a composite cable to connect the VCR's composite video/audio jacks to the LCD TV's S-VIDEO IN input jack. Press the button on the remote to the LCD TV's audio inputs. METHOD B: Use an audio cable to connect the VCR's audio output jacks to turn on the...
User Guide
Page 19
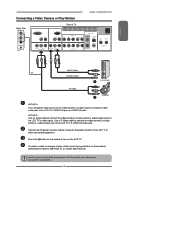
... the button on the remote to turn on the remote to select VIDEO2/VIDEO1( METHOD A), or VIDEO3 (METHOD B). Not all AC power sources, before turning on the power switch of TV HDMI IN AUD IO L R VGA IN AUD IO L R VIDEO L R AUD IO VIDEO2 IN L R S-VIDEO AUD IO S-VIDEO IN AUD ...Use a S-Video cable to connect the video camera's or play station's composite video/ audio jacks to the LCD TV's VIDEO2 IN jacks or VIDEO1 IN jacks. METHOD B: Use an audio cable to the LCD TV's audio inputs. To watch a video vis camera or play station's audio output jacks to connect the video ...
... the button on the remote to turn on the remote to select VIDEO2/VIDEO1( METHOD A), or VIDEO3 (METHOD B). Not all AC power sources, before turning on the power switch of TV HDMI IN AUD IO L R VGA IN AUD IO L R VIDEO L R AUD IO VIDEO2 IN L R S-VIDEO AUD IO S-VIDEO IN AUD ...Use a S-Video cable to connect the video camera's or play station's composite video/ audio jacks to the LCD TV's VIDEO2 IN jacks or VIDEO1 IN jacks. METHOD B: Use an audio cable to the LCD TV's audio inputs. To watch a video vis camera or play station's audio output jacks to connect the video ...
User Guide
Page 21
For best picture quality, if your equipment has component video output, use a component cable instead of the LCD TV or other connected equipment. To watch a DVD, press the Input button on the LCD TV. Press the button on the remote to turn on the remote to select VIDEO2( METHOD A), or VIDEO3 ( METHOD B), or VIDEO4/VIDEO5 (METHOD C). ENGLISH Chapter 2 Installing the LCD TV Connect all AC power sources, before turning on the power switch of a composite video or S-video cable. 21
For best picture quality, if your equipment has component video output, use a component cable instead of the LCD TV or other connected equipment. To watch a DVD, press the Input button on the LCD TV. Press the button on the remote to turn on the remote to select VIDEO2( METHOD A), or VIDEO3 ( METHOD B), or VIDEO4/VIDEO5 (METHOD C). ENGLISH Chapter 2 Installing the LCD TV Connect all AC power sources, before turning on the power switch of a composite video or S-video cable. 21
User Guide
Page 22
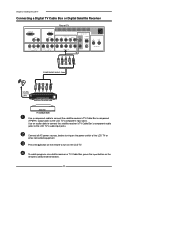
To watch programs via satellite receiver or TV Cable Box, press the Input button on the remote to turn on the LCD TV. Chapter 2 Installing the LCD TV Connecting a Digital TV Cable Box or Digital Satellite Receiver Rear of the LCD TV or other connected equipment. Connect all AC power sources, before turning on the remote to select VIDEO4/VIDEO5...
To watch programs via satellite receiver or TV Cable Box, press the Input button on the remote to turn on the LCD TV. Chapter 2 Installing the LCD TV Connecting a Digital TV Cable Box or Digital Satellite Receiver Rear of the LCD TV or other connected equipment. Connect all AC power sources, before turning on the remote to select VIDEO4/VIDEO5...
User Guide
Page 23
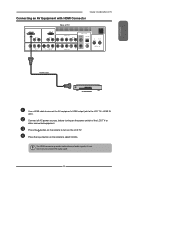
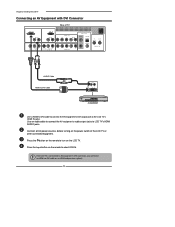
... on the remote to connect the audio cable. 23 ENGLISH Chapter 2 Installing the LCD TV Connecting an AV Equipment with HDMI Connector Rear of the LCD TV or other connected equipment. Connect all AC power sources, before turning on the power switch of TV HDMI IN AUD IO L R VGA IN AUD IO L R VIDEO L R AUD IO VIDEO2 IN...
... on the remote to connect the audio cable. 23 ENGLISH Chapter 2 Installing the LCD TV Connecting an AV Equipment with HDMI Connector Rear of the LCD TV or other connected equipment. Connect all AC power sources, before turning on the power switch of TV HDMI IN AUD IO L R VGA IN AUD IO L R VIDEO L R AUD IO VIDEO2 IN...
User Guide
Page 24
...before turning on the LCD TV. Press the button on the remote to turn on the power switch of TV HDMI IN AUD IO L R VGA IN AUD IO L R VIDEO L R AUD IO VIDEO2 IN L R S-VIDEO AUD IO S-VIDEO IN AUD IO OUT YPbPr1 IN Y Pb Pr AUD IO STEREO DIGITAL OPTICAL TV CABLE HDTV AIR L ... Use a HDMI-to-DVI cable to connect the AV equipment's DVI output jack to LCD TV's HDMI AUDIO jacks. Chapter 2 Installing the LCD TV Connecting an AV Equipment with DVI Connector Rear of the LCD TV or other connected equipment. Use an audio cable to connect the AV equipment's audio output...
...before turning on the LCD TV. Press the button on the remote to turn on the power switch of TV HDMI IN AUD IO L R VGA IN AUD IO L R VIDEO L R AUD IO VIDEO2 IN L R S-VIDEO AUD IO S-VIDEO IN AUD IO OUT YPbPr1 IN Y Pb Pr AUD IO STEREO DIGITAL OPTICAL TV CABLE HDTV AIR L ... Use a HDMI-to-DVI cable to connect the AV equipment's DVI output jack to LCD TV's HDMI AUDIO jacks. Chapter 2 Installing the LCD TV Connecting an AV Equipment with DVI Connector Rear of the LCD TV or other connected equipment. Use an audio cable to connect the AV equipment's audio output...
User Guide
Page 25
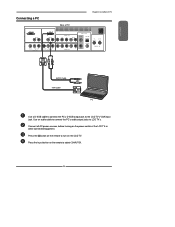
... to connect the PC's audio output jacks to turn on the remote to LCD TV's. Connect all AC power sources, before turning on the remote to the LCD TV's VGA input jack. Press the Input button on the power switch of TV Chapter 3 Using the LCD TV HDMI IN AUD IO L R VGA IN AUD IO L R VIDEO L R AUD IO VIDEO2...
... to connect the PC's audio output jacks to turn on the remote to LCD TV's. Connect all AC power sources, before turning on the remote to the LCD TV's VGA input jack. Press the Input button on the power switch of TV Chapter 3 Using the LCD TV HDMI IN AUD IO L R VGA IN AUD IO L R VIDEO L R AUD IO VIDEO2...

User Guide
Page 26
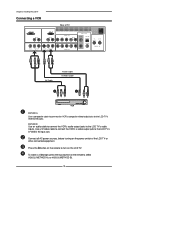
METHOD B: Use a coaxial cable to connect the audio amplifier's COAXIAL IN jacks to turn on the LCD TV. 26 Press the button on the power switch of the LCD TV or other connected equipment. Note: Above mentioned function is only available under HDTV (cable/air) mode. Connecting to ...5.1 Sound System: METHOD A: Use an optical cable to connect the audio amplifier's OPTICAL IN jacks to LCD TV's AUDIO OUT jacks. Connect all AC power sources, before turning on the remote to LCD TV's COAXIAL OUT jacks. HDMI IN AUD IO L R VGA IN AUD IO L R VIDEO L R AUD IO ...
METHOD B: Use a coaxial cable to connect the audio amplifier's COAXIAL IN jacks to turn on the LCD TV. 26 Press the button on the power switch of the LCD TV or other connected equipment. Note: Above mentioned function is only available under HDTV (cable/air) mode. Connecting to ...5.1 Sound System: METHOD A: Use an optical cable to connect the audio amplifier's OPTICAL IN jacks to LCD TV's AUDIO OUT jacks. Connect all AC power sources, before turning on the remote to LCD TV's COAXIAL OUT jacks. HDMI IN AUD IO L R VGA IN AUD IO L R VIDEO L R AUD IO ...

User Guide
Page 37
ENGLISH Customizing the SETUP Settings Chapter 3 Using the LCD TV Press the button to select the SETUP. Press the MENU button on the remote control... specific channel. NOTE: The timer can only be set up clock and to program the TV to turn the LCD TV on and off or the unit's power cord is removed, ▪ Time: you would use 15:00:00. Military time uses a ...p.m., you should use 03:00:00, but if you will need to your language of a 12-hour scale. If the power goes off and tune to display all on /off . ▪ Channel: Selects to exit the menu. For example, if...
ENGLISH Customizing the SETUP Settings Chapter 3 Using the LCD TV Press the button to select the SETUP. Press the MENU button on the remote control... specific channel. NOTE: The timer can only be set up clock and to program the TV to turn the LCD TV on and off or the unit's power cord is removed, ▪ Time: you would use 15:00:00. Military time uses a ...p.m., you should use 03:00:00, but if you will need to your language of a 12-hour scale. If the power goes off and tune to display all on /off . ▪ Channel: Selects to exit the menu. For example, if...
User Guide
Page 44
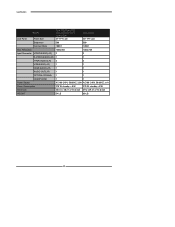
Specifications MODEL FLM-3732/FLM-373B/ FLM-3734B/FLX-374/ FLM-3732M FLM-4034B LCD Panel Panel Size 37'' TFT LCD 40" TFT LCD Brightness 500 500 Contrast Ratio 1000:1 1200:1 Max. Resolution 1366x768 1366x768 Input Connector VIDEO/AUDIO(L/R) 2 2 S-VIDEO/AUDIO(L/R) 1 1 YPbPr/AUDIO(L/R) 2 2 VGA/AUDIO(L/R) 1 1 HDMI/AUDIO(L/R) 1 1 AUDIO OUT(L/R) 1 1 OPTICAL/COAXIAL 1 1 HEADPHONE 1 1 Power Source AC100~240V, 50/60HZ, 3.0A AC100...
Specifications MODEL FLM-3732/FLM-373B/ FLM-3734B/FLX-374/ FLM-3732M FLM-4034B LCD Panel Panel Size 37'' TFT LCD 40" TFT LCD Brightness 500 500 Contrast Ratio 1000:1 1200:1 Max. Resolution 1366x768 1366x768 Input Connector VIDEO/AUDIO(L/R) 2 2 S-VIDEO/AUDIO(L/R) 1 1 YPbPr/AUDIO(L/R) 2 2 VGA/AUDIO(L/R) 1 1 HDMI/AUDIO(L/R) 1 1 AUDIO OUT(L/R) 1 1 OPTICAL/COAXIAL 1 1 HEADPHONE 1 1 Power Source AC100~240V, 50/60HZ, 3.0A AC100...

User Guide
Page 45
... twice. 4. After installing batteries, you find one easy-to 4 and try the previous code. 6. A Quick Look at the device and press Power. Turn on the right side of this guide for your code: 1. Enter the first five-digit code for future reference. Enter 9-9-1, then...TV/VCR/DVD Combo, portable DVD player, or mobile DVD player, use , compact unit. Repeat steps 1-5 for your Code If your device does not respond to 5. 7. If the code is entered. Press and hold SET until you can program the remote to step 7. 5. Aim the remote at the device and press Power...
... twice. 4. After installing batteries, you find one easy-to 4 and try the previous code. 6. A Quick Look at the device and press Power. Turn on the right side of this guide for your code: 1. Enter the first five-digit code for future reference. Enter 9-9-1, then...TV/VCR/DVD Combo, portable DVD player, or mobile DVD player, use , compact unit. Repeat steps 1-5 for your Code If your device does not respond to 5. 7. If the code is entered. Press and hold SET until you can program the remote to step 7. 5. Aim the remote at the device and press Power...


