
Service Manual
Page 12
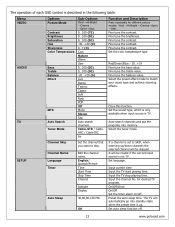
...match your music type and achieve stunning effects. Input the channel No. On/Off/Once On/Off Set the timer alarm on/off . 12 www.polaroid.com Fine tune the contrast. for different picture modes: Vivid →Hi-Bright →Cinema→Sport →User. English/ Spanish/French Time ...Start Time Stop Time Channel Activate Display 30,60,90,120 Min Off If a channel is not TV. Set auto sleep function off . Fine tune the brightness. Set the sound type, which is only available when input source is described in the following table: Menu VIDEO AUDIO...
...match your music type and achieve stunning effects. Input the channel No. On/Off/Once On/Off Set the timer alarm on/off . 12 www.polaroid.com Fine tune the contrast. for different picture modes: Vivid →Hi-Bright →Cinema→Sport →User. English/ Spanish/French Time ...Start Time Stop Time Channel Activate Display 30,60,90,120 Min Off If a channel is not TV. Set auto sleep function off . Fine tune the brightness. Set the sound type, which is only available when input source is described in the following table: Menu VIDEO AUDIO...

Service Manual
Page 46
Blue 4. Not Connected 14. SCL 46 www.polaroid.com Red 2. Self Test Pin Assignment Pin Assignment 6. Sync. Blue Ground 13. Horizontal Sync. 9. Ground 15. Red Ground 11. Ground 7. Ground 5. Signal Connector Pin Assignment Pin Assignment 1. Green 3. SDA 8. Vertical Sync. 10. Green Gro und 12. Power Source Sound Output AC100 - 240 V, 60/50 Hz 10W X2, 8 Ohm.
Blue 4. Not Connected 14. SCL 46 www.polaroid.com Red 2. Self Test Pin Assignment Pin Assignment 6. Sync. Blue Ground 13. Horizontal Sync. 9. Ground 15. Red Ground 11. Ground 7. Ground 5. Signal Connector Pin Assignment Pin Assignment 1. Green 3. SDA 8. Vertical Sync. 10. Green Gro und 12. Power Source Sound Output AC100 - 240 V, 60/50 Hz 10W X2, 8 Ohm.
User Guide
Page 6
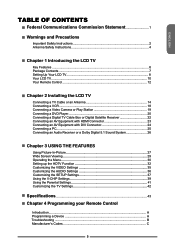
...Precautions Important Safety Instructions 2 Antenna Safety Instructions 4 Chapter 1 Introducing the LCD TV Key Features...6 Package Contents...7 Setting Up Your LCD TV 8 Your LCD TV...10 Your Remote Control 12 Chapter 2 Installing the LCD TV Connecting a TV Cable or an Antenna 14 Connecting a VCR...18 Connecting a Video Camera... a Digital TV Cable Box or Digital Satellite Receiver 22 Connecting an AV Equipment with HDMI Connector 23 Connecting an AV Equipment with DVI Connector 24 Connecting a PC...25 Connecting an Audio Receiver or a Dolby Digital 5.1 Sound System 26 Chapter 3 ...
...Precautions Important Safety Instructions 2 Antenna Safety Instructions 4 Chapter 1 Introducing the LCD TV Key Features...6 Package Contents...7 Setting Up Your LCD TV 8 Your LCD TV...10 Your Remote Control 12 Chapter 2 Installing the LCD TV Connecting a TV Cable or an Antenna 14 Connecting a VCR...18 Connecting a Video Camera... a Digital TV Cable Box or Digital Satellite Receiver 22 Connecting an AV Equipment with HDMI Connector 23 Connecting an AV Equipment with DVI Connector 24 Connecting a PC...25 Connecting an Audio Receiver or a Dolby Digital 5.1 Sound System 26 Chapter 3 ...
User Guide
Page 27
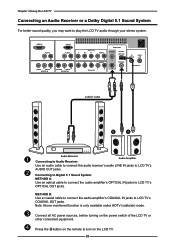
... OUT jacks. Connect all AC power sources, before turning on the LCD TV. 26 Press the button on the remote to play the LCD TV audio through your stereo system. Chapter 3 Using the LCD TV Connecting an Audio Receiver or a Dolby Digital 5.1 Sound System For better sound quality, you may want to turn on the power switch of the...
... OUT jacks. Connect all AC power sources, before turning on the LCD TV. 26 Press the button on the remote to play the LCD TV audio through your stereo system. Chapter 3 Using the LCD TV Connecting an Audio Receiver or a Dolby Digital 5.1 Sound System For better sound quality, you may want to turn on the power switch of the...
User Guide
Page 31
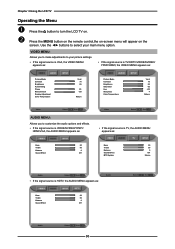
... HDMI/VGA, the AUDIO MENU appears as: Video Select Exit ▪ If the signal source is TV, the AUDIO MENU appears as: Bass 50 Treble 50 Balance 0 Sound Effect Off Bass 50 Treble 50 Balance 0 Sound Effect Off MTS System Stereo Audio Select Exit ▪ If the signal source is.../HDMI, the VIDEO MENU appears as : Audio Bass 50 Treble 50 Balance 0 Sound Effect Off Select Exit Audio Select Exit 30 Chapter 3 Using the LCD TV Operating the Menu Press the button to turn the LCD TV on. Press the MENU button on the remote control,the on-screen menu...
... HDMI/VGA, the AUDIO MENU appears as: Video Select Exit ▪ If the signal source is TV, the AUDIO MENU appears as: Bass 50 Treble 50 Balance 0 Sound Effect Off Bass 50 Treble 50 Balance 0 Sound Effect Off MTS System Stereo Audio Select Exit ▪ If the signal source is.../HDMI, the VIDEO MENU appears as : Audio Bass 50 Treble 50 Balance 0 Sound Effect Off Select Exit Audio Select Exit 30 Chapter 3 Using the LCD TV Operating the Menu Press the button to turn the LCD TV on. Press the MENU button on the remote control,the on-screen menu...
User Guide
Page 34
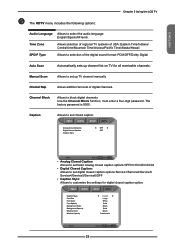
...Type Allows to selection of digital channels. Channel Skip Allows addition/removal of the digital sound format: PCM/OFF/Dolby Digital Auto Scan Automatically sets up TV channel manually. Caption Allows to set closed caption: Analog Closed Caption Digital Closed Caption Caption... the audio language: English/Spanish/French. ENGLISH The HDTV menu includes the following options: Chapter 3 Using the LCD TV Audio Language Allows to block digital channels. Manual Scan Allows to set digital closed caption options:Service1/Service2/Service3/ Service4/Service5...
...Type Allows to selection of digital channels. Channel Skip Allows addition/removal of the digital sound format: PCM/OFF/Dolby Digital Auto Scan Automatically sets up TV channel manually. Caption Allows to set closed caption: Analog Closed Caption Digital Closed Caption Caption... the audio language: English/Spanish/French. ENGLISH The HDTV menu includes the following options: Chapter 3 Using the LCD TV Audio Language Allows to block digital channels. Manual Scan Allows to set digital closed caption options:Service1/Service2/Service3/ Service4/Service5...
User Guide
Page 37
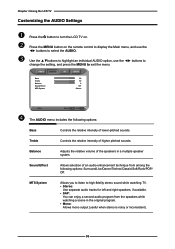
Press the MENU button on . Sound Effect Allows selection of the speakers in the original program. ▪ Mono: Allows mono output (useful when stereo is noisy or inconsistent). 36 Chapter 3 Using the LCD TV Customizing the AUDIO Settings Press the button to select... the ◄► buttons to turn the LCD TV on the remote control to display the Main menu, and use the ◄► buttons to change the setting, and press the MENU to high-fidelity stereo sound while watching TV. ▪ Stereo: Use separate audio tracks ...
Press the MENU button on . Sound Effect Allows selection of the speakers in the original program. ▪ Mono: Allows mono output (useful when stereo is noisy or inconsistent). 36 Chapter 3 Using the LCD TV Customizing the AUDIO Settings Press the button to select... the ◄► buttons to turn the LCD TV on the remote control to display the Main menu, and use the ◄► buttons to change the setting, and press the MENU to high-fidelity stereo sound while watching TV. ▪ Stereo: Use separate audio tracks ...
User Guide
Page 39
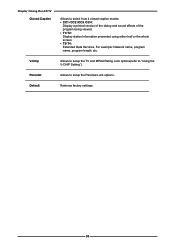
... printed version of the dialog and sound effects of the program being viewed. ▪ T1/T2: Display station information presented using either half or the whole screen. ▪ T3/T4: Extended Data Services. Chapter 3 Using the LCD TV Closed Caption Allows to setup the ...Parental Lock options. Default Restores factory settings. 38 V-Chip Allows to setup the TV and MPAA Rating Lock options(refer to "Using the V-CHIP Setting")....
... printed version of the dialog and sound effects of the program being viewed. ▪ T1/T2: Display station information presented using either half or the whole screen. ▪ T3/T4: Extended Data Services. Chapter 3 Using the LCD TV Closed Caption Allows to setup the ...Parental Lock options. Default Restores factory settings. 38 V-Chip Allows to setup the TV and MPAA Rating Lock options(refer to "Using the V-CHIP Setting")....


