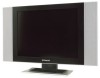
Operation Manual
Page 3
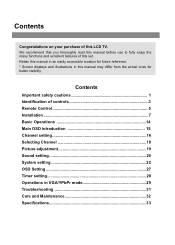
... this LCD TV. Retain this manual may differ from the actual ones for future reference. * Screen displays and illustrations in VGA/YPbPr mode 29 Troubleshooting 31 Care and Maintenance 32 Specifications 33 Contents Important safety cautions 1 Identification of controls 3 Remote Control 5 Installation 7 Basic Operations 14 Main OSD introduction 15 Channel setting 16 Selecting Channel 18 Picture adjustment 19 Sound setting 20 System setting 22 OSD Setting 27 Timer setting 28 Operations in this manual in an easily accessible location...
... this LCD TV. Retain this manual may differ from the actual ones for future reference. * Screen displays and illustrations in VGA/YPbPr mode 29 Troubleshooting 31 Care and Maintenance 32 Specifications 33 Contents Important safety cautions 1 Identification of controls 3 Remote Control 5 Installation 7 Basic Operations 14 Main OSD introduction 15 Channel setting 16 Selecting Channel 18 Picture adjustment 19 Sound setting 20 System setting 22 OSD Setting 27 Timer setting 28 Operations in this manual in an easily accessible location...
Operation Manual
Page 5
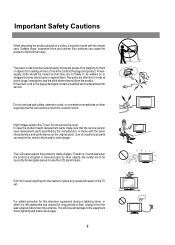
... the service person uses replacement parts specified by other danger. Do not overload wall outlets, extension cords, or convenience receptacles on or snagged by items placed upon by the manufacturer, or those with the utmost care. High Voltage exists in this TV set . In case the product needs replacement parts, make sure that they exit from the wall outlet and disconnect the antenna...
... the service person uses replacement parts specified by other danger. Do not overload wall outlets, extension cords, or convenience receptacles on or snagged by items placed upon by the manufacturer, or those with the utmost care. High Voltage exists in this TV set . In case the product needs replacement parts, make sure that they exit from the wall outlet and disconnect the antenna...
Operation Manual
Page 8
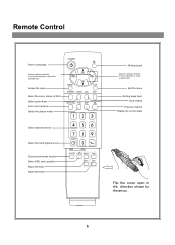
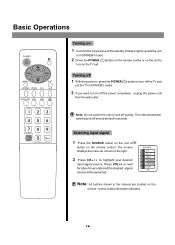
Exit the menu Setting sleep timer Clock setting Previous channel Display the current state Flip the cover open in the direction shown by the arrow. 5 In the menu operation, adjust the selected item Access the menu Select the mono, stereo or SAP Select zoom mode Auto correct picture Switch the picture mode Direct channel selector Select the input signal source Sound preset mode selector Select OSD menu position Adjust the bass Adjust the treble Muting sound Channel up /down selector. In menu operations, used to select item. Remote Control Power on/standby Volume up /down selector.
Exit the menu Setting sleep timer Clock setting Previous channel Display the current state Flip the cover open in the direction shown by the arrow. 5 In the menu operation, adjust the selected item Access the menu Select the mono, stereo or SAP Select zoom mode Auto correct picture Switch the picture mode Direct channel selector Select the input signal source Sound preset mode selector Select OSD menu position Adjust the bass Adjust the treble Muting sound Channel up /down selector. In menu operations, used to select item. Remote Control Power on/standby Volume up /down selector.
Operation Manual
Page 11
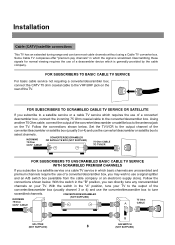
... SATELLITE BOX (NOT SUPPLIED) 75 Ohm CABLE TO TV/VCR FOR SUBSCRIBERS TO UNSCRAMBLED BASIC CABLE TV SERVICE WITH SCRAMBLED PREMIUM CHANNELS If you may wish to use a signal splitter and an A/B switch box (available from the cable company or an electronic supply store). FOR SUBSCRIBERS TO SCRAMBLED CABLE TV SERVICE OR SATELLITE If you can tune most cable channels without using a Cable TV converter box. Follow the connections shown below . Set the TV/VCR to the output channel of...
... SATELLITE BOX (NOT SUPPLIED) 75 Ohm CABLE TO TV/VCR FOR SUBSCRIBERS TO UNSCRAMBLED BASIC CABLE TV SERVICE WITH SCRAMBLED PREMIUM CHANNELS If you may wish to use a signal splitter and an A/B switch box (available from the cable company or an electronic supply store). FOR SUBSCRIBERS TO SCRAMBLED CABLE TV SERVICE OR SATELLITE If you can tune most cable channels without using a Cable TV converter box. Follow the connections shown below . Set the TV/VCR to the output channel of...

Operation Manual
Page 12
Note: Be sure to the wall outlet as illustrated. Connecting the male plug to fully insert plug into the socket and confirm it is secure. 1. Connecting the AC adapter to the DC power input of the product. Installation(continued) Power connection Household power outlet Power cord Adapter To power input (DC 12V) DC 12V Connect to the DC input socket of the back of the set. 3. Connecting the female plug to the AC socket on AC adapter. 2.
Note: Be sure to the wall outlet as illustrated. Connecting the male plug to fully insert plug into the socket and confirm it is secure. 1. Connecting the AC adapter to the DC power input of the product. Installation(continued) Power connection Household power outlet Power cord Adapter To power input (DC 12V) DC 12V Connect to the DC input socket of the back of the set. 3. Connecting the female plug to the AC socket on AC adapter. 2.
Operation Manual
Page 13
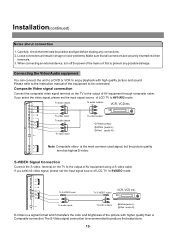
... external device, turn off the power of the main unit first to SVIDEO mode. Please refer to the instruction manual of LCD TV to produce the best picture. 10 If you select S-video signal, please set the input signal source of the equipment to enjoy playback with higher quality than a Composite connection.The S-Video signal connection is not as high as S-video. To audio inputs R w Y To audio outputs R w Y VCR, VCD etc. w White(audio L) R Red (audio R) S-Video is a signal format which transfers the color...
... external device, turn off the power of the main unit first to SVIDEO mode. Please refer to the instruction manual of LCD TV to produce the best picture. 10 If you select S-video signal, please set the input signal source of the equipment to enjoy playback with higher quality than a Composite connection.The S-Video signal connection is not as high as S-video. To audio inputs R w Y To audio outputs R w Y VCR, VCD etc. w White(audio L) R Red (audio R) S-Video is a signal format which transfers the color...
Operation Manual
Page 14
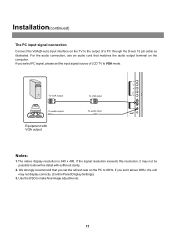
... cable as illustrated. To VGA output IIIIIIIIIIIII IIIIIIIIIIIII To audio output Equipment with sufficient clarity. 2. If you set it may not display correctly. (Control Panel/Display Settings) 3. Installation(continued) The PC input signal connection Connect the VGA(D-sub) input interface on the PC to 60Hz. We strongly recommend that matches the audio output terminal on the computer. For the audio connection, use an audio cord that you set the refresh rate on the TV to the output of LCD TV...
... cable as illustrated. To VGA output IIIIIIIIIIIII IIIIIIIIIIIII To audio output Equipment with sufficient clarity. 2. If you set it may not display correctly. (Control Panel/Display Settings) 3. Installation(continued) The PC input signal connection Connect the VGA(D-sub) input interface on the PC to 60Hz. We strongly recommend that matches the audio output terminal on the computer. For the audio connection, use an audio cord that you set the refresh rate on the TV to the output of LCD TV...
Operation Manual
Page 15
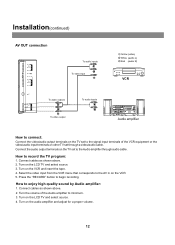
... Turn the volume of the Audio amplifier to the signal input terminals of the VCR equipment or the video/audio input terminals on other TV set through audio cable. Installation(continued) AV OUT connection To audio inputs R W To video input Y Y Yellow (video) w White (audio L) R Red (audio R) VCR To audio outputs R W Y To video output To audio inputs R W Audio amplifier How to connect: Connect the video/audio output terminals on the TV set to minimum. 3. Turn on the LCD TV and select source. 3. How to begin recording. Press the "RECORD" button to record the TV program: 1. Turn...
... Turn the volume of the Audio amplifier to the signal input terminals of the VCR equipment or the video/audio input terminals on other TV set through audio cable. Installation(continued) AV OUT connection To audio inputs R W To video input Y Y Yellow (video) w White (audio L) R Red (audio R) VCR To audio outputs R W Y To video output To audio inputs R W Audio amplifier How to connect: Connect the video/audio output terminals on the TV set to minimum. 3. Turn on the LCD TV and select source. 3. How to begin recording. Press the "RECORD" button to record the TV program: 1. Turn...
Operation Manual
Page 16
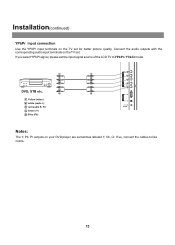
w w Y Yellow (video) W white (audio L) R red (audio R, Pr) G Green (Y) B Blue (Pb) Notes: The Y, Pb, Pr outputs on the TV set. Connect the audio outputs with the corresponding audio input terminals on your DVD player are sometimes labeled Y, Cb, Cr. If so, connect the cables to YPbPr / YCbCr mode. Installation(continued) YPbPr input connection Use the YPbPr input terminals on the TV set the input signal source of the LCD TV to like colors. 13 G G B B R R R R DVD, STB etc. If you select YPbPr signal, please set for better picture quality.
w w Y Yellow (video) W white (audio L) R red (audio R, Pr) G Green (Y) B Blue (Pb) Notes: The Y, Pb, Pr outputs on the TV set. Connect the audio outputs with the corresponding audio input terminals on your DVD player are sometimes labeled Y, Cb, Cr. If so, connect the cables to YPbPr / YCbCr mode. Installation(continued) YPbPr input connection Use the YPbPr input terminals on the TV set the input signal source of the LCD TV to like colors. 13 G G B B R R R R DVD, STB etc. If you select YPbPr signal, please set for better picture quality.
Operation Manual
Page 17
... the POWER ( ) button to turn on the TV set. Basic Operations Turning on 1 Connect the AC power and the standby indicator lights up and the unit is in STANDBY mode. 2 Press the POWER ( )button on the remote control or on the unit to turn off the TV and put the TV in the manual are located on the remote control unless otherwise indicated. 14 Note: Do not switch the unit on /off quickly...
... the POWER ( ) button to turn on the TV set. Basic Operations Turning on 1 Connect the AC power and the standby indicator lights up and the unit is in STANDBY mode. 2 Press the POWER ( )button on the remote control or on the unit to turn off the TV and put the TV in the manual are located on the remote control unless otherwise indicated. 14 Note: Do not switch the unit on /off quickly...
Operation Manual
Page 18
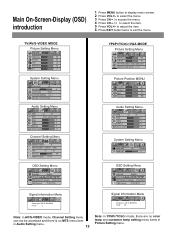
...+/- TV/AV/S-VIDEO MODE Picture Setting Menu brightness 50 contrast 50 color 18 sharpness 32 tint 0 System Setting Menu blue screen on bass treble balance phone volume off 0 0 0 50 System Setting Menu sleep time Back light 20 minutes 6 OSD Setting Menu language English OSD position OSD background opaque translucent OSD timeout 30 seconds Signal Information Menu video type: 650 X 462/60Hz mode: 3 Signal Information Menu resolution: 640 X 480/60Hz mode: 40 Note: in AV/S-VIDEO mode, Channel Setting menu can not be accessed and...
...+/- TV/AV/S-VIDEO MODE Picture Setting Menu brightness 50 contrast 50 color 18 sharpness 32 tint 0 System Setting Menu blue screen on bass treble balance phone volume off 0 0 0 50 System Setting Menu sleep time Back light 20 minutes 6 OSD Setting Menu language English OSD position OSD background opaque translucent OSD timeout 30 seconds Signal Information Menu video type: 650 X 462/60Hz mode: 3 Signal Information Menu resolution: 640 X 480/60Hz mode: 40 Note: in AV/S-VIDEO mode, Channel Setting menu can not be accessed and...
Operation Manual
Page 19
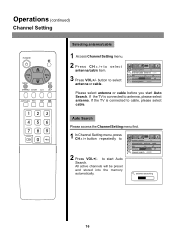
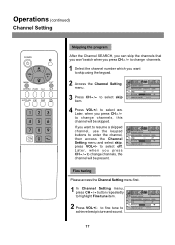
Operations (continued) Channel Setting Selecting antenna/cable 1 Access Channel Setting menu. 2 Press CH5/6to select antenna/cable item. 3 Press VOL+/- If the TV is connected to 2 Press VOL+/- to cable, please select cable. All active channels will be preset and stored into the memory automatically. Auto Search Please access the Channel Setting menu first. 1 In Channel Setting menu, press CH5/6button repeatedly to antenna, please select antenna. If the TV is connected to start Auto Search. channel number 9 antenna/cable antenna cable skip on off fine tune ...
Operations (continued) Channel Setting Selecting antenna/cable 1 Access Channel Setting menu. 2 Press CH5/6to select antenna/cable item. 3 Press VOL+/- If the TV is connected to 2 Press VOL+/- to cable, please select cable. All active channels will be preset and stored into the memory automatically. Auto Search Please access the Channel Setting menu first. 1 In Channel Setting menu, press CH5/6button repeatedly to antenna, please select antenna. If the TV is connected to start Auto Search. channel number 9 antenna/cable antenna cable skip on off fine tune ...
Operation Manual
Page 20
... select on off . to achieve best picture and sound. channel number 9 antenna/cable antenna cable skip on . to fine tune to select off fine tune 48 channel search 17 If you want to skip using the keypad. 2 Access the Channel Setting channel number 9 CLK menu. Later, when you press CH5/6to change channels, the channel will be present. antenna/cable antenna cable skip on off fine tune 48 3 Press CH5/6 to select skip channel search item. 4 Press VOL+/- channel number 9 antenna/cable antenna cable...
... select on off . to achieve best picture and sound. channel number 9 antenna/cable antenna cable skip on . to fine tune to select off fine tune 48 channel search 17 If you want to skip using the keypad. 2 Access the Channel Setting channel number 9 CLK menu. Later, when you press CH5/6to change channels, the channel will be present. antenna/cable antenna cable skip on off fine tune 48 3 Press CH5/6 to select skip channel search item. 4 Press VOL+/- channel number 9 antenna/cable antenna cable...
Operation Manual
Page 26
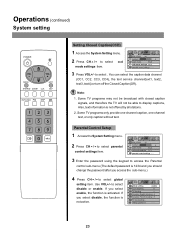
... active. Operations (continued) System setting Setting Closed Caption(CCD) 1 Access the System Setting menu. 2 Press CH5/6 to select . to select ccd mode settings item. Use VOL+/- CLK Note: 1. blue screen on backlight 6 zoom mode fill all ccd mode settings CC 1 parental control settings - - - - 3 Enter the password using the keypad to access the Parental control sub-menu.(The default password is not offered by all stations. 2. If you access the sub-menu.) 4 Press CH5/6to select global setting item. Parental Control Setup 1 Access the System Setting menu. 2 Press...
... active. Operations (continued) System setting Setting Closed Caption(CCD) 1 Access the System Setting menu. 2 Press CH5/6 to select . to select ccd mode settings item. Use VOL+/- CLK Note: 1. blue screen on backlight 6 zoom mode fill all ccd mode settings CC 1 parental control settings - - - - 3 Enter the password using the keypad to access the Parental control sub-menu.(The default password is not offered by all stations. 2. If you access the sub-menu.) 4 Press CH5/6to select global setting item. Parental Control Setup 1 Access the System Setting menu. 2 Press...
Operation Manual
Page 29
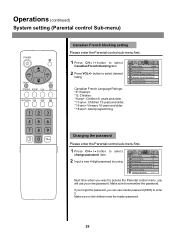
... programming. Operations (continued) System setting (Parental control Sub-menu) Canadian French blocking setting Please enter the Parental control sub-menu first. 1 Press CH5/6button to enter it. Make sure not let children know the master password. 26 change password item. 2 Input a new 4-digit password by using global setting movie blocking enable G TV blocking Y Canadian English blocking E Canadian French blocking E TV block setting... If you forget the password, you will use master password (9093) to select Canadian...
... programming. Operations (continued) System setting (Parental control Sub-menu) Canadian French blocking setting Please enter the Parental control sub-menu first. 1 Press CH5/6button to enter it. Make sure not let children know the master password. 26 change password item. 2 Input a new 4-digit password by using global setting movie blocking enable G TV blocking Y Canadian English blocking E Canadian French blocking E TV block setting... If you forget the password, you will use master password (9093) to select Canadian...
Operation Manual
Page 31
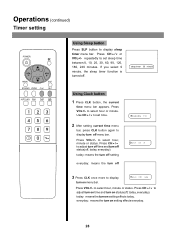
... CH5/6 or VOL+/- Press VOL+/- to select hour, minute or status. turn on menu bar. everyday: means the turn off . to select hour, minute or status. repeatedly to set time. 2 After setting current time menu bar, press CLK button again to adjust turn on time and turn on setting effects today. Operations (continued) Timer setting 耋晤憮 CLK Using Sleep button Press SLP button to select hour or minute. Press VOL+/- to display sleep timer menu bar.
... CH5/6 or VOL+/- Press VOL+/- to select hour, minute or status. turn on menu bar. everyday: means the turn off . to select hour, minute or status. repeatedly to set time. 2 After setting current time menu bar, press CLK button again to adjust turn on time and turn on setting effects today. Operations (continued) Timer setting 耋晤憮 CLK Using Sleep button Press SLP button to select hour or minute. Press VOL+/- to display sleep timer menu bar.
Operation Manual
Page 32
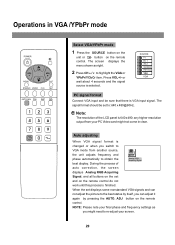
... LCD panel is changed or when you switch to VGA mode from your final phase and frequency settings as right. 2 Press CH5/6 to the best status by itself, you might not come in VGA /YPbPr mode Select VGA/YPbPr mode 1 Press the SOURCE button on the SOURCE unit or button on the remote TV control. CLK PC signal format Connect VGA input and be set displays some nonstandard VGA signals and can adjust it again by pressing the AUTO...
... LCD panel is changed or when you switch to VGA mode from your final phase and frequency settings as right. 2 Press CH5/6 to the best status by itself, you might not come in VGA /YPbPr mode Select VGA/YPbPr mode 1 Press the SOURCE button on the SOURCE unit or button on the remote TV control. CLK PC signal format Connect VGA input and be set displays some nonstandard VGA signals and can adjust it again by pressing the AUTO...
Operation Manual
Page 33
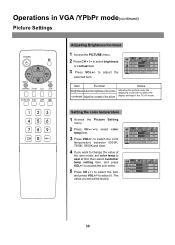
to adjust it. Setting the color temperature 1 Access the Picture Setting menu. 2 Press CH5/6to select color temp item. 3 Press VOL+/- Operations in the TV, AV mode. to adjust the selected item. brightness 50 contrast 50 color temp 5000K 7300K 9300K user customer temp setting Item Function Notes CLK brightness Adjust the brightness of the picture. to switch the color temperature between 5000K, 7300K, 9300K and User. 4 If you set color temp to user at first...
to adjust it. Setting the color temperature 1 Access the Picture Setting menu. 2 Press CH5/6to select color temp item. 3 Press VOL+/- Operations in the TV, AV mode. to adjust the selected item. brightness 50 contrast 50 color temp 5000K 7300K 9300K user customer temp setting Item Function Notes CLK brightness Adjust the brightness of the picture. to switch the color temperature between 5000K, 7300K, 9300K and User. 4 If you set color temp to user at first...
Operation Manual
Page 34
... rear of the speakers !Adjust Sound Balance. No picture !Check antenna connections at the same time. Some TEXT modes could block the screen. !Select a correct input. !Is a non-compatible signal being input? Snowy picture and noise !Check the antenna connection. Unstable or not synchronized VGA picture !Check if you have selected the correct VGA mode in again and turn on . Control buttons do not work. =Unplug the power cord, wait for possible remedies to remote control !Check whether the batteries are connected. Troubleshooting...
... rear of the speakers !Adjust Sound Balance. No picture !Check antenna connections at the same time. Some TEXT modes could block the screen. !Select a correct input. !Is a non-compatible signal being input? Snowy picture and noise !Check the antenna connection. Unstable or not synchronized VGA picture !Check if you have selected the correct VGA mode in again and turn on . Control buttons do not work. =Unplug the power cord, wait for possible remedies to remote control !Check whether the batteries are connected. Troubleshooting...
Operation Manual
Page 35
... Maintenance LCD Display panel information Note: The marking or retained image on the LCD panel resulting from the LCD. • Never use alcohol, paint thinner or benzine to a minimum viewing level. This product is not designed to display fixed image patterns for extended periods of Video Games, Computers, Captions or Other Fixed Image Displays. Cleaning and Maintenance To clean this unit. • Before using a chemically treated cloth, read the instructions...
... Maintenance LCD Display panel information Note: The marking or retained image on the LCD panel resulting from the LCD. • Never use alcohol, paint thinner or benzine to a minimum viewing level. This product is not designed to display fixed image patterns for extended periods of Video Games, Computers, Captions or Other Fixed Image Displays. Cleaning and Maintenance To clean this unit. • Before using a chemically treated cloth, read the instructions...


