
Service Manual
Page 20
These defective cells can be controlled. 4. Polaroid Display Cell Defect Specification In some cases, a panel may have defective cells that cannot be categorized into two types; (1) Non-lighting or dark cell defect: ... which the cell is always on The Polaroid Display Cell Defect Specifications below define the allowed limits for display cell defects and are used as the criteria in determining whether an LCD panel is replaced. 7 or more defective pixels across the entire LCD screen Polaroid will repair (replace LCD panel) or replace the TV. 20 www.polaroid.com
These defective cells can be controlled. 4. Polaroid Display Cell Defect Specification In some cases, a panel may have defective cells that cannot be categorized into two types; (1) Non-lighting or dark cell defect: ... which the cell is always on The Polaroid Display Cell Defect Specifications below define the allowed limits for display cell defects and are used as the criteria in determining whether an LCD panel is replaced. 7 or more defective pixels across the entire LCD screen Polaroid will repair (replace LCD panel) or replace the TV. 20 www.polaroid.com
Service Manual
Page 23
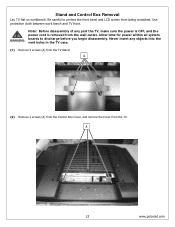
...within all system boards to protect the front bezel and LCD screen from the TV. Be careful to discharge before you begin disassembly. Use protective cloth between work bench and TV front. Note: Before disassembly of any objects into the vent holes in the TV case. (1) Remove 4 screws (A) from the wall outlet... 3 screws (A) from the Control Box Cover, and remove the Cover from being scratched. Stand and Control Box Removal Lay TV flat on workbench. Never insert any part the TV, make sure the power is OFF, and the power cord is removed from the TV Stand. A 23 www.polaroid.com
...within all system boards to protect the front bezel and LCD screen from the TV. Be careful to discharge before you begin disassembly. Use protective cloth between work bench and TV front. Note: Before disassembly of any objects into the vent holes in the TV case. (1) Remove 4 screws (A) from the wall outlet... 3 screws (A) from the Control Box Cover, and remove the Cover from being scratched. Stand and Control Box Removal Lay TV flat on workbench. Never insert any part the TV, make sure the power is OFF, and the power cord is removed from the TV Stand. A 23 www.polaroid.com
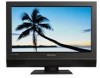
User Guide
Page 7
...and Precautions Important Safety Instructions 2 Antenna Safety Instructions 4 Chapter 1 Introducing the LCD TV Key Features ...6 Package Contents ...7 Setting Your LCD TV...8 Your LCD TV...11 Your Remote Control 13 Chapter 2 Installing the LCD TV Connecting a TV Cable or an Antenna 15 Connecting a VCR ...20 Connecting a Video Camera... 5.1 Sound System 28 Chapter 3 USING THE FEATURES Wide Screen Viewing...29 Operating the Menu...30 Customizing the VIDEO Settings...32 Customizing the AUDIO Settings...34 Customizing the TV Settings...36 Customizing the SETUP Settings ...38 Using the Program...
...and Precautions Important Safety Instructions 2 Antenna Safety Instructions 4 Chapter 1 Introducing the LCD TV Key Features ...6 Package Contents ...7 Setting Your LCD TV...8 Your LCD TV...11 Your Remote Control 13 Chapter 2 Installing the LCD TV Connecting a TV Cable or an Antenna 15 Connecting a VCR ...20 Connecting a Video Camera... 5.1 Sound System 28 Chapter 3 USING THE FEATURES Wide Screen Viewing...29 Operating the Menu...30 Customizing the VIDEO Settings...32 Customizing the AUDIO Settings...34 Customizing the TV Settings...36 Customizing the SETUP Settings ...38 Using the Program...
User Guide
Page 13
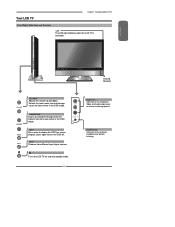
Selects sub-menu item when in the OSD mode. VIDEO1 IN Connects to turn the OSD off. Turns the LCD TV on external video equipment. CHANNEL▲▼ Scans up and down through channels. HEADPHONE Connects to the external headphone for items when in the ...to display the OSD (on screen display), press again to the composite Video and Audio output jacks on and into standby mode. 11 INPUT Chooses from different input signal sources. Selects the main-menu item and change values for private listening. Your LCD TV Chapter 1 Introducing the LCD TV Front/Right Side View and ...
Selects sub-menu item when in the OSD mode. VIDEO1 IN Connects to turn the OSD off. Turns the LCD TV on external video equipment. CHANNEL▲▼ Scans up and down through channels. HEADPHONE Connects to the external headphone for items when in the ...to display the OSD (on screen display), press again to the composite Video and Audio output jacks on and into standby mode. 11 INPUT Chooses from different input signal sources. Selects the main-menu item and change values for private listening. Your LCD TV Chapter 1 Introducing the LCD TV Front/Right Side View and ...
User Guide
Page 15
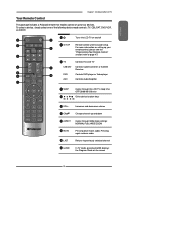
...device function keys 6 VOL+- ENGLISH Your Remote Control Chapter 1 Introducing the LCD TV This package includes a Polaroid remote that enables control of the following device mode controls: TV, CBL/SAT, DVD/VCR, or AUDIO. 2 SET UP 1 3 TV CAB/ SAT DVD AUX SLEEP 4 DVD MENU 5 6 VOL CH ...PAGE 7 8 9 MUTE ASPECT LAST 10 LIVE TV GUIDE PIP MENU 11 OK INFO CC EXIT DVR 1 2 3 ABC DEF 4 5 6 GHI JKL MNO 7 8 9 PQRS TUV WXYZ INPUT . 0 ENTER 1 Turns the LCD TV on the screen 13 For ...
...device function keys 6 VOL+- ENGLISH Your Remote Control Chapter 1 Introducing the LCD TV This package includes a Polaroid remote that enables control of the following device mode controls: TV, CBL/SAT, DVD/VCR, or AUDIO. 2 SET UP 1 3 TV CAB/ SAT DVD AUX SLEEP 4 DVD MENU 5 6 VOL CH ...PAGE 7 8 9 MUTE ASPECT LAST 10 LIVE TV GUIDE PIP MENU 11 OK INFO CC EXIT DVR 1 2 3 ABC DEF 4 5 6 GHI JKL MNO 7 8 9 PQRS TUV WXYZ INPUT . 0 ENTER 1 Turns the LCD TV on the screen 13 For ...
User Guide
Page 16
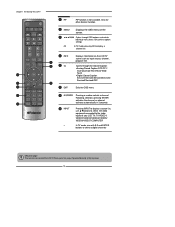
...use with 0-9 and ENTER buttons to select a digital channels Effective range: The remote can control the LCD TV from up to display a channel list 15 INFO Displays information on the screen. 14 OK Cycles through the Closed Caption: Analog Closed Caption:OFF/CC1/ CC2/CC3/CC4/Text1/... Pressing a number selects a channel. Chapter 1 Introducing the LCD TV 12 PIP PIP function is not available. SET UP TV CAB/ SAT DVD AUX SLEEP DVD MENU 13 MENU Displays the OSD menu on the LCD TV MUTE ASPECT LAST LIVE TV 12 screen such as input source, channel, program title. Only for ...
...use with 0-9 and ENTER buttons to select a digital channels Effective range: The remote can control the LCD TV from up to display a channel list 15 INFO Displays information on the screen. 14 OK Cycles through the Closed Caption: Analog Closed Caption:OFF/CC1/ CC2/CC3/CC4/Text1/... Pressing a number selects a channel. Chapter 1 Introducing the LCD TV 12 PIP PIP function is not available. SET UP TV CAB/ SAT DVD AUX SLEEP DVD MENU 13 MENU Displays the OSD menu on the LCD TV MUTE ASPECT LAST LIVE TV 12 screen such as input source, channel, program title. Only for ...
User Guide
Page 31
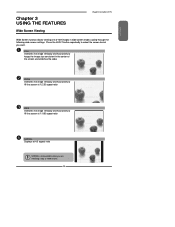
... keeps the image size consistent in the center of 4:3/16:9 images in wide screen mode, cycling through the following wide screen settings. ENGLISH Chapter 3 USING THE FEATURES Wide Screen Viewing Chapter 3 Using the LCD TV Wide Screen function allows viewing of the screen and stretches the sides ZOOM Stretches the image vertically and horizontally to fill...
... keeps the image size consistent in the center of 4:3/16:9 images in wide screen mode, cycling through the following wide screen settings. ENGLISH Chapter 3 USING THE FEATURES Wide Screen Viewing Chapter 3 Using the LCD TV Wide Screen function allows viewing of the screen and stretches the sides ZOOM Stretches the image vertically and horizontally to fill...

User Guide
Page 32
... 50 Bass 50 50 Treble 50 0 Balance 0 Sound Effect Surround MTS Stereo SPDIF Type Dolby Digital Audio Language English Speaker On 30 Chapter 3 Using the LCD TV Operating the Menu Press the button to customize the audio options and effects. ▪ If the signal source is VIDEO/S-VIDEO/YPbPr/ HDMI/VGA, the... 54 Brightness 54 Saturation 54 Color Temperature HUE 0 Noise Reduction Medium Sharpness 5 VGA Color Temperature Noise Reduction Medium AUDIO MENU: Allows you to turn the LCD TV on the screen.
... 50 Bass 50 50 Treble 50 0 Balance 0 Sound Effect Surround MTS Stereo SPDIF Type Dolby Digital Audio Language English Speaker On 30 Chapter 3 Using the LCD TV Operating the Menu Press the button to customize the audio options and effects. ▪ If the signal source is VIDEO/S-VIDEO/YPbPr/ HDMI/VGA, the... 54 Brightness 54 Saturation 54 Color Temperature HUE 0 Noise Reduction Medium Sharpness 5 VGA Color Temperature Noise Reduction Medium AUDIO MENU: Allows you to turn the LCD TV on the screen.
User Guide
Page 40
... to display the system current time. ▪ OFF :Selects to set the current time. Chapter 3 Using the LCD TV The SETUP menu includes the following options: OSD Language Time Setup Selects to display all on-screen menus in your language of the program being viewed ▪ T1/T2: Display station information presented using...
... to display the system current time. ▪ OFF :Selects to set the current time. Chapter 3 Using the LCD TV The SETUP menu includes the following options: OSD Language Time Setup Selects to display all on-screen menus in your language of the program being viewed ▪ T1/T2: Display station information presented using...
User Guide
Page 48
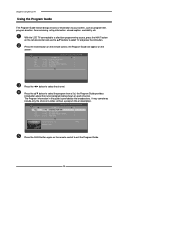
...information in the guide is provided by the broadcasters. With the LCD TV connected to a television programming source, press the INPUT button on the remote control to select TV and press the OK button. EYEWITHNESS NEWS TV-PG Press the GUIDE button again on the remote control and ... NIGHT FOOTBALL cc SPORTSZONE cc Press the ◄► button to your screen, such as program title, program duration, time remaining, rating information, closed caption, availability, etc. Chapter 3 Using the LCD TV Using the Program Guide The Program Guide feature brings all sorts of information to...
...information in the guide is provided by the broadcasters. With the LCD TV connected to a television programming source, press the INPUT button on the remote control to select TV and press the OK button. EYEWITHNESS NEWS TV-PG Press the GUIDE button again on the remote control and ... NIGHT FOOTBALL cc SPORTSZONE cc Press the ◄► button to your screen, such as program title, program duration, time remaining, rating information, closed caption, availability, etc. Chapter 3 Using the LCD TV Using the Program Guide The Program Guide feature brings all sorts of information to...


