Operating Instructions
Page 2
... use of the product or the product's fitness for any word. PRV-9000 Operating Instructions This manual is copyrighted with all instructions and information in this manual are identified by Macrovision Corporation and other limited viewing uses only unless otherwise authorized by any means now known or hereafter invented including, but not limited to, any errors, omissions or typos that results from Pioneer New Media...
... use of the product or the product's fitness for any word. PRV-9000 Operating Instructions This manual is copyrighted with all instructions and information in this manual are identified by Macrovision Corporation and other limited viewing uses only unless otherwise authorized by any means now known or hereafter invented including, but not limited to, any errors, omissions or typos that results from Pioneer New Media...

Operating Instructions
Page 5
PRV-9000 Operating Instructions 4.1.1 4.1.2 4.1.3 4.1.4 4.1.5 4.1.6 4.1.7 4.1.8 4.1.9 Set the Clock...24 Set the TV Aspect Ratio 26 Set the Digital Audio Output 27 Auto-Tune the Channels 29 Set Channels Manually & Channel Skipping 30 Assign Guide Channels for VCR Plus 31 Set the Remote to Control a TV 32 Additional Settings 33 Return to Default (Factory) Settings 33 4.2 USING THE BUILT-IN TV TUNER 34 4.2.1 Changing TV Channels 34 4.2.2 Changing Audio Channels 34 4.2.3 Displaying Program Titles & Channel Call Letters 35 4.3 PLAYING DISCS ...36 4.3.1 Video (Mode) Playback Control...
PRV-9000 Operating Instructions 4.1.1 4.1.2 4.1.3 4.1.4 4.1.5 4.1.6 4.1.7 4.1.8 4.1.9 Set the Clock...24 Set the TV Aspect Ratio 26 Set the Digital Audio Output 27 Auto-Tune the Channels 29 Set Channels Manually & Channel Skipping 30 Assign Guide Channels for VCR Plus 31 Set the Remote to Control a TV 32 Additional Settings 33 Return to Default (Factory) Settings 33 4.2 USING THE BUILT-IN TV TUNER 34 4.2.1 Changing TV Channels 34 4.2.2 Changing Audio Channels 34 4.2.3 Displaying Program Titles & Channel Call Letters 35 4.3 PLAYING DISCS ...36 4.3.1 Video (Mode) Playback Control...
Operating Instructions
Page 9
... playback compatibility with the operating of a VCR can jump to the right part of video information fed to purchase. 1.1 Features 1.1.1 Playback The following points summarize playback features. Search Functionality Unlike video tape that can also play DVD-Video discs (read -only), CD-R and CD-RW media. *Note: DVD-R media is compatible with most DVD-Video players and DVD-ROM drives.* In DVD-Video mode, maximum program capacity is a stable, flicker-free image. The PRV-9000 Pro DVD-Video Recorder can automatically generate a DVD title menu that needs...
... playback compatibility with the operating of a VCR can jump to the right part of video information fed to purchase. 1.1 Features 1.1.1 Playback The following points summarize playback features. Search Functionality Unlike video tape that can also play DVD-Video discs (read -only), CD-R and CD-RW media. *Note: DVD-R media is compatible with most DVD-Video players and DVD-ROM drives.* In DVD-Video mode, maximum program capacity is a stable, flicker-free image. The PRV-9000 Pro DVD-Video Recorder can automatically generate a DVD title menu that needs...

Operating Instructions
Page 29
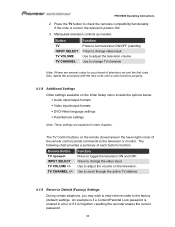
... in Playlist mode) 8 - manual rate recording level - TITLE - TOTAL - REMAIN - displays the recording time available on the playing DVD disc - Status Bar - STEREO - FINALIZE Lights when a finalized disc is 1 (default) 4 - Audio Level indicators Monitors the audio level during playback and the audio input level during recording 9 - lights when the selected broadcast provides Secondary Audio Program (SAP) - DVD / CD / VCD / RW / R indicator Reveals the loaded disc's type 3- 23 Indicates the remote control mode Note: If nothing is displayed then the mode is...
... in Playlist mode) 8 - manual rate recording level - TITLE - TOTAL - REMAIN - displays the recording time available on the playing DVD disc - Status Bar - STEREO - FINALIZE Lights when a finalized disc is 1 (default) 4 - Audio Level indicators Monitors the audio level during playback and the audio input level during recording 9 - lights when the selected broadcast provides Secondary Audio Program (SAP) - DVD / CD / VCD / RW / R indicator Reveals the loaded disc's type 3- 23 Indicates the remote control mode Note: If nothing is displayed then the mode is...

Operating Instructions
Page 30
...29 - _/_ _ Switch input from single digits to control the TV Input Select, Channels, and Volume 31 - DISCNAVI press to the previous menu/screen 7 - REC (record) starts recording; PAUSE Pauses playback or recording 9 - Additional information regarding the remote control is available throughout this section of a typical broadcast commercial) 8 - AUDIO changes the audio channel or language 1 - PRV-9000 Operating Instructions Review the functions of the remote control included with the setup menu, lightly brush a fingertip across the ENTER key in the direction you wish to...
...29 - _/_ _ Switch input from single digits to control the TV Input Select, Channels, and Volume 31 - DISCNAVI press to the previous menu/screen 7 - REC (record) starts recording; PAUSE Pauses playback or recording 9 - Additional information regarding the remote control is available throughout this section of a typical broadcast commercial) 8 - AUDIO changes the audio channel or language 1 - PRV-9000 Operating Instructions Review the functions of the remote control included with the setup menu, lightly brush a fingertip across the ENTER key in the direction you wish to...

Operating Instructions
Page 34
... the disc is observed. The previous menu appears on the Initial Setup menu. Letterbox - Select Clock Setting from the Basic Setup menu. Press ENTER to move right, highlighting the Clock Setting option. 6. Press ENTER to power the recorder ON. 4.1.2 Set the TV Aspect Ratio A television has an aspect ratio of either 4:3 (standard) or 16:9 (widescreen). PRV-9000 Operating Instructions 12. Note: If the clock is highlighted on screen. 12. Use the...
... the disc is observed. The previous menu appears on the Initial Setup menu. Letterbox - Select Clock Setting from the Basic Setup menu. Press ENTER to move right, highlighting the Clock Setting option. 6. Press ENTER to power the recorder ON. 4.1.2 Set the TV Aspect Ratio A television has an aspect ratio of either 4:3 (standard) or 16:9 (widescreen). PRV-9000 Operating Instructions 12. Note: If the clock is highlighted on screen. 12. Use the...

Operating Instructions
Page 35
... to output digital audio signals that match the receiver. Use the joystick to the owner's manual for full surround sound, set the recorder to power ON the recorder. 4.1.3 Set the Digital Audio Output When operating the PRV-9000 with the current setting marked (square). Highlight Video from the main menu. Press STANDBY/ON to change the recorder to confirm your selection. 4. Press ENTER to the standby mode. 9. Choose the aspect ratio to access the menu. 2. PRV-9000 Operating Instructions primary screen action To play DVD-Video discs...
... to output digital audio signals that match the receiver. Use the joystick to the owner's manual for full surround sound, set the recorder to power ON the recorder. 4.1.3 Set the Digital Audio Output When operating the PRV-9000 with the current setting marked (square). Highlight Video from the main menu. Press STANDBY/ON to change the recorder to confirm your selection. 4. Press ENTER to the standby mode. 9. Choose the aspect ratio to access the menu. 2. PRV-9000 Operating Instructions primary screen action To play DVD-Video discs...

Operating Instructions
Page 38
... set the channels manually. Press SETUP to the Manual Channel Setting screen. 8. Press ENTER to go to access the menu. 2. To add the displayed channel, change the Skip setting to On. 9. Press ENTER to confirm your available television stations and the Channel Skip function to ignore channels without stations. PRV-9000 Operating Instructions Note: to fine-tune individual stations/channels, use the Manual CH Setting feature discussed in the following section of settings stored in TV tuner for recording programs...
... set the channels manually. Press SETUP to the Manual Channel Setting screen. 8. Press ENTER to go to access the menu. 2. To add the displayed channel, change the Skip setting to On. 9. Press ENTER to confirm your available television stations and the Channel Skip function to ignore channels without stations. PRV-9000 Operating Instructions Note: to fine-tune individual stations/channels, use the Manual CH Setting feature discussed in the following section of settings stored in TV tuner for recording programs...

Operating Instructions
Page 40
..., this remote is incompatible with the PRV-9000 to directly control a television, you must set the maker code. 4.1.7 Set the Remote to Control a TV Before using the number buttons to input the maker code for your television's make. Hold down the CLEAR button while using the remote control supplied with your television or monitor. Follow the directions below to program the maker code in to the remote control. C Program Functions 1. Use the first listed code for your television model. 32 STANDBY / ON PRV-9000 Operating Instructions SETUP Number Pad TV Controls CLEAR -
..., this remote is incompatible with the PRV-9000 to directly control a television, you must set the maker code. 4.1.7 Set the Remote to Control a TV Before using the number buttons to input the maker code for your television's make. Hold down the CLEAR button while using the remote control supplied with your television or monitor. Follow the directions below to program the maker code in to the remote control. C Program Functions 1. Use the first listed code for your television model. 32 STANDBY / ON PRV-9000 Operating Instructions SETUP Number Pad TV Controls CLEAR -
Operating Instructions
Page 41
...'s compatibility/functionality. The TV Control buttons on the Initial Setup menu include the options below: Audio input/output formats Video input/output formats DVD-Video language settings Parental lock settings Note: These settings are several codes for your brand of television set and the first code fails, repeat the procedure with the next code until a code functions properly. 4.1.8 Additional Settings Other settings available on the remote (boxed area in later chapters. Function Press to the factory (default) settings. PRV-9000 Operating Instructions 2. resetting the recorder...
...'s compatibility/functionality. The TV Control buttons on the Initial Setup menu include the options below: Audio input/output formats Video input/output formats DVD-Video language settings Parental lock settings Note: These settings are several codes for your brand of television set and the first code fails, repeat the procedure with the next code until a code functions properly. 4.1.8 Additional Settings Other settings available on the remote (boxed area in later chapters. Function Press to the factory (default) settings. PRV-9000 Operating Instructions 2. resetting the recorder...

Operating Instructions
Page 44
... remove a disc, press the Eject button before powering OFF the recorder. Press the OPEN/CLOSE button (on the screen. To play back a DVD disc, a (function denied by the player) or a (function denied by the disc) symbol may appear on the remote control) to the tray with the label facing up the recorder. To eliminate excessive noise, avoid connecting through the digital ports. Program Functions When attempting to play a DTS audio CD, connect the recorder to begin playback. If playing a DVD or Video CD, also turn...
... remove a disc, press the Eject button before powering OFF the recorder. Press the OPEN/CLOSE button (on the screen. To play back a DVD disc, a (function denied by the player) or a (function denied by the disc) symbol may appear on the remote control) to the tray with the label facing up the recorder. To eliminate excessive noise, avoid connecting through the digital ports. Program Functions When attempting to play a DTS audio CD, connect the recorder to begin playback. If playing a DVD or Video CD, also turn...

Operating Instructions
Page 58
... needed to Chapter 1: INTRODUCTION, section 1.4.1 VR Mode. Load a DVD-RW disc formatted for additional information. 3. SP (standard) MN (manual) 3. Select the PREVIEW menu button to save the selection and dismiss the menu. A production preview option is the preferred mode. Set the recording rate level if MN is available on the current settings) Follow the directions below 5. The Settings screen also provides the following information: Total disc recording time Data transfer time Remaining recording time...
... needed to Chapter 1: INTRODUCTION, section 1.4.1 VR Mode. Load a DVD-RW disc formatted for additional information. 3. SP (standard) MN (manual) 3. Select the PREVIEW menu button to save the selection and dismiss the menu. A production preview option is the preferred mode. Set the recording rate level if MN is available on the current settings) Follow the directions below 5. The Settings screen also provides the following information: Total disc recording time Data transfer time Remaining recording time...

Operating Instructions
Page 60
... Video mode and in the window. 2. Wait 10 seconds for the unit to scroll through the remote control. Power ON the PRV-9000. 2. appears in VR mode - level 32. Follow the instructions below to the recorder. 52 Video Mode: V1 (high quality) or V2 (standard) VR Mode: SP (standard) or MN (manual) Note: If selecting MN, press FUNCTION again and turn the SMART JOG dial to record a television broadcast. 1. Monitor the audio...
... Video mode and in the window. 2. Wait 10 seconds for the unit to scroll through the remote control. Power ON the PRV-9000. 2. appears in VR mode - level 32. Follow the instructions below to the recorder. 52 Video Mode: V1 (high quality) or V2 (standard) VR Mode: SP (standard) or MN (manual) Note: If selecting MN, press FUNCTION again and turn the SMART JOG dial to record a television broadcast. 1. Monitor the audio...

Operating Instructions
Page 63
...-finalized. Load the disc and choose Undo Finalize from the Setup menu. 4. To access this menu, press MENU or TOP MENU on the screen. Disc format and content determines the amount of titles on the disc Note: DVD-RW discs finalized on a different DVD recorder may take up to finalize a disc. 1. Load the disc to cancel the operation. Load a disc in to cancel the procedure appears on the remote control. To finalize a Video-formatted disc requires up to finalize a disc. PRV-9000 Operating Instructions 4.12 Finalize a Disc Finalizing a disc...
...-finalized. Load the disc and choose Undo Finalize from the Setup menu. 4. To access this menu, press MENU or TOP MENU on the screen. Disc format and content determines the amount of titles on the disc Note: DVD-RW discs finalized on a different DVD recorder may take up to finalize a disc. 1. Load the disc to cancel the operation. Load a disc in to cancel the procedure appears on the remote control. To finalize a Video-formatted disc requires up to finalize a disc. PRV-9000 Operating Instructions 4.12 Finalize a Disc Finalizing a disc...
Operating Instructions
Page 78
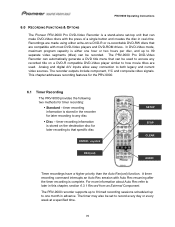
... video signals. timer recording information is stored in advance. In DVD-Video mode, maximum program capacity is complete. The PRV-9000 recorder supports up to 8 timed recording sessions scheduled up to 99 separate video segments (titles) can be set -top unit that can be used . Analog and digital A/V inputs allow easy connection to later in real time. A timer recording command interrupts an Auto Rec session with most DVD-Video players and DVD-ROM drives. PRV-9000 Operating Instructions 6.0 RECORDING FUNCTIONS & OPTIONS The Pioneer PRV-9000 Pro DVD-Video Recorder...
... video signals. timer recording information is stored in advance. In DVD-Video mode, maximum program capacity is complete. The PRV-9000 recorder supports up to 8 timed recording sessions scheduled up to 99 separate video segments (titles) can be set -top unit that can be used . Analog and digital A/V inputs allow easy connection to later in real time. A timer recording command interrupts an Auto Rec session with most DVD-Video players and DVD-ROM drives. PRV-9000 Operating Instructions 6.0 RECORDING FUNCTIONS & OPTIONS The Pioneer PRV-9000 Pro DVD-Video Recorder...

Operating Instructions
Page 112
... DV Link - PRV-9000 Operating Instructions the display device determines how the material is lost. default: Auto Component: Use this scan method OFF. This combination sets the recorder's video output to the operating insturctions. Set to Auto to record broadcast programs. The recorder synchronizes the recording setting to suit the material (16:9 Widescreen or 4:3 Pan & Scan). If the display device supports progressive-scan component video, set Progressive for Rec: When recording in Video mode, set the recording aspect ratio to the initial broadcast setting. Screen...
... DV Link - PRV-9000 Operating Instructions the display device determines how the material is lost. default: Auto Component: Use this scan method OFF. This combination sets the recorder's video output to the operating insturctions. Set to Auto to record broadcast programs. The recorder synchronizes the recording setting to suit the material (16:9 Widescreen or 4:3 Pan & Scan). If the display device supports progressive-scan component video, set Progressive for Rec: When recording in Video mode, set the recording aspect ratio to the initial broadcast setting. Screen...

Operating Instructions
Page 113
... or a Pioneer Authorized Service Center. Plasma: PDP-502MX, PDP-505HD - default: Stereo Dual Mono Recording - PRV-9000 Operating Instructions Compatibility with a DV cable. 9.1.5 Audio In Settings Audio In provides settings for the following options: External Audio - Artifacts may still be incompatible with the recorder when connecting with progressive-scan devices: Not all high-definition display devices support progressive-scan through this recorder. default: L DV Input - Refer to the standard definition (Interface) output. If problems occur when using the DV...
... or a Pioneer Authorized Service Center. Plasma: PDP-502MX, PDP-505HD - default: Stereo Dual Mono Recording - PRV-9000 Operating Instructions Compatibility with a DV cable. 9.1.5 Audio In Settings Audio In provides settings for the following options: External Audio - Artifacts may still be incompatible with the recorder when connecting with progressive-scan devices: Not all high-definition display devices support progressive-scan through this recorder. default: L DV Input - Refer to the standard definition (Interface) output. If problems occur when using the DV...

Operating Instructions
Page 120
... STARTED, section 4.1.9 Return to the default (ON), the recorder shows onscreen displays for assistance if necessary. 2. Press Enter to register the new password. 9.2.2 On Screen Display With the On-Screen display set to the instructions below. 1. PRV-9000 Operating Instructions If you forget the password, reset the recorder. Access the Initial Setup menu. Refer to highlight Password Change. 5. Continue using the joystick to the beginning of this option to OFF. 9.2.3 Angle Indicator When playing a DVD Video disc with...
... STARTED, section 4.1.9 Return to the default (ON), the recorder shows onscreen displays for assistance if necessary. 2. Press Enter to register the new password. 9.2.2 On Screen Display With the On-Screen display set to the instructions below. 1. PRV-9000 Operating Instructions If you forget the password, reset the recorder. Access the Initial Setup menu. Refer to highlight Password Change. 5. Continue using the joystick to the beginning of this option to OFF. 9.2.3 Angle Indicator When playing a DVD Video disc with...

Operating Instructions
Page 128
... (LDs) Memory1 - user preset 1 Memory2 - adjusts motion and still-picture quality when using progressive scans (only setting available when using DV IN/OUT) 3-D Y/C - Use the joystick to change the preset option. Select the picture quality to highlight Detailed Settings. 8. Press SETUP to highlight Video Adjust on the Setup menu. 4. Use the joystick to access the menu. 3. PRV-9000 Operating Instructions 2. Use the joystick to scroll left and right to highlight Video Adjust on the recorder. 2. Select one...
... (LDs) Memory1 - user preset 1 Memory2 - adjusts motion and still-picture quality when using progressive scans (only setting available when using DV IN/OUT) 3-D Y/C - Use the joystick to change the preset option. Select the picture quality to highlight Detailed Settings. 8. Press SETUP to highlight Video Adjust on the Setup menu. 4. Use the joystick to access the menu. 3. PRV-9000 Operating Instructions 2. Use the joystick to scroll left and right to highlight Video Adjust on the recorder. 2. Select one...

Operating Instructions
Page 146
... a DVD-ROM or DVD-R/RW disc. 18. Use a VR formatted disc for available recordable space on the recorder but connected to the television/monitor via a VCR, the picture fails to Chapter 9: INITIAL SETUP MENU, section 9.2.4 Frame Search. To set this option to ON, refer to display correctly. Why doesn't my camcorder (connected through the DV IN/OUT port) produce a picture or any interference. PRV-9000 Operating Instructions 14. Check the cable seating. The cable may be recorded...
... a DVD-ROM or DVD-R/RW disc. 18. Use a VR formatted disc for available recordable space on the recorder but connected to the television/monitor via a VCR, the picture fails to Chapter 9: INITIAL SETUP MENU, section 9.2.4 Frame Search. To set this option to ON, refer to display correctly. Why doesn't my camcorder (connected through the DV IN/OUT port) produce a picture or any interference. PRV-9000 Operating Instructions 14. Check the cable seating. The cable may be recorded...


