Owners Manual
Page 2
... manufacturer's instructions. 8) Do not install near this unit, make sure the unit has been installed so that the power cord can be charged for even during lightning storms or when unused for long periods of important operating and maintenance (servicing) instructions in accordance... installing this equipment (such as the main disconnect device for general household purposes. D36-AP9-3*_A1_En WARNING: This product contains chemicals known to dripping, splashing, rain or moisture. NO USER-SERVICEABLE PARTS INSIDE. D8-10-2_A1_En IMPORTANT NOTICE THE MODEL NUMBER AND SERIAL NUMBER OF...
... manufacturer's instructions. 8) Do not install near this unit, make sure the unit has been installed so that the power cord can be charged for even during lightning storms or when unused for long periods of important operating and maintenance (servicing) instructions in accordance... installing this equipment (such as the main disconnect device for general household purposes. D36-AP9-3*_A1_En WARNING: This product contains chemicals known to dripping, splashing, rain or moisture. NO USER-SERVICEABLE PARTS INSIDE. D8-10-2_A1_En IMPORTANT NOTICE THE MODEL NUMBER AND SERIAL NUMBER OF...

Owners Manual
Page 3
... your nearest PIONEER authorized service center or your equipment at a safe level - English The Safety of Your Ears is illegal in many areas. Sound can hear it comfortably and clearly, without annoying blaring or distortion and, most out of your equipment by playing it there.... Do not place the unit, a piece of furniture, etc., on . ESTABLISH A SAFE LEVEL: • Set your volume control at a low setting. • Slowly increase the sound until you can be stepped on the power cord, or pinch the cord. S001a_A1_En POWER-CORD CAUTION Handle the power ...
... your nearest PIONEER authorized service center or your equipment at a safe level - English The Safety of Your Ears is illegal in many areas. Sound can hear it comfortably and clearly, without annoying blaring or distortion and, most out of your equipment by playing it there.... Do not place the unit, a piece of furniture, etc., on . ESTABLISH A SAFE LEVEL: • Set your volume control at a low setting. • Slowly increase the sound until you can be stepped on the power cord, or pinch the cord. S001a_A1_En POWER-CORD CAUTION Handle the power ...
Owners Manual
Page 4
Please read through these operating instructions so you will know how to operate your equipment...8 Playback...9 Pausing playback...9 Finishing playback...9 Additional information...9 03 Others Troubleshooting...11 Cautions on use...11 Maintenance of each part...11 About trademarks and registered trademarks...11 Specifications...12 4 Contents 01 Before you for buying this Pioneer product. Thank you start Features...5 Checking what's in the box...5 Assembly...5 02 Operation Part names and functions...7 Adjustment...7 Connecting your model properly.
Please read through these operating instructions so you will know how to operate your equipment...8 Playback...9 Pausing playback...9 Finishing playback...9 Additional information...9 03 Others Troubleshooting...11 Cautions on use...11 Maintenance of each part...11 About trademarks and registered trademarks...11 Specifications...12 4 Contents 01 Before you for buying this Pioneer product. Thank you start Features...5 Checking what's in the box...5 Assembly...5 02 Operation Part names and functions...7 Adjustment...7 Connecting your model properly.
Owners Manual
Page 5
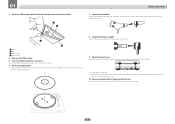
... stable while playing records even when there are not obstacles when the player is moved, thus preventing disconnection problems. Checking what's in the box Please check that don't have been completed. 1 Set the turntable. Balance weight ! D41-6-4_A1_En Assembly ! Power cord ! Operating instructions (this function can use , fully automatic record player Once you have a phono equalizer, this document) 2 Turn the turntable so...
... stable while playing records even when there are not obstacles when the player is moved, thus preventing disconnection problems. Checking what's in the box Please check that don't have been completed. 1 Set the turntable. Balance weight ! D41-6-4_A1_En Assembly ! Power cord ! Operating instructions (this function can use , fully automatic record player Once you have a phono equalizer, this document) 2 Turn the turntable so...
Owners Manual
Page 6
...headshell. Insert the hinges of the turntable. When removing the dust cover, open the dust cover fully then pull out upward with attached cartridge into their holders on the back .... 6 Set the turntable sheet. ! Next, while keeping the headshell horizontal, tighten the lock nut. 3 4 1 Roller 2 Belt 3 Ribbon tape 4 Square hole 4 Remove the ribbon tape. 5 Turn turntable slowly five or six turns. Once assembly... ribbon tape and catch the belt on the turntable so the bottom, which has the Pioneer logo, faces down. 8 Attach the balance weight. Check that the belt is finished, remove the twist...
...headshell. Insert the hinges of the turntable. When removing the dust cover, open the dust cover fully then pull out upward with attached cartridge into their holders on the back .... 6 Set the turntable sheet. ! Next, while keeping the headshell horizontal, tighten the lock nut. 3 4 1 Roller 2 Belt 3 Ribbon tape 4 Square hole 4 Remove the ribbon tape. 5 Turn turntable slowly five or six turns. Once assembly... ribbon tape and catch the belt on the turntable so the bottom, which has the Pioneer logo, faces down. 8 Attach the balance weight. Check that the belt is finished, remove the twist...

Owners Manual
Page 7
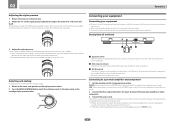
... device is power to balance the tone arm and adjust the stylus pressure. b ANTI-SKATING dial When a record is played, there is used to move the tone arm up . Turn the balance weight until the tone arm becomes almost horizontal. ! d Balance weight Used to pull the stylus tip toward the inner perimeter. For cartridges with a cartridge attached. 6 Lock...
... device is power to balance the tone arm and adjust the stylus pressure. b ANTI-SKATING dial When a record is played, there is used to move the tone arm up . Turn the balance weight until the tone arm becomes almost horizontal. ! d Balance weight Used to pull the stylus tip toward the inner perimeter. For cartridges with a cartridge attached. 6 Lock...
Owners Manual
Page 8
... adjust to the same value as the cartridge stylus pressure value. When turning the balance weight, the stylus pressure adjustment ring turns together. Wait until all the connections between devices have been completed. If the player starts operating when the power cord is plugged in equalizer of record player is made to prevent stylus jumping. 1 Match to the same scale...
... adjust to the same value as the cartridge stylus pressure value. When turning the balance weight, the stylus pressure adjustment ring turns together. Wait until all the connections between devices have been completed. If the player starts operating when the power cord is plugged in equalizer of record player is made to prevent stylus jumping. 1 Match to the same scale...
Owners Manual
Page 9
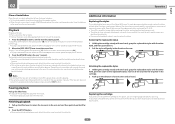
... the speaker system. ! Do not touch the tone arm or turntable or turn off the amplifier's power before playback is played, the tone arm returns to its original position and the turntable automatically stops turning. ! If the tone arm does not return to its original position after a record finishes playing. Removing the replaceable stylus 1 Holding the cartridge steady with one exclusively for PL-30...
... the speaker system. ! Do not touch the tone arm or turntable or turn off the amplifier's power before playback is played, the tone arm returns to its original position and the turntable automatically stops turning. ! If the tone arm does not return to its original position after a record finishes playing. Removing the replaceable stylus 1 Holding the cartridge steady with one exclusively for PL-30...
Owners Manual
Page 10
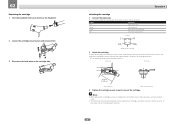
...In this player should be sure to readjust the horizontal balance, stylus pressure, and anti-skating value. ! They are color-coded as shown on the cartridge side. To achieve the required overhang, mount in .) Mount parallel. Operation Attaching the cartridge 1 Connect ... shown below . ! The thickness of cartridge) 2 Attach the cartridge. After replacing the cartridge, be 19 mm. Be careful to mount the cartridge. 02 Removing the cartridge 1 Turn the headshell lock nut and remove the headshell. 2 Loosen the cartridge mount screws and remove them properly. Notes...
...In this player should be sure to readjust the horizontal balance, stylus pressure, and anti-skating value. ! They are color-coded as shown on the cartridge side. To achieve the required overhang, mount in .) Mount parallel. Operation Attaching the cartridge 1 Connect ... shown below . ! The thickness of cartridge) 2 Attach the cartridge. After replacing the cartridge, be 19 mm. Be careful to mount the cartridge. 02 Removing the cartridge 1 Turn the headshell lock nut and remove the headshell. 2 Loosen the cartridge mount screws and remove them properly. Notes...
Owners Manual
Page 11
... in Assembly. (Page 5 ) Has the belt been cut , replace it with something similar to turn . The turntable does not turn the volume on the record. Adjust the arm height correctly. scratches? Adjust anti-skating correctly. Maintenance of the record. Is the headshell attached properly? headshell part. Is the stylus pressure adjusted property? Does the record have scratches? Is the connection to...
... in Assembly. (Page 5 ) Has the belt been cut , replace it with something similar to turn . The turntable does not turn the volume on the record. Adjust the arm height correctly. scratches? Adjust anti-skating correctly. Maintenance of the record. Is the headshell attached properly? headshell part. Is the stylus pressure adjusted property? Does the record have scratches? Is the connection to...

Owners Manual
Page 12
... (+41 °F to +95 °F) Tolerable operating humidity 5 % to 85 % (no condensation) Turntable part Drive method...Belt drive system Motor...DC servo motor Rotation speed...33 1/3 rpm, 45 rpm Wow and flutter...0.1 % or ...Turntable...Aluminum die-casting Tone arm part Arm type...Static balance straight type tone arm Effective length...221.5 mm Overhang...19 mm Stylus pressure variable range 0 g to 4.0 g (1 scale 0.1 g) Proper cartridge weight...4.5 g to change without notice. ! © 2014 PIONEER HOME ELECTRONICS CORPORATION. 03 Specifications Power requirements...AC 120 V, 60 Hz Power...
... (+41 °F to +95 °F) Tolerable operating humidity 5 % to 85 % (no condensation) Turntable part Drive method...Belt drive system Motor...DC servo motor Rotation speed...33 1/3 rpm, 45 rpm Wow and flutter...0.1 % or ...Turntable...Aluminum die-casting Tone arm part Arm type...Static balance straight type tone arm Effective length...221.5 mm Overhang...19 mm Stylus pressure variable range 0 g to 4.0 g (1 scale 0.1 g) Proper cartridge weight...4.5 g to change without notice. ! © 2014 PIONEER HOME ELECTRONICS CORPORATION. 03 Specifications Power requirements...AC 120 V, 60 Hz Power...
Owners Manual
Page 13
... you what action Pioneer will take any initial request to Customer Support, should your complaint in what time period, to the representative, a resolution number will be reached during the rental period or (b) retail sale, whichever occurs first. Call the Customer Satisfaction Manager at the option of original owner's transaction. To receive warranty service you for this...
... you what action Pioneer will take any initial request to Customer Support, should your complaint in what time period, to the representative, a resolution number will be reached during the rental period or (b) retail sale, whichever occurs first. Call the Customer Satisfaction Manager at the option of original owner's transaction. To receive warranty service you for this...
Owners Manual
Page 36
...-7555 PIONEER ELECTRONICS AUSTRALIA PTY. DE C.V. BOX 1540, Long Beach, California 90801-1540, U.S.A. Tous droits de reproduction et de traduction réservés. To register your product, find the nearest authorized service location, to purchase replacement parts, operating instructions, or...In Canada/Aux Canada http://www.pioneerelectronics.ca S018_B1_EnFr PIONEER HOME ELECTRONICS CORPORATION 1-1, Shin-ogura, Saiwai-ku, Kawasaki-shi, Kanagawa 212-0031, Japan PIONEER ELECTRONICS (USA) INC. TEL: (800) 421-1404 PIONEER ELECTRONICS OF CANADA, INC. 340 Ferrier Street, Unit...
...-7555 PIONEER ELECTRONICS AUSTRALIA PTY. DE C.V. BOX 1540, Long Beach, California 90801-1540, U.S.A. Tous droits de reproduction et de traduction réservés. To register your product, find the nearest authorized service location, to purchase replacement parts, operating instructions, or...In Canada/Aux Canada http://www.pioneerelectronics.ca S018_B1_EnFr PIONEER HOME ELECTRONICS CORPORATION 1-1, Shin-ogura, Saiwai-ku, Kawasaki-shi, Kanagawa 212-0031, Japan PIONEER ELECTRONICS (USA) INC. TEL: (800) 421-1404 PIONEER ELECTRONICS OF CANADA, INC. 340 Ferrier Street, Unit...
Product Sheet
Page 1
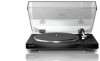
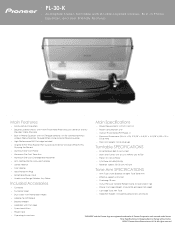
All rights reserved PL-30-K Audiophile Stereo Turntable with Double-Layered Chassis, Built-in Phono Equalizer, and User-Friendly Features Main Features Main Specifications ›› Full-Automatic Operation ›› Power Requirements: AC 120 V, 60 Hz ›› Double-...Record ›› Balance Weight ›› Headshell with Cartridge ›› Spare Lead Wires ›› Power Cord ›› Operating Instructions "PIONEER" and the Pioneer logo are registered trademarks of Pioneer Corporation and are used under license. Note: Specifications...
All rights reserved PL-30-K Audiophile Stereo Turntable with Double-Layered Chassis, Built-in Phono Equalizer, and User-Friendly Features Main Features Main Specifications ›› Full-Automatic Operation ›› Power Requirements: AC 120 V, 60 Hz ›› Double-...Record ›› Balance Weight ›› Headshell with Cartridge ›› Spare Lead Wires ›› Power Cord ›› Operating Instructions "PIONEER" and the Pioneer logo are registered trademarks of Pioneer Corporation and are used under license. Note: Specifications...
