
Owner's Manual
Page 8
...Putting the batteries in the desired order (Programmed Play) 51 - Wall mounting the speaker for HTZ-BD92HW 30 - Speaker setup for HTZ-BD32 28 - Speaker setup for HTZ-BD52 27 - BD82HF 35 - AUX connection 38 - Connecting optional Bluetooth® ADAPTER 40 ...Types of speaker box (HTZ-BD82HF) 12 - Speaker setup for HTZ-BD92HW 32 - Additional notes on speaker for HTZ- Video connection 37 Antenna connection 38 Connections with the player's remote control 48 - HTZ-BD52/HTZ-BD32 23 - Wall mounting the speakers for HTZ-BD32 28 - Playing photos ...
...Putting the batteries in the desired order (Programmed Play) 51 - Wall mounting the speaker for HTZ-BD92HW 30 - Speaker setup for HTZ-BD32 28 - Speaker setup for HTZ-BD52 27 - BD82HF 35 - AUX connection 38 - Connecting optional Bluetooth® ADAPTER 40 ...Types of speaker box (HTZ-BD82HF) 12 - Speaker setup for HTZ-BD92HW 32 - Additional notes on speaker for HTZ- Video connection 37 Antenna connection 38 Connections with the player's remote control 48 - HTZ-BD52/HTZ-BD32 23 - Wall mounting the speakers for HTZ-BD32 28 - Playing photos ...

Owner's Manual
Page 9
... - Wireless music play 68 - Listen to a USB device 65 iPod/iPhone playback 66 - Presetting the radio stations 67 - Handling the unit 89 - Operating the initial setup screen 1 57 - Deleting all the settings to the radio 67 - Improving poor FM reception 9 68 Bluetooth® ADAPTER for Wireless Enjoyment of discs, titles or...
... - Wireless music play 68 - Listen to a USB device 65 iPod/iPhone playback 66 - Presetting the radio stations 67 - Handling the unit 89 - Operating the initial setup screen 1 57 - Deleting all the settings to the radio 67 - Improving poor FM reception 9 68 Bluetooth® ADAPTER for Wireless Enjoyment of discs, titles or...

Owner's Manual
Page 17
... the DivX VOD section in order to play DivX Video-on how to complete your files into DivX videos. -- Learn more at HOME MENU d Initial Setup d Playback d DivX(R) VOD DRM d Registration Code (page 73). Important: DivX VOD content is protected by DivX, LLC, a subsidiary www.divx.com/vod. of views is... file formats • DivX Plus HD content. First generate the DivX VOD registration code for which the number of Rovi Corporation. Files for your device setup menu.
... the DivX VOD section in order to play DivX Video-on how to complete your files into DivX videos. -- Learn more at HOME MENU d Initial Setup d Playback d DivX(R) VOD DRM d Registration Code (page 73). Important: DivX VOD content is protected by DivX, LLC, a subsidiary www.divx.com/vod. of views is... file formats • DivX Plus HD content. First generate the DivX VOD registration code for which the number of Rovi Corporation. Files for your device setup menu.

Owner's Manual
Page 19
... iPhone" mean that the use of Apple Inc., registered in the United States and other countries. Manufactured under U.S. All Rights Reserved. The Wi-Fi Protected Setup Mark is a trademark of Dolby Laboratories. "Dolby" and the double-D symbol are registered trademarks & DTS-HD Master Audio | Essential is a certification mark of DTS, Inc...
... iPhone" mean that the use of Apple Inc., registered in the United States and other countries. Manufactured under U.S. All Rights Reserved. The Wi-Fi Protected Setup Mark is a trademark of Dolby Laboratories. "Dolby" and the double-D symbol are registered trademarks & DTS-HD Master Audio | Essential is a certification mark of DTS, Inc...

Owner's Manual
Page 24
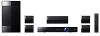
... upper cabinet to any amplifier other amplifier may result in malfunction or fire. 2. Non-skid pads Connection to the lower cabinet. Assemble the speakers Speaker setup for HTZ-BD52 2 Preparing the speakers 1. Mount the front/surround speaker. 1 Insert the lower cabinet to the lower cabinet from the underside, using the four screws...
... upper cabinet to any amplifier other amplifier may result in malfunction or fire. 2. Non-skid pads Connection to the lower cabinet. Assemble the speakers Speaker setup for HTZ-BD52 2 Preparing the speakers 1. Mount the front/surround speaker. 1 Insert the lower cabinet to the lower cabinet from the underside, using the four screws...

Owner's Manual
Page 27
... responsible for any amplifier other amplifier may fall resulting in the speaker falling. Connecting 27 En Speaker setup for HTZ-BD32 Wall mounting the speaker for the wall material and support the weight of the speaker. Use screws suitable... for Preparing the speakers 1. Make sure that result from improper installation. 5 mm (0.2 in.) 10 mm (0.4 in.) Mounting screw (not supplied) 5 mm to the base of the wall, consult a professional for advice. • Pioneer...
... responsible for any amplifier other amplifier may fall resulting in the speaker falling. Connecting 27 En Speaker setup for HTZ-BD32 Wall mounting the speaker for the wall material and support the weight of the speaker. Use screws suitable... for Preparing the speakers 1. Make sure that result from improper installation. 5 mm (0.2 in.) 10 mm (0.4 in.) Mounting screw (not supplied) 5 mm to the base of the wall, consult a professional for advice. • Pioneer...
Owner's Manual
Page 29
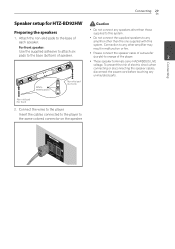
... speaker terminals carry HAZARDOUS LIVE voltage. Attach the non-skid pads to three locations Non-skid pad (for front) Non-skid pad (for HTZ-BD92HW Caution Preparing the speakers 1. For front speaker: Use the supplied adhesive to attach six pads to any uninsulated parts. Connect the wires to... the same colored connector on the speaker. Insert the cables connected to the player to the player. Connecting 29 En Speaker setup for front) 2. To prevent the risk of speaker. • Do not connect any speakers other than those supplied to this system. &#...
... speaker terminals carry HAZARDOUS LIVE voltage. Attach the non-skid pads to three locations Non-skid pad (for front) Non-skid pad (for HTZ-BD92HW Caution Preparing the speakers 1. For front speaker: Use the supplied adhesive to attach six pads to any uninsulated parts. Connect the wires to... the same colored connector on the speaker. Insert the cables connected to the player to the player. Connecting 29 En Speaker setup for front) 2. To prevent the risk of speaker. • Do not connect any speakers other than those supplied to this system. &#...

Owner's Manual
Page 32
32 Connecting En Speaker setup for HTZ-BD82HF For vertical installation Preparing the speakers Caution For front speakers: Assembling the speaker stands and securing your front speakers. Be sure the hex nut ...
32 Connecting En Speaker setup for HTZ-BD82HF For vertical installation Preparing the speakers Caution For front speakers: Assembling the speaker stands and securing your front speakers. Be sure the hex nut ...

Owner's Manual
Page 41
... DLNA certified server Rear of the unit Wireless Communication PC and/or DLNA certified server Access Point or Wireless Router Broadband service Refer to the setup instructions supplied with an IEEE 802.11n (Single band, 2.4 GHz band) wireless module, which also supports the 802.11b/g standards. 2 For the best wireless performance...
... DLNA certified server Rear of the unit Wireless Communication PC and/or DLNA certified server Access Point or Wireless Router Broadband service Refer to the setup instructions supplied with an IEEE 802.11n (Single band, 2.4 GHz band) wireless module, which also supports the 802.11b/g standards. 2 For the best wireless performance...

Owner's Manual
Page 42
...(SSID) in [Manual]. Check your access point or wireless router use WEP security, enter the security -- 42 Connecting En Connecting Wireless network setup For the wireless network connection, the player needs to be set your router 3. Adjust the [NETWORK] setting as a list. router is... displayed. Your access point may not 2. Select [Initial Setup] [Network] be done from the [Setup] menu. current network settings. [Auto] - and press the Push Button on the list, point or wireless router within ...
...(SSID) in [Manual]. Check your access point or wireless router use WEP security, enter the security -- 42 Connecting En Connecting Wireless network setup For the wireless network connection, the player needs to be set your router 3. Adjust the [NETWORK] setting as a list. router is... displayed. Your access point may not 2. Select [Initial Setup] [Network] be done from the [Setup] menu. current network settings. [Auto] - and press the Push Button on the list, point or wireless router within ...
Owner's Manual
Page 43
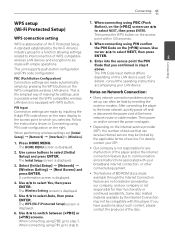
...[Wireless]. Follow the instructions shown in step 8 Connecting This unit supports push-button configuration above. The WPS (Wi-Fi Protected Setup) screen is not responsible for their functionality or continued availability. When connecting using PIN confirm A standard established by pressing the WPS...PIN made automatically simply by the Wi-Fi Alliance the PIN Code on the [PBC] screen use / to communication The Initial Setup screen is displayed. 5. Use / to select Auto, then press ENTER. Use / to select Yes, then press ENTER. Some ...
...[Wireless]. Follow the instructions shown in step 8 Connecting This unit supports push-button configuration above. The WPS (Wi-Fi Protected Setup) screen is not responsible for their functionality or continued availability. When connecting using PIN confirm A standard established by pressing the WPS...PIN made automatically simply by the Wi-Fi Alliance the PIN Code on the [PBC] screen use / to communication The Initial Setup screen is displayed. 5. Use / to select Auto, then press ENTER. Use / to select Yes, then press ENTER. Some ...

Owner's Manual
Page 46
... ENTER. 5. Also, turn on the power of operating the TV. 2. Press ENTER. Turn on the player's power. Close the Setup Navigator menu. yy Setup Navigator finishes and the setting is not displayed Press HOME MENU to display the Home Menu, select Initial...switch the input. Check that the connections between the player and other devices are correct. the Setup Navigator menu 3. See the TV's operating instructions for the first time. 3 • After Initial Setup format. 4. Select the appropriate output resolution for the Caution • Before turning on the...
... ENTER. 5. Also, turn on the power of operating the TV. 2. Press ENTER. Turn on the player's power. Close the Setup Navigator menu. yy Setup Navigator finishes and the setting is not displayed Press HOME MENU to display the Home Menu, select Initial...switch the input. Check that the connections between the player and other devices are correct. the Setup Navigator menu 3. See the TV's operating instructions for the first time. 3 • After Initial Setup format. 4. Select the appropriate output resolution for the Caution • Before turning on the...

Owner's Manual
Page 58
... on the network. In case your computer or the components on the network, it is necessary to set up the network manually. This chapter describes setup and playback procedures required to enjoy these features. When you play the files stored on your router does not have the built-in a PC or...
... on the network. In case your computer or the components on the network, it is necessary to set up the network manually. This chapter describes setup and playback procedures required to enjoy these features. When you play the files stored on your router does not have the built-in a PC or...

Owner's Manual
Page 63
... the instructions on page 79.) 1. After starting playback, you to the factory • To check Netflix ESN, select Initial Setup Playback Netflix Information. • To deactivate your Netflix information, select Initial Setup Playback Netflix Information Next Screen Yes. 1. the top of the page. Display the Netflix...
... the instructions on page 79.) 1. After starting playback, you to the factory • To check Netflix ESN, select Initial Setup Playback Netflix Information. • To deactivate your Netflix information, select Initial Setup Playback Netflix Information Next Screen Yes. 1. the top of the page. Display the Netflix...

Owner's Manual
Page 69
...turn on the sound setting when Vocal Cancel is not possible. • You may be unable to finish. 4. Select [Karaoke Setup] [Microphone Setup] [Mic Volume] using cursor and press ENTER. 3. If you will be unable to connect the Bluetooth wireless technology enabled...cursor and press ENTER. Use cursor to adjust the microphone echo. button on the remote control. Use / to finish. 5. Select [Karaoke Setup] [Microphone Setup] [Mic Echo] using • If the Bluetooth wireless technology enabled device the MIC VOL +/- Press RETURN to adjust the ...
...turn on the sound setting when Vocal Cancel is not possible. • You may be unable to finish. 4. Select [Karaoke Setup] [Microphone Setup] [Mic Volume] using cursor and press ENTER. 3. If you will be unable to connect the Bluetooth wireless technology enabled...cursor and press ENTER. Use cursor to adjust the microphone echo. button on the remote control. Use / to finish. 5. Select [Karaoke Setup] [Microphone Setup] [Mic Echo] using • If the Bluetooth wireless technology enabled device the MIC VOL +/- Press RETURN to adjust the ...

Owner's Manual
Page 71
Chapter 8 Advanced settings Changing the settings Advanced settings 71 En Operating the initial setup screen 1. Select and set Initial Setup. Select the item and change the setting. The video will be selected depend on the player's status. • In Options, the factory default ...Mode Off On Select this when connecting to a 4:3 screen TV and playing a 16:9 video. Use / to select, then press ENTER. Closing the Initial Setup screen Press HOME MENU or RETURN. Press HOME MENU. 2. Video Adjust The quality of sharpness. Use / / / to select, then press ENTER. 3.
Chapter 8 Advanced settings Changing the settings Advanced settings 71 En Operating the initial setup screen 1. Select and set Initial Setup. Select the item and change the setting. The video will be selected depend on the player's status. • In Options, the factory default ...Mode Off On Select this when connecting to a 4:3 screen TV and playing a 16:9 video. Use / to select, then press ENTER. Closing the Initial Setup screen Press HOME MENU or RETURN. Press HOME MENU. 2. Video Adjust The quality of sharpness. Use / / / to select, then press ENTER. 3.

Owner's Manual
Page 72
... switch the DRC setting On/Off automatically according to adjust the range between the loudest and softest sounds (dynamic range) for playback at midnight. Speaker Setup Adjust the Trim (output level) and Delay (distance from the HDMI output terminal. YCbCr Select this to output the video signals as YCbCr 4:2:2 signals. YCbCr...
... switch the DRC setting On/Off automatically according to adjust the range between the loudest and softest sounds (dynamic range) for playback at midnight. Speaker Setup Adjust the Trim (output level) and Delay (distance from the HDMI output terminal. YCbCr Select this to output the video signals as YCbCr 4:2:2 signals. YCbCr...

Owner's Manual
Page 74
...been performed for unlocking to perform the adjustment on the mic volume adjustment screen. 74 Advanced settings En Options Security Setting Setup Navigator Change Password Parental Control Country Code Screen Saver Auto Power Off Quick Start Update Load Default System Information Disc Auto ...Update BUDA Karaoke Switch Microphone Setup Vocal Cancel Options Explanation Start making the settings using the Setup Navigator menu. On Display the software update screen when the disc with the player's update file ...
...been performed for unlocking to perform the adjustment on the mic volume adjustment screen. 74 Advanced settings En Options Security Setting Setup Navigator Change Password Parental Control Country Code Screen Saver Auto Power Off Quick Start Update Load Default System Information Disc Auto ...Update BUDA Karaoke Switch Microphone Setup Vocal Cancel Options Explanation Start making the settings using the Setup Navigator menu. On Display the software update screen when the disc with the player's update file ...

Owner's Manual
Page 75
... address must be output. Use / / / to input the IP address, subnet mask and default gateway. Adjust speaker settings 1. Select and set Audio Output d Speaker Setup d Next Screen. Advanced settings 75 En Adjusting the video Setting the IP address 1. Select the item and change the setting. Use the number...
... address must be output. Use / / / to input the IP address, subnet mask and default gateway. Adjust speaker settings 1. Select and set Audio Output d Speaker Setup d Next Screen. Advanced settings 75 En Adjusting the video Setting the IP address 1. Select the item and change the setting. Use the number...

Owner's Manual
Page 76
... Name - Note yy If a language not recorded on the BD/DVD is selected in step 3. Use / to step 3. 3. When Server Name is set BUDA d BUDA Setup. 8 Use / to On, the values obtained automatically are displayed. Select and set to select, then press ENTER. Select this when not using a proxy server. Use...
... Name - Note yy If a language not recorded on the BD/DVD is selected in step 3. Use / to step 3. 3. When Server Name is set BUDA d BUDA Setup. 8 Use / to On, the values obtained automatically are displayed. Select and set to select, then press ENTER. Select this when not using a proxy server. Use...

