Owner's Manual
Page 3
..., or other hazards. REPLACEMENT PARTS - The product should be situated away from heat sources such as to provide some protection against them might be taken to qualified service personnel under the following the operating instructions. Please write this serial number on the bottom (DVD/CD Tuner) / Rear panel (Powered Subwoofer). OUTDOOR ANTENNA GROUNDING - LIGHTNING - For added protection for this product through openings as opening or removing covers may result...
..., or other hazards. REPLACEMENT PARTS - The product should be situated away from heat sources such as to provide some protection against them might be taken to qualified service personnel under the following the operating instructions. Please write this serial number on the bottom (DVD/CD Tuner) / Rear panel (Powered Subwoofer). OUTDOOR ANTENNA GROUNDING - LIGHTNING - For added protection for this product through openings as opening or removing covers may result...
Owner's Manual
Page 6
... bass level 36 Muting the sound 37 05 Playing discs Introduction 38 Using the Disc Navigator to control your model properly. Please read through these operating instructions so that you start Features 9 Introduction to home theater 10 General disc compatibility 10 CD-R/RW compatibility 11 DVD-R/RW compatibility 11 PC-created disc compatibility 11 Compressed audio compatibility 11 JPEG file compatibility 12 02 Controls and displays Front panel 13 Display unit 13 Display 14 Remote control 16 03 Getting started Switching...
... bass level 36 Muting the sound 37 05 Playing discs Introduction 38 Using the Disc Navigator to control your model properly. Please read through these operating instructions so that you start Features 9 Introduction to home theater 10 General disc compatibility 10 CD-R/RW compatibility 11 DVD-R/RW compatibility 11 PC-created disc compatibility 11 Compressed audio compatibility 11 JPEG file compatibility 12 02 Controls and displays Front panel 13 Display unit 13 Display 14 Remote control 16 03 Getting started Switching...

Owner's Manual
Page 7
... Surround sound setup Setting up surround sound 58 System Setup menu options 58 Setting the channel levels 60 09 Video Adjust menu Video Adjust 61 Creating your own presets 61 10 Initial Settings menu Using the Initial Settings menu 63 Digital Audio Mode Settings 63 Dolby Digital Out 63 DTS Out 63 Linear PCM Out 64 Video Output settings 64 TV Screen 64 Component Out 65 S-Video Out 66 Language settings 66 Audio Language 66 Subtitle Language 66 DVD Menu Language 67 Subtitle Display 67 Display settings 67 OSD Language 67 On Screen Display...
... Surround sound setup Setting up surround sound 58 System Setup menu options 58 Setting the channel levels 60 09 Video Adjust menu Video Adjust 61 Creating your own presets 61 10 Initial Settings menu Using the Initial Settings menu 63 Digital Audio Mode Settings 63 Dolby Digital Out 63 DTS Out 63 Linear PCM Out 64 Video Output settings 64 TV Screen 64 Component Out 65 S-Video Out 66 Language settings 66 Audio Language 66 Subtitle Language 66 DVD Menu Language 67 Subtitle Display 67 Display settings 67 OSD Language 67 On Screen Display...

Owner's Manual
Page 9
... and CD-ROM discs that this player is playing, you enjoy true discrete multi-channel home theater sound with Dolby Digital and DTS encoded DVD discs. See also Compressed audio compatibility on page 49. "Dolby", "Pro Logic" and the double-D symbol are trademarks of Dolby Laboratories. *2 "DTS" and "DTS Digital Surround" are registered trademarks of DVD-Audio and Super Audio CD (SACD). Picture zoom While a DVD or Video CD is fully compatible with surround sound playback. Energy...
... and CD-ROM discs that this player is playing, you enjoy true discrete multi-channel home theater sound with Dolby Digital and DTS encoded DVD discs. See also Compressed audio compatibility on page 49. "Dolby", "Pro Logic" and the double-D symbol are trademarks of Dolby Laboratories. *2 "DTS" and "DTS Digital Surround" are registered trademarks of DVD-Audio and Super Audio CD (SACD). Picture zoom While a DVD or Video CD is fully compatible with surround sound playback. Energy...

Owner's Manual
Page 14
... selected. 2 Lights when a disc is playing. 3 MIDNIGHT Lights when the Midnight mode is selected (page 35). 4 QUIET Lights when the Quiet mode is being received. Lights when a stereo FM broadcast is selected (page 35). 5 PGM Lights when a program list has been programmed (page 44). 6 RPT and RPT-1 RPT lights during repeat play. RPT-1 lights during repeat one-track play (page 43). 14 En 18 17 16 15 8 V.PART Light when playing a video part of a Dolby Digital source...
... selected. 2 Lights when a disc is playing. 3 MIDNIGHT Lights when the Midnight mode is selected (page 35). 4 QUIET Lights when the Quiet mode is being received. Lights when a stereo FM broadcast is selected (page 35). 5 PGM Lights when a program list has been programmed (page 44). 6 RPT and RPT-1 RPT lights during repeat play. RPT-1 lights during repeat one-track play (page 43). 14 En 18 17 16 15 8 V.PART Light when playing a video part of a Dolby Digital source...

Owner's Manual
Page 17
... select a Surround mode (page 31). TOP MENU Use to display the top menu of a DVD disc in the play a program list (page 44). SURROUND Use to display/change the DVD subtitle display (page 48). ANGLE Press to change the screen zoom level (page 49). Use to select channels on /off (page 35). 16 DVD/CD buttons (In MAIN) AUDIO Press to select an audio channel or language (page 48). RANDOM Use to select a random play mode (page 41). Use to adjust the volume on or into standby. INPUT...
... select a Surround mode (page 31). TOP MENU Use to display the top menu of a DVD disc in the play a program list (page 44). SURROUND Use to display/change the DVD subtitle display (page 48). ANGLE Press to change the screen zoom level (page 49). Use to select channels on /off (page 35). 16 DVD/CD buttons (In MAIN) AUDIO Press to select an audio channel or language (page 48). RANDOM Use to select a random play mode (page 41). Use to adjust the volume on or into standby. INPUT...

Owner's Manual
Page 21
... signal to confirm. INPUT BASS MODE DIALOGUE VIRTUAL SB AUTO SURROUND ADVANCED PROGRAM REPEAT RANDOM What it does Switches your TV in the table, you have. Using the Room Setup Before using the next code in TV tuner and an external video source. • The default setting is for your TV, hold down ) buttons to set the clock again. The remote transmits an on your TV using the Room Setup. Changes the TV channel...
... signal to confirm. INPUT BASS MODE DIALOGUE VIRTUAL SB AUTO SURROUND ADVANCED PROGRAM REPEAT RANDOM What it does Switches your TV in the table, you have. Using the Room Setup Before using the next code in TV tuner and an external video source. • The default setting is for your TV, hold down ) buttons to set the clock again. The remote transmits an on your TV using the Room Setup. Changes the TV channel...
Owner's Manual
Page 23
... started 03 DISPLAY OPEN CLOSE DVD MENU RETURN MUTE ENTER SOUND MASTER VOLUME TV CONTROL CH INPUT VOL BASS MODE DIALOGUE VIRTUAL SB AUTO SURROUND ADVANCED PROGRAM REPEAT RANDOM AUDIO SUBTITLE ANGLE ZOOM 1 SYSTEM SETUP 4 DIMMER 7 CLR MAIN TOP MENU 2 HOME MENU 3 TEST TONE 5 QUIET/ MIDNIGHT 8 CH LEVEL 6 TIMER/ CLOCK 9 FOLDER- 0 FOLDER+ ENTER SUB ROOM SETUP Button HOME MENU ENTER RETURN What it does Displays/exits the on-screen display Changes the highlighted menu item Selects the highlighted menu item (both ENTER buttons work in the...
... started 03 DISPLAY OPEN CLOSE DVD MENU RETURN MUTE ENTER SOUND MASTER VOLUME TV CONTROL CH INPUT VOL BASS MODE DIALOGUE VIRTUAL SB AUTO SURROUND ADVANCED PROGRAM REPEAT RANDOM AUDIO SUBTITLE ANGLE ZOOM 1 SYSTEM SETUP 4 DIMMER 7 CLR MAIN TOP MENU 2 HOME MENU 3 TEST TONE 5 QUIET/ MIDNIGHT 8 CH LEVEL 6 TIMER/ CLOCK 9 FOLDER- 0 FOLDER+ ENTER SUB ROOM SETUP Button HOME MENU ENTER RETURN What it does Displays/exits the on-screen display Changes the highlighted menu item Selects the highlighted menu item (both ENTER buttons work in the...
Owner's Manual
Page 29
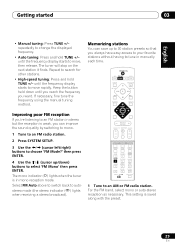
... ENTER. Keep the button held down ) buttons to 30 station presets so that you want. SOUND MASTER VOLUME TV CONTROL CH INPUT VOL BASS MODE DIALOGUE VIRTUAL SB AUTO SURROUND ADVANCED PROGRAM REPEAT RANDOM AUDIO SUBTITLE ANGLE ZOOM 1 SYSTEM SETUP 4 DIMMER 7 CLR MAIN TOP MENU 2 HOME MENU 3 TEST TONE 5 QUIET/ MIDNIGHT 8 CH LEVEL 6 TIMER/ CLOCK 9 FOLDER- 0 FOLDER+ ENTER SUB ROOM SETUP 1 Tune to autostereo mode (the stereo indicator ( ) lights when receiving a stereo broadcast). until you reach the frequency you always have...
... ENTER. Keep the button held down ) buttons to 30 station presets so that you want. SOUND MASTER VOLUME TV CONTROL CH INPUT VOL BASS MODE DIALOGUE VIRTUAL SB AUTO SURROUND ADVANCED PROGRAM REPEAT RANDOM AUDIO SUBTITLE ANGLE ZOOM 1 SYSTEM SETUP 4 DIMMER 7 CLR MAIN TOP MENU 2 HOME MENU 3 TEST TONE 5 QUIET/ MIDNIGHT 8 CH LEVEL 6 TIMER/ CLOCK 9 FOLDER- 0 FOLDER+ ENTER SUB ROOM SETUP 1 Tune to autostereo mode (the stereo indicator ( ) lights when receiving a stereo broadcast). until you reach the frequency you always have...

Owner's Manual
Page 36
... modes are connected. 36 En SOUND MASTER VOLUME 1 Press SOUND. 2 Use the / (cursor left/right) buttons to select 'Bass' or 'Treble'. 3 Use the / (cursor up/down) buttons to adjust the overall tone. Boosting the bass level There are three bass modes you 're listening to confirm. Can be adjusted from -3 to +3. 4 Press ENTER to . • Music - DISPLAY OPEN CLOSE DVD MENU RETURN TUNE+ ST- 04 Home theater sound Adjusting the bass and treble • Default setting: Treble: 0, Bass: 0 Use the bass...
... modes are connected. 36 En SOUND MASTER VOLUME 1 Press SOUND. 2 Use the / (cursor left/right) buttons to select 'Bass' or 'Treble'. 3 Use the / (cursor up/down) buttons to adjust the overall tone. Boosting the bass level There are three bass modes you 're listening to confirm. Can be adjusted from -3 to +3. 4 Press ENTER to . • Music - DISPLAY OPEN CLOSE DVD MENU RETURN TUNE+ ST- 04 Home theater sound Adjusting the bass and treble • Default setting: Treble: 0, Bass: 0 Use the bass...

Owner's Manual
Page 60
... LEVEL and then using the / (cursor up /down ) buttons to . Center speaker • R - You should hear the test tone at the same volume from the speakers active in turn. STANDBY/ON CD FM/AM DVD TUNER TV L1/L2 LINE DISPLAY OPEN CLOSE DVD MENU RETURN MUTE ENTER SOUND MASTER VOLUME TV CONTROL CH INPUT VOL BASS MODE DIALOGUE VIRTUAL SB AUTO SURROUND ADVANCED PROGRAM REPEAT RANDOM AUDIO SUBTITLE ANGLE ZOOM 1 SYSTEM SETUP 4 DIMMER 7 CLR MAIN TOP MENU 2 HOME MENU 3 TEST TONE...
... LEVEL and then using the / (cursor up /down ) buttons to . Center speaker • R - You should hear the test tone at the same volume from the speakers active in turn. STANDBY/ON CD FM/AM DVD TUNER TV L1/L2 LINE DISPLAY OPEN CLOSE DVD MENU RETURN MUTE ENTER SOUND MASTER VOLUME TV CONTROL CH INPUT VOL BASS MODE DIALOGUE VIRTUAL SB AUTO SURROUND ADVANCED PROGRAM REPEAT RANDOM AUDIO SUBTITLE ANGLE ZOOM 1 SYSTEM SETUP 4 DIMMER 7 CLR MAIN TOP MENU 2 HOME MENU 3 TEST TONE...

Owner's Manual
Page 61
... Chapter 9 Video Adjust menu Video Adjust • Default setting: Standard From the Video Adjust screen you can change the preset number from the Recall Settings menu item. • Depending on -screen display. Creating your own. 1 Press HOME MENU and select 'Video Adjust' from the on the disc and the TV/ monitor, you may not see above). 2 Press (cursor down ) buttons to select a setting. • Use the / (cursor left /right) buttons to select a preset. HOME MENU DVD Play Mode Video Adjust Initial Settings Disc Navigator 2 Use the ...
... Chapter 9 Video Adjust menu Video Adjust • Default setting: Standard From the Video Adjust screen you can change the preset number from the Recall Settings menu item. • Depending on -screen display. Creating your own. 1 Press HOME MENU and select 'Video Adjust' from the on the disc and the TV/ monitor, you may not see above). 2 Press (cursor down ) buttons to select a setting. • Use the / (cursor left /right) buttons to select a preset. HOME MENU DVD Play Mode Video Adjust Initial Settings Disc Navigator 2 Use the ...

Owner's Manual
Page 63
... decoder, set this jack. HOME MENU DVD Play Mode Video Adjust Initial Settings Disc Navigator 2 Select the setup category from the list on the left, then select an item from the on the following pages may not correspond to DTS > PCM. Dolby Digital Out • Default setting: Dolby Digital Initial Settings Digital Audio Mode Video Output Language Display Options Dolby Digital Out DTS Out Linear PCM Out Dolby Digital Dolby Digital > PCM If the connected component is Dolby Digital compatible. Digital Audio Mode Video Output Language Display Options Dolby Digital Out DTS...
... decoder, set this jack. HOME MENU DVD Play Mode Video Adjust Initial Settings Disc Navigator 2 Select the setup category from the list on the left, then select an item from the on the following pages may not correspond to DTS > PCM. Dolby Digital Out • Default setting: Dolby Digital Initial Settings Digital Audio Mode Video Output Language Display Options Dolby Digital Out DTS Out Linear PCM Out Dolby Digital Dolby Digital > PCM If the connected component is Dolby Digital compatible. Digital Audio Mode Video Output Language Display Options Dolby Digital Out DTS...

Owner's Manual
Page 66
...; Discs with those subtitles. Language settings Audio Language • Default setting: English Initial Settings Digital Audio Mode Video Output Language Display Options Audio Language Subtitle Language DVD Menu Lang. The DVD-Video format recognizes 136 different languages. Press DVD MENU to specify a language other than those listed. Select Other Language if you want to specify a language other than those listed. See also Selecting languages using an S-video cable. • Default setting: S2 Initial Settings Digital Audio Mode TV Screen S1 Video Output Component Out...
...; Discs with those subtitles. Language settings Audio Language • Default setting: English Initial Settings Digital Audio Mode Video Output Language Display Options Audio Language Subtitle Language DVD Menu Lang. The DVD-Video format recognizes 136 different languages. Press DVD MENU to specify a language other than those listed. Select Other Language if you want to specify a language other than those listed. See also Selecting languages using an S-video cable. • Default setting: S2 Initial Settings Digital Audio Mode TV Screen S1 Video Output Component Out...
Owner's Manual
Page 70
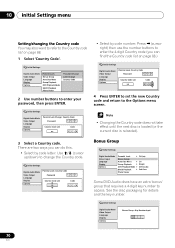
... DVD-Audio discs have an extra 'bonus' group that requires a 4-digit key number to access. There are two ways you can do this. • Select by code number: Press (cursor right) then use the number buttons to enter your password, then press ENTER. Initial Settings Digital Audio Mode Video Output Language Display Options Parental Lock Bonus Group Auto Disc Menu Group Playback DVD Playback Mode SACD Playback Photo Viewer Password Change Level Change Country Code 2 Use number buttons to enter the 4-digit Country code...
... DVD-Audio discs have an extra 'bonus' group that requires a 4-digit key number to access. There are two ways you can do this. • Select by code number: Press (cursor right) then use the number buttons to enter your password, then press ENTER. Initial Settings Digital Audio Mode Video Output Language Display Options Parental Lock Bonus Group Auto Disc Menu Group Playback DVD Playback Mode SACD Playback Photo Viewer Password Change Level Change Country Code 2 Use number buttons to enter the 4-digit Country code...

Owner's Manual
Page 74
... and line signal levels below. • Connect the LINE 1 (OUT) jacks to the analog inputs of an external playback component. In such cases, you may produce unpleasant distortion from the speakers. Connect using RCA pinplug stereo cables. AUDIO INPUT AUDIO OUTPUT E2 LINE1 N L AUDIO R LINE1 OUT S-VIDEO OUT VIDEO OUT VIDEO L AUD R TV LINE1 LINE2 IN IN IN XV-DV940/830 • Connect the OPTICAL DIGITAL OUT jack on the rear panel to the optical digital output of...
... and line signal levels below. • Connect the LINE 1 (OUT) jacks to the analog inputs of an external playback component. In such cases, you may produce unpleasant distortion from the speakers. Connect using RCA pinplug stereo cables. AUDIO INPUT AUDIO OUTPUT E2 LINE1 N L AUDIO R LINE1 OUT S-VIDEO OUT VIDEO OUT VIDEO L AUD R TV LINE1 LINE2 IN IN IN XV-DV940/830 • Connect the OPTICAL DIGITAL OUT jack on the rear panel to the optical digital output of...
Owner's Manual
Page 82
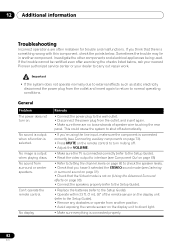
... connected correctly (refer to the Setup Guide). • Reset the video output to interlace (see Component Out on page 65) • Refer to Setting the channel levels on . General Problem The power does not turn muting off automatically. • If you're using the line input, make sure the component is connected correctly (see Listening in another position. • Avoid exposing the remote sensor on the display unit to direct light. • Make...
... connected correctly (refer to the Setup Guide). • Reset the video output to interlace (see Component Out on page 65) • Refer to Setting the channel levels on . General Problem The power does not turn muting off automatically. • If you're using the line input, make sure the component is connected correctly (see Listening in another position. • Avoid exposing the remote sensor on the display unit to direct light. • Make...
Owner's Manual
Page 83
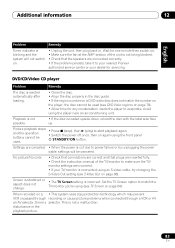
... make sure the TV/ monitor settings are connected correctly. • If the problem persists, take it to power failure or by unplugging the power cable, settings will not switch on the player, the disc cannot be canceled. Picture playback stops and the operation • Press (stop), then (play) to start playback again. • Switch the power off once, then on again using an S-video cable, try changing the S-Video...
... make sure the TV/ monitor settings are connected correctly. • If the problem persists, take it to power failure or by unplugging the power cable, settings will not switch on the player, the disc cannot be canceled. Picture playback stops and the operation • Press (stop), then (play) to start playback again. • Switch the power off once, then on again using an S-video cable, try changing the S-Video...

Owner's Manual
Page 85
... front panel buttons are connected. • Blinks rapidly for 2 seconds when an operation is prohibited because the source is digital 88.2 or 96kHz PCM. • Blinks rapidly for 2 seconds when an operation is prohibited because there is no surround speaker output. • Blinks rapidly for 2 seconds when an operation is prohibited because the sound is muted (see Muting the sound on page 29). Auto tuning will only detect radio stations with...
... front panel buttons are connected. • Blinks rapidly for 2 seconds when an operation is prohibited because the source is digital 88.2 or 96kHz PCM. • Blinks rapidly for 2 seconds when an operation is prohibited because there is no surround speaker output. • Blinks rapidly for 2 seconds when an operation is prohibited because the sound is muted (see Muting the sound on page 29). Auto tuning will only detect radio stations with...

Owner's Manual
Page 94
... mode 0.46 W Dimensions: DVD/CD Tuner . . 360 (W) x 74 (H) x 270 (D) mm 14 3/16 (W) x 2 29/32 (H) x 10 5/8 (D) in . Display Unit . . . . . 274 (W) x 44 (H) x 35 (D) mm 10 25/32 (W) x 1 23/32 (H) x 1 3/8 (D) in . Weight: DVD/CD Tuner 3.2 kg / 7 lb Display Unit 0.2 kg / 7 oz Accessories Operating Instructions 1 Setup guide 1 Display unit 1 Remote control unit 1 Power cord 1 Video Cord (yellow plugs 1 Display cable (gray plugs 1 Control cable A (blue plugs 1 Control cable B (black plugs 1 FM antenna 1 AM loop antenna 1 Dry cell batteries (AA/R6 2 Speaker cords (5 m 3 Speaker...
... mode 0.46 W Dimensions: DVD/CD Tuner . . 360 (W) x 74 (H) x 270 (D) mm 14 3/16 (W) x 2 29/32 (H) x 10 5/8 (D) in . Display Unit . . . . . 274 (W) x 44 (H) x 35 (D) mm 10 25/32 (W) x 1 23/32 (H) x 1 3/8 (D) in . Weight: DVD/CD Tuner 3.2 kg / 7 lb Display Unit 0.2 kg / 7 oz Accessories Operating Instructions 1 Setup guide 1 Display unit 1 Remote control unit 1 Power cord 1 Video Cord (yellow plugs 1 Display cable (gray plugs 1 Control cable A (blue plugs 1 Control cable B (black plugs 1 FM antenna 1 AM loop antenna 1 Dry cell batteries (AA/R6 2 Speaker cords (5 m 3 Speaker...


